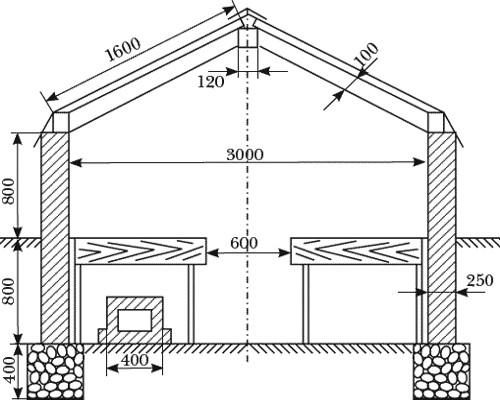
Quality projects attic roofs are designed for the construction of additional living space in the attic if the roof of the house has a sloping or broken shape. Building codes designed for the location of the intersection of the roof and facade at a height of up to 1.5 meters. Otherwise, there will be no attic; you will end up with an ordinary attic, unsuitable for normal living.
A professional design for the attic roof of a private house assumes a wall height of 1.4 meters, so that it is comfortable vertical wall sit.
Modern house designs with a mansard roof are very economical and do not involve the construction of a complex, expensive foundation.
Advice! You should pay attention to the hydro- and vapor barrier of the house so that the building “breathes”.
Design options
Pick up ready-made projects houses with a mansard roof and a garage are possible, taking into account the option of the future roof:
- triangular;
- asymmetrical;
- broken line
A typical house design with a sloping mansard roof is suitable for gable, single-pitch, sloping, gable, domed, pyramidal, and semi-oval roofs.
- The simplest design is a single-slope system. The structure is represented by an inclined plane fixed to load-bearing walls of different heights. This type is rarely used when arranging attics.
- The standard design of a gable mansard roof is assembled from two slopes, which are directed in opposite directions.
- Hip and half-hip designs involve four slopes. Comfortable rooms are created inside such systems.
- Broken roofs are suitable for small structures.
- Pyramid, dome, conical structures are suitable for houses with a round shape.
Choosing the type of attic
During the construction process, you can use a single-level attic together with a gable or broken roof. A one-level attic goes well with two-level supports and external consoles.
Attention ! When choosing a design for a gable mansard roof, take into account the loads that the building will exert on the foundation.
In the video you can see how an attic is being built over a garage:
Gable roofs are characterized by the following parameters:
- different sizes of cornice overhang;
- tilt angle;
- rafter design (hanging, inclined).
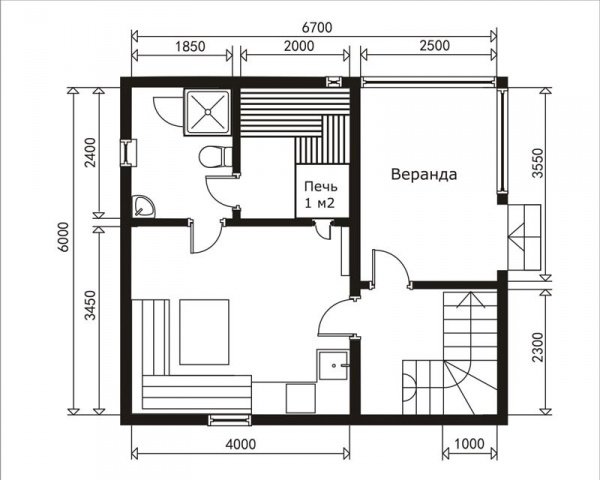
This do-it-yourself attic roof project allows you to make a bathroom and several bedrooms. This attic “apartment” is equipped with two balconies, which can be accessed from the bedroom. The material for the frame can be plasterboard. Decorating facades is possible using plaster or clinker bricks.
Gable roofs are suitable for the following structures:
- garages;
- low-rise buildings;
- utility structures.
Algorithm of actions
When building an attic, use the following algorithm:
- First, we select a design option for the future gable roof, you can select ready-made mansard roof designs by searching for them on the Internet.
- We calculate the cost of constructing an attic.
- We purchase materials and put the mansard roof project into practice.
Characteristics of a gable semi-hip roof
This roofing option is recognized as a functional and original design. Under the roof you can build an attic in which you can live comfortably. The most popular materials for such a roof are metal tiles and corrugated sheets.
Characteristics of a hip roof
This design is supposed to have four slopes, two of them are triangular in shape, two are made in the shape of a trapezoid. The layers of the roof resemble a layer cake:
- metal tiles;
- waterproofing layer;
- counter-lattice;
- sheathing;
- insulation layer;
- initial sheathing;
- cornice;
- vapor barrier layer;
- rafter.
Gable roof design
When building a new house or replacing an old roof, consider external characteristics roofs. Projects of houses with a mansard roof (pictured above) are common for the following reasons:
- reasonable cost;
- aesthetic appearance;
- easy installation;
- snow and water do not accumulate.
The slopes are fastened together at a certain angle, and the house itself acts as a support. Fastening from above is carried out to the ridge of the house, to the side walls. The rafter system for the rafter system project for the attic roof of a 9x9 house involves the use of dry, high-quality timber.
Before construction begins, the timber is processed chemicals to protect against high humidity, fungal diseases. It is advisable to cover the beams with an antiseptic and fireproof composition.
Components of a gable roof
A mansard gable roof requires the following components: rafters, beams, mauerlat, ridge, purlins, struts, tightening, supports.
You can find it for free if you want next projects mansard roofs:
- symmetrical, the basis of which is a triangle;
- broken lines, allowing maximum use of free space for housing;
- asymmetrical, giving the building an original look, while reducing the area in the attic.
Advice ! When choosing a simple project for a sloping mansard roof, you can carry out construction on your own, but serious projects It is advisable to entrust it to professional builders.
Drawing of a gable roof
If your plans include independent implementation project of a garage with a mansard roof, follow the sequence of actions:
- start with a sketch;
- think over a plan for the future roof;
- complete all calculations;
- purchase materials for rafters and coverings.
Drawings of mansard roofs can be downloaded from a variety of construction sites or purchased from professional engineers.
Advice ! Do not skimp on drawings; the reliability of the design and its durability depend on their quality.
The video will show the stages of constructing an attic roof over a garage:
Calculation of the future gable roof
- Carrying out calculations is a critical step; it involves taking into account the maximum weight of the roof, taking into account possible wind, snow, and rain loads. Roofing projects for different regions countries have significant technical differences related to climatic features region.
Attention! For regions where there is a significant amount of precipitation in winter, a roof with a significant angle of inclination is needed.
- When making calculations, remember that as the steepness of the roof and its height increase, the consumption of materials for the implementation of the planned project will also increase.
- Construction of a new one on your own gable roof - great option saving money (provided you have construction skills).
- There are many roofing materials on the construction market. High Quality. If the house is being built from wooden beam, it is better to purchase metal roofing.
Advantages of metal tiles: reasonable cost, long service life, aesthetic appearance.
Calculation and installation of the rafter system is the most difficult and time-consuming stage of installing a new roof. The construction of a gable structure involves taking into account many nuances; neglecting them can be “expensive” for the owner of the house. Do not skimp on calculations, because in the end you will be able to save financial resources, since the service life of the gable roof will be significantly increased.
Equipment attic room significantly increases living space Houses. Even an unheated room will serve as additional thermal insulation for the home.
A mansard roof is made in the form of a broken gable structure, but there are many other options:
- the classic gable roof is characterized by simple calculations, the work of constructing the rafters is doable even for a novice craftsman, its disadvantage is the low ceiling;
- shed - a simple type of roof that provides one full wall in the attic;
- tent, having four slopes of the same size;
- multi-pincer - attractive and balanced, but complex design.

The gable sloping attic roof of the house allows you to obtain a sufficient height of the ceilings in the room and expand comfortable area. To build it, you will need a well-designed project. Create it yourself - not an easy task, can be ordered at construction company or use a special computer program. The design diagram will allow you to calculate required amount material for rafters, insulation, waterproofing, roofing covering. The angle of inclination for roof slopes is calculated taking into account the recommendations of the manufacturer of roofing materials, and also takes into account climatic conditions- snow and wind load.
Features of a gable sloping roof

The lower part of the rafter system is installed at an angle of 60 °, it support pillars become a frame for interior walls premises. The angle at the top of the rafters does not exceed 45 °, which allows you to reduce the amount of material used, but without compromising the quality of the coating. Additional rigidity to the frame of the room is given by struts, which are attached to the floor beam and the bottom of the rafters.

Construction stages

- A support beam - a mauerlat - is laid along the perimeter of the building. It is attached to the load-bearing walls and transfers the load from the rafters to the base of the building. The mauerlat is attached to brick or block walls using embedded anchors or studs. You can mark the places for drilling holes for fastening with a tape measure or by placing a beam on the wall and pressing it down until dents appear. Roofing material must be laid under the timber for waterproofing. The Mauerlat is put on the anchors and secured with nuts.
- Floor beams are durable timber from coniferous species. They are laid on the Mauerlat and extend beyond the perimeter of the walls by 0.5 meters to increase the area of the attic. Another way is to attach it to special pockets left in the masonry. The ends of such beams must be covered with mastic and roofing felt to protect them from moisture. The beams are fastened with self-tapping screws and angles. The outer beams are laid level, and the cord is pulled to ensure proper installation of the rest. The optimal pitch of the beams is 0.6 m; it allows you to lay insulation without trimming. All beams are leveled in height; if the level is insufficient, boards are placed; if the beam protrudes, it is cut off.
- Attached to the outermost load-bearing beams vertical racks. Their height and installation location are determined by the drawing. After being aligned vertically using a level and plumb line, the racks are temporarily fixed with jibs from the board. After securing the outer posts, a cord is stretched between them, along which the remaining beams are installed. Each rack is placed on a beam and temporarily fixed, creating two parallel rows.
- The racks are fastened with purlins - boards; this element is necessary to impart rigidity to the structure. A crossbar is placed on top of the purlin, which connects the racks on opposite sides. The tie is attached to the posts metal corners. The complex of these elements limits the attic space. To make the structure stronger, struts are subsequently installed.
- Before installing the lower rafters, a template is made to facilitate the work. In order not to check every time how to properly saw off the upper part of the rafters, take a board and, attaching it to the purlin, cut it under the right angle. This will be the template. A groove is cut at the bottom of the rafters, which are attached to the Mauerlat. If the lower rafters rest on an extended beam, they are cut in place and secured with angles, screws and nails.
- Before you build the upper rafters, you need to mark the center of the roof. For convenience, you can nail the board to the Mauerlat and the end tie; it will serve as a guide for aligning the rafters. To be able to trim the upper rafters on the ground, a template is made. To do this, take a board and apply it to the purlin and saw it off at an angle. All rafters are made according to the template, with correct installation racks, they are all the same size. Top part hanging rafters are secured with metal plates or scraps of boards. The joints with the purlins are fastened with corners. The outer rafter legs are installed first, then the rest. Hanging racks made of timber measuring 25x150 mm connect the places where the rafters are attached to each other and the tightening.
- The lower rafters require reinforcement with struts; for this, a board is used, bolted to the rafters and the supporting beam. After installing all the struts, the temporary supports are removed. Having collected completely truss structure, sew up the gables.

A vapor barrier membrane is attached to the rafter structure using a stapler. Laying out the canvases starts from the cornice; they must be laid with an overlap of 15 cm and secured with tape. Insulation is laid on top, the material is laid tightly, leaving gaps is not allowed. To fix the insulation, a lathing is stuffed. It is made from planks, the width of which is from 10 to 15 cm, and the thickness is 5 cm. This part of the work ends when interior decoration premises.
WITH outside Waterproofing is attached to the rafters, protecting the roof from water ingress. The material is fixed with a lathing on which the roofing covering will be attached. The pitch between the slats depends on the type of material. Soft roof needs continuous sheathing, so the entire area of the attic roof is covered with sheets of plywood, providing a flat and strong base.
When sheathing the gables, space is left for windows, if they are provided for in the design.

Work on self-construction roofing is a complex and painstaking process. Using the experience of craftsmen who share construction secrets in the provided video will help you understand the sequence and nuances of roof installation.
Video
This video shows how to make a mansard roof at home:
Photo


Roof mansard type allows your home to acquire an original appearance, a special flavor, unusual architecture, and, most importantly, harmony with the natural environment.
Thanks to design features Such roofs made it possible to functionally, maximize and practically use the space of the house.
The use of attic space for attics is in great demand today, especially in private construction.
Advantages of an attic roof
The main advantages of such roofs include:
- Beautiful exterior of the house.
- Increasing building density.
- Creation of additional living space on a previously built house.
- Minimum construction time.
- Low price compared to new construction.
- After insulation work, the attic floor embodies warmth and comfort.
- Saving material resources.
Types of attics
Today they can be presented in the following forms:
- Single-level attic with a gable roof.
- Single-level with a sloping roof.
- Single-level roof view with remote consoles.
- Two-level roof view from mixed type support.
Single-level attic with a gable roof
The presented type of roof is equipped with one level of attic, above which a gable roof is formed.
This option is one of the simplest, as it does not require particularly complex calculations during design and is not accompanied by great difficulties during construction.
Such a roof, in addition to being simple in its design features, is also very practical.
The practicality of the roof is associated with the presence of a large angle and the absence of obstacles in the form of additional elements roofs for precipitation.
Single-level attic with a sloping roof
The presented option also provides for one level of the attic, but a different type of rafter system design is already used here.
As a result, not two are formed flat roofs, and four.
The advantages of this type are that the upper part of the building takes on the full appearance of a room, with vertical flows and walls.
Thus, there is an increase in space in the rooms.
However, the design of such a rafter system is characterized by more complex shape.
Single-level attic type with remote consoles
Roofing with remote consoles is even more difficult option attics. The main advantages of this design can be considered an increase in the space on the upper floor.
As a rule, it turns out to be much more spacious, in contrast to the second type of roof. This type of construction is characterized by a displacement of the attic space to one side of the house, to the edge.
Using this type attics can be made into full-fledged ones vertical windows On the one side.
Speaking about the advantages of such a roof, it is necessary to understand its disadvantages.
The main disadvantage of the design is its more complex shape.
It consists of one large sloping plane on one side, and two planes on the opposite side.
In most cases, part of the roof with a large plane is carried further beyond the walls of the house than usual.
Thanks to this offset, you can make a canopy in which you can place anything from a terrace to a garage.
Two-level attic with mixed type of support
This design is one of the most complex, as it has at least two rooms in the upper part of the house, located at different levels.
The photo below shows two options for how to build a mansard-type roof on two levels.

Quite often, the type of attic presented is a full-fledged project, the formation of which is carried out during the design process of the house.
This design is not separate integral part home, but is included in the structure of the main house design.
Characteristic features of the attic roof
1. Design
Such a roof implies the presence of the following structural elements:
- rafters and ridge;
- sheathing;
- roofing material;
- Mauerlat;
- thermal insulation layer;
- internal lining;
- vapor barrier layer.
- scheme .
When constructing a sloping mansard roof, it is necessary to use trusses of a broken structure.
Their screed will be replaced by an interfloor ceiling.
The bottom chord of the attic truss acts as the base of the attic floor.
2. Features of the mounting system
The main features of the roof installation system include:
- Increased complexity and high cost
The thing is that the height of the attic ceilings turns out to be a little low.
To get a full attic space it is necessary to use a straight roof, not a broken one.
Then the attic will have walls that are located at sharp angles to the floor. - The presence of roof windows makes it possible to implement various design ideas
For example, windows can be presented in the form of vents or act as doors to access the roof. - High requirements for bearing capacity rafter systems for tile roof construction
The optimal cross-section for this type of roofing is considered to be 5×15 cm, pitch - 100 cm.
If the roof slope is 45 degrees or higher, the pitch value increases to 140 cm.
In places where there is heavy snowfall, this distance should take a smaller value.
As a rule, it is 60-80 cm. - The need to organize water drainage from the walls
When wooden house rafter legs are made with a margin of 55 cm.
For this there must be nests and spikes.
If the house is made of stone, then beams are placed under the ends of the rafters, the role of which is to distribute the load along the entire perimeter.
They should be placed slightly above the top of the attic floor.
Installation and insulation of an attic roof
Starting the construction of the attic, Special attention it is necessary to pay attention to roof insulation, since it is considered the main element of the building envelope.
The role of the attic covering should not only be to protect the house from the influence of precipitation, but also to serve as some kind of obstacle to overheating of the upper floor in hot weather. summer time and cooling in winter.
Warm indoor air contains much more moisture than cold outdoor air.
Therefore, water vapor penetrates from the room to the outside.
Because outer part roof covering closed waterproofing layer, which transmits water vapor very poorly, then all conditions are created for the occurrence of condensation moisture from the inside of the roof.Despite the fact that the roof waterproofing is well done, inner surface wet spots and mold will begin to appear on the roofing.
As a result, the thermal insulation qualities of the insulation deteriorate.
Therefore, it can only bring tangible comfortable living.
Insulation work should begin with protection thermal insulation material from exposure to water vapor contained in the air of the room. 
To do this, it is necessary to place a vapor barrier layer on the inside of the insulation.
Then a layer of insulation is laid according to the height of the rafters and secured so that it does not move along the slope over time.
Then installation is carried out waterproofing material, fastening of which occurs with the help of bars, installed without fail, on top along the length of the rafters.
The presented bars serve to create vents in the roof gap for the purpose of removing excess moisture in the atmosphere.
The sheathing is laid on these bars, and the roofing material itself is directly laid on it.
For vapor barrier, you can use penofol or polycraft, which is laid with the foil side facing the room.
Thus, thermal radiation emanating from the room to the outside is reflected from the surface of the aluminum foil. Thanks to this, the amount of heat loss through the attic covering is reduced.
A mansard roof is the best option, thanks to which you can increase usable area at home without spending a lot of effort and money.
And built this way extra room will personify comfort and coziness.
Watch a short video on how to make a mansard roof with your own hands:
Not only your comfort and coziness, but also the appearance of the building, its presentability and style depend on the shape of the roof. Let's look at how to make an attic roof with your own hands, the design and diagram of its rafter system, basic device, as well as insulation.
Design features of the attic roof
A mansard roof is original design roof, which is characterized by a double slope on each side. This type design It has a steep slope at the base and a calmer slope at the top. Depending on how the roof is designed, the lower slopes may extend all the way to the ground or not be visible at all due to the walls. An exception is a broken mansard roof - this roof can have concave parts over its area or even a round base, depending on the design solution.
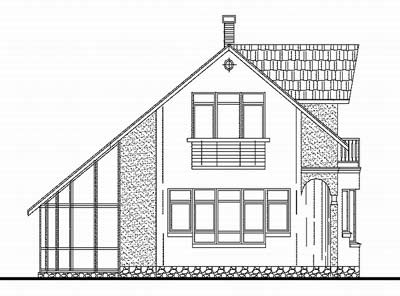
Photo - Mansard roof with balcony
The popularity of the attic roof of private houses has not lost its relevance for several centuries, despite the complexity of the rafter system. The fact is that, thanks to its unique structure, the roof cornice forms an additional technical floor, which can be used as living room or attic. In addition, the rafter system of the attic roof allows you to add windows to it, thereby improving the appearance, although this design is already very beautiful.
 Photo - House with a mansard roof
 Mansard half-hip and multi-gable roofs are often used to cover garages, cottages, bathhouses and other premises.
 Photo - Scheme of an attic with a window
 But such a roof has its own flaws:
- Mansard roof rafters are not intended for use in very snowy areas. Under the pressure of the snow cover, the roof can collapse or the foundation may settle. If you decide to install such a structure at home, then you need to very carefully calculate the attic roof;
- Due to snow accumulation, the roof may begin to leak;
- The design has a fairly high price due to the complex rafter system;
- This roofing option is not suitable for houses with strip foundation- they will settle.
Video: installation of the attic rafter system
Types of mansard roofs
There are several types of gable mansard roofs; they are mainly distributed by the pediment. Depending on its shape there are:

Each of these types is still used in the design of houses with and without balconies, but many of them are very dependent on weather conditions certain regions. For example, concave attics have worked well in dry areas with low average annual precipitation, while convex ones do an excellent job of removing liquid and snow from their surface.
 Photo - Convex attic
 Corner-type roofs are often shown in foreign films of the 60s - these are uneven attics, non-traditional, as they are also called. They are oblong in design on one side and shorter on the other, perfect for building gazebos and terraces.
Single and two-level structures are roofs with and without an attic. Many owners are inclined to believe that an attic is needed, because insulating the attic roof will cost much less and will settle down faster.
How to build a mansard roof with your own hands
Attic floor hip roof has a steep bottom, usually with dormers that are perpendicular to the sides of the wall. The upper part is slightly inclined at a certain angle; its minimum value should ensure sufficient water drainage from the roof surface. Traditionally, the underside of the roof should not be visible from the ground, but in some cases exceptions are possible.
 Photo - Mansard half-hip roof
 The technology for constructing an attic roof is quite complex, but we will try to explain everything step by step.
 Photo - Roofing pie of an attic roof
 Principal roofing pie the attic roof has its own peculiarities:

As you can see, a lot depends on the slope of the roof and the selected finishing materials. Let's discuss how to make a mansard roof step by step with your own hands:
- Prepare drawings and diagrams; they will be needed in order to correctly connect the rafter nodes. The height of the beams, ventilation or windows, and the pitch of the rafters must already be calculated for them;
- Now you need to approve the plan from a specialist architect. This is an optional item, but if you are concerned about your own safety, we strongly advise you not to skip it;
- One more preparatory stage can be called impregnation of all wooden beams. As we have already said, the attic roof has quite big problems with drainage, so you need to prepare the tree to work in extreme conditions for it;
- Now we do everything as in the diagram below. To understand it, you need to be familiar with construction terms:


How to insulate an attic roof
Many owners from cool regions are wondering how to insulate an attic roof. This process is carried out from the inside, in addition, you need to start from the fact that such a roof itself is quite heavy. Based on this data, we are left with several insulation options:
- Mineral wool;
- Styrofoam;
- Insulation made of foam blocks.
 Photo - Insulation of the attic roof
 An ordinary construction mansard roof is most often covered with mineral wool (in this case, the thickness of the insulation often reaches several tens of centimeters, depending on the climate). This best option for those who have thought out the interior of their attic and who like to save money. Of course, there are more expensive options for powder coating and insulation, but they often do not live up to expectations, and their cost per hour is higher than the price of the roof itself.
During the operation of a private house, country cottage or country house, the question of increasing living space often arises. It is usually solved through an extension or superstructure.
Adding an extension to a house is a troublesome task. In addition, a residential extension has one significant drawback - it “steals” the usable area of the site.
Therefore, a popular way to expand living space individual house is the construction of a second floor or attic, i.e. attic roof. The design of the attic roof allows you to use the resulting space as a living space.
What is better: attic or second floor
The following facts speak in favor of the attic: lower construction costs, better insulation living space, less load on the foundation. In general, the attic is the highlight of the house and gives it a certain flavor.
Essentially, a full 2nd floor is more practical and easier to implement than an attic floor. It all depends on the situation; if a house is being designed, then it is better to immediately provide a second floor, because... installing an attic is a more troublesome task. And if the house is residential and has an attic roof, then it would be reasonable to equip it with a living room instead of an attic “for the necessary things.”
Types of attic roof
 The optimal tilt angle is 40°. The ramp should be located on the leeward side. Allows you to equip a small attic above the attic. Due to only one acute angle The usable area of the room increases.
Gable mansard roof
 A simple gable (pitched or gable) consists of two slopes connected at a certain angle. The advantage of a gable roof is the ease of manufacturing the rafters and finishing. The disadvantage is the appearance of a “blank” area (at the junction of the roof and the wall), which is usually not used. Often attics with gable roof erected along with the walls. A roof with a 45° pitch is ideal for houses no more than 6 m wide.
 Asymmetrical gable mansard roof. A private house with such a roof it will be distinguished by originality and functionality at the same time.
The difficulty in building a roof with asymmetrical slopes lies in the calculations.
 Broken mansard roof. Its difference is that each slope has two components. Device sloping roof allows you to get a higher attic space. And also reduce unused area. Such roofs are the most common due to the possibility of attaching a garage or summer kitchen under one roof.
Hip mansard roof
 Hip mansard roof. In this design, the roof slopes play the role of walls.
 One of the varieties of hip mansard roof is a Danish hip roof. Its construction is distinguished by the presence of gables, which allow the installation of ordinary, rather than roof windows (dormers).
 Semi-hipped mansard roof (gable, hipped). Complex design, low slopes protect the gables of the house from precipitation.
 Pitched roofs can be single or multi-level.
 Non-standard solutions are also quite possible for an attic roof. Their design requires careful calculation of loads, stability, etc. It is difficult to carry out installation without special education, so the cost of the work is higher compared to classical structures.
Some examples of the original mansard roof are in the photo.
Having decided on the types, the question remains of how to make an attic roof with your own hands.
The brief instructions contain the main stages of work and will draw your attention to some of the nuances of their implementation.
Stage 1 - Design and calculation
Choice appearance mansard roof, and its parameters are calculated taking into account factors such as:
SNiP 2.01.07-85 “Loads and impacts” will be a reliable assistant in calculations.
Nuance. The greater the angle of inclination, the lower the height will be attic room (minimum height the ceiling of the room on the attic floor is 2.2 m). Accordingly, than smaller angle the slope of the attic roof, the larger the area of the room. If the slope is insufficient, precipitation can accumulate on the roof, which will lead to additional loads on it.
More careful attention is paid to calculations if a non-standard mansard roof is being erected. For example, an asymmetrical gable mansard roof has a shifted center of gravity. This affects the uniformity of load transfer to load-bearing walls and foundations.
At this stage, the issue of how to access the attic floor is also resolved. Choosing a location for the staircase to the attic important decision. Internal layout allows you to use it at any time of the year. The exterior allows you to save useful space on the lower floor.
Advice. Ceiling folding ladder for attic floor- This is the most economical option, but the least practical.
Mansard roof rafter system
The choice of rafter system is influenced by:
- attic dimensions;
- parameters of the overlapped span;
- roof shape;
- first floor construction;
- location of load-bearing walls and additional supports;
- weight of roofing material.
The design of the attic roof truss system
There are two types of roof truss system with attic:
- hanging rafters. The walls of the house serve as the basis for the rafter legs. When constructing hanging trusses, a Mauerlat is not always installed (depending on the wall material);
- layered rafters. IN in this case additional support is required. The type used is a ridge girder or an attic wall reinforced with reinforced concrete. The installation of a layered rafter system is allowed at a distance between load-bearing walls of up to 7 meters.
The structural difference between a roof structure with hanging and layered rafters is shown in the diagram.

When building an attic roof, they are often used combined type- there are hanging rafters on top of the system, and layered rafters on the sides.

In this case, drawings must be prepared indicating the location individual elements and the distances between them. An example is shown in the figure.

Material prepared for the website www.site
Calculation of rafter legs for an attic roof
Choosing the type of wood and justifying its optimal thickness.
The amount of material required for the rafter system depends on its type and all the factors listed above.
Nuance. The gap between the rafter legs depends on the lumber used.
The pitch of the rafter legs under the attic roof will be 60-90 cm.
The material can be laminated timber (80x80, 100x100 mm), board (section 50x150 for slate and metal tiles, section 50-200 for ondulin).
Nuance. The length of the spans increases the diameter (section) of the rafters or reduces the gap between them.
As for the species, it is recommended to use pine. Its wood is characterized by high strength, flexibility, ease of processing, and the absence of knots. Industrial wood must be at least grade 2. Solid beams can be replaced with glued beams; it has higher quality characteristics.
Thickness of the board for making rafters (section rafter leg) must be at least 50 mm. The width of the board for the rafter leg is from 150 mm (if the length of the rafters is up to 6 meters, if more, then 180-200 mm). On the one hand, this requirement is due to the fact that the load bears on it, on the other hand, insulation is placed between the rafter legs.
Advice - any construction or reconstruction must be legalized by the relevant authorities.
Stage 2 - Installation of the Mauerlat
Mauerlat is an additional wooden frame along the upper perimeter of the building.
The purpose of the Mauerlat is to create conditions for reliable fastening of the lower part of the rafters. As well as the redistribution of the load that is created from the pressure of the roof on the load-bearing walls and foundation of the building.
Installation of a simple gable mansard roof requires installation of a mauerlat only on those walls on which the rafter legs will rest. A hip roof requires its installation along the entire perimeter of the building.
Advice. IN wooden log house The role of the Mauerlat is played by the upper crown. This can be done, but only if the rafter legs are installed on sliding fasteners. Because Due to the load on the rafter system (wind, snow), horizontal pressure is created and the upper logs can move outward. In addition, if the material for the rafter system is not dried properly, then over time, if it is rigidly fastened, the roof will become deformed.
Nuance. A stone cottage and house requires the installation of a mauerlat along the entire perimeter of the external walls. In brick, you can install its links only under the rafters.
The parameters of the Mauerlat for logs are diameter 150 mm, for timber - 100x100 mm.
The species is pine, but larch is better.
The fastening of the Mauerlat must be reliable, because this is the basis for the entire rafter system.
There are several ways to fasten the Mauerlat: with anchor bolts, studs or reinforcement (fixed in the base load-bearing wall);
Advice. If the structure is built from foam concrete or other porous material, you can use only long bolts or reinforcement, the length of which is 3 times the width of the mauerlat beam. This is due to the fact that any other fasteners are pulled out very easily from a porous material.
- annealed wire (embedded in brickwork);
- wooden dowel (used when installing a mauerlat in a log house).
Nuance. To prevent the destruction of the Mauerlat, it is necessary to ensure proper waterproofing, for example, put roofing felt, and treat the timber itself with antiseptic solutions.
If the width of the attic matches the width of the house, the rafter legs rest on the base of the load-bearing wall. But, it’s better to install a Mauerlat.
Stage 3 - Construction of the attic roof
Construction of the attic roof frame
Floor beams. Installed on the Mauerlat. In the future, they will serve as the basis for installing the floor in the attic.
Arrangement of the rafter system of the attic roof
For a simple roof, making rafter legs involves forming simple triangles. They can be assembled on the ground and installed in the form of ready-made triangles.
For a gable sloping roof, first a U-shaped frame is attached, and the rafter part is already fixed on it in a hanging (for the top) and inclined (for the sides) way. The diagrams below show this more clearly.
The lower ends of the rafter leg must be sawed down and attached to the mauerlat using nails or metal brackets (movable fastening).
Nuance. The filing of the leg must be very precise to ensure a tight fit to the Mauerlat.
The rafter legs are installed at the same distance from each other. Otherwise, the load on the system will be distributed unevenly.
Installation begins with the outer legs. Then you need to stretch the rope between them. This way the horizontal position will be maintained when installing the intermediate legs.
After all the rafters are installed, they are connected to each other. The pitch of the sheathing depends on the selected roofing material.
Advice. The places intended for the installation of roof windows are reinforced with transverse beams. This way the window will be securely fixed.
If the attic roof is significantly wide, you need to install a ridge beam. It will serve as additional support. And part of the load (from the weight of the roof and snow) will be redistributed onto it.
With a significant length, the ridge beam is supplemented with support.
Waterproofing attic roof
A hydrobarrier film is attached to the sheathing. The peculiarity of its fastening is to make an overlap of 100 mm. Most manufacturers mark the overlap area with a bright stripe.
The waterproofing film is fastened with a construction stapler. And in case of rain, it will reliably protect the structure even in the absence of roofing material.
Insulation of the attic roof
The insulation is laid under the waterproofing. Professionals recommend using flexible insulation for these purposes - mineral and basalt wool. Their advantage is flexibility, the ability to fill any voids.
Laying a vapor barrier
The vapor barrier film protects the roof insulation from steam penetrating into it from the attic living space.
Advice. It is important to ensure the necessary gaps between roofing material and insulation. Their presence and parameters are determined by the type of insulation, the class of films used and the roofing material.
Construction of an attic roof - video
Stage 4 - Installation of roof windows
The window area, for sufficient daylight, must be at least 12.5%.
Due to the design features of the mansard roof, special ones are used for glazing. skylights. The installation technology involves installing windows before completing finishing works. In this case, the windows must open to provide access fresh air. In bad weather, they should naturally be closed.

Stage 5 - Roofing the attic roof


