Original crafts from plastic bottles, you can easily decorate your site! This material is quite durable and easy to process, thanks to which a wide variety of products are created.
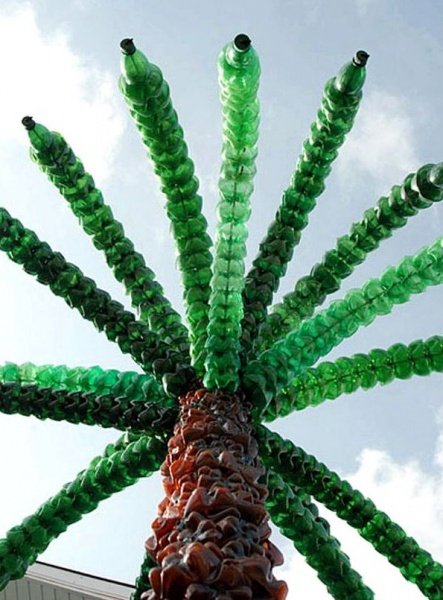
For example, you can create a wonderful palm tree from plastic bottles with your own hands! Such evergreen palm will all year round decorate your site or, for example, a playground.
This master class will help you make such a craft!
You will need materials and tools such as:
- plastic bottles brown tint and green;
- scissors;
- stationery knife;
- thick wire for the frame.
To begin with, you need to decide how tall the palm tree will be. IN in this case, the palm tree will be approximately 1.5 meters high, and the second one will be 50 cm. To do this, you need about 23-25 bottles of a brown shade for the trunk and 15 bottles of a green shade for the crown!
To create a trunk, brown bottles need to be cut in half as in the photo below.

You need bottles of different sizes, the larger ones at the base, and the smaller ones at the top of the barrel. The caps from the bottles must be removed. You will need both the top and bottom of the bottle.

Then, the edges of the blanks are cut out in the form of petals; you should get about 6 “petals”.


Afterwards, they need to be bent.


It should look like this.


In the future they will add up to each other. Since there is no hole for the wire in the bottom of the bottle, it needs to be made using a hot nail, knife, or you can drill it. By folding the blanks, you get a rather fluffy palm tree trunk.

After all the parts for the palm tree trunk are ready, you need to start creating the palm leaves!

Bottles can be used different shades green. You can also experiment with the volume of containers, for example, use two-liter ones at the base, and place smaller ones at the top. To do this, you need to cut off the neck and bottom of green bottles.

Then, cut the bottle into three parts.

If you want wider leaves, you can only cut it into two parts. You will get something like this.


Afterwards, the strips need to be straightened in different directions.


This will give some splendor to the crown!
Now, the simplest and final stage in creating a palm tree from plastic containers remains!
After all the parts are ready, you need to securely install the frame made of wire or other suitable material in the desired location on the site. And then, string all the resulting palm tree parts onto the frame.
Using a large cork from a five-liter bottle, make a clamp on top to securely fasten the leaves. To do this, you need to make a hole in the center of the cork, slightly smaller in diameter than the frame.
Then, after the crown is completely assembled, put it on the wire!

That's all, you've got a very original palm tree that can be installed on your property or on the playground!

The final look of the craft. Photo 1.

The final look of the craft. Photo 2.
Such a craft will certainly decorate the area, and also give positive mood for kids, including a handmade plastic basket!
Do you want to decorate your personal plot an interesting handmade craft? Create a work of art on your own from scrap materials? A palm tree made from plastic bottles is what you need, it will turn the area into an amazing exotic garden and will please the eye long years. Our master class is devoted to how to make a palm tree from plastic bottles with your own hands, step by step, from used PET containers.
If you have the desire and creative impulse, let's get to work.
Materials and tools
First of all, let's decide on the quantity and quality of materials. What container is suitable for our craft? Of course, every home has used plastic bottles, but are all of them suitable for our work? Of course not. We strictly choose only brown and green bottles for the trunk and crown. For a larger plastic beauty, a container with a volume of 2 liters is best suited; for a smaller tree, a one and a half liter container will do.
We will need:
- 15-20 brown bottles for the trunk big tree and 15-10 for small;
- 6-8 green bottles to create 1 palm leaf;
- stationery knife or scissors;
- a metal rod or wooden handle for attaching the trunk;
- wire and rope;
- scotch.


Below is detailed instructions on making palm trees with diagrams and photos.
Let's get started
Algorithm of actions:
- We create a crown for trees;
- We make the barrel;
- We unite structural elements;
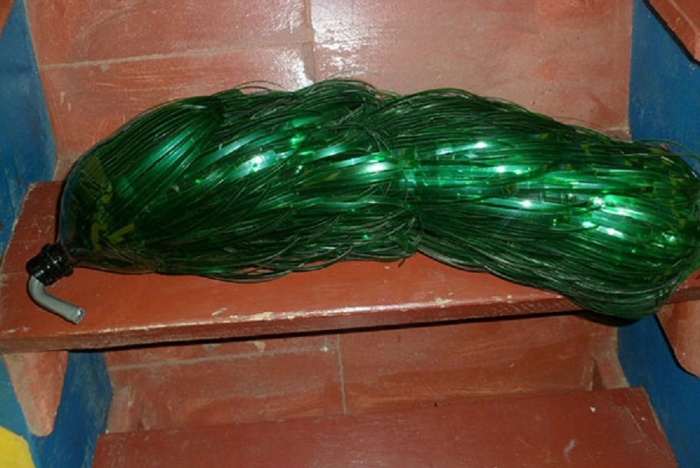
Let's start creating leaves. To do this, take a green bottle and, using a stationery knife or scissors, cut off the bottom, as shown in the photo.

Then, on the resulting workpiece, stepping back 3-4 cm from the throat, we make frequent longitudinal stripes.
Note! The more often the stripes appear, the fluffier our leaves will be.


In the same way we prepare 5 more blanks. We insert the resulting blanks on top of each other. In order to fasten them together, we use wire or rope: we thread it through the neck and fix it. The first sheet is ready.

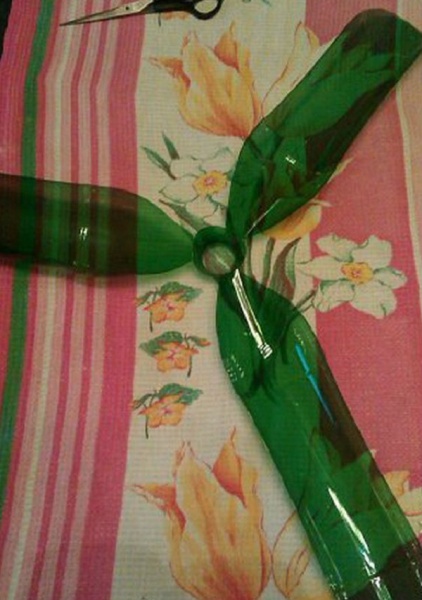
We bring to your attention the second method of making palm branches. To do this, take a green bottle and remove the bottom using a utility knife. Visually divide the bottle into four parts and cut it. The result is a workpiece as shown in the photo below:

Then we decorate the resulting leaves, for this we make sharp teeth along the perimeter of the leaves, bend the resulting fluffy leaves outward, and fix them.

Repeating steps 1-3, prepare the remaining parts of the crown. We remind you that one palm tree requires at least 6-7 leaves.

The procedure for creating leaves can be represented schematically:

Let's start making the barrel. As we know, in nature the trunk of a palm tree is covered with scales. To make our exotic plastic beauty as similar as possible to its natural counterpart, we will try to recreate the natural relief of its base. This will require almost the entire bottle. Brown.

Carefully cut off the bottom.

Cut the bottle into 6 equal flakes. It turns out such a wonderful “daisy”.

We create similar daisies for two palm tree trunks. We collect them together and fasten them in the same way as the leaves. The trunks are ready.

The number of blanks depends on how tall the trees are going to be made.
The resulting bases should hold the crown tightly; for this it is necessary to strengthen them with reinforcement or a wooden handle as shown in the diagram.

Quick assembly
Now that all the structural elements are ready, let's begin the assembly. There are several layout options ready-made elements. Let's stick to something simpler. We prepare the top of the trunk, cut off the neck from the brown bottle. Almost at the very bottom we make several cross-shaped cuts. This is where we will insert our crown. The assembly process is presented more clearly in the diagrams below.


Important! For the resulting masterpieces, it is necessary to make a foundation so that they stay well in the ground and do not wobble.
If you have the opportunity, you can prepare a welded structure for subsequent concreting.
What wonderful and unique trees We have succeeded, so you can create a whole exotic evergreen alley in your garden that will be the envy of your neighbors. Imagine and create interesting crafts for your site, involve children in the work.

Use your imagination and decorate your tropical beauties using multi-colored bottles of smaller diameter: add fruits to palm trees in the form of bananas and coconuts.
Pay attention to the creations of your colleagues, take notes and use the techniques and elements you like in your work. Some work options are shown in the photo below:


Video on the topic of the article
We invite you to consider video lessons from experienced craftsmen:
Plastic bottles - excellent material for manifestation creativity. A huge number of crafts fit organically into landscape design adjacent areas. This hobby also performs a noble function, preventing clogging environment non-degradable waste. There are many ways to make a palm tree from plastic bottles. The proposed options will help you build a real masterpiece that will become a worthy element of decorating the site.
First option
A real palm tree is impressive in size. To make a plant close to the original, you will need a lot of plastic bottles. Therefore, it is better to distribute the task of collecting containers in advance among the immediate environment. Brown and green containers are designed for classic palm trees. Extraordinary and extravagant individuals can experiment with plastic bottles blue color or other shades unconventional for palm trees.
Advice! Palm long time will retain its original attractiveness if plastic bottles are pre-soaked in warm soap solution and carefully remove any remaining labels and adhesive solution.

Materials required for work:
- plastic containers;
- scissors and stationery knife;
- wide tape;
- thick wire for leaves;
- metal rod for the barrel.

The aesthetics of the craft will be ensured by bottles of the same volume. For large plant 2-liter containers are optimal; a medium-sized plant can be made from a 1.5-liter container. Bottles of 0.5 liters are appropriate for a dwarf specimen.
A palm tree made from plastic bottles is assembled with your own hands in stages:
- initially the branches are decorated for a lush crown;
- then the trunk is assembled;
- Finally, the structure is connected together and securely fixed to the surface.
Let's look at how to make a crown step by step:

The number of branches at the top may vary, but is aesthetically pleasing appearance palm trees are achieved with a minimum of 5-7 lush leaves.

When the preparation of the crown is finished, they move on to assembling the palm trunk. Here you will also need almost the entire plastic bottle, with the exception of the bottom. The container is cut lengthwise into 5 equal fragments, as shown in the photo:

Palm blanks are strung on a rod, each new level comes with an offset. The result should be something like this:

Advice! To connect the crown and trunk of the palm tree together, parts are welded on the top of the metal fittings, where the wire with leaves can be threaded. This is the most reliable way fixation. Small, light leaves are secured with tape.


For heavy structures, it is preferable to have a reliable foundation. There are several options for installing a palm tree from plastic bottles:
- the trunk can be fixed on a metal platform, which is subsequently buried in the ground;
- the reinforcement is buried half a meter into the ground and concreted;
- lighter products can be covered with brick chips with further compaction of the soil around the palm trunk.

Second option
The following method of forming a palm tree from plastic bottles with step by step algorithm actions.
Work begins with the labor-intensive process of assembling the barrel:
- You will need a third of the plastic container, cut off from the neck side.
- All blanks are cut into 8 parts, leaving intact small area near the base.
- To ensure that the palm trunk has a scaly surface, each segment is bent outward.
- Reduce waste plastic bottles Using the bottom of the container will help. To do this, use a hot knife to make a hole of a suitable diameter at the bottom. Otherwise, the process of forming blanks is identical to the algorithm described above.

Palm leaves can also be made into other shapes. The crown will be presented in the form of wide foliage, reminiscent of a fan. You can use green and yellow plastic containers for it.
Comment! The splendor of the crown directly depends on the number of leaves from the bottles, and their width depends on the size of the containers.
Krona tall palm tree It’s better to make it from a 5-liter container; for a medium-sized plant, 1.5-liter containers will be enough. Cutting the leaves of a fan is quite simple:
- on plastic container the bottom is removed;
- the bottle is cut lengthwise into 3 parts;
- each segment is rounded at the end;
- the petals are cut into fringes on both sides, leaving a narrow untouched strip about 1.5 cm wide in the middle;
- splendor is achieved by bending the fringe in different directions.
Finally, the elements strung on the cable and fittings are fastened together.


Third option
Another method involves creating a palm tree using the bottoms of plastic bottles. It should be noted that such a container will require much more.
Crown design step by step:
- At each bottom it is necessary to make a hole whose diameter corresponds to the prepared base. The work is performed with a hot knife or drill.
- Green bottle blanks are strung on a rigid cable.
- The edges of the wire are secured with caps to keep the parts in place.
For a tall palm tree you will need a lot of bottles, and they should be green and brown. If you stock up on a sufficient number of such bottles, other aspects of manufacturing will not cause difficulties.
If you first carefully get acquainted with step by step guide How to make a palm tree from plastic bottles, then creating such a masterpiece will take no more than one evening.
Materials and tools you will need:
- plastic bottles,
- stationery knife,
- scissors,
- glue,
- metal cable or thick rope with a diameter of about 7 mm.
The frame for the entire structure can be reinforcement or a flat wooden stick.
Some people make a palm tree from clear plastic bottles, but the result is not so beautiful. It's better to find plastic right away desired color: brown will go to the trunk, and green will go to the crown.
Step-by-step instructions for making a palm tree
A palm tree made from plastic bottles with your own hands has 3 stages of production: creating a crown, making a trunk and combining the entire structure.
Let's look at each stage in detail.
Read also about.
A hole is made in the very base equal to the diameter of the frame. There should be enough such blanks so that they completely cover the reinforcement or wooden stick.

Assembly
The frame stick is inserted into the ground, then the brown parts of the trunk are strung on it. In this case, the bottoms of the bottles should “look” up. The crown is collected into one “bouquet” and tied to the top of the palm tree using thick wire.
If the leaves were strung on a metal cable, then it makes sense to weld them to the trunk. This way the structure will hold even stronger.
To prevent the palm from being blown away by the wind, you can initially make a small foundation at the base.
If you don’t want to bother with cement, then you can simply stick the reinforcement in deeper, and then sprinkle the finished trunk with a little earth, as if the tree were growing on a small hill.
Advice: if you used a cable for the leaves, the crown can be made multi-level. To do this, you need to make about 15 leaves. 3 pieces are fastened together, thereby making “branches”. Then, with the help of weaving, they form a wire frame, like artificial Christmas tree. Having collected all the metal “stems” together, they are attached to the frame. Real palm trees do not have such branched crowns, but on plastic palm tree it looks very nice.
Summer cottages, especially in middle lane Russia, cannot boast of having exotic plants from hot countries, first of all, because these plants need a completely different climate. But sometimes you really want to mentally return to the warm sea, sit under a palm tree and watch the sunset. And if it’s not possible to organize seas at your dacha, then “cultivating” a palm tree is very simple, you just need to collect a large number of empty plastic bottles. In this article we offer you a master class on making a palm tree with your own hands.
First of all, it must be said that there are many various ways build such a palm tree. And they all turn out different, but very similar to the real thing:


In our master class we will try to make a palm tree, as in the photo:

Making a palm tree from plastic bottles
To make a palm tree you will need:
- Plastic bottles (at least 100 pieces, green and brown)
- Scissors
- Candle
- A piece of reinforcement or an iron pin
- Wire
Step-by-step instructions for collecting palm trees:
1. First of all, all the bottles need to be prepared: washed, cleared of labels, and removed the safety rings for the lid from the neck. Any bottle from small to large will do.

2. Using a knife, cut off the bottom of green bottles. The bottom is cut as close to the edge as possible so that the rest of the bottles are longer, then the palm leaves will be fluffy and large.

3. The bottle is cut. 1.5 liter, liter - into three parts, 2 liter - into 4. You need to cut the bottle up to the neck, and cut each petal along the edge - give the desired shape.


4. We make a fringe on each leaf - very finely, so the palm tree will be more magnificent. There should be about 1 cm of untouched bottle left in the center.


5. Light a candle and bring it to the flame outside petal. Fringe will receive interesting shape, and will become more alive.


We have a blank, and we have to make 36 of them. Six branches. And each of them has 6 leaves.
6. The next stage is preparing the place for “planting” the palm tree. An iron rod is taken and driven 30-40 centimeters into the ground.

7. Cut the bottom of brown bottles as evenly as possible and put it on a rod. Then we put the next one on this bottle, etc. until the end of the rod length.


8. Using welding rods or thick wire, connect all 6 branches together. To do this, you need to make 3 holes through (crosswise) in the topmost bottle of the barrel. Pass a thick wire through them and put the finished branches with leaves on this wire.

9. At the bottom of our 6 branches there are covers in which you need to make 2 holes. The wire is pulled through the entire branch and twisted at the top (there is the same lid with 2 holes). One more hole must be made to attach the branch to the welding rod at the base.


As a result, we get a wonderful palm tree (small in the picture):

There is another way to make a trunk for a palm tree, as a result of which the palm tree will have a slightly different appearance:

1. To create such a trunk, you need to cut the brown bottles so that the lower part is slightly larger. Top part cut into 8 parts to the point where the bottle narrows, and then we cut the ends of each of the 8 parts so that they take a triangular shape and bend them at the base, we do the same with the bottom of the bottle, but we make a hole in it equal in diameter to the neck.


So, we told you how to make a palm tree from plastic bottles step by step, now we suggest you familiarize yourself with the video lesson for this master class.
We wish you achievements in your creativity!


