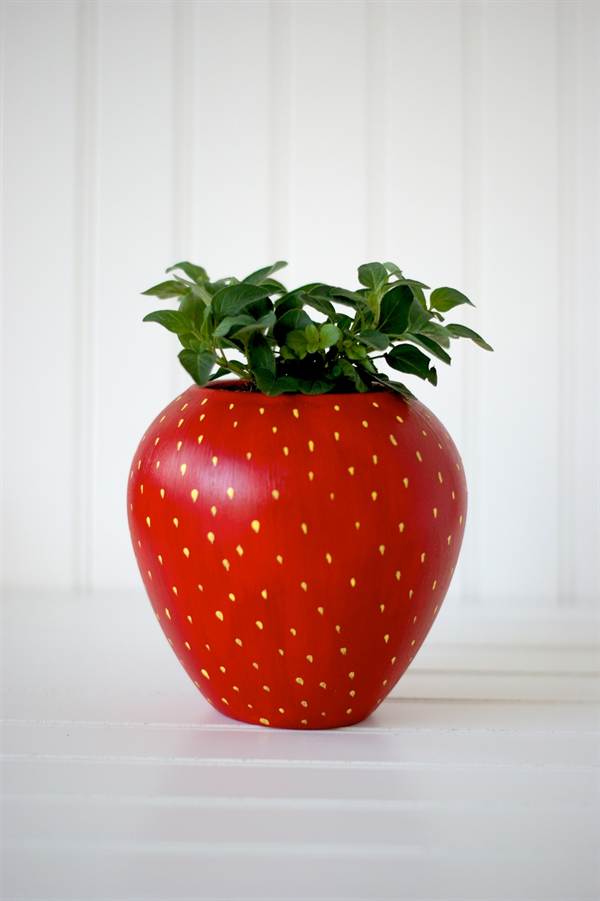
Gardeners and hobbyists indoor plants You should definitely know how to make flower pots with your own hands. Tubs and pots will transform the interior and add a “zest” to each plant. In addition, homemade pots will help you save money and get rid of unnecessary items and materials.
Decorative pots provide great opportunities for creativity. They can be painted, decorated with decoupage, ribbons, fabric, accessories, made from different materials and given the most unusual shape.
We do it ourselves
It’s not hard to think of what you can make pots out of.
For flower pots Any material is suitable, including waste material that does not allow moisture to pass through and holds its shape well.
Undoubtedly, the most beautiful and comfortable pots are ceramic. If it is possible to make a pot on a pottery wheel, then you should confidently use it. Clay - optimal material for planting domestic and ornamental plants. It retains moisture and allows air to pass through, does not overheat and holds its shape well.
If it is not possible to make a pot yourself, then you can purchase a ready-made one and figure out what and how to decorate it. There are many ideas for decorating pots. It is not necessary to paint the pot with paints; you can use your imagination and come up with the most unusual “outfits” for it.

Thrifty gardeners can save money on a ceramic pot and make it from scrap materials. The simplest pots and tubs are made from plastic bottles. Just cut it off top part, fill up the soil and start planting the plant. However, you can get a little creative and make elegant flower pots from such an unattractive material as plastic.


For making two versions of pots will be needed following materials and tools:
- 1.5-2 liter bottle;
- CD;
- glue gun;
- stationery knife;
- marker;
- hole puncher;
- spray paint.

Progress:
- Draw a wavy line in a circle approximately in the middle of the bottle (you can have a straight line) and carefully cut the bottle into two parts along it (you get two blanks for pots);

- Glue the part with the neck to the middle of the disk (before screwing the lid tightly);

- When the glue sets, turn the workpiece over and drip a little glue along the edges for stability;

- Use a hole punch to make holes along the wavy edges;
- Spray paint the resulting pots and wait until completely dry.

The pots are ready! You can plant plants.


To ensure that the edges of the cut bottle are even and smooth, they can be trimmed with a soldering iron. You can also use a soldering iron to give the edges an original shape.
Hanging pots are also easy to make from bottles. The most simple model suspended from both sides - by the bottom and neck. One side of the bottle must be cut lengthwise, and two through holes must be made on the sides with an awl or soldering iron so that the pot-bottle can be hung.

Plants can be planted directly in such pots, or they can be used as flowerpots. If desired, paint the outside of the bottles with acrylic paint.
More interesting models- cats. To make them you will need:
- bottles with embossed bottom;
- marker;
- spray paint;
- stationery knife;
- soldering iron or awl;
- ropes or pieces of strong fishing line (4 pcs.);
- sample.
- Cut off the bottom of the bottle;
- Draw ears by hand or using a template and cut them out;


- Paint the workpiece from a spray can and wait until it dries completely;

- Make a muzzle with a marker: draw eyes, ears, mustache, nose;
- To hang the pot, you need to make holes on four sides and thread ropes or fishing lines into them.

Ready! You can plant a plant.
Instead of cats, you can make other animals, for example, a bunny or a bear.
Original pots are easily made using tin cans and clothespins. To do this you need to do the following:
- Peel off the label and wash the tin can and dry it;

- Attach ordinary wooden clothespins tightly to each other to the wall of the jar.


The result was a small pot, reminiscent of a traditional tub. If desired, you can paint the clothespins with acrylic paints, and so that they retain their original appearance longer, coat them with varnish.


Eco-friendly pots and vases can be made from wood. They will decorate both the apartment and Vacation home. Tree - cheap material, easy to process. However, it is worth remembering that when making wooden pot The hygroscopicity of wood should be taken into account. To prevent the tub from starting to rot or deteriorate from moisture, it must be treated in a special way– impregnate with moisture-protective agents, cover with stain, varnish or other means.

The easiest way is to assemble a pot from ready-made wooden beams, securing them with glue or nails.


Unusual outdoor wooden tubs and flowerpots for summer cottage can be made directly from a piece of log. To do this you need:
- a log or stump of sufficiently large diameter;
- drill with a drill length of up to 25 cm and a diameter of 20 mm;
- chisel;
- file and sandpaper for smoothing the walls of the pot;
- impregnation for wood against moisture and decay;
- polyethylene.
A great idea is to make a simple flower pot out of plastic bottle. Decorating your home with plants has been popular since ancient times. It’s good when the house or apartment is spacious - you can enjoy growing flowers and greenery. But many of us have to make do with just the window sill space.
With the advent of products such as pots and flower pots, it has become much more more possibilities for interesting and original decoration premises. Finding a beautiful pot or flowerpot is not an easy task. I would like to add that pots are suitable for both indoor plants and outdoor flowers.

Pots are mostly made of clay and plastic. Less commonly used are plastic and ceramics. New clay pots Before planting flowers, it is recommended to immerse them in water for 1 hour. Thus, gases escape from the pores and harmful salts, formed during firing. As for the materials from which the pots are made, these are most often wood, ceramics, metal, plastic, rattan, polystone, glass. It is necessary to understand the difference between a flower pot and a flowerpot:
The pot has special holes through which excess moisture comes out. Flower pots do not have holes. Do not forget that 10-15 minutes after watering, the remaining water must be poured out.

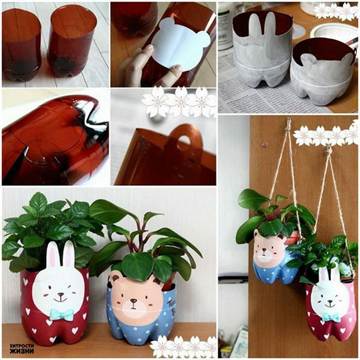
An original flowerpot with cat faces is suitable for the garden and for the windowsill. Make this craft from bottles of different sizes (for example, 2 liters and 0.5 liters).
For work we will need:
- Plastic bottles 2 liters and 0.5 liters.
- Markers.
- Acrylic paint or white spray paint.
- Scissors.
You need to cut off the bottom of the bottle, and then cut off the top so that you get cat ears.

Then we need to paint the resulting blanks with acrylic paint or spray paint.

The product needs to be dried and a drawing applied with markers. Draw the cat's face. You can use the template. The template is given in two versions: for a 2 liter and 0.5 liter bottle.

When the product is ready, pour gravel on the bottom for drainage. Then we fill it with soil and plant the plant. Such a flowerpot can be made hanging - to do this, make holes on all four sides and thread 4 ropes of the same size into the holes. Tie all ends together on a hook.

In this simple way you can make not only cats, but also other animals.

Our master class is now complete. Funny crafts made from materials that are usually thrown away.
Let's try to make it with our own hands from ordinary plastic. original flowerpot. We have a shampoo bottle.

To work you will need:
- Shampoo bottle.
- Scissors.
- Model knife for cutting bottles.
- Colored adhesive tape(can be replaced with braid).
- Hearts, beads.
- Glue Moment.
- Insulating tape.

Use a knife to cut 2 holes in the plastic bottle. The hole is a long oval. To avoid sharp cuts, we cover the holes with electrical tape. Decorate the neck and sides with colored ribbon.

With this simple step by step instructions in literally 10-15 minutes you can make a charming flower pot from a plastic bottle with your own hands. We will tell you how to turn an ordinary and used bottle into a cute little cat. The craft is so simple and understandable that even small children can handle it.
Such a flower pot will fit well both in the country house and in home interior. If you have children, let the flower in a “cat” stand in the child’s room, especially if he makes this pot with his own hands. True, in the process of creating crafts, you must strictly follow safety precautions: cut the bottles yourself, do not trust a child to do this, and you need to paint them properly rubber gloves, preferably also in a gauze bandage to cover Airways(fresh acrylic paints have practically no effect on adults at all).
What do we need?
- clear plastic bottles
- acrylic paints (can be in a spray can)
- permanent marker
- decorative varnish (non-toxic)
- priming
- plant
Plastic bottles don't have to be big. If, for example, you decide to plant a cactus in a pot, you can even take a 0.5 liter bottle. For big flowers Bottles from 2 liters are more suitable.

How to make a pot?
We cut the bottles so that we form two cat ears in front and a tail in the back. If the edges are too sharp, you can carefully melt them using a candle or lighter. Keep the bottle at a distance of 2-3 cm from the fire, with its edge facing towards it. Take precautions!

We paint future flower pots both on the outside and on the outside. inside. Acrylic lays flat on plastic, so there should be no problems. Since we paint on the inside too, the craft will not turn out pale - apply additional layer no need. If you have paints in spray cans, use them, the scheme will be the same.

We draw eyes and ears on the bottle using permanent marker. If you don't have it, take it acrylic paint a different color and a thin brush.
Leave the cats to dry for a day. If you wish, you can coat the flower pot with a non-toxic water-repellent varnish (if your acrylic is already water-repellent, you do not need to do this).
All that remains is to pour the soil (this is important point, since we need to make plastic pots stable). Next, you can add soil or plant the flower directly in the ground - it depends on the plant itself and its needs.

Greetings, dear friends! There are flowers in almost everyone. They all stand in sometimes nondescript and ordinary store-bought pots. But what if you give them a twist? Today we invite you to learn how to decorate pots with your own hands.
For this you can use the most different materials: glass pebbles for aquariums, lace, buttons and even simple pencils. The result is vibrant handmade products that you can’t help but admire.
DIY pots: unusual options


The ability to make something original and new out of unnecessary or ordinary things is very valuable when decorating a home. Create with your own hands from scrap materials useful thing- one of the most common hobbies, and hand made never loses its popularity.
You can make any thing yourself - from decorative jewelry to furniture. Here we will look at decorating a flower pot with our own hands, which provides enormous scope for creativity. Products created by craftsmen are suitable for both rural houses and country gardens, as well as modern interior apartments.

You can consider decorating a flower pot from a ready-made base in the form of the most ordinary plastic or clay dishes, or you can use things that at first glance are inappropriate for this as a base - cans, glass vessels, cardboard, pebbles, various Decoration Materials and many other items.
A masterpiece from nothing
For lovers of handicrafts, decorating a flower pot with your own hands will not cause special problems. Moreover, they can use a variety of materials to make it. It is only important that appearance The product was combined with the decoration of an apartment or house. Vases, pots, containers for house plants can be made from everything you find at hand.

Used items
Everyone probably has used aluminum cans, cans of paint and other liquids, etc. Their appearance leaves much to be desired, but the right decor will help you create unique and interesting things. For example, quite tall cans of canned pineapple or other fruits, soups, canned pet food and decorative paints you can simply wash them, carefully remove the labels and use them as flower pots. Their silvery surface looks interesting in a high-tech or minimalist style.

If the jars become bent during use or look unsightly, you can further decorate them with fabric, fur, pebbles or walnut shells. Directly about decorating flower pots we will talk a little lower. Or you can just paint it.

Everyone definitely has plastic bottles. modern man. You shouldn’t throw them away right away, because you can create a lot of useful things from them. For example, by leaving the necks of bottles, you can make beautiful flowerpots for climbing plants. To use the base of the bottle as a flower pot, you need to give it strength and decorate it in an interesting way.

Recently it has become fashionable to use old shoes as flower pots. These can be rubber boots or summer rubber slippers. Most often they are used in gardens and dachas, in modern apartments they are not so appropriate.

An old leaky bucket makes a great place for a large fern or other massive plant. To do this, the handles of the bucket are removed, the base is decorated and turned into a designer masterpiece.

The design of a flower pot and the process of creating it from old records seems interesting. Vinyl record heats up and easily changes its shape. If you give it the shape of a pot or bowl, you get very stylish decorative items.
You can glue wooden or plastic clothespins together to form a plant pot, or use broken children's toys. Pots are also woven from rolled newspapers or magazine pages. It all depends only on your imagination, free time and desire.

From old bags, lampshades, boxes, plastic packaging, watering cans or other equipment you can also create unique pots, vases or containers for indoor plants. Even from used rubber tires you can create an interesting flower pot, however, you cannot do this without brute male power.
Construction materials
Boards, cardboard, leftover decorative tiles, broken bricks, chicken wire or various barrels can also be used to make excellent stands or pots for plants.
From thick or corrugated cardboard you can create completely different pots or flowerpots for indoor and garden plants. These can be ordinary round versions of pots, or they can be elongated rectangular or diamond-shaped models. You can find a design for such a model from folk craftsmen, or you can come up with it yourself, remembering technology or creativity lessons at school.

It is quite simple to design a flower pot from boards or wooden blocks. Having cut out the base, you can easily use nails or glue to create a real flowerpot for large indoor plants. Moreover, products made from rough, untreated boards are more suitable for streets, while processed wood looks great in an apartment. It can be additionally decorated with burlap, ribbons and other decorative details.

Remains of decorative ceramic tiles can be used to create a small square flower pot by simply gluing the pieces together. They look interesting mirror tiles and mosaic options.
Wire mesh can be used as flowerpots, large production barrels are suitable for installations with large garden plants, and they don’t even need to be particularly decorated: rough stands with delicate garden plants look harmonious.

Made from natural material
The most common method for making flower pots is considered to be natural material. This could be a pebble, a stump, shells from various nuts, pine cones, etc.
From pebbles - flat pebbles of a streamlined shape - you can easily glue together an entire decorative composition, in which there is room for a houseplant. You can also use cones or nut shells.

From ordinary hemp or logs, which are often used as seating in the garden, you can cut inner part and plant a plant there. It looks very stylish in the garden.
From the vine or various twigs You can also create an interesting pot for indoor plants, but products made from vines are not so easy to make.

It’s interesting to decorate a flower pot with your own hands from half a coconut shell. They make excellent flowerpots for small plants that will fit perfectly into an eco-style interior.
Decorating the ordinary
Now let's consider the question of how to decorate a flower pot, what techniques can be used and what materials to use. Moreover, you can use the most ordinary store-bought plastic or clay pots, or you can decorate what was obtained as a result of the skillful use of used things.

One of the common ways to decorate a flower pot is to paste the product. various materials. These could be shells, beautiful pebbles, glass shards, birch bark, coffee beans, cereals, nut shells or cones, buttons or beads. With their help, you can create a certain picture on the surface of the pot using different textures or colors.

A special decoration is considered to be eggshells, which are applied to the surface using the crackle technique. shell from boiled eggs pre-cleaned, degreased in a baking soda solution, and then dried. Then PVA glue is applied to the surface of the pot, and the shell is placed on top with the convex side up. Cover the top of the shell with a napkin or paper and press to form cracks. To keep the shell parts further apart, you can push them apart with a toothpick. The pattern is covered with ink on top, and after it penetrates into the cracks, it is washed off from the shell itself with a damp cloth. Ink remains inside the cracks, and the shell has its original appearance. All this splendor can be varnished on top.

Also, decorating flower pots involves painting them, and the colors are selected to match the interior. Drawings can be abstract or realistic, and you can also use decoupage techniques to apply various images that repeat patterns on walls or textiles. You can also put some inscriptions on the surface of the pot.

You can also use polymer clay for decoration, creating bas-reliefs using toothpicks on the surface of the pot.
Wrapping pots in fabric or fur is also considered an excellent decorative technique. To ensure that the fabric or burlap holds well, you can tie them with strings, or you can glue them tightly. Using knitted material, such as the sleeves of an old sweater, you can create winter “clothes” for pots that can easily be stretched over small containers.

You can also wrap a flowerpot with twine or thick rope, then decorate it for contrast satin ribbon. Decorate the surfaces of flower pots with coconut fiber, dry grass, and acorns.


An interesting idea on how to decorate a flower pot is to cover it with pencils or dry sticks. The first option is perfect for a creative workshop, and the second - for an eco-style interior. To do this, you need to take pencils or dry twigs of the same length and, tightly gluing or tying them to each other, as if wrapping them in a pot.
Creating and decorating flower pots will be a real treat for lovers of such entertainment. With constant practice, you can create really interesting, unique and original things that will give the interior of your home or appearance your garden spontaneity and individuality.
We present to your attention a video with ideas for decorating flower pots with your own hands.
If you found this article useful, share it with your friends by clicking your icon social network. Thank you!
Probably not a single house is complete without indoor plants and flowers. After all, flowers decorate our interior, adding the necessary colors to it. Flower pot is also considered an important decoration for the interior and therefore it must correspond to it.
Sometimes it happens that we urgently need a flower pot, but we don’t have one at hand. It is for such cases that a simple and affordable pot comes in handy. You can make such a pot from an ordinary plastic bottle and a CD. Surely in any home there is a plastic bottle and a CD. Also, such a pot is perfect for growing seedlings, only you will need to make a cap on top to create a greenhouse effect.
To make a flower pot you will need:
* Plastic bottle.
* CD disk.
* Thermal gun.
* Dye.

Method for making a flower pot:
Take a plastic bottle and cut it in half. It is best to draw on the bottle first so that the edges are smooth and beautiful. The bottle can be cut straight, or you can make the edge wavy, then it will look more interesting. You can cut the bottle using a soldering iron, then the edges will be smoother. If the edges turn out uneven, they need to be trimmed and made even.

Now we will make flower pots from the two halves. One pot will be made only from a bottle, and the second from a bottle and a CD.

We drip silicone onto the bottle cap and glue it to the disk in the middle.


All pots are ready. You can make small holes along the edge of the pot for beauty. All that remains is to paint our pots; there are many different spray paints that can imitate stone, marble, etc. Check your local stores and you're sure to find something for yourself. There are interesting paints with special... effects, but can also be painted with ordinary acrylic or aerosol.

We plant what we need in ready-made pots; they can also be used for seedlings.


Another pot made from a plastic bottle
I want to show you another simple and affordable option making a flower pot from a bottle of shampoo, conditioner, etc.
To work you will need:
* Marker.
* Plastic bottle.
* Stationery knife.
* Earth.
* Flower.

Method for making a pot from a bottle:
First we draw on the bottle what we want to cut out. Then we carefully cut it out and color it at our discretion. We put some soil and plant a flower.

That's it, another bottle flower pot is ready.

Copyright © Attention!. Copying text and photographs can only be used with the permission of the site administration and indicating an active link to the site. 2019 All rights reserved.


