Even a small amount of Untidy shoes in the hallway creates a feeling of untidiness and disorder. But what if the family is large and there are a lot of shoes? What if the corridor is narrow? In such a situation, spacious and non-bulky shoe shelves will save you. With their help, you can compactly place all your sandals, shoes, boots and boots, saving space in the lobby. We offer to organize free place in the hallway and make a roomy shoe rack. Moreover, a DIY shoe rack is a great opportunity to show off your carpentry knowledge and skills, because its design is extremely simple.
Another positive point in favor of making a shoe stand with your own hands is the availability of materials from which you can make it. In addition, if you use available means and materials to make it, you will be able to significantly save your family’s budget.
Wooden shoe rack in the hallway - no one has canceled traditions
Wood is the most common and affordable material for creating any homemade furniture, this also applies to shoe racks. Options for making shelves from chipboard or MDF, from boards or furniture panels are possible. You can make a budget shelf if you make it from plywood with your own hands. Stop your choice on quality plywood from birch.
Except suitable material you will need a standard set of carpentry tools:
- hacksaw or jigsaw;
- sandpaper or sander;
- drill;
- screws and metal corners for fastening the structure or furniture ties;
- special protective equipment for processing wooden products.
The first thing you need to think about is the drawings and diagrams of the shelf or rack you like. You can draw them yourself or find suitable ones on the Internet and adjust them to your size.

So, everything is prepared to create a shelf for shoes made of wood, you can get to work.
Shoes take important place in any person's wardrobe. Not only the service life, but also the appearance of your shoes and boots depends on how you store them correctly. Shoes carelessly scattered around the hallway spoil appearance premises and can create a negative impression among visitors about the owner of the house, but a beautiful and convenient shelf for shoes will make the hallway more comfortable.
Choice, types
When choosing shelves for shoes in the hallway, you should take into account a lot of nuances: the size and number of pairs that will be stored in it, the dimensions of the structure itself, as well as the area and design of the room into the interior of which the shelf will need to fit.

Choosing material
Depending on your preferences, you can choose a shelf not only of any shape and size, but also made from almost any material you can imagine.
A DIY shoe rack could look like this:
- wooden shelf for shoes;
- shoe rack made of glass and plastic or plastic;
- metal constructions;
- minimalist style solutions in the form of individual hooks or horns;
- other options.

How to make it yourself
To store shoes, you can use any of the following: large quantity solutions available on the market, or you can make such a design yourself.
Answering the question: how to make a shoe rack with your own hands is quite simple. When planning the manufacture of a shoe rack, you can give free rein to your imagination and make not only a practical and durable product, but also an exclusive piece of furniture that will organically fit into the design of your room.

To make a shoe rack in the hallway as in the photo, any materials that are on hand at the moment are suitable: wooden boards, remnants of plywood or chipboard, plastic panels, wooden or plastic skirting boards, remaining after repair. Plain or plexiglass can also be used in the manufacturing process.
An assembled shoe rack with your own hands can be decorated various materials, covered with wallpaper, leather substitute or other similar material, painted in various colors. Wooden elements, which make up the shoe stand in the hallway, can be varnished.

Required Tools
Depending on what material you choose to create your shelf, you may need different items. You should not think that a do-it-yourself shoe stand is made using any special tools or auxiliary devices. All required set probably exists in the house of every owner who has at least once done something around the house with his own hands:
- wood saw or metal hacksaw (which is suitable not only for cutting iron blanks, but also a variety of plastic materials);
- hammer;
- screwdriver;
- sharp knife;
- measuring instruments(tape measure or long ruler, level, etc.);
- drill or hammer drill, if you need to attach the shelf to the wall;
- coarse and fine sandpaper;
- universal adhesive or intended for specific materials;
- nails, screws and other fastening products;

Making from wood
One of the most common materials not only for making shoe racks, but also for other pieces of furniture is wood. There are many options for making wooden shelves.
A DIY shoe stand made of wood is a common option. From the narrow ones wooden slats glue a rectangle of the required size, cut out the bottom from a piece of plywood. For decoration, you can fill the resulting box with pebbles or other filler. In the end it turns out simple shelf for shoes is open and uncomplicated.

For those who don’t want to fuss around for a long time, you can choose a minimalist solution: a do-it-yourself wooden shoe rack in the form of two wooden planks mounted on the hallway wall, one above the other at a short distance.
The bottom bar is made wider and serves as the actual shelf on which shoes and boots will stand. Moreover, there is no need to make a board for the entire length of the sole; the size at which half or a third of the shoe will stand on the shelf will be sufficient. The second board, narrower, plays the role of a stop that will not allow the shoes to fall and will hold them securely on the shelf.
More difficult option– a DIY shoe rack with several shelves will allow you to store large quantity couples, though it will take up more space in the hallway. The shelf can be equipped with sliding doors that will hide shoes from prying eyes. Top shelf can serve as a convenient bench or stand for various things. Such a shelf for shoes in the hallway as in the photo below will fit into any interior.

Made of wood and metal
Using metal fastening and movable fittings such as angles, hinges, slides or others sliding mechanisms if desired, you can make complex design, which will not be inferior to industrial analogues.
From improvised metal structures you can assemble the base for a shoe rack in the form of a rack. Metal shoe stand for the hallway, supplemented wooden shelves will be more durable than completely wooden product and will allow on for a long time forget about the chaos among shoes.

Made from PVC pipes
To make a shoe rack, you can use not only conventional materials such as wood or metal. One of original solutions is a shoe rack made from scraps plastic pipes, intended for installation of heating or water supply systems for premises. Naturally, it will be easier and more pleasant to work with new pipes. There is nothing complicated in making such an interior item.
First you need to decide on the dimensions of the future product; as a rule, it is taken as a basis maximum size, i.e. the size of the largest pair. Using a hacksaw, we cut pipes of suitable diameter into separate pieces. We process the edges of the resulting blanks with a file or sandpaper and fasten them together in the form of a pyramid. You can use anything for fastening: decorative cord, rubber rings, glue, etc. Also suitable stationery clips for papers.

For decoration, you can pre-paste each section of pipe with wallpaper, oilcloth, fabric, or paint it. If the shoe shelf is planned for storing children's shoes, then using pipes different diameters it is possible to give the design even more original look.

A shoe rack in the hallway can be made from identical plastic boxes that can be folded into various configurations. The use of boxes will also allow you to expand the design, purchasing additional boxes as new pairs become available.
A do-it-yourself shoe rack made in the form of a hedge will look organically on summer cottage.

Shoe shelf into the hallway with electric dryer will allow you to dry shoes that are wet from the weather.
For shoes with long heels, you can arrange storage by stretching a strong cord or rubber band in a secluded place. Shoes hung by the heels will not take up much space.
Photo gallery
More more ideas To create a shoe rack with your own hands, you will find in our photo gallery.
Very often, the layout of the apartment does not allow installing a full-fledged shoe closet in the hallway. As a rule, the corridors are very narrow and it is not possible to install wide chests of drawers.
The furniture market offers a huge selection of various ready-made shoe racks and chests of drawers, but they are not always suitable in size, color and design.
A good storage alternative in this case is a shoe rack with built-in shoe racks.
There are one-, two- and three-section systems. Depending on the number of sections, the number of shoes that will fit in the ready product. The depth of the shoe rack may also change.
Today we invite you to consider the process of manufacturing and assembling a two-section shoe rack, the dimensions of which are: 1100*700*250 (W*H*D). And using this material, you can easily make such a shoe rack with your own hands at home.
The materials for making shoe racks can be:
- MDF board,
- Chipboard board,
- Plywood,
- Tree.
As for plywood, this is certainly one of the most durable materials for making furniture. However, it requires additional processing and painting.
MDF is also highly durable. Its dense structure facilitates the process of drilling and assembling the product. But, often, if you make a shoe rack entirely from MDF, the product turns out to be quite heavy and expensive. Therefore, only facades are usually made from MDF, and the entire body is assembled from chipboard.
When ordering cutting and lamination of MDF, you can additionally choose milling on the plate, that is, using special milling equipment, a relief pattern will be applied to the parts. He will add special style your shoe rack.

IN this material we will consider making shoe boots from chipboards 16 mm thick for the frame, and 10 mm for the internal partitions of the overshoes. This material is one of the most budget-friendly on the market.
Due to the fact that chipboards have a wide range of colors, you can choose the color you like most or choose a decor that best matches the rest of the furniture in your home.
Our design involves the use of two colors: dark wenge (for the roof, sides, internal pillar and bottom) and wenge light color(for facades).
Of course, it is much easier to order detailing from a specialized store or workshop, since chipping cannot be avoided when cutting parts yourself. You just need to go to a furniture shop with detailing, and they will also trim them for you.
Edging parts
At home, veneering is only possible, because for plastic one you need special machine and glue, which, heating up to high temperatures, provides good adhesion of the edge to the part.
- Roof,
- facades,
- Sidewalls.
All internal parts, partitions in overshoes can be pasted over in the same way PVC edging, but 0.5 mm thick. You will need to hand over the detailing to the furniture shop craftsmen, which will also indicate how to veneer the parts.
Detailing

Shoe cabinet details
Details chipboard 16 mm, color: dark wenge:
- 1100*250 – roof/bottom, 2 pcs.
- 668*250 – sidewalls and internal stand, 3 pcs.
- 526*250 – internal horizontal shelves, 2 pcs.
Details chipboard 16 mm, color: light wenge:
- 311*518 – facades, 4 pcs.
Details chipboard 10 mm, color: light wenge:
- 510*140 – internal partitions for overshoes – 4 pcs.
- 510*135 - internal partitions for shoe boots - 4 pcs.
- 510*85 - internal partitions for shoe boots - 4 pcs.
Fibreboard part 3 mm, color: white:
- 696*1096 – back wall – 1 pc.
Accessories for shoe racks
- Shoes - 4 sets. These are plastic sandwiches for the sidewalls, each set contains two pieces, size: 192*287*85*16;
- Handles – 4 pcs;
- Thrust bearings – 6 pcs.;
- Self-tapping screws;
- Confirmations
- Double-sided tape (for mounting facades).
Necessary tool
- Screwdriver;
- Screwdriver, tape measure, square;
- Confirmation bat;
- Screw bit;
- Drill for confirmations;
- Awl.
Assembling a shoe rack
First of all, we assemble the frame of the shoe rack, four main parts - two sidewalls, a roof and a bottom. The box itself can be assembled at:
- Confirmats - here you will see the stubs from them,
- Minifixes - the process of installing an eccentric coupler is described in more detail in the article.
- Furniture metal corners.
It's up to you to decide what will be easiest for you. I would still recommend minifixes.
After we assemble the box, we can install the internal parts.
The easiest way to screw them to the sidewalls and bottom is with confirmations, and to the roof and between each other in the center - with metal corners.
The final work on the frame will be the installation of the fiberboard back wall. In principle, nothing complicated should arise here.
It should be remembered that when installing the back wall of fiberboard, you should always have a perfect square/rectangle with even diagonals
Installation of galoshes
Now we will need to install the mechanisms for the shoe rack. They are attached to the sides. Below are the installation dimensions and mounting drawings of these mechanisms:


To make it easier to understand the installation dimensions and easier to install the opening mechanism for our shoe rack, you can use the drawings below.
On the sidewalls you need to mark the attachment points for the rotation axis and the stop pin, and you can immediately screw the panels to the sidewalls.

At our shoe shoe standard size: 192*287*85*16 . First, make markings for future fastening of the plastic part according to the above drawing and installation diagram (for each shoe shoe, the kit always includes a drawing and wiring diagram its installation, according to which, in fact, installation should be carried out).
First of all, the shoe shoe needs to be screwed to the sidewalls of the chipboard using self-tapping screws. In this case, pay attention to the fact that the shoe shoe should tilt freely and return to its original position.
Now you need to connect the parts made of chipboard (the shoe shoe itself), the thickness of which is 10 mm, and the plastic parts of the shoe shoe.
Do this in stages. That is, first you insert the parts into special grooves and screw them with self-tapping screws to the left side panel, then to the internal vertical partition. Then repeat these steps with reverse side partition and right side panel.

At the next stage, all we have to do is install the facades, handles and thrust bearings.
We glue double-sided tape onto the shoe shoe, try on the facade, press it and screw it.
Please note: in our detailing, the dimensions of the facades for cutting and edging are already indicated with the necessary indents and gaps of 2 mm on each side. Also, based on the installation drawing of the shoe shoe, the gap of the facade from below should be at least 7 mm!!!
That is, step by step, we have:
- The height of the opening for the facade is 326 mm.,
- height of the facade in detail 311 mm.,
- when we glue the edge to the facade, we will add 2 mm on each side - it will already be 315 mm,
- you will also need 2 mm for the gap,
- As a result, in an opening with a height of 326 mm there will be a facade with a height of 315 mm (2 mm each for the gap at the top and bottom, plus an additional gap of 7 mm at the bottom).
At the very end, all we have to do is screw on the thrust bearings and at this point the assembly can be considered complete.
Shoe rack drawing
Now all the shoes in your hallway will be in their places, while the folding mechanism will not interfere with free movement in the hallway.
If the dimensions of this shoe rack do not suit you, you can proportionally reduce or increase all the dimensions of the parts, having previously calculated how much space is needed to fit all the shoes.
Good luck to all home crafters!
For residents small apartments The issue of shoe placement in the hallway is very acute. Families with children know what it means to have shoes scattered throughout the apartment. The problem is no less pressing for those who like to select a variety of accessories to complement their look. To maintain order in your home and conveniently arrange each pair, it is not at all necessary to buy expensive shelves from the assortment furniture stores. Make convenient devices for storing shoes you can use available materials, if you show your imagination. Here are some examples for inspiration.
Simple wooden nightstand
Making such an interior item is quite simple. The four boards are connected to each other using furniture screws. Thin ones are attached to the cabinet facades wooden planks. The best paint for painting is water based. Optional top part can be made contrasting and adapted for sitting.
You can simply hang your shoes on the shelf!
The idea is brilliant in its simplicity. To avoid dirtying the floor with dirty soles of boots and sneakers, you just need to keep them suspended. 
Wooden pallet shelf
They make a lot of things out of such an affordable and practical thing as pallets. They are also suitable for making shoe racks. Building such a piece of furniture is quite simple, since parts of the pallets for the hallway can be left untreated.

Ladder instead of a shoe cabinet
For this idea it will work as a ready-made wooden staircase, and made independently from planed boards. The main thing is that the steps are located at an angle so that shoes do not stain the wall.

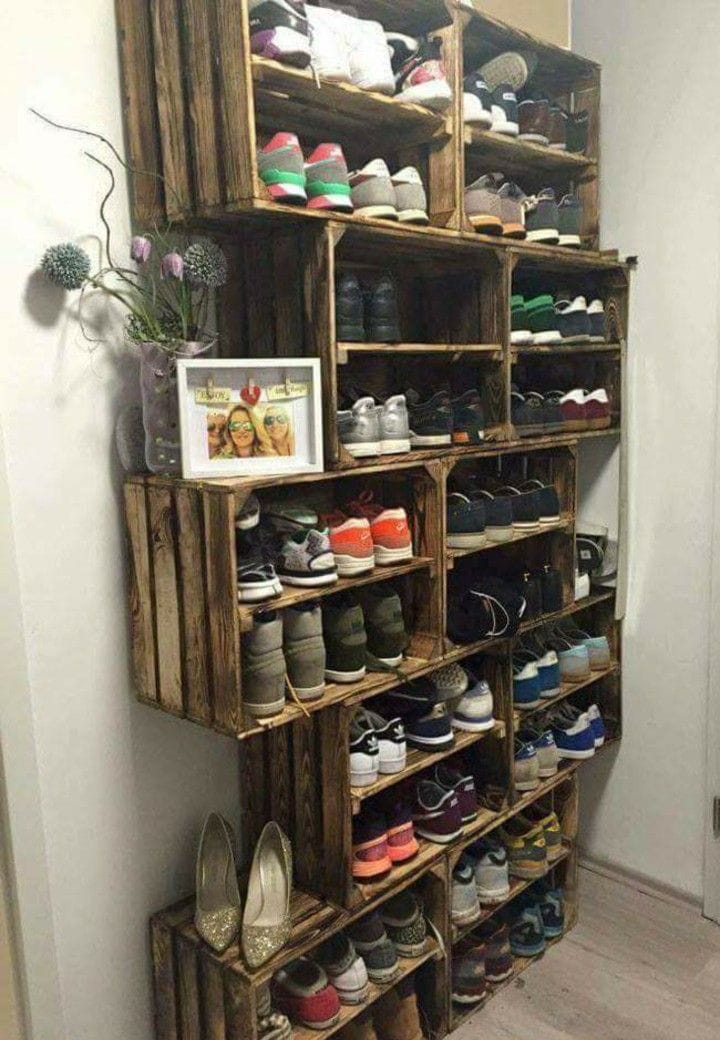
Rack of boxes
Wooden boxes are another universal remedy for lovers original furniture. If you place the drawers vertically, they are suitable for storing tall autumn and winter shoes. Lateral surface can be adapted to store keys, accessories for hoopoe behind shoes and other useful little things.

Rack for shoes of different heights
In spring and autumn, the weather is very changeable, and shoes of almost all seasons can be relevant. Such simple design with shelves of different heights allows you to store autumn boots next to sandals and sneakers.

Bee hive
Very original design can be created by combining several wooden hexagons, each of which is suitable for storing one or even several pairs of shoes, depending on their size.

Shelf with French chic
An ordinary piece of furniture can become a real hallway decoration if you glue a special film or paper with text printed on the back of the shelf. With this design, it is better to choose a neutral color for the shelf itself.

Skateboard shelves
True skateboarding fans always have a few old boards that have fallen into disrepair. As a last resort, you can turn to fellow hobbyists for help. Multi-colored shelves are great for storing sports shoes.

Shoe organizer
The design of shelves of different heights allows you to store shoes for different weather conditions. Small mirror in the hallway will allow you to evaluate your image before leaving the apartment.

Farmhouse style bench
It is very convenient to store shoes in closed drawers located on the shelves of the bench in rustic style. This storage method gives the hallway a neater look, since shoes are hidden from view.

Full wall shoe cabinet
So that the design does not seem bulky, it is better to choose boxes made of thin plywood and arrange them in the form brickwork. The strength of such a locker ensures wide board, to which individual shelves are attached.
Diagonal shelves
By placing regular wide shelves diagonally, you can significantly save space in the hallway.

Copper pipes
An original piece of furniture can easily be made from pipes left over after a bathroom renovation. To attach the shelf parts together, special adapters from a plumbing store are suitable.

Dynamic design
Bars of the same size are attached to the wall using special movable corners. When folded, the structure is decorative panel, and if necessary turns into space for storing shoes and accessories.
You can buy various pieces of furniture in a store, but it will be much cheaper to make them yourself. Such a solution will not only be profitable, but will also allow you to realize your design ideas. home handyman. A shoe rack with your own hands can be made from scrap materials. It is not at all necessary to purchase a whole laminated chipboard sheet, furniture panels will be enough. Such blanks can be bought at any store. building materials. They are completely ready for assembly - they have edges and are cut into equal parts.
Preparation before starting work
If you are making a shoe rack with your own hands, then you can purchase metal mesh. Their standard width can be 46.4; 56.4; 76.4 and also 86.4 centimeters. If there is a need to make a design custom size, then the mesh can be ordered depending on your wishes, but this approach will cost a little more. If the shelves have the most impressive width, which was mentioned above, then external dimensions The shoe racks will be as follows: 120x90x34 cm. A depth of 34 cm will be enough to place medium-sized boots there.
If you make a shoe rack with your own hands, then important point is functionality and compactness. To do this, it is recommended to place the shelves at a slight angle, which will be facing inward. In this case, the cabinet will take up a minimum amount of space.
Preparing parts
When making a shoe rack with your own hands, several elements are prepared. Among them are the sidewalls, facades, top cover, back wall and drawers. The last three elements will be needed in a single copy, while the sidewalls and facades will be needed in the amount of 2 pieces. Sidewalls can be made from furniture board, and facades will look great from MDF or laminated chipboard. Back wall can be formed from hardboard.

If you are making a shoe rack with a seat for the hallway, you should not forget about the presence of fasteners.
Preparing accessories and fasteners
The master will have to purchase 8 confirmations, 4x16 self-tapping screws, facade handles and dowels, furniture steel corners, 4 hinges and a drill, as well as a hammer and screwdriver.
Carrying out the assembly
Using confirmations, you need to fix the drawers on the sidewall. To do this, you need to make through holes for the fasteners, the diameter of which will be 8 millimeters. The drawers in the end parts must have small holes, the depth of which will be 60 millimeters. All holes must match as accurately as possible. Half of the corners should be screwed to top cover, while the remaining 4 are used instead of wall fasteners. They need to be installed to the side parts.

If you are making a shoe rack with a seat for the hallway, then all the elements are tightened with self-tapping screws. Before attaching the hardboard, you need to check how even the box is; its diagonals should be equal to each other. On the vertical sides of the facades you need to measure 15 cm from below and from above. While the depth should be 2.2 cm. At the marked points you need to make holes with a diameter of 3.5 cm. At the next stage, the doors are installed and secured, and the handle is also fixed.

Such a shoe rack, the drawings of which you can draw up yourself, is installed on the floor or suspended at a certain height from the surface. This will allow you to carry out wet cleaning under the new piece of furniture. The distance between the second and bottom shelves should be 35 cm, which will allow boots to be placed there.
Making a compact shoe rack
If you don’t have too much space in your hallway, you can make a compact model of a shoe rack. Any master can handle these jobs. First of all, prepare long shoe brushes, special plywood, screws, tenons, wood glue, moisture-resistant varnish, acrylic paint and a brush.
Work technology
The shoe rack, the size of which you can select depending on the number of family members, must be made according to a certain method. It involves the use of brushes at the first stage. 6 holes should be drilled in the edge of the plywood into which tenons, pre-treated with glue, are installed. Identical holes are made in the plywood, which will subsequently allow the elements to be coated and connected to each other. For reliability, the workpieces are tightened with clamps.

This design will also have side elements that are installed in the same way. Use the tool to saw off the handles on the brushes, if any. Drill two holes in each of them and screw the blanks to the base with short self-tapping screws. Brushes will prevent damage to shoes while using yours. homemade design. It is recommended to place the shoe rack with a slight slope in relation to the vertical surface. This will allow the shoes to stay on the shelves and not fall out.
Conclusion
A metal shoe rack is considered not very practical, since, for example, patent leather shoes in it can be accidentally damaged. However, it is still possible to make it; to do this, you should use new ones that are installed in several rows using metal corners or wooden slats. It is recommended to paint the last elements to match the color of the dryer. A self-made shoe rack is not only useful item furniture. It can become an excellent interior decor for your hallway - it all depends on the imagination of the master and the desire to create.


