And you shouldn’t look down on this problem - the choice of where to stick the first roll of wallpaper. It is from him that the whole dance will begin: Captain Vrungel used to say - whatever you name the ship, that’s how it will sail. And we will say - how correctly the choice of place from where to start gluing wallpaper on a non-woven basis is carried out, this will be the result of all the work.
The price of this choice is very high, sometimes it is so high that it even forces you to redo the whole thing.
A problem that never escapes anyone
First, let's decide what needs to be taken into account when making this choice.
What we take into account
The first is the location of all the elements of the room:
- door position relative to neighboring ones internal corners and ceiling;
- the same three window points, and everything is much more complicated if there are two windows or there is access to the balcony;
- position of sockets and switches;
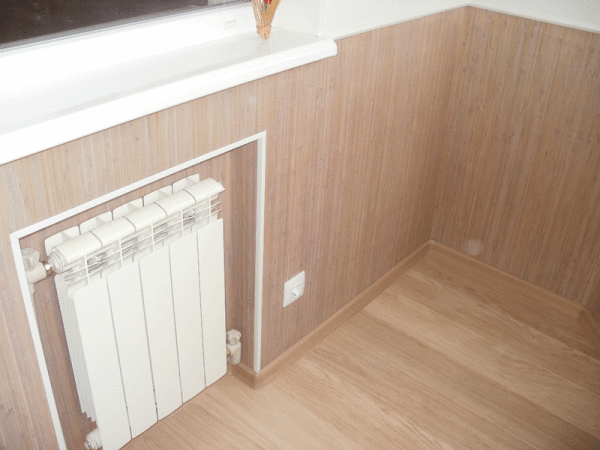
- position of the battery and heating system pipes.
The second is something that is often forgotten, perhaps because it requires a more subtle calculation:
- furniture arrangement and
- accommodation additional elements interior
Helpful advice!
Of course, everyone has their own ideas about saving, but we advise you to pay attention to this nuance.
You are going to put a wardrobe in the room, a wall, and make a partition for the wardrobe, which will cover the entire wall from floor to ceiling, from the left corner of the wall to the right.
So why bother gluing wallpaper here, and even racking your brains about how it’s more convenient to do it on the corners.
Wouldn't it be easier to give up wallpaper on this wall?
This wall is usually large, in any case not with front door and a window, so the total savings in wallpaper will be at least 40%, which is very decent.
Be sure to check out the bonus video in this article to help you delve even deeper into this killer wallpaper geometry. Mistakes and inconsistencies happen - of course, you need to be prepared for them, but always try to predict in advance.
New wallpaper was purchased, cut into panels, and glue was diluted in a bucket. It's time to get to work on the walls. But it was not there. Suddenly, as if lightning, a strange question flashes in your head: “Where, in fact, should I start gluing and in what way should I glue this super modern wallpaper?” Your bewilderment is quite understandable. Let's figure out together what's what and apply the acquired knowledge in practice while the glue has not yet dried.
What types of wallpapers are there?
Each type wall coverings sticks differently. To figure out where to start, you need to find out what kind of coatings are in front of you. Modern wallpaper are divided into paper (simplex and duplex), non-woven and non-woven based. We won’t talk about the other varieties, since it’s a stretch to call them wallpaper.
Paper ones are made, naturally, from paper. They can be single-layered or multilayered, but everyone can easily distinguish paper from other materials. Yes and low price will tell you the correct answer.
Non-woven ones are non-woven fabric, somewhat similar to gauze or rare burlap. They also come in single-layer and multi-layer. In any case, even if the non-woven fabric is already painted at the factory or a pattern is applied to it, then you can easily identify this material by the “gauze” outside and inside.
On a non-woven basis - this is, simply put, when some material is connected to non-woven material, and the latter is only a base that will stick to the wall. The “face” of such wallpaper can be paper or vinyl. Vinyl coverings are also different from each other, but for you at the moment this does not matter. In any case, you will be gluing non-woven material to the walls.
Different wallpapers adhere differently
So, if you find that you bought paper ones, then, despite their thickness, they will overlap.
If work is carried out in a room, then the window will always be the starting point. Stand with your back to the window: the wallpaper will be glued first on your right hand to the door to the room, and then on your left to the same door. The overlap must be done so that the joints are illuminated by the sun, that is, the subsequent panel must overlap the previous one. In this case, daylight from the window will fall on the joined surface and will not cast a shadow on the wallpaper.

If the renovation takes place in a hallway or some room where there are no windows, dark room, for example, the direction of gluing starts from the door, and then returns to it in a circle. If there are several doors in the room, then any door can be selected as the starting point.
If the wallpaper you purchased turns out to be non-woven or purely non-woven, then such coverings are glued end-to-end and where you start gluing them does not matter. According to old memory, gluing begins either from the window or from any corner, retreating from it by the width of the roll. You can start working from the center of one of the walls, from the beginning long wall, with a short one, from the door. In general, you can choose any place you like to start. No matter which side you fall from sunlight at the junction, no shadow will be cast.

If you wish, you can put it not vertically, as was customary a long time ago, but horizontally and get absolutely new interior. With a little imagination, you can come to the decision that if you paste wallpaper horizontally to the middle of the wall, and top part– vertically, you get an original fantasy border. This design will look beautiful if they are different colors or invoices.
By the way, in the hallway, where it is not always clean due to street dirt, the lower half of the wall coverings especially suffers. If, when gluing, you divide the walls in half and cover the lower half with dark, washable wallpaper, then putting things in order in such a room will become simple and easy. In the end, it is always easier to replace half of the wallpaper than the entire surface.
Now you can begin the renovation, or rather the part of it, which includes covering the walls with new modern wallpaper.
https://www.youtube.com/watch?v=PEjqYsLbx0Q Video can't be loaded: We glue wallpaper professionally pufas.ru (Movie 3 of 6) (https://www.youtube.com/watch?v=PEjqYsLbx0Q)
Usually, repair work and decoration of the corridor is carried out after all the rooms in the apartment have been renovated.
The corridor is a connecting room that has its own specific functions. That's why finishing of this premises should be taken as seriously as the decoration of other rooms.
Which wallpaper should you choose?
When choosing wallpaper, you must take into account the size of the corridor and its illumination. For finishing well-lit and spacious corridors You can use wallpaper with floral prints. They will also look good in such corridors classic wallpaper with vertical stripes. In addition, there are restrictions on color scheme wallpaper. For example, designers do not recommend using wallpaper in corridors dark tones and shades.
Minus the majority Russian apartments the fact that they are small in size. That is why owners often face the question: What wallpaper should I put in the hallway? Many corridors are very dark and narrow, they need an influx of light. Most apartment owners with such corridors try to solve the problem with bright wallpaper, not knowing that they are capable of darkening dark rooms.
Bright wallpaper absorbs light even if you hang it up a large number of lamps, the corridor will not become brighter. It is best to choose peach, soft pink, blue, golden-yellow wallpaper for the corridor. It is the wallpaper of these colors that will visually enlarge the corridor and make it bright.
Rules for wallpapering in the hallway
Rule one: wallpaper for the corridor should not be too light.
Rule two: it is best to use washable wallpaper in the hallway. Today, specialized stores offer a huge range of such wallpapers, so choosing the right ones will not be difficult.
Rule three: when choosing wallpaper for the corridor, you need to take into account the color scheme of the furniture. Also, the wallpaper should go well with floor covering and the ceiling of the corridor. Also great importance The wallpaper pattern also plays. For small corridors, you should not choose wallpaper with a large floral pattern, as it will visually reduce it.
How to properly hang wallpaper in the hallway?
In order to properly hang wallpaper in the hallway, the entire work process must be divided into two stages.
Stage one
Before you start hanging wallpaper in the hallway, you need to prepare the walls, that is, peel off the old wallpaper from them. There are two ways to get rid of old wallpaper: the first method is quite labor-intensive and requires time and effort. Using any sharp tool, such as a spatula, the wallpaper must be gradually peeled off. The second method is much easier. Before peeling wallpaper off the walls, you need to moisten it generously with water. This method will help quickly and without special effort free the walls from old wallpaper.
Stage two
Let's move on to wallpapering, but we shouldn't rush, because first we need to measure and calculate everything so that there is enough wallpaper. Also, to hang wallpaper in the hallway, you need glue. Today on store shelves there is a huge assortment of glues for various types wallpaper Therefore, you should only choose the glue that is intended for the type of wallpaper you have chosen.
When gluing wallpaper, glue must be applied from the center to the edge. Special attention should be given to the edges of the wallpaper. They should be coated with glue more thoroughly. After the glue is applied, you need to wait for the glue to be absorbed. If you purchased heavy wallpaper, then before gluing it you should coat the wall with glue.
- Back
- Forward
News
Grilled chicken fillet
 Ever since I was a child, I can’t stand dry chicken fillet, so now I’m always looking for any recipes that make chicken fillet tender and juicy. This is exactly what the recipe is chicken fillet Grilled.
Recipe for canning cucumbers in liter jars
 And I continue the topic of conservation, this time it’s the turn canned cucumbers for the winter, just as delicious as
. My godmother, an expert on the most popular food, shared the recipe with me. delicious dishes in cooking. The secret is in the spices. So, let's begin…
And I continue the topic of conservation, this time it’s the turn canned cucumbers for the winter, just as delicious as
. My godmother, an expert on the most popular food, shared the recipe with me. delicious dishes in cooking. The secret is in the spices. So, let's begin…
Preserving tomatoes for the winter
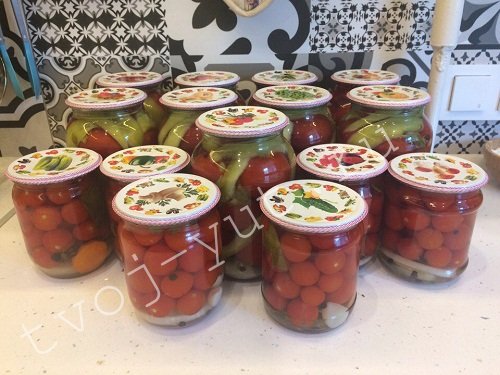 I don’t know about you, but I just love eating in winter. canned tomatoes
, especially with fresh mashed potatoes. This simple dish makes me very nostalgic for my childhood.
I don’t know about you, but I just love eating in winter. canned tomatoes
, especially with fresh mashed potatoes. This simple dish makes me very nostalgic for my childhood.
Chicken roll with cheese and zucchini
 The other day I came across an amazing chicken, cheese and zucchini roll recipe, which interested me very much. I just happened to have 2 zucchini lying around at home, which I left just in case for sautéing, but I wasn’t in the mood for sautéing at all, and here is this recipe. In general, I share this miracle with you! You will not regret! Very tasty and juicy!
Venigret ingredients, recipe
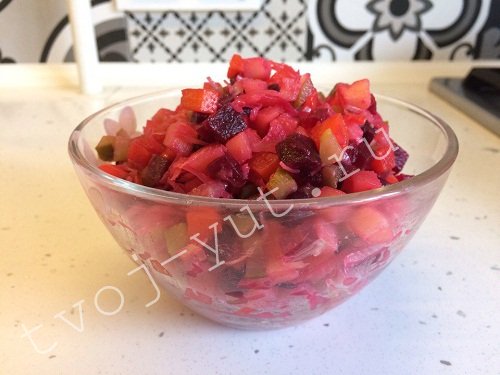 Venigret- beautiful hearty salad, very bright, and also budget-friendly. I'm sure absolutely everyone likes him. Let's remember how it is prepared...


