Plastic products replaced the old ones wooden windows, which may be useful in the country.
For example, if there is no finance to purchase a new greenhouse from modern materials, you can use old frames.
Greenhouses are small structures no more than 1.5 meters high, while the height of a greenhouse can reach 3 m. Compared to greenhouses, artificial heating is almost never used in such structures.
They are heated solar energy and natural biological heating (heat released during the decomposition of humus and manure). There are no doors in the greenhouses, so to gain normal access to the crops being grown, you need to remove or open the side or top part designs.
Greenhouses can be portable or stationary, but they are rarely used when growing adult crops (mainly seedlings).
Another difference between a greenhouse and a greenhouse is the ease of production.
Self-construction of a greenhouse requires financial costs and certain experience. The greenhouse covering can be polyethylene film or non-woven material.
Sometimes cellular polycarbonate is used. In greenhouse structures made of window frames do it yourself, mostly installing glass.
The frame may have different shapes(“house”, triangular, arched, etc.).
The material can be used:
- fiberglass and metal reinforcement;
- window frames;
- wooden blocks;
- polypropylene pipes.
Choosing a location for a greenhouse
The greenhouse assembly procedure takes little time.
First, you need to thoroughly select and prepare the site for its construction and select the necessary building materials.
The land plot on which the construction of the protective structure will be carried out must meet the following requirements:
- The area should be flat and dry. Stagnation of moisture is not allowed; the greenhouse cannot be placed in swampy areas, on slopes and in lowlands. If a greenhouse is built in a place where water stagnates, then drainage is required.
- Plants in a greenhouse require good lighting . Therefore, you should not place the structure near tall bushes, trees or objects. The optimal direction for placing the structure is west-east, but one of the sides should be facing south.
- The place should be protected from winds.
- It also provides availability of a water source. The frame should be protected from rotting by laying roofing material under the bottom. The boards can be tarred.
If you are thinking about it, you should know about choosing a place for construction and study our instructions.
A barbecue made from a gas cylinder - how beautiful and functional design B-B-Q? The material contains photos and video instructions.
Form factor
The greenhouse can have any shape. It is easy to build such a structure in the form of a pyramid, a stationary type with a foundation, or in the form of a mobile structure that can be moved to another location.
After the material for the greenhouse has been prepared, it is necessary to determine its dimensions. There is no optimal length for such an object, so it will depend on the number and size of frames. But a very long greenhouse will not be convenient to use.
Also, the height and width of the greenhouse will depend on the size of the frames used.
The essence of the design of window frames
In essence, when constructing a greenhouse from window frames, products are used that are suitable for use, but must be disposed of from residential premises.
It will be easier to build such a greenhouse from old proportionate and identical frames, which can be found for free.
The video shows the construction of a greenhouse made from window frames and other arrangement options.
Construction works
To ensure the necessary durability and strength of the greenhouse, a foundation is built, which can be columnar, strip, ready-made (metal frame or timber).
When building a foundation, you should follow general rules, if necessary, waterproof or insulate necessary materials. The main difference is the width of the foundation, which for strip base should exceed 10-15 cm.

To carry out further work, you will need long boards and bars, self-tapping screws for fastening frames, and bricks for building a foundation.
After building the foundation, the following steps are performed:
- . For a tight fit, it is advisable to remove the paint from the frames and cover them with drying oil; it is better to first remove the glass and remove the metal fittings.
- Frame assembly. The standard frame consists of a post, bottom and top harness. The frame is assembled, and the window frames are fastened with nails, self-tapping screws, and screws. For better reliability, it is better to secure the frames on the outside and inside.
- Floor arrangement. The floor serves as protection against heat loss and dampness. It can be made by pouring concrete onto gravel using bricks. For dense and smooth surfaces, roll waterproofing material is suitable.
- Roof installation and shape. The best option is gable roof, but you can also make a single-slope structure.


Assembling the greenhouse frame

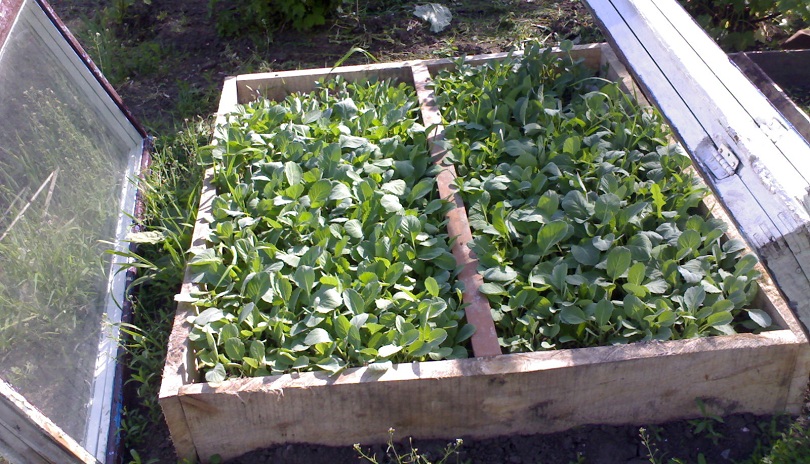
In the photo, a mini greenhouse made from window frames, made by yourself
Temperature in the building
It is advisable to maintain a constant temperature inside the greenhouse.
The following methods are used for this:
- Solar heating. This is the cheapest and most popular method, so for good heating of the structure, the film or glass should be kept clean.
- Biofuels. This biological method heating the greenhouse becomes the most effective, it is economical and affordable, since heat is released during the decomposition of manure.
Application of biofuel
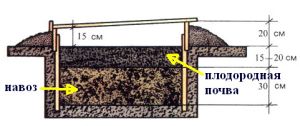
The earthen side walls of the structure should be finished with insulating material (foam plastic), the bottom should be laid with a layer of leaves, straw or peat chips.
The stuffing is done with layer-by-layer alternation of layers of foliage and manure. The larger the volume of the leaves, the lower the temperature will be inside the greenhouse. Such simple methods will help on long time retain the heat that is released during fermentation.
Gradually the substrate will settle, so you should make a high layer. Then soil is poured onto the organic matter.
When using biofuels, it should be taken into account that manure can be different types and the ways to bookmark it are different:
This should be remembered
When constructing a greenhouse, you should be guided not only by the availability of free space on the site, but also by the parameters of the frames. You can order a frame made of plastic, but its installation will require special fasteners.
If the frame is long, it can be used as a single upper sash. Short frames can be placed across the frame to create several opening lids.
If the greenhouse will be used for a long time, then it is better to make it permanent. To do this, its body is laid out of brick.
The top cover of the frames can be removable so that it can be removed for the winter. If it is difficult to make a stone body, then you can use boards.
Particular attention is paid to the tightness of the structure, for which all parts are firmly attached, cracks and grooves are sealed for complete insulation internal space from natural environment. Care should be taken to support the upper doors, which should fix the frames in the open position.
What material is best for a greenhouse? Each owner will answer this question differently. First of all, the choice depends on financial capabilities.
Greenhouse made from old window frames – a budget option, not requiring serious investments capital. This design is easy to make with your own hands. The construction process does not take much time.
How to choose the right material for a homemade greenhouse
How to build:
- dig posts treated with fungicidal preparations into the ground;
- attach flexible branches to them;
- the distance between the posts is no more than 1.4 m;
- connect the ends of the opposite branches;
- the frame is ready;
- cover .
Option No. 2. Greenhouse made of metal mesh
To make this fairly durable structure, take welded mesh or chain link:
- secure the posts in the ground at a sufficient depth;
- make the strapping from timber or boards, attach the mesh to it;
- Stretch a transparent film over the frame.
Greenhouses from old window frames
Many owners make shelters for plants from unnecessary frames, which, after repair, some people simply throw in a landfill. Of all types of structures made from scrap materials, this is the most durable and strong. The cost of work is minimal.

Second life of old windows
The design deserves closer attention. Learn all the nuances of building an inexpensive and reliable greenhouse.
Design Features
- This design allows enough light to pass through and protects plants well from the effects of precipitation. Prevent high humidity Regular ventilation will help.
- The structure will last for more than one year. In such a building you can install a system
- An ordinary one can build an inexpensive greenhouse House master. Patience and accuracy are required. An assistant wouldn't hurt.
The more accurately the frames are selected and adjusted, the better the design looks.
Where to install the greenhouse?
There are several requirements for the place: 

- flat, well-lit area protected from the wind;
- absence nearby tall trees or high-rise buildings creating shade;
- The longer side of the greenhouse should be positioned from north to south.
Nuances you need to know:
- choose window frames of the same size;
- make sure that the glass is intact and the wood is not rotten;
- calculate required amount ram, take a couple in reserve;
- Before installation, remove all fittings, remove old paint, treat the wood with an anti-fungal compound;
- After the fungicide has dried, paint the frames.
Pros and cons of a greenhouse made from old windows
There are more advantages than disadvantages. Judge for yourself.
Positive sides:
- glass transmits ultraviolet light well. The plants grow quickly and bear fruit well;
- a properly assembled greenhouse retains a sufficient amount of heat;
- glass is easier to clean than film;
- Broken glass is easy to replace.
Disadvantages of the structure:
- heavy glass requires a foundation;
- large hail can damage the coating;
- without ventilation in sunny days It may be too hot inside.
These shortcomings are not so serious as to spoil the overall impression of a window frame greenhouse. Many of them are easy to fix.
How to build a greenhouse from old windows

Before you start building, prepare a sufficient amount of material
Pay attention to the nuances:
- First, find a sufficient number of old windows. You may need more than one day.
- Secondly, study the material on the topic and watch the video. You must have a clear idea of how to act.
- And finally, deal with time. from unnecessary frames it takes about three weeks to harden. In this period of time you will probably have time to find suitable frames.
Contact the installation company plastic windows. Perhaps the staff will tell you the address where free material for your greenhouse will appear in the near future. Try it, most likely they will help you.
If you are building a greenhouse with your own hands
The owner will be helped by diagrams with printed dimensions that can be used as a basis. If you plan to build a structure of a different size, be sure to make a drawing of the future structure.

Don't build by eye. Measure each frame. You will understand what size it will be.
Select old windows of the same size. This will make it easier to attach them.
Pay special attention to the location of the frames. Install them strictly level. A skewed frame will lead to various problems.
On the drawing, indicate the location of the beds and passages. The width of the beds is about a meter. It is advisable to leave free space for walking.
If the building is large, make a passage the width of a small cart. Carrying fertilizer in buckets is a bad idea.
Greenhouse frame made from window frames

For the strength and reliability of a homemade shelter for plants, make wooden frame. You will need a timber measuring 50 x 50 cm or a high-quality dry board suitable in size to the width of the window frames (4 cm).
Attach the long elements of the window frame to the racks. This will reliably isolate the gap between adjacent frames.
Frame details:
- rack;
- bottom trim;
- top harness.
For fastening use:
- nails;
- screws.
What's better? Of course, screws. They are more expensive, but the connection is stronger. Secure frames not only with outside. Inside, attach the fastening to a support board of medium thickness.
After connecting the frames, fill all the cracks with foam. Don’t skimp, a high-quality design will keep you warm even in cold weather.
Do you need a foundation?

Most owners who have set up a homemade greenhouse from window frames do not regret that they made the basis for their greenhouse. The foundation will not only be a good support for the frame. Pouring the base helps maintain desired temperature in the greenhouse and reduces heat loss.
Types of foundation:
- tape;
- point;
- metal.
The most durable and reliable is tape. The filling depth depends on the region. Check the depth of soil freezing in your area.
The foundation is poured around the perimeter. The width of the base is at least 100 m. For winter greenhouse Insulate the foundation from the outside. Slabs made of lightweight, highly water-repellent polystyrene foam are suitable.
A common version of a strip foundation is concrete or masonry. Check the quality of the base filling by level. Distortions are unacceptable.
Making a greenhouse from window frames
Detailed video instructions will be a good help. After viewing this material, any owner will easily understand all the intricacies of making and installing a homemade shelter for plants.
Useful tips
There are little things that can affect the operation of a homemade greenhouse. Pay attention to them:
- Frames should not be rotten. Without regret, throw away frames even with small rotten areas.
- Check if the windows open.
- Do not forget to treat the wood with fungicidal compounds, otherwise the frames will begin to rot;
- Do not make paths less than 50 cm wide - it will be inconvenient to walk between grown plants;
- Don't forget to ventilate the greenhouse. Excessive humidity And heat impair plant development.
- The best material for the roof is polycarbonate or, in extreme cases, film. The window frames are too heavy and there is too much going through them. sunlight, and the plants overheat.
Greenhouse made from window frames photo
There are plenty of options for homemade greenhouses.

Are you thinking about making an inexpensive and durable greenhouse? Pay attention to the old window frames. They will make an excellent building that will last for many years. 
Such a shelter can be heated and harvested early vegetables or grow. 
Build a homemade greenhouse following the recommendations and enjoy the fruits of your labor.
Fresh and organic vegetables are always welcome “guests” on our table. Owners summer cottages They make a lot of effort to grow “their” cucumbers, tomatoes and peppers. However, hard work alone is not enough. After all, to receive high yields it is necessary to create seedlings suitable conditions for growth and development. Therefore, a greenhouse is an excellent solution - you can build a structure with your own hands from inexpensive and accessible materials.
Today, many people in their homes are removing old window frames, replacing them with convenient and practical double-glazed windows. But such frames can be given a “second life” by using them to build a greenhouse or greenhouse. So, today we will look in detail at how to build a “house for vegetables” without significant costs.
Greenhouse from old frames: pros and cons
Before starting construction of a greenhouse, you should consider both the advantages and disadvantages of such a project. First, about the advantages:
- Affordable project cost. Enough to collect required quantity unnecessary window frames left over after renovation, and you are provided with the basic material. This is much cheaper than using new blocks to build a greenhouse.
- Quick installation. After the foundation has been poured and dried, all that remains is to assemble the frames into one whole - and the greenhouse, built with your own hands, is ready. This stage will only take a few days, but you should carefully prepare for it.
- Set of available tools. A hammer and nails are all you need.
Helpful advice: if possible, it is better to use a power tool - a jigsaw and a screwdriver. If your household does not have these useful things, you can easily rent them.

“Disadvantages” of a greenhouse made from old window frames:
- Constant maintenance of the structure. Old wood dries out, and cracks form through which moisture and other unfavorable factors from the environment can penetrate.
- Limited service life. If old window units, then their service life is quite short. True, such a “house” for vegetables and seedlings will definitely serve for 5 - 7 years.
Note! Old window frames - suitable material for the construction of a greenhouse for “home” personal plot. However, for growing, for example, cucumbers, on an “industrial” scale, it is better to choose a metal profile or steel pipes. Of course, this will cost much more, but the design will also be more reliable.
Greenhouse made from window frames for dummies
Before you begin construction, you should consider important details. For example, is it necessary to make a wooden frame or can you skip this stage? This will depend on the thickness and configuration of the assembled window units. With a significant thickness of the frames, it will be possible to do without a frame completely.
We stock up on materials:
- Rubble and sand- for the foundation of a future building. Of course, you can build a greenhouse from window frames without a foundation, but the reliability will be questionable.
- Boards and beams of different sections- for wall studs 50 x 100 mm, for corner studs - 100 x 100 mm.
- Fittings- nails, door and window hinges, locks and handles on the door, steel cornice, antiseptic wooden surfaces. When constructing a roof from steel sheets, you will have to purchase this material as well.
- Old frames.


Required tools:
- hammer
- screwdriver - possibly electric
- a circular saw
- chisel
- wood drills
- level
- square
- roulette
- piece of cord
- polyurethane foam
- screws

DIY greenhouse - drawings
Any construction begins with the design of the future structure. However, in our case, you just need to assemble a structure from ready-made modules. We carry out the following preparatory work:
- We lay out the window frames on a flat piece of ground, choosing parts for the sides and ends. We achieve the most perfect compatibility"puzzles".
- We measure and record the results of the layout.
- Let's do detailed drawing on paper indicating all the parameters and dimensions of the parts.
- We are preparing three more drawings - the foundation, frame and roofing part of the future greenhouse made from window frames.


How to build a greenhouse from window frames with your own hands - step-by-step guide (with photos and videos)
So, after acquiring and preparing all necessary tools you can start working.
Step #1. Choosing a place for a greenhouse
The site for the building should be chosen taking into account the fact that the plants will require maximum access to sunlight. Therefore, there should be no permanent buildings or tall trees nearby that block sunlight.
If you plan to build a greenhouse from film frames, then you should choose a site that is not blown strong winds. Otherwise, the microclimate of the structure may be disrupted, which will adversely affect the plants inside. However, even a glazed greenhouse is not recommended to be placed in a windy area to avoid stress.
The soil must be dry and dense, since in a wet and swampy environment subsidence and subsequent deformation of the wooden structure are possible.


Step #2. Foundation for a greenhouse
The selected area needs to be cleared - remove debris, uproot roots, weeds and stumps.

We transfer the dimensions of the future greenhouse to the site and drive small stakes around the perimeter, between which we stretch a cord or rope. Now in each corner and near the sides you need to dig small holes up to 0.5 meters deep - at the level of soil freezing. Pour crushed stone into the holes (about 10 cm) and compact it.
Now the formwork is next - we insert it into each hole asbestos cement pipe(diameter 10 - 15 cm), level it, insert the reinforcement. The structure should be strengthened in position with bricks and then filled with concrete. We assemble on the foundation lower crown made of timber and fastened with iron plates.

If you plan to build a greenhouse from window frames without a foundation, then you can simply make a frame from timber and lay it on the ground. For waterproofing purposes, you can use roofing material in which the beams are wrapped (pictured).

As a rule, concrete dries completely after a couple of weeks. After this, the plane under the greenhouse along the entire perimeter of the foundation can be laid out with bricks. This creates a flat surface, which greatly facilitates subsequent assembly.

Step #3. Assembling a greenhouse frame from window frames
The assembly of the structure is carried out in the following sequence: installation of pillars and a frame made of timber, to which we attach the window frames.
Important! If you plan to use timber rather than boards for the frame, be sure to take into account their thickness. After all, a beam that is too thin simply will not support the weight of the entire structure and can fall apart at any moment like a house of cards.
First, measure the width of the window frames. Along the perimeter of the foundation, we measure segments whose length exceeds the width of the frames by 5 - 7 cm and mark these places. At these points we fix the posts made of timber of the same height. Then we pull the thread over the pillars according to the level in order to correct the tops. If there are protruding parts, you need to cut them down.
We take the timber and lay it horizontally on the “tops”. Thus, “cells” for window frames are obtained. Now you need to install the frames, not forgetting the door and window, and securely strengthen all the parts.

By using polyurethane foam We seal the gaps between the modules and the pillars. Professionals recommend puttingtying or painting dry foam, which will avoid drying out.

Step #4. Making a roof
The roof can be single-pitch or gable - let's focus on the first option. First, we lay the boards on the wall frame under the support of the rafters. At the same time, it is important not to forget to mark the slots for installing the inclined beams of the greenhouse roof from the frames.
We place racks in each corner of the side wall - this creates a slope. Between the posts we place a block onto which we fix the front roof board. Place the side boards into the roof and attach them to the front board with screws. We make grooves under the rafter boards in the outer board, for which we use a template (the letter “P”, cut taking into account the width and height of the nest).

Now we pull the cord and check that all the rafter beams are in the same plane. Place on top roofing- it is advisable to make it from cellular polycarbonate, glass or film.

Each of these materials has its own advantages and disadvantages. If you build a greenhouse from frames under film, then such a structure will not place excessive load on the foundation. True, polyethylene needs to be periodically watered with water to knock down dust and dirt. Many people prefer polycarbonate as a coating. All that remains is to attach the door and ventilation window and the design is ready.
Greenhouses made from window frames: photo
There are many different greenhouses - small, large, lean-to, gable, arched. The photo shows different variants designs.


As you can see, a do-it-yourself greenhouse made from window frames is not such a difficult construction (even for “dummies”). Here it is important to carefully study all the details and carefully take measurements. And, of course, stock up on patience and tools - and things will definitely work out! After all, such a greenhouse can be equipped with a heating system, water supply, light and other amenities. Good luck with your work!
Are you replacing windows? Does your neighbor change his windows? Do you see how they replace windows “wholesale” in kindergarten opposite or another institution? Here is the answer to the question of where to get window frames for. Otherwise, you can always negotiate with your neighbors or even post an advertisement about buying window frames inexpensively, with take-out or self-pickup (many people throw them away for free, but they also offer money). That is, it is not difficult to find material for production, if you have the desire.
But, in addition to the materials, you also need to know the correct algorithm for creating a greenhouse from window frames.
Foundation or foundation
The base of the greenhouse is necessary here, since wooden frames have some weight, and if you also add a greenhouse cover, Consumables and so on, then its mass will increase even more. This means that in order to prevent and completely prevent subsidence of the greenhouse and its destruction, as well as to ensure the greenhouse’s reliability and stability, it must be installed on a foundation.

Foundation for such a greenhouse you can choose at your own discretion:
- Brick. A reliable, but expensive foundation; if installed correctly, it will last a long time, but can be damaged by waterlogging and temperature changes. Stable and strong, will easily withstand a wooden structure;
- Stone. Expensive, but extremely strong and reliable foundation, on which you can even install a polycarbonate greenhouse on a metal body. Easy to carry external influences and serves as a durable base. The price of this foundation can be significantly reduced if you use untreated stone;
- Tree. A wooden foundation is strong and stable, but short-lived. After 5-8 years it will require replacement, but it is perfect for a greenhouse made of frames, since they themselves are unlikely to last more than 8 years;
- Concrete. Strip foundation from cement mortar will serve as a reliable and durable foundation on which a greenhouse made of window frames can stand for decades.
These foundation options, in principle, can be afforded by everyone, but if suddenly the emphasis is on a budget greenhouse, then it is better to choose a wooden beam, it will be quite sufficient.

Greenhouse frame
A greenhouse made from old frames is already a self-sufficient frame that only requires correct installation, fastenings and light lathing for covering.
In order for the frame to be reliable, first of all, it needs to be stable. To do this, the window frames are fixed to the foundation or base, and also fastened together (more on the installation process itself a little below). You can fasten the frames together using a corner and self-tapping screws, wooden beams and nails, wire and clamps. Depending on the desired durability and reliability, you can determine the fastening methods yourself.

Let's talk a little more about them:
- Fastening frames with metal corners and screws. A fairly simple process that anyone can do. During the installation of the greenhouse, you will only need to maintain the level and dimensional placement of the window frames on the base, as well as connect them to each other. By external or inner corner you lay adjacent frames metal corner with holes, and secure it to the frames themselves with self-tapping screws. This method very reliable and will provide stability;
- Fastening with beams and nails. Everything is much simpler here than in previous version. From the inside, knock down the frames using medium-sized bars, for example, 30x30 mm. Just apply one block to two frames, and hammer several nails into each frame, through the block;
- Fastening with clamps or wire. Honestly, this is the most economical way, which will not take much time from the master. At the site of the intended fastenings, you simply make a few turns steel wire, around adjacent frames, and tighten it with pliers. This action can also be accomplished using steel or plastic clamps that are clamped when tensioned.

We build a greenhouse from window frames - video
Greenhouse installation
Building a greenhouse from window frames is quite simple if you follow the basic rules of any, even the most minimal, construction. Try to initially think through the entire scope of work. Do it step by step, making sure to complete each separate element construction sites, follow the rules for working with materials and take preliminary measurements and calculations seriously. In this case, you will receive a reliable building that is ready to serve you for a very long time.

One of the mandatory moments in the construction of a greenhouse is its installation on the base. To do this, it is not enough to fasten the components together; it is also necessary to secure them firmly with the help of special elements on the foundation. Most often, a metal corner is used for this - inexpensive and practical option fastenings
The corner is fixed to the base of the greenhouse using welding, bolts, and anchors. Next, window frames are attached to it. This must be done sequentially, slowly, each time securing the frame not only to the foundation, but also connecting it to the next frame (the methods are described just above). Thus, with a little effort, you can install a greenhouse from window frames on the base, ensuring its stability and preventing it from sinking into the ground.

Covering a greenhouse using window frames
The structure of a greenhouse made from old window frames is quite heavy, so we do not recommend adding glass to its weight. Although, many summer residents do just that, but the calculation is in this case goes to a small greenhouse. It is best to cover the greenhouse with plastic film. To do this, you will need light sheathing along the top of the perimeter of the greenhouse. It can be made of steel wire, mounting profile or slats, that is, there is a great choice here too.
After installing the sheathing under the so-called “ceiling” of the greenhouse, you can safely stretch the film. It should be secured using special clamps and clamps, or traditional methods, creating eyelets (holes for fastenings) yourself.
Upon completion of the work on laying the foundation, creating the frame, installing and securing the greenhouse, as well as stretching the film cover onto the frame, you must check the correctness of the construction. Of course, a greenhouse made from frames with your own hands could turn out to be very elegant and quite durable, but it must meet certain standards - stability, light transmission, tightness, ventilation, and so on.
Having learned how to build a greenhouse from frames and having completed the job, you can safely begin planting crops in the greenhouse from which you want to get a rich harvest. By the way, about the methods of growing many of them, proper care, fertilizing, pruning and harvesting, you can read in the materials on our website, a site that constantly provides its visitors with useful tips.
We are building a greenhouse with our own hands from old window frames: which frames to choose - wooden or plastic?
Window frames have undoubted advantages compared to other materials. First of all, this strength of window frames.
A wooden frame will have to be built in any case, but the frames fastened together will take part of the mechanical load on themselves, and the resulting structure will be stronger than wire arches or pine poles, from which greenhouse frames are most often made ( but no stronger than factory galvanized steel frames).
Additional advantage appears at such a greenhouse, if the windows can open. In this way it is very easy to regulate the temperature inside in late spring and summer, when on a sunny day in a closed greenhouse the temperature can reach a disastrous 60 degrees.
Opening and closing required windows,you can adjust the temperature even in separate parts greenhouse, if it is large enough.
Double glass provides good thermal insulation in conditions where there are no cracks through which heat could escape and cold wind could blow.
Another plus - durability. Glass does not decompose in the sun like plastic film, and if for some reason it breaks, it is easy to replace, especially for wooden frames.
Finally, price. If you change the windows yourself, then you get the material for the greenhouse for free, if your friend changes them, he can sell the material he doesn’t need for next to nothing.
Disadvantage is less strength compared to metal frames, vulnerability to the effects of putrefactive fungi that decompose wood and various insect pests. This makes a greenhouse out of wooden frames short-lived.
A greenhouse made from window frames has its advantages and disadvantages, but if building a greenhouse is necessary, try it, do it yourself.
Plastic windows for greenhouses
 As a rule, plastic windows have double-glazed windows, which allows them to provide more reliable thermal insulation than wooden frames with single panes.
Positive aspects double glazing is strength(and structural rigidity), as well as resistance to negative environmental factors. They do not swell or dry out due to changes in humidity, like wood, and do not rot. Therefore, they do not need to be treated with antiseptics or painted.
Disadvantages of plastic windows are their heavy weight, inaccessibility and difficulty in repair(glass in wooden frame you can replace or simply fill the frame with film if the glass breaks and the double-glazed window has to be completely replaced).
Preparatory work
How to build a greenhouse from old window frames with your own hands, how to choose a location, what kind of foundation to make? Let's try to answer these questions.
Selecting a location
When choosing a location for a greenhouse, a summer resident usually has little choice. The main thing that the place was not shaded from the south, southeast and southwest. Particularly harmful for greenhouse plants proximity to walnut, because this tree not only casts a shadow, but also releases phytoncides that inhibit the growth of all other plants.
Trees can be dangerous also because during a storm heavy dry branches break off from them, which can damage or destroy the greenhouse.
It is also desirable that the building was protected from the wind, which can destroy it.
The soil under the structure must be level, motionless and dry.. It is desirable that this be sandy soil. If the soil is clayey, you should fill it with gravel, pour sand on top and apply a fertile layer.
Preparation of the project and drawing
 When designing a greenhouse, it is important to consider the following points:
- ratio of window frame sizes to the height you need(it is advisable that the height of the walls be at least 180 cm), if it is not possible to stack the frames one on top of the other, you will have to build up the walls from below using other materials;
- roof: most likely, you will have to use timber or metal carcass for the roof, because winter time may accumulate on the roof up to several tons of snow;
- the roof ridge needs to be oriented along the north-south axis, to provide correct lighting greenhouses.
If according to calculations it turns out that there are not enough window frames, You can use polycarbonate sheets instead appropriate size.
If the greenhouse will be heated by a stove, immediately think about where the smoke will come out. Chimney can come out both through the wall and through the roof, but if it is made of metal, it will become very hot, and therefore should not come into contact with either polyethylene or polycarbonate.
It is advisable to provide a special window for it (you can also use an existing window), and the space between round pipe and cover the square window frame, for example, with tin or plywood.
Foundation
Unlike conventional greenhouses made of wood or steel frame and polyethylene film, greenhouses from window frames foundation is needed. This is due to the fact that the frames are too heavy, and the soil under them will sag unevenly if you build a greenhouse without a foundation.
What materials can be used to create such a frame? It turns out there are quite a lot of options:
In areas where there are severe frosts, the foundation should reach maximum depth ground freezing. Also use thermal insulation, for example, foam.
Step by step: building a greenhouse
How to prepare frames?
Before you start building walls, frames should be prepared. First of all, you should remove everything metal parts such as hinges, awnings, latches and protruding nails. The frames are then cleaned of old paint using metal brushes.
After this the tree is necessary etch with an antiseptic so that bacteria and fungi do not destroy it too quickly. Fortunately, the choice of antiseptics today is quite wide. After this you can additionally paint the frames, but the antiseptic itself provides sufficient protection against fungi, insects, rodents and moisture.
If you decide to nail the frames, glass must be removed during installation, if with screws, then you don’t have to do this.
Frame
How to build a greenhouse from old window frames with your own hands: photos and drawings will help us see this more clearly and build our own version of a greenhouse from wooden or plastic windows. To build the frame use timber 50X50 mm or a board 40 mm thick. The frame consists of racks, top and lower harness. The latter should be made of identical boards and increase the height of the walls of the greenhouse. The racks should be spaced at such a distance from each other that the window frame fits strictly between them, and they, in turn, cover the gaps between two adjacent frames.
For real The roof frame must be strong. It is best for the roof to be gable, with additional supports under the ridge, otherwise it may collapse under the weight of the snow. Therefore, complete the roof frame best made from timber.

Rice. 4. Diagram of the structure of the frame and the placement of window frames on it.
Assembly
Installation can be done with both nails and screws. Screws hold more firmly, but are more expensive. Each frame is secured both outside and inside, on each of its four sides. Then the gaps between the frames are sealed with polyurethane foam.
Installation of a greenhouse from plastic windows will have to be done using bolts and nuts, drilling holes for them.
Roof
It is not advisable to use windows for the roof. Instead, you can stretch plastic film or use polycarbonate. Fully transparent roof means it will be too hot inside in warm months, therefore it must be sprinkled with a chalk suspension (as for whitewash) to create a slight shadow. The light that penetrates through the walls is enough for photosynthesis. The film is attached using slats.
Doors
It is advisable to do them two at the ends of the greenhouse so that if ventilation is necessary, a draft can be created. The easiest way is to put together their frames from boards and tighten them plastic film, nailing it to the tree using thin slats.

Rice. 5. The role of the door is played by the opening window.
Conclusion
Thus, window frames are cheap and comfortable material For self-construction greenhouses. The advantages of such a greenhouse are the availability of materials, ease of installation and operation, and the disadvantages are the need for a foundation and lower strength compared to a steel frame.
Useful video
Some more information about homemade greenhouses from the window frames, can be seen in the video.


