So, in previous articles we looked at creating a local network both directly () and using .
Networks of this type are classified as cable networks - the connection of functional units here is carried out using a twisted pair cable, crimped on both sides with connectors. This is a simple, reliable and functional method of creating local networks, but the design is static and rather cumbersome. And in some cases, when the user requires “freedom of movement” or the network is designed in a relatively small room, this is a very significant drawback. After all, you must admit, it is illogical to purchase a lightweight portable PC in order to (like a goat at a peg) walk around the same switch with it.
And in this article we will tell you how to create a home network via a wifi router, and also step by step we will look at checking the functionality of the network we have created.
How to make a local network via a wifi router
In general, organizing a home wifi network is similar to creating a simple local network through a switch, with the only difference being that a managed router (unlike a switch) often requires manual configuration of the parameters of this network. And to connect functional units (PCs, office equipment, etc.) instead of a cable, you can use a wireless wifi connection.
Creating a home network through a router: basic methods
1. Setting up a local network with a dynamic IP address of functional nodes.
In this case, connecting computers can be done either using a wireless Wi-Fi connection or the “classic” method - using a crimped network cable.
So, if there is no Wi-Fi module on a desktop PC, you should connect the computer to the router via a cable crimped on both sides with RJ-45 connectors.
On computers equipped with a wifi adapter, as well as laptops, netbooks, tablets, etc. to connect to the network you need to run "Wireless connection" further "Search for available wireless connections" find the name of your Wi-Fi router (which is usually indicated on the label on the back of the router) and press the button “Connect.”
In most cases, you will also need to enter a password (security key), which can be found on the label of your router.
This completes the creation of a local network via a wifi router.
However, to connect to any computer on this local network, you must log in each time. "Network Neighborhood" and select the desired user there by the known name of his computer. This inconvenience is due to the fact that the IP address of the computer will change each time the device is turned on/off (only the network name of the PC will remain constant), and the user will only be able to connect to the computer using the above method.
2. How to set up a home network via a wifi router while maintaining the IP?
To ensure that every time you turn on any network computer (connected either via cable or via a wireless wi-fi connection) it is not assigned a new IP address (which in some cases is simply unacceptable), it is necessary to create a home network via a wifi router On each of the connected devices, enter the settings manually.
To do this you should:
Open folder "Network Connections",
Select the type of connection to use "Wireless Connection"(or " Local network connection"),
Right-click and select from the list that opens "Properties",
- choose "The marked components are used by this connection", further "Internet Protocol Version 4(TCP/ IPv4)",
Choose "Use nextip-address" and in the field " ip-address» enter the address of your local network,
Here, unlike the first option for organizing a wireless network between computers, all connected devices will have a permanent IP address, which can be used for:
Connecting to computers of other network users;
Using some additional network functions;
Designing a wifi network where there are quite a lot of users, and the wifi router is one of many network devices (for example, a large local network with a dozen unmanaged switches, one of the nodes of which is a router or a large LAN, where routers are used instead of unconfigurable switches).
3. Setting up a local network via a wifi router?
The methods proposed above for creating a home Wi-Fi network are the simplest and most functional, however, in any system, as is known, failures periodically occur. And the most common problem that administrators face when creating computer networks through a router is periodically occurring IP address conflicts.
In this case, to organize the grid you should and remove the dynamic IP address there (that is, disable DHCP). Next, on all devices you need to register the network settings (similar to the method discussed above), and if necessary (if there is Internet on the network), in addition to the IP address and subnet mask, you should register the “main gateway” and “ ”.
(In the columns “main gateway” and “DNS server” the same value is indicated - the IP address of the router to which the Internet is connected).
To check the functionality of your home Wi-Fi network, you can:
Go to " Network environment"and find other computers connected to the network there;
Ping any computer with a previously known IP address. To do this, go to the “Start” menu → “Run”, then enter “cmd” in the command line, press the “Enter” button and in the command line type ping xxx.xxx.xxx.xxx, where xxx.xxx.xxx.xxx – IP address of the desired computer.
Using the router and operating system settings, you can create a separate system in which home devices will participate (access to unverified devices will be denied). Such a network can be created using the functionality of a router installed to distribute a Wi-Fi signal. Let's figure out how to create a home network via a Wi-Fi router, what tools are needed for this, and consider a step-by-step algorithm of actions.
What will a home network via Wi-Fi router do?
By creating such a connection, you get a number of advantages. Firstly, no wires are required to transfer data - all information will be transmitted via a Wi-Fi router. Secondly, the system can use personal computers, laptops, mobile phones and any devices that support wireless data transfer. Now you don't need flash drives or portable hard drives to exchange files between devices. Thirdly, you don’t have to register the settings on each device, since everything is , not the operating system.
What is required for a home Wi-Fi network?
Setting up a home network via a Wi-Fi router requires the following components:
- connected devices (computers, phones, etc.);
- and a configured router;
- Internet access.
Step-by-step instructions for creating a home network via Wi-Fi
First of all, you need to set the DHCP mode in the router settings. Access to the menu is obtained using any browser by entering the standard IP device in the address bar and password. If the router does not support this mode, then it will have to be replaced with another one.

Now let's create a homegroup:


- Disable password protection everywhere.
On the second device, connect the Wi-Fi network and go to the “Network Center” window. Select the created group and click on “Join”. Enter the password previously issued by the system. Carry out the same settings as on the first PC, then reboot the device.
How to make a homegroup accessible via Wi-Fi from a mobile device (Android)?
To create a connection to a PC from a tablet or smartphone, install the free ES Explorer program. Go to the LAN section and click on search. An Android tablet or smartphone will provide a list of groups. Choose yours from them and connect. Now you can connect to allowed folders from tablets/smartphones.
To configure other folders, do the following:

Now all connected devices will see the selected folder as shared. As you can see, creating such a connection is quite simple.
Wireless Internet networks are becoming increasingly popular. Having looked into any restaurant, park, airport, beauty salon, shopping center, store, many of you instinctively connect to free wi-fi via your phone or tablet.
Therefore, the question arises to be able to surf the Internet at home without connecting to annoying wires.

Why do you need to install wi-fi in an apartment?
Installationwi- fi at home will give you the opportunity to:
- connect to the Internet from different devices (laptops, mobile phones, tablets) simultaneously;
- have access to the World Wide Web from any corner of the apartment;
- do any business (wash the dishes, lie on the couch, cook dinner, do the cleaning) and at the same time enjoy online movies;
- read books or watch TV shows from any gadget while lying in bed;
- remove wires around the house that all family members get caught on and that pets like to chew on;
- be online around the clock on social networks and in work applications;
- take candy from neighbors who ask for access to connect to your Wi-Fi.

Wi-Fi is a modern technology that has ceased to be a rarity. It significantly expands the possibilities of using the Internet connection, makes you mobile, not tied to a wired access point. It's really convenient!

Which wireless technology to choose
To installing internet in the apartment really brought benefits, you need to decide which type of wireless network is suitable in your case.
There are three in total:
- Bluetooth technology. Allows one device to share traffic with another device if they are within a couple of meters. This is convenient if the transmitter is constantly located close to the receiver.
- Large-scale mobile networks (WiMAX or 3G). They operate on the basis of mobile communication towers and stations installed throughout the city. Can be used via modem, tablet or mobile phone. The speed of the Internet connection is not particularly good, and depends on the distance from the tower.
- Wi-fi access via local network. This is not an independent technology, but only a way to distribute input channels between various devices from an existing local network. That is, a building (apartment, house, office, store) is provided with local Internet and a wi-fi router is installed, allowing many devices to use one connection.

If you want to know how much does it cost to install Wi-Fi in an apartment?, you need to contact your local Internet provider.
Some companies provide their regular users with free routers for temporary or permanent use.

Speed and range of wi-fi coverage
At first, the speed of Wi-Fi connections left much to be desired. At the beginning of the last decade, with the development of mobile gadgets, communication standards that determine speed have significantly improved.
The first wi-fi routers of the 802.11 standard were not widely used, since the speed did not exceed 1 megabit per second. When connecting several devices, the Internet generally froze. Later, Intel included the 802.11b standard in its platform, which increased the speed to 11 megabits. Oddly enough, it will continue to be widely used in our time.

The next speed level was overcome by the 802.11a standard, which differs from the previous one only in the range of applicable frequencies. But the speed is already 54 megabits. And, of course, modern high-speed networks of the 802.11n standard provide users with speeds of 150-300 Mb/s, but not all communications companies can allow its use.
Router installation, price which varies depending on the transmitter power and antenna sensitivity can be produced both in office premises and in apartments.

To be more precise, the quality of the equipment directly affects the Wi-Fi operating range and connection speed. If you need to provide Internet access to a large house, you can use several access points. Such a network can be interconnected using a wired or wireless method. For a small apartment, medium-power equipment is suitable, the operating range of which will extend over a radius of several meters.

Reliability and security of wi-fi routers
To enter a Wi-Fi network, as a rule, you need a password. Naturally, unless the user himself wants to disable it to provide free use to everyone around him. There are two types of routers:
- closed, providing Internet access only to users who have specified the necessary settings on their device;
- open, to which anyone can connect.

On the Internet you can find many programs that promise to guess the password for your neighbors’ Wi-Fi. But modern technologies WPA and WPA2 provide security and block the activities of such spying services. Most routers support the combined WPA/WPA2 security type, which guarantees complete security from intruders.

At installing internet in the apartment, the user is generated an individual and complex password, which he can change independently if desired.
Technological progress is growing daily. To keep up with competitors, manufacturers of technical equipment regularly release new models of wi-fi routers. They often enter the market crude, unable to provide reliable operation. You have to wait months for updated firmware and endlessly call technicians to set up the system.

How to choose a router for installing Internet in an apartment
If you want to know how much does it cost to install Wi-Fi in an apartment? To ensure that it is of high quality and performs its functions flawlessly for a long time, follow some recommendations:


Cost of installing wi-fi in an apartment
When connecting this technology, many are interested in the question of how much it costs to connect Wi-Fi in an apartment. After all, some people want to get all the benefits of wireless Internet, but are not ready to shell out a large amount of money. In order to buy a high-quality router, you will have to fork out some money. If we talk about the price range, it fluctuates around $30-250.
According to user reviews, the ASUS RT-N16 is a pretty good device for home use, the price of which is approximately $80.
The choice depends on the manufacturer and service provider. Currently popular routers are Cisco, ZyXEL, ASUS, NETGEAR, TP-LINK, Linksys. It is also not recommended to overpay more than $100. After all, in an apartment the load is not the same as in a shopping center, restaurant or office. And the coverage area is not needed.
Wireless Internet is gaining more and more popularity and this process can no longer be stopped. To have wireless Internet or a Wi-Fi access point at home. I tried to describe in detail the process of connecting a Wi-Fi router with photographs and videos.
In fact, there is nothing complicated here, but you will need a little care and, perhaps, the phone number of your Internet provider. The whole process can be divided into three stages: physical connection, setting up a router and setting up a computer or laptop.
Connecting the router to the computer
After you have taken the router out of the box, you need to connect it to your computer. By default, I will mean that you have a regular wired Internet.


Enter the router settings
After turning on the router, it needs time to boot and get itself in order. At this time, the lights on the front panel may light up and go out, wait 1 minute. We need to go to the administrative interface of the router and configure it. This is done through any browser, such as Internet Explorer, Google Chrome or Opera. To log into the “admin panel” of the router you need to write in the address bar:
192.168.1.1
login: admin
password: admin

A small note: the address 192.168.1.1 is used in most routers. If you receive a “Page not found” or “Page cannot open” error, then try using a different address, for example: 192.168.0.1
If there is an ambush here, then you need to find out the correct address, for example from the sticker on the back of the device:

If it’s not there, then you need to look at the instructions, which may be on the included disk, or search the Internet from your phone. The same applies to the login (username) and password (password), i.e. not everyone has admin/admin. If the device is used, then maybe someone changed the default settings. In this case it is necessary. To do this, you need to find the “Reset” hole on the router and press the button inside with a match.
Network cable is not connected
Let’s say the login address and login/password are known, but you still can’t log into the admin area due to a network error. Then you need to check the network card settings in Windows 7/10. Let's go “Start -> Control Panel -> Network and Internet -> Network and Sharing Center”. There on the left we find “Change adapter settings”. The “Local Area Connection” connection should NOT be in the “Network cable not connected” status:

If this is so, then most likely this is the problem, i.e. The cable is not connected, is connected in the wrong place or is faulty.
Also, the status should not be “Disabled”. If this is the case, then right-click on the icon and select “Enable”.
Incorrect TCP/IP settings
If you still can’t log into the admin panel, then right-click on the connection icon and select “Properties”, and there we find “Internet Protocol version 4 (TCP / IPv4)” and double-click on it. In the protocol properties, you need to check that the “Obtain an IP address automatically” and “Obtain DNS server address automatically” checkboxes are checked. Click “OK” twice. Now wait 10 seconds and you can check.

I hope this was sorted out and I was able to log in to the admin panel of the router without any problems.
Quickly setting up a Wi-Fi connection on a router
It's more complicated here, because... All routers are different and the interface may vary greatly. Yes, and Internet settings among providers can also differ dramatically. If you have a TP-Link router or another with the ability to quickly set up, then you are in luck, everything can end very quickly. Find the “Quick Setup” item in the menu on the left or top and follow the instructions of the wizard:
On the first screen just click “Next”

I have a 3G router, so I'm prompted to select my preferred connection type: 3G or cable. I don't have a 3G modem so I select "WAN only"


If you don’t know what to choose, then try automatic mode. The router itself will try to determine the type of connection. If he succeeds, the wizard will move on to the next configuration step. But you may need to enter your login and password (in case of PPPoE connection)

or network settings (in case of “Static IP” connection type)

The provider should have given you all this information; look carefully in the contract. If the technician is unable to determine the connection automatically, then he will have to call the provider and ask, or try at random, there seem to be not many options
At the next step, the wizard prompts us to enable the Wi-Fi module:

- “Wireless Radio” - this is Wi-Fi, must be in the “Enabled” position
- In the “Wireless Network Name” field, enter any name of the point in English
- Parameters: “Channel”, “Mode”, “Channel Width”, “Max Tx Rate” set as in the screenshot or leave it as default.
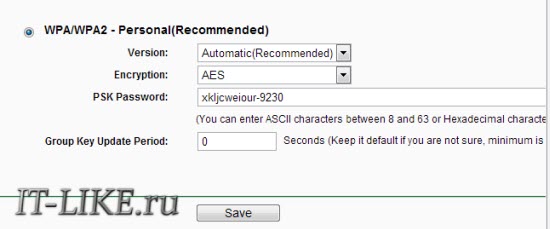
- , safety. Don't leave Wi-Fi without a password! Not only will everyone around you use your Internet and download the channel, it will be such a huge, huge hole in your security! Virtually anyone will be able to access all of your personal data. Set the switch to WPA/WPA2 and enter a complex password.
A small digression: when everything works, if it turns out that the Internet is too slow or if there are problems, then try selecting “Channel” not “Auto”, but some number from 1 to 13 and saving the settings. You can go through all the numbers to find the right one. The fact is that now there is a lot of wifi equipment around, and each device needs its own channel to work. As a result, devices operating on the same channel interfere with each other.
It’s good if you don’t have the cheapest router and it can operate at a frequency of 5 MHz. In this case, there will be a corresponding option to select a frequency of 2.4 or 5 MHz. There are much fewer devices operating at this frequency, and therefore the likelihood that someone will interfere is reduced significantly.
Manual setting
Well, if there was no automatic setup, then you will have to go through the items manually. We find a section something like “Network” and there is an item with the word “WAN”:

There should be similar settings items. Everything here is the same as for automatic setup, only we ourselves must select the type of Internet connection and enter the login/password.
- “Secondary Connection” leave “Disabled” or “Dynamic IP”, this is only needed to access the provider’s internal network.
- “Connection Mode” set to “Connect Automatically” so that the router connects to the Internet automatically after each reboot.
If the provider requires you to specify the IP address and DNS server, then this can be done in the Advanced settings, but usually this is not necessary:

But, for example, I have a provider with problematic DNS servers and I register the Google server: 8.8.4.4 , which always works! How does a problematic DNS server manifest itself? This is when not a single site or website, but Skype or torrents work without problems! However, if you install the server on Google, then the internal sites of some providers may not open, for example, such as account replenishment and statistics.
It is here, in the manual settings, that you can specify the connection type - VPN, if you have one. To do this, select “L2TP”, enter the name/password and VPN server address (provided by the provider). If an IP address, mask, gateway and DNS are provided, then select “Static IP” and enter all the data. Don't forget to check the automatic connection box at the bottom.

That’s it, save the settings and look for the “Wireless Settings” menu section:

All settings have been described above. For Wi-Fi to work, the checkbox must be checked. "Enable Wireless Router Radio".
Next point, here we enable encryption, that is, we set up security as already mentioned above:
The router setup is complete! I advise you to save all parameters from the menu "System Tools -> Backup & Restore". Button “Backup” - saves, “Restore” - restores from a saved file. This will be useful in case everything suddenly goes to hell and all settings are lost. You can easily restore them from a file
Oh yes, I almost forgot, change the default password for logging into the admin area. This is done in the section “System tools -> Password”.
How to connect a laptop to WiFi
In Windows 8/10, you need to click on the icon at the bottom of the screen:

A panel will appear on the right where you need to select the desired wireless network. Remember when we gave the name of the network in English? This is where you need to find it. If this is a public institution and you don’t know which network to connect to, then choose any one with a higher signal level. When you hover over a network, a hint appears whether a password is required or not. If, when you hover, you see something like WPA/WPA2, this means that you need a password to connect to the Wi-Fi network.

You can leave the “Connect automatically” checkbox. Next, the system will connect to the router and ask for the Wi-Fi password that we set earlier. If your device supports QSS technology, then you don’t have to enter a password, but simply press the button on the router labeled “QSS”. In this case, the password will be filled in without our participation!

When the system asks about file sharing, I advise you to select “No, do not enable sharing” if you do not know why it is needed:

I made a short video tutorial on how to do this:
In Windows 7, everything is the same, only the icon and the window with found networks look “Semerovsky”

Here you also find the desired connection, click on it and voila.
No Wi-Fi icon or not connecting
First, check whether the wireless module is turned on using the switch on the laptop body. Many Asus, Toshiba, Sony and Acer models have this switch. On some laptops, wifi can be activated using hot buttons, for example “Fn+F2” (look for the antenna icon on the F1-F12 buttons). In any case, the method works through the “Network Control Center”, the same way when we “turned on” the network interface to connect to the router via wire.
In more severe cases, please study.
I hope everything worked out for you! Most likely, questions will arise regarding setting up the router, because... The interface and parameter names are different for everyone. To receive an answer in the comments, immediately send a link to a screenshot of the window.


