Well, dear friends Summer residents, is it time to start choosing gifts for the New Year? Today we have collected for you 20 wonderful things that can make life in the country much easier.
All these miracles of science and technology are not a brilliant invention that exists “somewhere out there” in a single copy or torn off from a foreign site of dubious appearance, we found all these things in real online stores (for the most part in two well-known ones: American and Chinese, for a long time working in our country).
- Scoops for picking flowers / berries.


An unusually handy thing for collecting flowers, legume pods, berries. The configurations and materials of these scoops are slightly different. We liked the option with steel teeth and a shallow slatted bottom through which unwanted leaves fall out that accidentally fall into the scoop.
- Washing machine with water tank.

Country version of an automatic washing machine. The water used for washing is pre-filled into a special removable tank and fed through the filter into the washing machine. The tank is enough for a full wash (volume from 65 to 100 liters, depending on the type of machine).
If there is still a central water supply, such a machine can be connected to it. And use the tank in case of possible interruptions in water supply (in summer cottages this happens even if there is a water supply).
- Chair on wheels.


Doing garden work while sitting on a “mobile chair” is just a dream! The seat height is adjustable, and the wheels are thoughtful enough to overcome any bumps in the road. There are options with additional shelves for baskets and country tools.
- Holder for sawing firewood of the desired size.

Men will appreciate this item. Firewood is firmly fixed in it. They do not need to be constantly moved and maintained, each time stopping the chainsaw and then starting it again. Sawing firewood to the desired length is also not a problem, there is a ruler here.
For easy storage, the design is easy to fold and does not take up much space.
- Devices for collecting fruits, cones, nuts from the ground.

We've never seen anything like it, honestly! It is enough to walk with this wheelchair, like with a vacuum cleaner, near fruit trees and the fallen fruits are inside the ball, at least according to the assurances of the anatomy brochure. Lots of apples this year. We really want to try.
- Overlays for hands for collecting grass and foliage.

When collecting grass or fallen leaves, you always want to grab as much as possible in order to get the job done faster. And now ... the hands turn .... in big hands!
- Bags for small things and tools on the belt.

It is most convenient to carry the necessary little things and tools around the garden in such a handbag. It is small, does not constrain movements, hands are always free.
And yes, it looks stylish!
- Folding car.

Another useful transformer for the garden. When folded, such a wheelbarrow-cane will easily take place on a rack with garden tools (rakes, shovels), and when unfolded, it will serve as an excellent tool for transporting foliage, grass, and even relatively heavy loads.
- Device for collecting fruit from trees.

Fruit pickers have been on the market for a long time. Yes, and many summer residents make such useful little things with their own hands, for example, from plastic bottles.
Nevertheless, we decided to place this device in our article for two reasons. Firstly, the thing is really ingeniously simple and at the same time greatly facilitates country life. And secondly, it is this design presented that seems to us one of the most convenient (from those available on the market today).
- Mini-mower for "hard-to-reach places".

Ah, those hard-to-reach places. You always beware of them: in some cases, you can damage the fences of flower beds or the fence, in some you are afraid for the mower itself. Such a device will save the situation.
- Folding dryer for herbs, berries, fruits.

A small flat circle when folded, if necessary, turns into a large convenient dryer that can be hung in any room directly from the ceiling. Each section of the dryer has a zippered window and is unloaded separately. It is very convenient for drying different types of herbs.
- Garden mini shower.

Very unusual shower. And not only because it is portable, powered by a small pump (which can be lowered into any barrel). But after all, the water here does not beat habitually from top to bottom, but vice versa - from bottom to top. Of course, you won’t be able to wash your hair, but you can quickly freshen up on a hot summer day completely.
- Flexible circle.

Another great garden helper.
- Automatic 6-row seeder.

How inconvenient it is to usually mess around with small seeds. Landing them smoothly and accurately is an almost impossible task. It is even more difficult for the elderly.
Such a seeder will help to sow everything quickly, evenly, economically and without bending over the beds. It greatly facilitates the work and minimizes the consumption of seeds.
The seeder has two rollers and the actual central planting part. The front roller levels the soil, the rear roller closes the furrows and sets the seed roller in motion.
The planter has 4 seed hole sizes and adjustable planting depth.
- Garden knee pad with adjustable lifting handles.

To perform many garden work, the summer resident has to kneel. If the work continues for a long time, the legs become numb and it becomes extremely difficult to get up from the knees. This tool will help a lot. The handles are height adjustable.
- Apron for easy berry picking.

Hands are free, you do not need to hold anything, while it is absolutely impossible to miss.
- Portable shower.

Such a shower is useful not only in the country, but also on a trip and on a hike. When assembled, it fits easily in the palm of your hand. Hangs on any large branch.
- Holder for garden tools on wheels.

How convenient it is to take all the necessary tools at once and simply transport them to the place of work. This will help such a rack on wheels.
- Miracle shovel / ripper.

All gardeners want their summer cottage not only to please with a harvest, but also to be attractive. It is not necessary to purchase expensive decorative items - good country homemade products can be made with your own hands from improvised materials, which for the most part we throw in the trash.
Useful crafts for the garden
As a rule, garden, suburban areas do not differ in large areas, and one can only dream of amenities in the form of a shower. Making a garden shower with your own hands is not difficult at all:
It is important to choose the right place to place the shower. It is better if it is an elevated place, then it is more convenient to equip the drain. Do not place the shower far from home so that you do not feel uncomfortable on a cool evening. Choose a site that is not covered by branches of shrubs and trees - the water will not heat up through them, and a lot of insects will fly in.

The simplest type of shower is in the form of a rack mounted on a wall or vertical panel. All you have to do is supply water and drain wastewater.
Among other useful homemade products for a summer cottage:
- A gazebo where you can have a good time on a summer evening.
- Recreation area with barbecue.
- Playground for kids: swing, horizontal bar, sandbox, small table with a bench.


Original flower beds
Flowers on the backyard are an indispensable element, with them the cottage looks attractive. An original flower garden can be made from various items - at least from an old wheelbarrow. Find a place for it in the landscape, fill it with soil and plant annuals. Lush multi-colored hats will attract attention with bright colors and fragrance.

You can turn an old bicycle into a flower stand. Place small planters with ornamental plants and flowers on it. It is better if they are different: low and medium in height, hanging down, of different colors and shapes.

On the fence or railings of an open terrace, verandas, you can place unusual flower pots, the role of which will perfectly play ... old teapots, bowls and pots. And the remaining single tea cups from the service can be hung obliquely against the wall: let the effect be created as if the flowers “poured out” of them.

In the garden, an old bathtub, a shabby wooden chair, a watering can can become the basis for a flower garden, even old shoes can become the basis for a planter. Such an unusual use of old things will delight the neighbors and your guests.

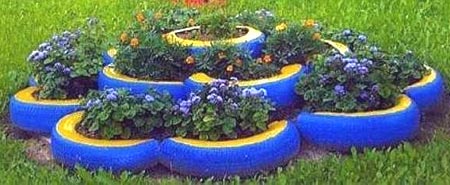
The original flower garden can be made from old car tires:
Paint the tire a bright color and hang it from a chain to a sturdy bough on a tree. Insert a planter with a flower inside the tire. Hanging flowering plants will look more effective.

Place the cover on the stand. Gently wrap it with thick jute twine so that each row fits snugly against the previous one. Fill the container with soil and plant flowers.
Original furniture for a summer residence can be made from wooden pallets. Sofas and benches, complemented by soft pillows, will make your stay comfortable.

On a Saturday evening, when you sit down to take a break from gardening, look around for material for original crafts for your site. Having shown imagination and making a little effort, you will turn your site into a cozy relaxation corner or a fairy-tale kingdom.

Photo of homemade products for summer cottages and gardens


7 country miracle helpers!
Unusual hand gardening tool (photo, video, drawings)
The flat cutter is a great achievement of the agricultural mind. This is the first truly versatile garden tool. Not just for tillage, but a tool for comprehensive cohabitation with the cultivated plant community and soil.
Fokine flat cutter "Swift"
2. Ripper Wonder-shovel "Plowman"
Ripper Wonder-shovel "Plowman" blueprints:
A shovel, which can be attributed to the category of cultivators-cultivators - "Plowman". The mechanism of the ripper Plowman is simple and quite effective. The raising of the earth is carried out by the work of a simple lever. The main load falls on the legs, with which the working forks are pressed into the ground. The lifting of the soil comes from the effort of the hands, which unloads the back and is therefore attractive to the elderly and gardeners suffering from back pain. Two opposite forks, passing one through the other, loosen the ground without wrapping it, providing a loosening depth of 15-20 cm.
Advantages of the design of a shovel or soil cultivator or potato digger
1. Deep tillage without seam turnover.
2.High productivity.
3. Significant physical effort is not required when processing the formation.
4.Available in production.
Mode of application:
A feature of tillage with a miracle shovel is that the garden is not dug across, but along. With both outstretched hands we take the miracle shovel by the edges of the upper bar, step on the platform (footboard) and it easily enters the ground. With a slight movement (can be combined with a slight shaking), stepping back two steps, we transfer the shovel from a vertical position to an almost horizontal one. After that, we take a step forward, pull the shovel back 30 cm, give the shovel a vertical position, drive it into the ground and repeat the cycles until the row ends. Then we proceed to the processing of the next row.
Materials: half an inch of labor, round timber (or hexagon) with a diameter of 15 mm.
For ease of transportation, you can make a collapsible design.
Miracle shovel Prokopenko blueprints:
Miracle pitchforks allow you to dig up the ground without loading your back at all due to the unique rotary way of working. Miracle pitchforks do not require you to bend down or squat. Efforts are applied only to the "steering wheel". At the same time, the productivity of digging increases by 3-4 times.
Miracle forks are adjustable in height over a wide range, which allows you to perfectly fit the tool to your height.
Miracle pitchfork swivel photo:
Miracle shovel of a monk - Father Gennady photos and drawings:
The Miracle Cleaver is a tool for easy and safe wood splitting. You can chop three times as much wood with the same amount of time and effort as with a regular cleaver. At the same time, even women and children will be able to chop wood, because the main work consists only in raising and lowering a kettlebell weighing 3.3 kg.
One Wonder Cleaver replaces four tools: Cleaver, Axe, Hammer and Chisel. If you follow the instructions for use, the tool is absolutely safe.
The Miracle Cleaver allows you to chop even very thick logs. However, it does not require any special skills and is very easy to operate.
Miracle Cleaver photo:
6. Miracle potato hiller
The miracle hiller is designed for loosening the soil on potato ridges and hilling up the sprouted potatoes.
Thanks to an optimally calculated design, the new invention contributes to high-quality soil cultivation (loosening and hilling) and the correct formation of a potato ridge.
Homemade products for summer cottages are a special pride for a zealous owner. To show ingenuity, practicality can not everyone. But take note, bring to life someone's useful experience, into a masterpiece, many can do it.
Original flower bed made from car tires
Used tires are a popular material for landscape transformation and practical structures.
Tire beds
Such homemade products for summer cottages and gardens have gained the greatest popularity. At the same time, the classic single flower beds receded into the background. Currently, you can see the following options:
Such homemade products for home and summer cottages with their own hands will take their rightful place in any landscape.
Playgrounds from tires
Grandchildren and children are frequent guests at the dacha. Therefore, they will appreciate the efforts of adults who decide where to place:
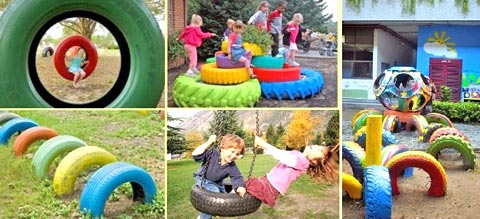 Options for playgrounds from tires
 - and cartoon characters from tires. Bright little animals made of tires will be a special source of pride in front of friends and neighbors.
- Swing. You can find from ordinary hanging models to rocking chairs made of a semicircle with a board installed instead of a seat.
- Cars, motorcycles. Wheels of different diameters allow you to assemble original racing cars and bikes. Any boy will feel like a real racer and will appreciate the efforts of adults.
- Furniture. Chairs and tables for playgrounds and impromptu banquets are every little lady's dream.
Read also
Heating greenhouses in winter
DIY crafts for the playground will provide an active, interesting summer for the child.
Useful tire crafts
Tires are often used for the following designs:

Rubber crafts, homemade products for summer cottages are popular due to the availability of improvised materials and a wide range of applications.
Useful crafts from plastic bottles
Another popular material for design and practical research. Useful homemade plastic bottles are widely used for country life:

Practical do-it-yourself crafts for giving with your own hands from plastic bottles are widely used due to the high availability of material and ease of processing.
A summer cottage is the territory where you can give yourself the freedom to conduct numerous experiments and dream up plenty. This is manifested not only in interior design, but mainly in the design of the garden or vegetable garden. Inquisitive and inventive owners have not been guided by expensive and standard methods for arranging their plots for a long time, since there are many alternative solutions for virtually all areas of activity.

There are several varieties of vertical beds that allow you to optimize the use of free space. Custom designs - a great opportunity to create an interesting design of the garden, vegetable garden, summer cottage.

This type of beds is in most cases used for growing ornamental plants or herbs.
Materials for manufacturing:

The length of the drainpipes is adjustable in accordance with the wishes of the owner of the site. However, bulky beds should not be made, as they can complicate movement around the territory.
Creating a bed

Stage 1. Create a container. To do this, we take a drainpipe, cut it in two lengthwise and put on special plugs on both sides.
Stage 2. We take the prepared metal holders, put them on the resulting frames for the beds.
Stage 3. We make holes in the pipe. They are made in those places where there will be metal fasteners.
Stage 4. We pass a cable or a strong rope through the holes made.
Stage 5. We fix the cable / rope with fasteners.
Stage 6. We fill the resulting beds with expanded clay and soil.
Stage 7. We plant plants in the beds.
Stage 8. We hang pipes to the chosen place. Sometimes a special wooden crossbar is placed for this, more precisely, a design in the shape of the letter “P”.
Step 9. Alternatively, you can make a special design for the pipes.

Important! A drainpipe bed is not resistant to strong gusty winds, so you should choose a place for it that is not blown from four sides by winds. Otherwise, the frame will quickly collapse, nullifying all your efforts.


A bed made from a plastic bag is another modification of vertical beds. It is extremely compact, functional and interesting in appearance. You can make such a bed in a couple of hours.

Materials for manufacturing:
- durable polyethylene film;
- sewing machine;
- priming;
- seedling.
In order for the bed to turn out to be strong, it is recommended to pay special attention to the thickness of the plastic film, which in this case will act as the "frame" of the structure. The minimum film thickness is 0.2 mm.
The process of creating a polyethylene bed

Step 1 . We cut out 2 rectangular pieces of film, the size of which corresponds to the size of the created beds. An allowance of one and a half to two centimeters should be left on each side. The recommended diameter of the beds is twenty centimeters.
Step 2. Sew the rectangles together, leaving only the top of the bag unconnected.
Step 3. We sew a handle to the future bed, the strength of which will withstand the weight of the bag filled with soil. It should also be noted that when watering, the weight will increase.
Step 4. Fill the bag with fertilized soil.
Step 5. We make horizontal cuts on the bag in increments of twenty centimeters. They are necessary in order to plant seedlings in the garden.
Step 6. We plant seedlings.
Step 7. Water the soil regularly and add the necessary fertilizers.
With these simple steps, you can get a cheap and useful garden bed.


An integral element of each suburban area is a compost heap. This is the place where all kinds of biochemical reactions take place that ensure the creation of fertilizers.
To create fertilizers that will satisfy all the requirements for them, several key steps should be carefully considered: creating a container and directly making the compost itself correctly. Let's talk about each of them in more detail.

Stage 1. We take eight supporting posts of the same length.
Stage 2. We process the lower part of the wooden posts with engine oil or tar.
Stage 3. We dig the posts into the ground so that they are reliable and stable. If the compost bin is located next to the fence, then 4 posts (that is, one side) can be attached to the fence. This will avoid having to dig 4 holes.

Stage 4. Between each two adjacent columns we nail the crossbars in such a way that in the end we get three independent sections. Be sure to leave gaps that will serve as ventilation holes.

Stage 5. In two sections, horizontally nail the boards to half the height of the pillars. In these places, it is planned to create two small doors.

Stage 6. There will be a large door in the remaining section, so only one board should be nailed. It should be located at the very bottom in a horizontal position, that is, like a regular crossbar.
Stage 7. Install the covers. To do this, you can use one large solid board.
Stage 8. We install the doors prepared in advance.
Stage 9. We provide doors with handles and latches.
Stage 10. We process wood using special impregnations.
Stage 11. We paint the box in any color that matches the preferences.

Many gardeners mistakenly believe that any components can be dumped into the compost heap. In fact, in order to create the right biofertilizer, the “ingredients” must be carefully selected.
Among the mandatory components of the compost heap are the following components:
- peat;
- ash;
- needles;
- tree branches;
- leaves;
- hay or grass;
- wood ash;
- plant roots;
- raw vegetables and fruits, etc.
All elements are randomly mixed in the heap. To speed up chemical reactions, it is recommended to cover the pile with a tarp (this is especially true in the absence of a box).

Trips to the country with the family suggest the presence of entertainment elements on the site that will delight children. The most common way to occupy young summer residents is a swing.
Building a swing yourself is not an easy task, but quite doable. Of course, you can always take a stick, tie it with a rope and hang the structure on a tree, but this can hardly be called a full-fledged swing. Real craftsmen prefer to build comfortable structures with a comfortable seating area.

Structural components:
- two logs;
- strong rope.
Indicators:
- log diameter - 85 mm;
- log length - 700 mm;
- the distance between the ropes is 500 mm.
Making a swing
Stage 1. We stretch the ropes between the logs.
Stage 2. We wrap each log with ropes.
Stage 3. We release the ropes out.
Stage 4. We tighten the ropes by 3 knots.
Stage 5. We fix the swing on the tree.
Important: such a swing is designed for only one person.
Garden path from improvised materials
There are several types of garden paths that you can easily do with your own hands.

Step 1. Remove the sidewall from the tire using a knife or saw.

Step 2. Cut the tires.
Step 3. We line the space with corrugated stripes.
Step 4. Paint the track with paint.
Step 5. Sprinkle with stone chips.
This is an economical option for those who do not want to rack their brains and spend time on a full-fledged garden path. Tire track is usually used for vegetable gardens, as it easily fits into the ground.

Stage 1. We paint the corks in different colors.
Stage 2. We dig a small trench.
Stage 3. We drive in supports to strengthen the future track.
Stage 4. We construct formwork using boards.
Stage 5. We install spacers along the edges of the trench.
Stage 6. We place crushed stone deep into the trench and carefully tamp it down.
Stage 7. We make a solution of sand, cement, glue and water.
Stage 8. Pour the solution into the trench.
Stage 9. We press the plugs in random order. Smooth multi-colored stripes look interesting.

These are the easiest and fastest ways to make a garden path without purchasing expensive materials.
DIY tools
The expression “everything will come in handy on the farm” turns out to be as relevant as possible when it comes to canisters. From this plastic container, you can make a large number of indispensable tools that are actively used in the process of country work.


To make this tool, we only need a sharp knife and a container directly.
Stage 1. Cut off the bottom of the canister.
Stage 2. We mark the cut line for the scoop on the container so that the handle from the canister is the handle of the future tool.
Stage 3. Cut off excess material.
As a result of these simple steps, we get an excellent scoop with a comfortable handle.

Materials:

Manufacturing
Step 1. Thoroughly wash the canister so that no odor remains in it.
Stage 2. We cut the canister vertically into two parts.
Stage 3. We make a groove on the plank using a woodworking machine.
Stage 4. We apply glue to the plywood and insert it into the bottom of the canister.
Stage 5. We paint the resulting shelf with a can.
Of course, this design will not withstand a lot of weight, but it is quite suitable for storing small parts.

Materials:
- 40 canisters;
- scissors;
- rope;
- paper;
- marker.
Stage 1. We pierce the top of the cans with a knife.
Stage 2. We make a stencil out of paper.
Stage 3. We apply it to the canister, circle it with a marker.
Stage 4. Cut out large holes with scissors.
Stage 5. We put the prepared canisters in several rows, tying each row by hooking the rope under the handles of the containers.
Stage 6. We tie the entire rows around the perimeter for greater strength.
Stage 7. If the cabinet is planned to be leaned against the wall, then we drill it to the surface.
Stage 8. We put heavy objects in the bottom row - stones or bricks.
The result is a fairly roomy and functional rack that will help get rid of the issue of storing many small parts.

Be resourceful and bold in implementing your ideas. Good luck!
Video - Do-it-yourself homemade products for summer cottages
Video - Do it yourself for a summer residence


