Many owners of suburban areas and summer cottages are faced with the fact that by the end of the season they accumulate a lot of unnecessary canisters and plastic bottles.
Such things don't throw it away: from them you can create a wide variety of crafts for the garden, cottage or garage, which can perform both practical and decorative functions.
Most of these items can be built with minimal effort in 10-20 minutes, and they will be able to make the territory more interesting and original.
 Depending on the characteristics, such containers classified according to the following parameters:
- Volume – from 1-2 to 50-80 liters.
- Form. Canisters can be flat or rounded, oval, rectangular or square in cross-section, and have a handle with a lid.
- Color. Plastic products are most often white or translucent; there are also canisters in green, blue, red and other shades.
For creating decorative items and practical devices containers for food products, water, fuels and lubricants, fertilizers, and other liquid products are suitable.
Before you start making a craft, it is advisable to inspect the canister for damage, thoroughly clean and degrease it.
How to make a washbasin?
A 5 liter plastic container is ideal for creating country or camping device for washing.
The filler hole of the canister will be used to fill it with water, and you need to make a hole in the bottom and insert a tap or valve.
To do this, you need to use a pair of seals in the form of rubber gaskets and a fastening nut so that water does not leak out and the tap is firmly fixed.
Finished washbasin or washbasin can be hung on a crossbar, hook, attach to a vertical surface with a belt or even tape. You can insert a funnel into the filler hole for convenience: this way, when filling the canister, water will not spill onto the ground.
If you install a simple tap, you can adjust the pressure by turning the handle.

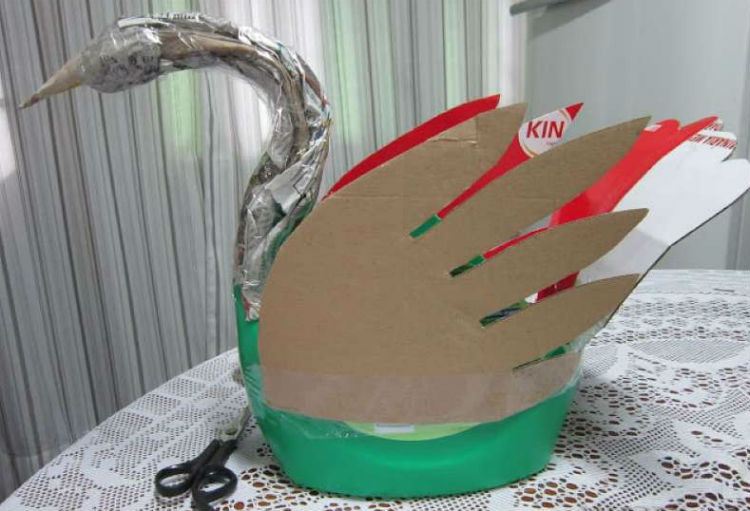
Master class on creating a swan
Bird sculptures for decorating suburban areas are often made of plastic. We present to your attention a small master class on making a swan from an old canister.
For this purpose 5 liter containers required. It is necessary to cut the product so that the body, tail and long neck are immediately cut out.

Then you need to prepare the wings from thick cardboard.
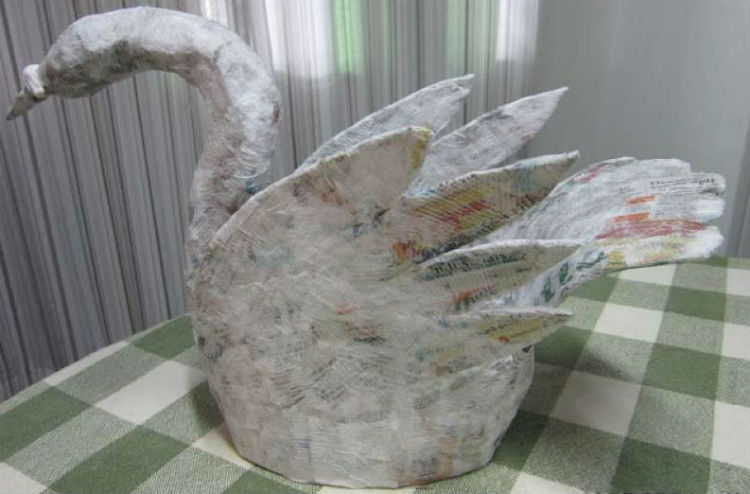
Worth a neck cover with newspapers and tape, then do the same for the entire workpiece.
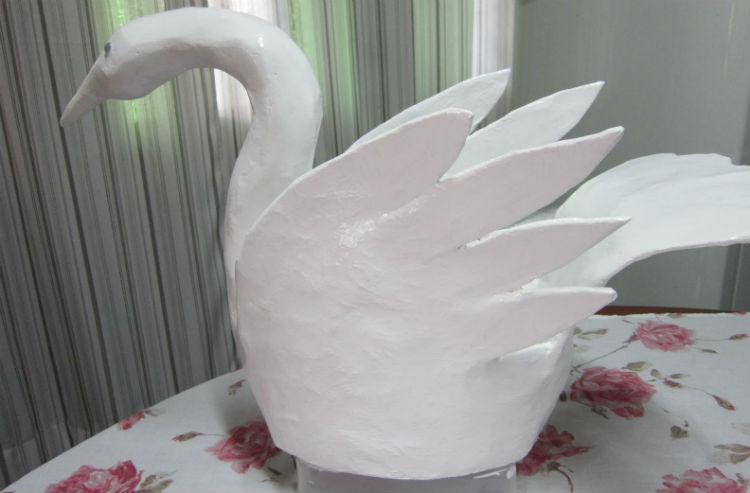
After you need apply a layer of simple napkins and coat the future sculpture with plaster mortar.
As the surfaces dry, they are sanded, painted and decorated with additional elements(for example, the eyes of a bird can be made of colored stones or glass).
Flowerbed for the garden
Many owners arrange flower beds in the garden or front garden, and plastic canisters can be adapted for two purposes:
- Container for planting flowers. You will need to cut the product, turning it into two halves, and dig it into the ground, then pour the prepared soil with fertilizers inside and sow flowers. The canisters themselves can be decorated with colored paper, paint, or other methods if desired. In addition, the mini-flower beds themselves can be lifted off the ground, as shown in the photo below: this is especially true if the soil is initially not suitable for specific varieties or is too wet.
- Fencing for the finished flower bed. This option is great for large flower plantings: canisters are dug in around the perimeter, blocking the plants. This design is rather decorative in nature, for it it is better to use colored containers of the same shade or alternate 2-3, then the fence will look aesthetically pleasing.

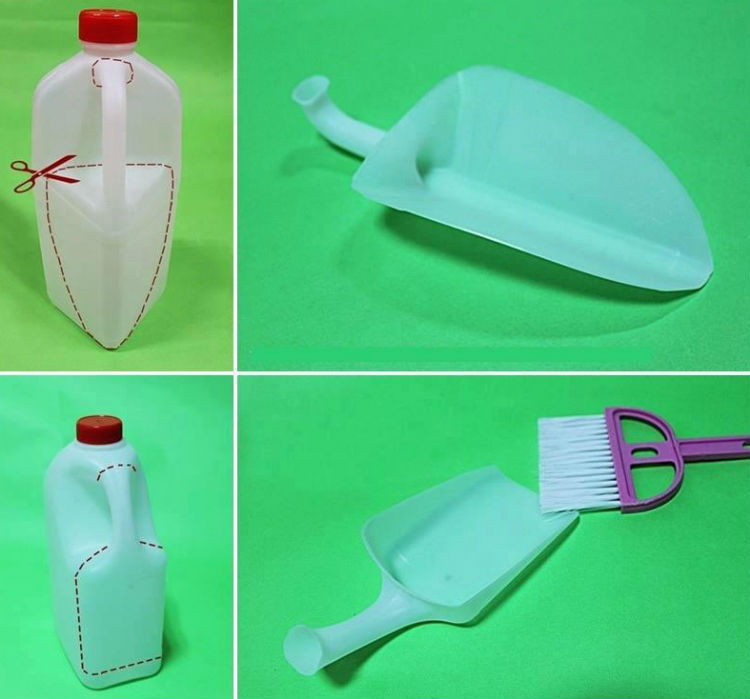
Plastic scoop
If the canister is small in size (1.5-2 liters), you can make a scoop from it for cleaning or garden work.
You will need to mark the future product on the surface and cut it out; the handle matches the handle of the container. The bow can be made either triangular or square.
In the first case, the scoop is convenient to use for digging up plants with a small root system from soft soil, and in the second case, for collecting debris.
Sprayer
A large capacity (10-30 liters) can be adapted for spraying plants with chemicals that protect plantings from pests.
Canister equipped with a manual or electric pump for ease of spraying. For carrying, you can attach a handle or straps to carry it on your back.
The hose, spray nozzles and boom can be purchased at any hardware or plumbing store.
A rubber nipple can be used to install the valve.
This sprayer is suitable for processing small vegetable gardens and front gardens; for larger areas an extension cord may be required.
Most often the device is made from a plastic canister used for spraying chemicals against pest beetles, cabbage beetles, as well as mold and mildew. You can also use products prepared according to folk recipes, from soap solution to urea.

Tool box for garage
To create such a device, you can use canisters of different sizes; the choice depends on how many things you plan to put inside.
The most commonly used containers are 10-20 liters for water, food, chemical, and flammable products. The shape should be rectangular, with a handle in the middle at the top.
Manufacturing instructions:
- make a vertical cut on the side of the neck and handle, leaving the wall of the narrow part of the canister intact;
- bend the resulting “door”, opening the container. Inside you can place sections of plastic cups or boxes, or any other fasteners. In such a box you can store small items (nails, screws, paper clips, electrical tape, etc.) or tools directly (hammer, pliers, pliers, etc.).
To make the tool box more durable and airtight, the sides can be reinforced with metal plates, for this the walls will need to be drilled and secured with bolts and nuts.

Watering can
For such a product, it is optimal to take a canister of detergent or other products that has slightly flattened shape and comfortable handle.
It is necessary to thoroughly wash the internal parts from any remaining liquid, then drill thin holes in the lid. The optimal size is 1-1.5 mm. Just above the handle you need to make a larger hole for air supply: if this is not done, watering the beds will be more difficult due to the pressure difference.
If necessary, you can equip the watering can with a plastic tube, which can be purchased at hardware or plumbing stores: it will increase the spray range.
Filling water is done through a plug, for this convenient to use a funnel or hose to prevent liquid from spilling.
You can also cut a wider lid, then using a funnel when filling with a regular bucket is not necessary. However, in this case, you should ensure that when watering the plants, water from the watering can does not flow onto the ground through the lid.

Creating a flowerpot
Hanging or stationary flower pots can also be made from plastic containers.
Canister can be cut in half horizontally, then treat the edge with a medium so that it is not sharp: grinding will be required. After this, holes are made 0.5-1 cm from the edge into which a cord or rope of small thickness is inserted, fastened together, making an allowance of 20-40 cm (the size depends on what plant the pots will be used for).
Then a single suspension is formed; it can be made in the form of a loop. Flowerpots can be hung on hooks, wire, or nails.
If the products are planned to be placed on a stand, It is not necessary to make holes for fastening.
In any case, small cuts are needed in the bottom: they allow you to create a proper soil microclimate and remove excess moisture.
The surface of the finished flowerpots can be woven into knitted covers, decorated with applique or painted - an example of such a craft is shown in the photo below.

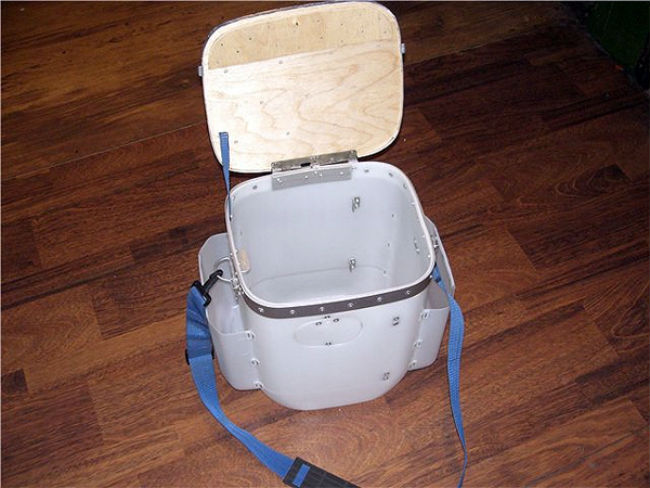
Fishing box
For this purpose, you can use 20-liter oil cans; side pockets, if necessary, are made from smaller containers.
The canister is cut off, leaving a height at which the fisherman It will be comfortable to sit for a long time, strengthen the cut with an aluminum strip fastened with rivets.
Inside you need to place a partition made of thick plastic: it not only divides the item into compartments, but also serves as an auxiliary stiffener and prevents the lid from deforming.
The lid is cut out of a thick plywood sheet and attached to hinges. The upper part is usually covered with soft material for comfort.
A strap is attached to the sides of the canister so that you can carry the fishing box on your shoulder. The internal compartment for tools can be divided into smaller segments (for equipment, rods, donks, circles, etc.).
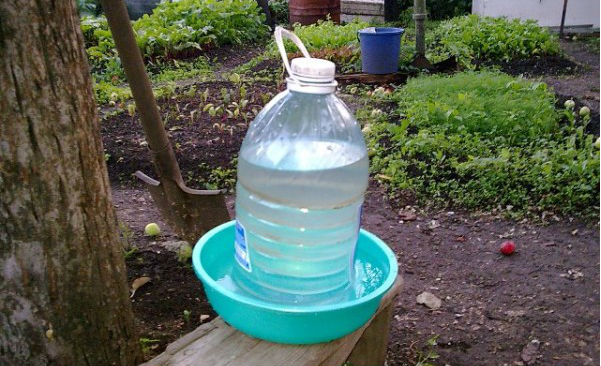
Drinking bowl for chickens
A device for providing poultry with fresh water can also be made from a 20-30 liter canister.
Required prepare a wide pallet, impermeable to moisture. Make slits in the bottom, then place the canister in the tray, leaving a gap of 1-2 cm between it and the bottom (for this you can make stands along the edge under the container).
The structure should be secured so that the water container does not overturn from an accidental push.
After filling liquid will flow evenly into the pan, where the chickens can drink from.
This drinking bowl for chickens is good not only for its simplicity, but also for the absence of the need to manually regulate the water flow.
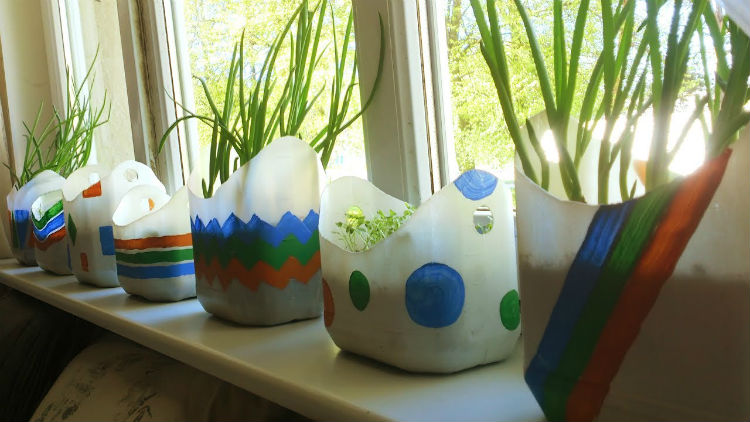
Flowerpots
It is very easy to make such products: just cut off the top part and make holes in the bottom to drain excess moisture. Canisters are placed on stands, soil is poured inside and seeds or flower seedlings are planted.
Such flowerpots can be decorated or treated with moisture-resistant paint, or decorated with appliqué.
Most often they are placed on terraces and in gazebos, turning the resting place into a paradise filled with living greenery.
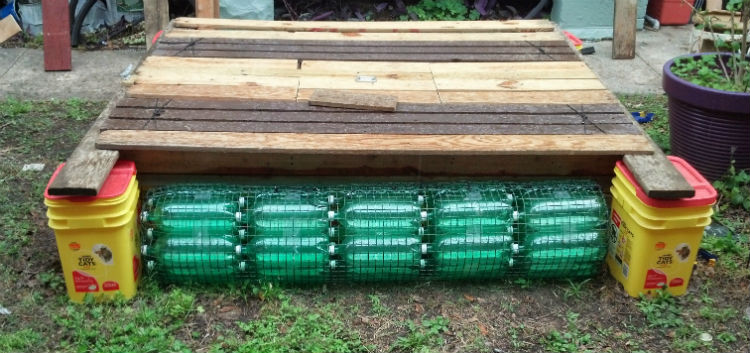
Raft of empty containers
This design is suitable for crossing a river, fishing, and mobile bridges on a pond.
The frame of the raft is made of 3 mm boards, knocking it down with nails or screws.
A raft is made from empty canisters with a volume of 40-50 liters, they are attached to the frame with packing tape or a special darkened film.
The second option is interesting because it protects plastic surfaces from fading under the rays of the sun. The frame must first be coated with antifungal agents and varnish to protect it from rotting when in contact with water.
Ready design can be equipped with the following equipment:
- mooring ladder;
- feeders for luring fish;
- seats, loungers;
- shelter from the sun;
- anchor.
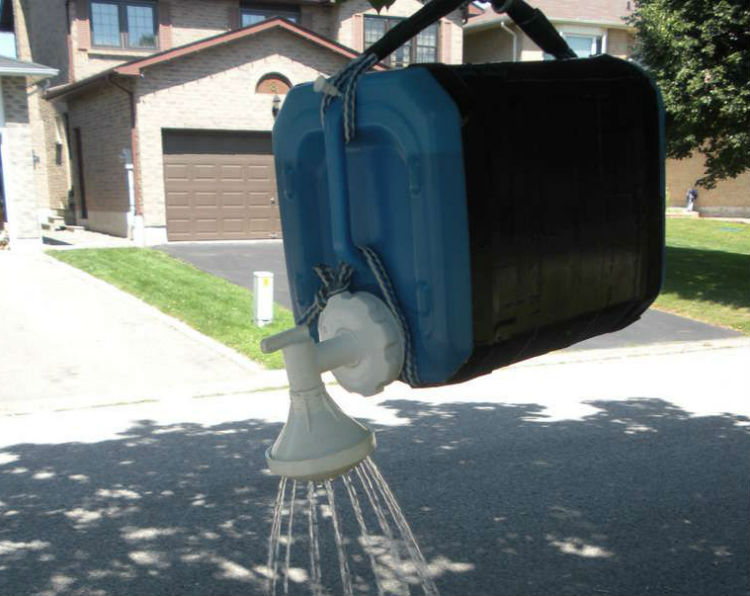
Shower for the cottage
The procedure for creating such a design includes the following steps:
- Creating a handle. To do this, you can use a simple rope, passing it through the handle of the container and tying it around a tree or other structure where the shower will be attached.
- Installation of the nozzle. You should make many small holes in the lid, blow them out, then insert it into the container tap. The joint should be sealed to prevent moisture from leaking.
- Creating a stopcock regulating water pressure. This product can be found in the plumbing department. Rubber seals will be required for installation.
- Cover arrangement where the water will be poured. It is better to make it closed so that dirt, leaves and insects do not get into the canister.
- The sides are covered with black electrical tape so that the water inside warms up faster: black walls absorb ultraviolet radiation better.
Useful video
Another idea for using a plastic canister is a toilet paper holder plus a shelf in this video:
Conclusion
If you have unnecessary plastic canisters and you cannot find a use for them, you should not throw them in the trash.
Plastic recycling and reuse in industry is the best option to use resources rationally without harming the environment.
In addition, the containers themselves can be used for both decorative and practical purposes - the choice depends only on the owner’s imagination.
From the article you learned what can be made from 10-50 liter canisters for the garden or garage, you learned how to make a washbasin, a swan, a watering can, a raft, boxes for the garage and other useful devices.
In contact with
Agree, a watering can is a necessary thing for a gardener, but it is not always at hand when you grow indoor plants. After all, watering simply from a mug at the root is not suitable for every plant and does not always have a beneficial effect on their appearance, since some plants need to be watered from above, including leaves and flowers.
Today we will look at an example of how you can do without a purchased watering can at home. And make it from a simple plastic bottle.
1. Take a half-liter or liter plastic bottle and wash it thoroughly, removing any stickers and removing any remaining soda or juice.

2. Using a marker, place dot marks on the bottle where the holes will be located in the future. The holes on the bottle should not be too close to each other, but also too far from each other, since at a close distance, the water will flow in one continuous stream. The optimal number of holes for irrigation is 25 pieces, 5 horizontally and 5 vertically, forming a square on the walls of the bottle.

3. Take pliers and a small nail. Clamp the nail with pliers near the head and bring it to an open fire. For an open fire, you can use a paraffin candle. Only the tip of the nail needs to be heated over the fire for 20 seconds.

4. Bring the heated nail to the plastic bottle where the markings are located, then pierce the wall of the bottle, slightly pressing on the nail. If the nail cools down when making holes, heat it again over a candle.

5. On the opposite side of the bottle, using a knife, cut a square hole for pouring water into the bottle. You choose the diameter of the square hole yourself, but it should not be lower than the irrigation holes, relative to the bottom of the bottle.

6. For convenient watering from a bottle, you can make a handle from adhesive tape.
A watering can for flowers is an indispensable attribute of a personal plot, a dacha plot of land, a cottage house and even an apartment. In order for the watering can to not only play its functional role, but also to be combined with the landscape design or interior of a newfangled apartment, you need to understand where exactly you will use it.
Handmade watering cans decorate the interior and are useful to use. Every housewife loves her flowers and takes care of them. The watering can is an assistant in this matter.
Watering can for flowers
If the permanent home for the watering can will be an apartment, you can take a watering can you already have or purchase the simplest option and then paint it a uniform color. However, this option will surprise few people, because you can buy a plain watering can in a store, so why then waste time and effort on painting it?

An excellent and simple option would be a beautiful bright sticker that is applied to the surface of the watering can. You can completely cover it, but you should understand that paper stickers will quickly get wet and deteriorate, unless, of course, you stick tape over the paper. This should be done along the entire perimeter of the drawing so that there are no gaps left, because water can get into things and seep into the depths.

As you know, they play a very important role. Some of them require special care; they should not be over-watered, which can happen if you pour water from a bottle in a large stream. You can also damage the trunk of the plant, even if you don’t notice it, but the plant will suffer.
Many indoor foliage flowers like to be watered from above, creating a rain effect. Droplets form on the leaves, and this also nourishes them. This is where a watering can will be useful, which can be combined with a sprayer.

However, it is also worth remembering that this rule does not apply to all house flowers, and for some of them, top watering will be marked by the onset of diseases and leaf rotting. Therefore, before using a watering can, read on the Internet how to properly water certain types of flowers.
How to make a watering can
Let's think about how to make a watering can with your own hands so that it not only helps you with watering, but also looks interesting and unusual.
The first and easiest option is to take it and make holes in its lid using an awl. To prevent this option from looking too ordinary and banal, you can take a bottle of an unusual shape, having first examined the entire range of drinks offered in the store.
It will be difficult to cover such a bottle, so if its color does not suit you, it is advisable to use paint. However, this maneuver applies to bottles whose surface is dense and does not bend, otherwise the paint will quickly crack.
However, the option of cracked paint is also not bad, because it is also interesting and unusual, but it will be suitable for you if you use a watering can, for example, in the country. This is not suitable for an apartment option, because peeling paint underfoot is not what we are looking for.

DIY watering can from a glass
The watering can can also be made from a glass. It will be more difficult to process, but this version of the watering can will last much longer and will look much more aesthetically pleasing. For such a device you need to take some kind of glass or even a ceramic mug, as well as a drill.
You should be very careful with the drill, because while working to create a hole, the mug may burst or small cracks may appear on it. To prevent this from happening, the hole should be drilled carefully and slowly.
- we take the plastic tube that we prepared, in accordance with the thickness of which we created a hole;
- paint the tube and the glass itself in the same color;
- insert the tube into the glass under the flower watering can;
- We fix it with glue so that there are no gaps through which water could seep through.
It is advisable if you choose a mug that has a narrow neck, since a wide top hole will be inconvenient to handle, and to prevent water from spilling out of it, you will need to pour too little water into an already small mug.

Unusual DIY watering can
If the option with an original small watering can does not suit you, and your plans include watering a large number of flowers planted in open ground, the idea of a large original watering can will certainly come in handy.
Take a bottle of some detergent and paint chaotic lines on it using regular paints. You will get an interesting avant-garde style watering can, on which dirt will not be too noticeable. To prevent the design from being washed off, cover the watering can with a varnish coating. Such a watering can can be left in the yard if you have one, next to which decorative elements look great.

However, a watering can can be a simple decoration for the interior or landscape design of the site. Even if you only have, it doesn’t matter, you can put a watering can next to them, it will only decorate and add aesthetics to the atmosphere.
In gardening there are no extra buckets or garden watering cans. In order not to run around the entire site with one watering can, you need to have several of them. Of course, you can purchase them in sufficient quantities, but this is “not our method,” as Fedya said in “Partner.” And the site is called “Do It Yourself”, not “How to Spend Money”.
We will make a watering can from an old plastic canister, which appears in abundance in the household of car enthusiasts. Not only will we “attach” an idle canister, but we will also make something useful in the garden, and we will also save some money on buying a ready-made watering can.
Actually converting a canister into a watering can involves inserting a tube into it, preferably at an angle to the body, like a real watering can. A couple of parts made from polypropylene plumbing pipe will help us with this; they will have to be purchased at the store. Of course, this is not the only possible design for a watering can, but I didn’t want to spend a lot of time or money on making it. And I preferred to use “standard” parts, which also open up some prospects for modernization.
So, I needed a “turn” of 45 (or better yet, 60) degrees (15 rubles) and a piece of pipe of 50 cm (21 rubles). They fit together perfectly in principle. Tools include a sharp knife and a hot-melt gun with hot glue. The melting point of hot-melt adhesive practically coincides with the melting point of polyethylene and polypropylene (the tip of the gun leaves melted marks on their surface), so the connection is very strong. It's not even gluing, but welding.
Having chosen a relatively flat place near the bottom of the canister, mark the location of the future hole on it and cut it out. The angle pipe should fit freely into it, but without a large gap.
Apply hot melt glue liberally to the joint, quickly insert the pipe into the hole and let the glue harden. Formally, our watering can is almost ready, we just need to add some small details. In particular, put a piece of pipe on the pipe and shorten it a little. For a standing watering can, the tube should not be significantly higher than the lid of the canister, otherwise such a long-nosed watering can will be inconvenient to use.

So that the nozzle does not experience a large lateral load, which tends to break it out of the canister, we tie the spout tube with a piece of strong wire to the neck or handle of the canister. Since the spout tube is quite large (mine was 40 mm), the flow of water from such a watering can must be limited somehow. It is enough to cut some kind of cork out of wood and cut off a small segment from it. Then a wide fan of water will flow from the watering can.
That's all. If you plan to fill the watering can from a tap or hose, you can stop working there. But if you are going to use a watering can to scoop up water, then it is better to cut a hole at the top of the watering can, on the side opposite to the spout of the watering can. Then the water will quickly fill the watering can, and the air will quickly exit from it through the spout.
Thus, having spent almost only 1 Euro (relatively speaking), you can make a quite decent and functional watering can for your garden. The capacity of the watering can is naturally determined by the capacity of the canister.
Video of a watering can from a canister:
I decided to write today’s article for those who have a summer house or a summer cottage. We will talk about watering plants. There are many ways to water plants: you can buy special nozzles (but this is a waste of money), you can water the plants from a watering can (but you need to bend over to each plant - after this your back hurts and bad posture occurs), you can simply point the hose at the plant ( but this option is also not always convenient and not all plants can be watered in this way). After analyzing this problem, I came to the conclusion that you can make a device (watering can) for watering plants at home, which will help you not bend over, thereby maintaining the health of your back and changing watering modes (that is, you can water both with a stream and scatter water).
To make our universal country watering can we will need the following components:
- an old unnecessary canister (10 - 20 liters);
- faucet (you can do without it, but with it our design will take on a more aesthetic appearance);
- flexible tube (about 1 meter, we took a transparent tube for aesthetics);
- a small piece of the same flexible tube (about 10 cm);
- hard tube (about 0.5 meters, we took part from an old fishing rod);
- a belt (so that you don’t have to carry the canister around with you, but hang it on your shoulder);
- a container for photographic film (it will serve us as a nozzle for spraying water).
So, at the lowest point of the canister we make a hole whose diameter will be slightly smaller than the diameter of the flexible tube:

Carefully insert the flexible tube into the hole we made in the canister

Next, take the faucet and carefully pull the flexible tube onto the faucet. On the other side of the tap, we stretch a piece of flexible tube so that approximately 3-4 cm is put on the tap, and the remaining 5-6 cm peeks out:


After this, we take the rigid tube and carefully pull it onto the protruding part of the flexible tube.
Everything must be sealed so as not to allow a drop of water to pass through, so tighten it as best as possible.
Now we attach a belt to the handle of the canister.
Next you need to make a nozzle that will spray water. A film container is useful for this. We make a hole in the lid of the container with a diameter that matches the diameter of the rigid tube.

Next, we put the cap with the hole on the rigid tube.

We make many small holes in the container itself.
Our universal watering can for watering plants is ready!
We fill the canister with water:

Close the lid of the canister tightly and put the structure on your shoulder. Next, slightly open the lid on the canister, thereby creating pressure. Next, open the tap and as you can see water flows:


Now we put the container-nozzle on the rigid tube and open the water:


