Working with papier-mâché is not just creating crafts, but rather a way self-actualization, bring "to life" their ideas, fantasies, dreams. Each master invests in products not only a lot of work, but also a piece of his soul. Perhaps that is why all papier-mâché crafts are real masterpieces, looking at which no one will remain indifferent!
The quality of porcelain depends not only on the quality of the clay, but also on how it works and that they are second to none. Biscuit dolls faced strong competition from papier-mâché and wax, which also had defects such as cracking and warping. This followed the fashion of celluloid dolls, which were flammable. New materials began to be tested in search of greater sustainability than biscuits and in response to the ideal of unattainable beauty represented by the face of porcelain. Plastic and rubber would only be used after World War II.


Today we want to invite you to plunge into Magic world dolls, feel like a creator creating little "people". After studying the tutorial workshops, you will learn how to make articulated and frame puppets, theatrical and glove puppets, fat dolls, as well as large figures and bottle mannequins.
A task for true professionals: a papier mâché articulating doll
Wax dolls. They were relatively inexpensive, they became popular in Britain and moved over from the mainland. The head was made of wax poured into molds made from paper mach sculptures, painted and coated with a layer of wax, giving the doll a lightness and complex transparency. This type of doll did not last long. This doll was created by the Pierotti family, Domenico Pierotti traveled from Italy to England for a visit, but the trip was so bad that he decided not to return and didn't bother making wax dolls.
Charisma is what can bring any doll to life! Therefore, when creating articulated or frame models, theatrical puppets, cute fat women or large dolls, it is necessary to pay attention to Special attention face:

paper dolls mache - paper mache dolls were the beginning of the world power of the German doll maker industry, before the first world war. They were made from a mixture of paper pulp with glue or resin, or from sheets of paper pressed together. The first mirror of female morphology, maids were made, then girls and finally children. Eyes and mouths also improved. Over time, they got the movement of opening and closing, as well as eyelashes and teeth.
Later, they began to make heads with their famous painted eyes. The secret of his success lay in the location of his factory near an art school with many sculptors. The Jumo family existed for two generations during the heyday of the French puppet masters. Known for their perfection and expressive eyes, they are the perfect representation of their time and place. Ten years later they specialized in Chinese porcelain and biscuit dolls. Madame Jumo was responsible for the materials and cuts of the dolls' famous costumes and accessories.
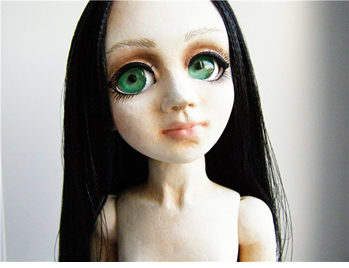
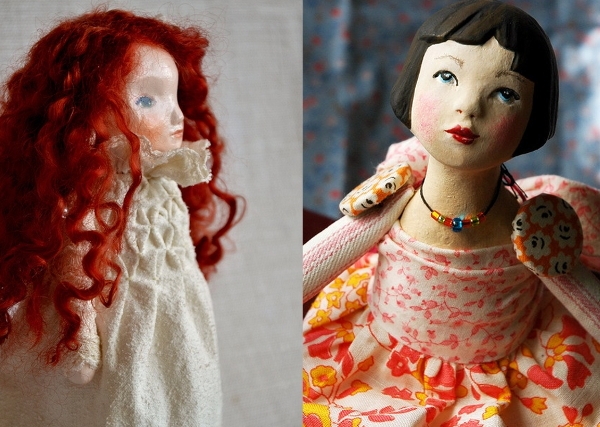
When forming a face for a future figure, it is important not only to carefully study the detailed training lesson, but also to think about the character of the model. Imagine what it will be like. And then proceed to recreate your idea.
What your doll will be is up to you! Who do you like the cheerful fat woman or the elegant mademoiselle, the naive simpleton or the sophisticated aristocrat, the sad beauty or the evil sorceress? Think about the image, and boldly proceed to bring the idea to life!
How to make a mass for modeling paper with your own hands?
Emil launched the company to international recognition with marketing, skilled craftsmen and a baby launch. From that moment on, the heads of the porcelain doll turned into currency. Used by Jacob Petit, this material is a shiny and hard paste that predates the famous cookie. Petit was the author of the most beautiful arrangements of famous porcelain and biscuit dolls. Doll heads with Chinese porcelain were attached to the body of a French doll. His mark was on the lower edge of the shoulder plate.
Papier-mâché dolls for the theater
home theater
The simplest theatrical puppets are glove puppets. Even kids can make them! To make such a wonderful glove doll with your own hands, prepare in advance:
- Toilet paper.
- "PVA".
- Deep bowl.
- Delineator.
- Dye.
- Brush.
- Clear nail polish.
- Yarn.
- Adhesive putty.
- Suit for a glove doll.
Description of the process of forming a glove doll: pour 2 tablespoons of "PVA" into a plate, a glass of water. Mix thoroughly. Dip toilet paper into the resulting solution:
Eugene Constant Barrois inherited his father's company but was smaller and failed until he used innovations such as glass eyes and an open mouth. His main competitor was Claude-Joseph Blampois. They developed a composition that made the puppets sit.
He was an experienced maker of mechanical automatons that outlived him. It was the first doll with articulated limbs, although it still used china on the head and had a body molded from leather. The dolls were between an adult and a child, so the clothes could be a child or an adult. Romer's husband and brother-in-law were mechanics who helped with the dolls' joints. Some of the dolls were dressed by Leontin's mother.
 Put a cartridge on your finger and form the head of a glove chrysalis on top of it. Set the workpiece aside until completely dry. Nothing can be done about it for the next 2-3 days. After complete drying, treat the irregularities with adhesive putty:
The puppet bodies were originally carved in wood and then proceeded to use molded composition. He also made biscuit wax dolls with sound mechanisms and some with fur mechanisms in their stomachs that summoned him when his stomach was compressed.
Using an advertisement in his office in Paris that could fix any doll from any manufacturer in 10 minutes and also replaced broken heads. By the end of the 19th century a large number of The dolls were imported from Germany, and many high-quality doll heads in which American manufacturers made the body have been patented. The luxury ones were imported from Paris. National production was cheap and impressively sophisticated. Sometimes they wrap themselves in mechanical baby carriages, sewing machines or pegs swinging to be classified as a proper doll in the eyes of purists, who often seem to think that any activity, such as a leisurely stroll, is not good for a lady.


![]()
At the next stage of work, we make a seal at the base of the cartridge. It is necessary in order to connect the glove doll costume to the head. Then we start painting the layout:
Despite the superiority of the French dolls, what set them apart from all others was that while the American dolls reflected a life of family affairs, the field or work, the French dolls lived in a luxurious, happy and peaceful world. No wonder the puritanical Americans did the hard work that was used to make Europe think it was sinful and decadent, even the puppets, which didn't speak at the time, testified to that.
The bodies of these dolls were originally made of wood or wire, covered with skins, leather or cloth, or stuffed with sawdust. Due to the weight and fragility of this doll, he compromised the use of biscuit in the limbs. The doll had long dress to cover the mechanism and the wheels on which it ran. Created by the American firm Martin and Runyon Morrison. The patent was also secured by Morrison in Europe. Newton received a very similar patent in Europe.
 First, cover the head with flesh-colored paint. After complete drying, draw eyes, mouth, eyebrows, cheeks. Now you can decorate the head of the glove old lady with hair. The wig is formed from threads and glued to the head:

He later added mechanisms for communication, walking and sleeping. They placed the heads of many famous doll makers who later attached their bodies. Currently, several materials are used to make dolls, such as: wood, straw, fabric, porcelain, paper, plush, metal, vinyl, paper mush, wax and plaster.
This child, wearing a cap and modern fashionable dress, alternately moved his arms and legs, as well as crawling on the floor, sometimes sliding to one side, as well as checking for the presence of fans present. Inside cork stopper the ondine wore a mechanism called clockwork that worked its limbs in a comfortable breathing rhythm that moved through the water. Thomas Edison improved upon the doll invented by Johann Maelzel and combines his phonograph technology with the doll, allowing him to word-phonograph dolls.

OLYMPUS DIGITAL CAMERA
At the end of the work, a suit is put on the seal at the base of the cartridge. Now the doll is ready to participate in the theatrical performance!
Theatrical puppets
Not only glove heroes, but also puppet puppets can become participants in theatrical puppet shows:
The phonograph was tied with a small knot of rope attached to the doll's waist. Edison's factory was able to make 500 puppet tracks a day and sold for $20 each. Like many other pioneering inventions, Edison was too expensive to be commercially satisfactory, and others reaped the benefits he planted. Despite his patent, Edison faced competitors both in his own country and in Europe. who created puppets that sang, exclaimed and prayed.
For the first time they used glass eyes. Buffalo Bill is said to have given his niece a doll. Because of a doll inspired by such a painting, Emil Jumo won the gold medal. This seal became famous and is enthusiastically celebrated by fans today when it is found in some part of the manufacturer. Some of the chapters he bought from François Gauthier. This doll scared the kids. Possibly also papier-mâché with a baby face and two wax masks that can be tied to the doll, one with an old face and the other with a baby.

Of course, making such unusual theatrical puppets takes much more time, but the result is definitely worth the effort! So, to form a theatrical papier-mâché puppet, you will need:
- Scheme with parameters.
- Insulated wire.
- Toilet paper.
- Newspaper.
- Plasticine.
- Wefts for a wig.
- Plastic eyes.
- Wood putty.
- Paperclips.
- Toothpicks.
- Sticks for sushi.
- Skins.
- Narrow bands.
- Brush.
- Dye.
Step-by-step instructions for forming a theatrical puppet from papier-mâché. The base and head for the torso of the theatrical puppet are molded from plasticine. The head is pasted over with a mass of toilet paper, and the body with newspapers:
Bru also made two-handed wax dolls. German manufacturers created novelties: a doll they drank, and eyelids that opened and closed with a lead weight that was once moved by a primitive method of pulling a thread attached to the body.
Like most events marked by time, it is outdated: an Italian doll named Lilly spoke 9 languages. When he pulled out the rope, he could say mom or dad, and then he moved his lips to kiss whoever was holding it, and when he laid her on the bed, the doll could be moaned, presumably in protest, like a child.
 After drying, the blanks are cut, the plasticine is taken out, and then the parts are glued again. The arms and legs will be done in the same way. Additionally, a wire will be placed inside them. Wire loops are used to connect parts:
The automaton was created by Jumo and Lambert to celebrate loyalty. The doll moves its head, directs kisses right hand and shakes the flag, which is in his left hand, to the sounds of Russian melodies. The company ended its operations in the late 1990s.
The dolls were made from a variety of materials, including biscuit, porcelain, composition, and early plastics. Prior to industrialization in Paris, there was an exchange of materials with Germany, which was carried out in large quantities, porcelain pastes and waxes used for doll faces, mainly from Tunringe and Nuremberg. There were also luxurious dolls, unique or large wooden series, also made in Germany for sale in France.
![]()
All parts are treated with putty for wood and polished. Then the body is covered with two layers acrylic primer. At the end of the work, you will need to color the head and attach a wig to it:
If earlier they were a luxury item, dolls began to have more affordable price, making it easier for the less wealthy classes to buy. However, they did not lose quality. Porcelain and bisque head dolls became popular, known as "porcelain dolls".
These dolls were worn by the great Parisian dressmakers and were used mainly to advertise the fashion of the time, are so famous "Poupé de modes" that crossed oceans inside "trousers" taking what was more beautiful and luxurious from the French fashion of the time. They were a product aimed at the wealthiest classes.
 The last coat of paint is fixed with varnish. Blanks are attached to tapes. Ordinary satin ribbons are inserted into wire loops and tied into a neat bow:
 In order for the theatrical papier-mâché puppet to be able to perform on stage, it is necessary to sew a suitable costume for it. In addition, for a successful performance, also prepare the wag. It can be purchased at a specialized store or made from plywood:
And wax doll makers began to play with new technologies. Sewing was considered art form for centuries, the first needles were horn or bone, and also a chain of animal tendons. Only 50 years after the English inventor registered a patent for the full sewing machine to pass the needle through the skin.
The success in the French capital was so great that the dolls became a symbol of luxurious and fashionable icons of society. Mothers tried to copy their dresses for themselves and their daughters. Almost all of this heritage is now in the hands of adults, collectors, museums or private collections, where it has the status of a work. To recognize an old doll, just search for your brand. It can be found in some parts, usually on the back of the head, under the hair and behind the shoulders. Others have labels or seals attached to the body. These marks allow collectors to identify the manufacturer, origin, size and model number.

Frame miracle doll made of papier-mâché
Unlike theatrical puppets, papier-mâché puppets cannot move. But, this does not diminish their charms.
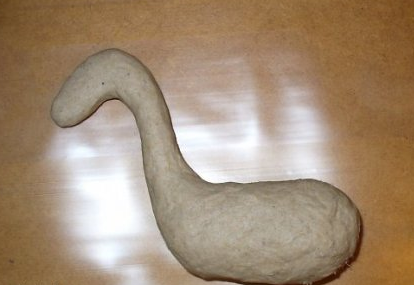
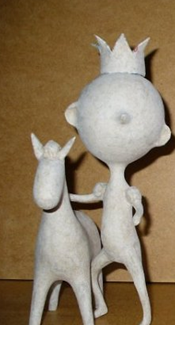
In today's MK, we want to reveal to you the secrets of creating the Little Prince, proudly sitting on his horse. First form a ball of newspapers using the papier mâché technique. Put it on a wire bent in the shape of the letter "Y". Wrap the wire with newspaper strips. Give the design the desired shape:


Additional volume of the frame figure can be increased with the help of papier-mâché mass. Now, putting the prince figure aside, we can begin to form the horse. This step also begins with the creation of a wire frame:
 Then there is an increase in volume. And a paper “dough” is applied on top. When the horse dries, wire legs are attached to its body. The joints are wrapped with newspaper and coated with "dough":


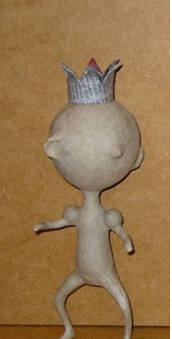
The work is carried out step by step. Now, while the horse is drying, we return to the prince's workpiece. Using the same technology, we can attach handles to the prince's body:
 The main part of the work has been completed. We start registration small parts. First of all, we make ears for a horse out of cardboard. We cover the ears with paper pulp. From it we sculpt a mane, a tail. We add the nose, ears, shoulder pads to the prince:


The prince needs a crown! We cut it out of cardboard. Cover with newspapers. We connect, as shown in the photo. We hope for the prince. We cover with "test":

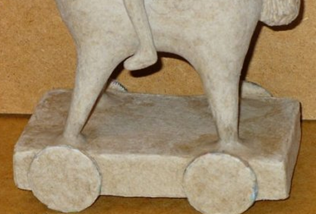
To remove irregularities, the workpieces are rubbed. The figures are connected together with the help of "papier mâché". Excess "dough" is removed with a fine skin:

The finished frame figure is installed on a platform made of foam and cardboard coated with papier-mâché:
 The final stage step by step lesson the painting of the frame crafts becomes:

A task for true professionals: a papier mâché articulating doll
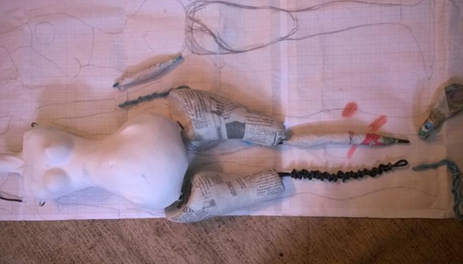
The most complex figures are articulated. Their creation can take from a week to several months. Novice creators rarely decide to take on such a responsible task, but experienced craftsmen are happy to delve into all the intricacies of the creative process:
 To create a papier-mâché articulated angel yourself, you need to prepare in advance the following materials and tools:
- Scissors.
- Awl.
- Thin drill.
- Manicure set.
- Needle file.
- Skewers, toothpicks, cocktail tubes.
- Sandpaper.
- Styrofoam.
- Toilet paper.
- Glue.
- Brush.
- Acrylic paint.
- Plastic (self-hardening).
- Two glass beads or eyes.
- Paper clips and napkin.
- Water container.
- Threads "Iris".
- Wig.
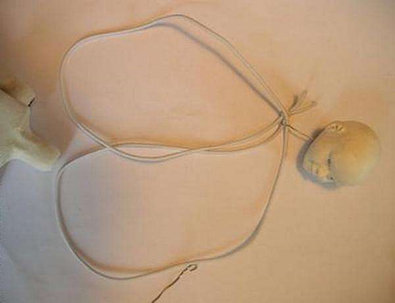
Schematic drawing depicting a articulated figurine in 3 copies:
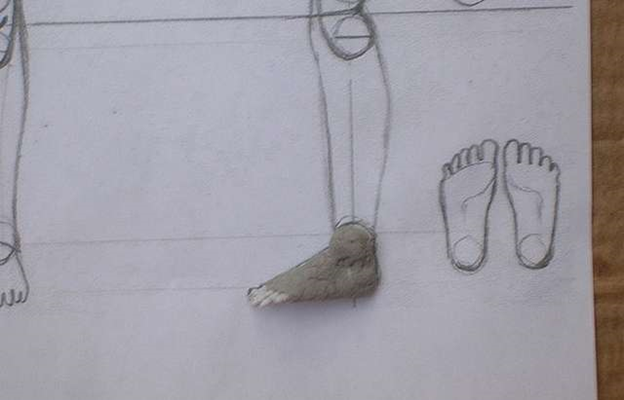
 Step by step instructions. Cut out paper patterns torso and head in full face and profile. Attach to the foam "full face" and circle with a pencil. Carefully cut out the resulting blanks. Turn them over, attach the "profile", circle, cut again. Give the details a smooth shape:


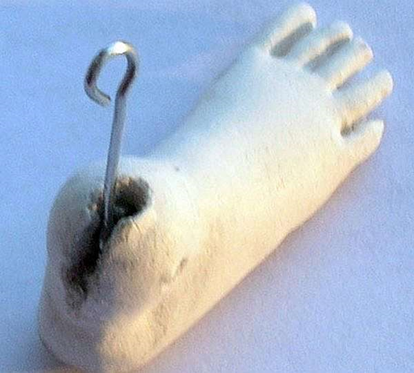
Stick a skewer into the head and torso. Coat the papier-mâché blanks. Set them aside to dry completely for about 2-3 days. Insert a skewer into the cocktail tube, and stick future hinges on top. From paper clips, bend the same details as in the photo:
Form the fingers and feet of the articulated doll from wire. Wrap them with extra thread. Roll 4 hinges from plasticine. Wrap them in cling film. In places where hinged parts should be located, it is necessary to prepare recesses:

The feet also need to be supplemented with articulated balls. The hinge elements on the feet, hands, as well as the elbow and knee bends must be propylene. A bent wire is inserted into the places of the cuts:

Before assembling the hinged craft, all elements must be covered with liquid plastic, dried, and sanded. In addition, you need to make sure that you do not forget to cut the necessary holes:

The assembly of the articulated doll takes place in several stages. First, an elastic band is tied to the bracket inside the head. Then the same rubber band is passed through the torso, handles and attached to the legs. At the end, the mobility of the joints is checked, filing, decorating the face, gluing the hair:

papier-mâché bottle mannequins
The basis for papier-mâché dolls can be various materials. Including plastic or plastic bottles:

To learn how to create such a wonderful doll, you can watch a short video:
bbw dolls and big figurines
Not all masters like thin dolls, the prototype of which is the famous Barbie. Some prefer to create large Soviet-style dolls or cute fat dolls:


Of course, someone can say that these dolls are not as graceful and elegant as Barbie. But, they certainly have a soul! Each figure has its own character, preferences, interests, so admiring them, we feel kinder, happier. In ourselves, the soul wakes up, buried under daily worries and worries.
Video: Fairy-tale paper dolls
Papier-mâché is one of the most interesting techniques for creativity. The material is made from improvised means available in every home. Papier-mache is used to create masks, home decor and, of course, toys. Especially popular is the manufacture of dolls, in which both adults and children can participate together.
Features tpapier-mâché techniques
Under the mysterious word papier-mache hides an unusual, but at the same time simple technique. It is based on the use of pieces of paper. Once this method was widely used only by decorators in theaters to create props. Now it has become popular among needlewomen and ordinary people.
The papier mache technique is the creation of things from shredded paper mixed with glue. It is worth noting several of its features. Often used newspaper and toilet paper. They are torn into small pieces, placed in a separate bowl and filled with a small amount of glue. Soon the mixture turns into a thick slurry. With its help, you can form any shape. Many masters make heads, feet, legs of dolls from it. It is important to understand that in order to create individual parts, the mixture must be thick. Therefore, several rules must be followed.
- Glue is poured into the paper little by little. If there is too much of it, then you need to add more pieces and wait. For creating desired consistency it will take a few minutes.
- If you used a newspaper, and the resulting mass began to mold poorly, then you should try another material. It's all about newspaper paint. Oddly enough, in the past, masses of newspapers with lead ink turned out good. They were soon replaced with safer paint. As a result, the mass for papier mache of them began to form worse. Even the most ordinary egg trays are suitable for replacement.
- Glue is better to use wallpaper. It gives the mass the necessary plasticity. If it is not at home, then you can replace it with ordinary PVA or cook a paste from starch or flour. To do this, fill them with a small amount hot water and boil until thick.
The second method, used in the papier mache technique, allows you to create hollow figures. It is also very simple. If you want to make an impression of a thing, then you need to cover its surface with Vaseline. After that, pieces of paper soaked in glue or paste are applied to it. One layer is superimposed on the other. The paper is laid out until the thickness is desired. Then the workpiece is allowed to dry. After that, the layer of paper is carefully removed from the thing.
Also, a similar papier-mâché technology is used when leveling products. Paper with glue is applied to smooth the surface and correct imperfections.
How to make a papier-mâché doll?

From papier mache you can make completely different dolls. They can look like ordinary figures or move thanks to internal frame and hinges. Many people combine techniques. Some parts of the toy are made of papier mache, while the rest are made of self-hardening plastic. They also use padding. The torso of the doll is made with the help of fabric, and then special balls for toys or any other bulk material are poured into it. Another option may also be used. The body is stuffed with pieces of unnecessary rags and sewn up.
Whichever manufacturing method you choose, special attention should be paid to drawings and patterns. Before you start sculpting, it is worth considering the details. If you want to make a complex doll with hinges, then it is better to draw it in several projections. You need a front and side view. On all parts with hinges, their contours should be noted.
For a rag doll with a papier-mâché head, a body pattern is made. It can be 2 ovals. The legs and arms are cut according to the same principle. Don't forget to allow for seam allowances.
For all types of pache mache dolls, hair and eyes are thought out in advance. Parts can be bought at a specialized store or made from improvised materials. For hair, yarn and pieces of fabric are used. The material is simply torn into fibers, from which strands are then formed. Pieces of satin, silk or fittings ribbons are best suited for this.
Eyes for dolls are easier to make from small pearl beads. For them, notches are formed in the dry part. Then the eyes are glued. After making the doll, you can paint them with your own hands using acrylic paints.
A simple master class
For the first time, you should choose a doll that is easier to make. Of course, hinged toys look the most spectacular. But it takes a lot of time to make them. In addition, this option is more suitable for an adult than a child. For children, it is worth choosing something simpler. Great option- finger puppet in mixed media. With its help, you can arrange a real theater at home!

You will need:
- Any fabric with a cut of 40 cm.
- Toilet paper
- Thread and needle
- Yarn orange color(acrylic or wool)
- Gouache
- Balloon
Manufacturing instructions:
- First you need to make a pattern of the body. It will be the same as that of the well-known Petrushka. In part, the pattern resembles a shirt with one-piece sleeves. They must be long enough. You can draw a pattern arbitrarily by hand. To make it symmetrical, fold a sheet of paper in half and draw a half, focusing on the fold. Remember that it is better not to make a neckline. Otherwise, the doll's head, made of papier mache, will not attach.
- Cut out the pattern and pin it onto the fabric folded right sides inward. Circle with chalk. Back off the lines by 1.5 cm for seam allowances.
- Stitch both pieces along the side and shoulder seams. Turn up the bottom of the body and sleeves.
- The head and hands are made using the papier mache technique. To do this, the paper is torn into pieces and filled with glue. She is allowed to stand until she swells. The balloon is inflated to right size. Its shape should be round. The ball is tied. The surface can be smeared with petroleum jelly or covered with a thin cling film. This will allow you to remove the paper without any problems.
- Layers of adhesive paper begin to be laid out on the ball. For better bonding, they can be alternated with dry. A rounded detail begins to form. Its bottom should be slightly wider than the rag throat of the body. Otherwise, we will not be able to properly attach the head. The formed ball is carefully laid to dry.
- We turn to the formation of hands. For this, it is better to use swollen paper pulp. We form small figures-mittens from it. The diameter of the lower part must be larger than the sleeve for proper fastening. If you are unable to mold parts due to the strong plasticity of the mass, add some paper to it. You can also use a wire frame and mold palms with fingers on its basis. The formed parts are set aside and allowed to dry.
- The blank for the head is carefully removed from the ball. The lower part is smeared with glue and glued to the rag neck so that it is located inside. The same is done with the hands.
- A nose is formed from the remnants of paper with glue and attached to the head. Let him dry.
- The head and hands are covered with white gouache. With a pencil outline the eyes and mouth of the doll. Draw them with paint.
- The threads are cut into equal parts and glued to the top of the head. A cap is sewn from the rest of the fabric. Its diameter should be equal to the volume of the head. The doll is ready!


