It is capable of effectively replacing guides, hinges and screws. It is only important to choose a specialized composition that will not harm the amalgam.
Mounting adhesives for mirrors and mirror mosaics, mirror tiles and huge mirror paintings have many advantages:
- do not destroy the metallized back surface of mirrors;
- have high adhesion to most;
- when hardened, they form a compound that is resistant to deformation of the base, fluctuations in temperature and air humidity, which allows them to be used in any room of the apartment;
- provide high strength and durability of the adhesive joint.
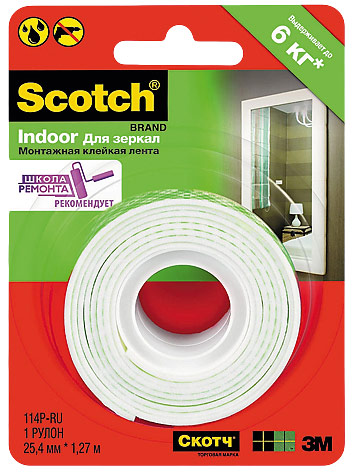
Mounting adhesive tape (Scotch) 0.025 × 1.25 m (235 RUR). Photo: Scotch
It is worth considering that 1 m² of mirror cloth with a thickness of 4–6 mm weighs 11–16 kg. Using glue, even a non-professional can glue a medium-weight mirror in a few minutes (the area of the most popular products rarely exceeds 0.5 m², and their weight is 5–6 kg). The main thing is to strictly follow the manufacturers' recommendations. Both the back of the mirror and the wall should be dry, degreased (with white spirit, acetone or gasoline), and free of dust and dirt. Optimal temperature indoors - from 10 to 30 °C. The lower the temperature, the more time glue hardening.
After gluing the mirror to the wall with a specialized assembly adhesive Within a few minutes, its position can be adjusted, which cannot be done when fixing the product with double-sided adhesive tape.
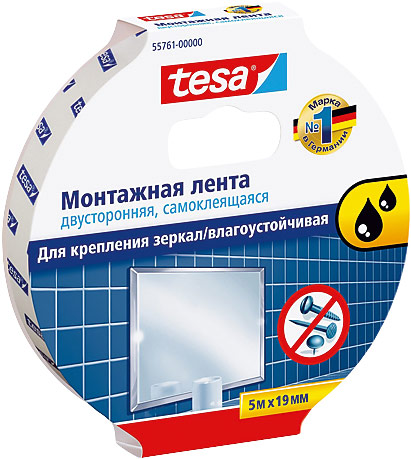
Mounting double-sided adhesive tape (Unibob) 0.019 × 5 m (200 RUR). Photo: Tesa
Most mounting adhesives for mirrors are based on synthetic rubber and resins in an organic solvent. When working with them, a contact circuit is used. The composition is applied to the back of the mirror in strips (in the case of massive products, spread over it notched trowel), after which they apply it to the wall and disconnect it. After waiting a few minutes, during which the solvent evaporates and the mass becomes sticky, the glued surfaces are reconnected, obtaining a durable, functional adhesive connection. It is advisable to carry out the process in a well-ventilated area, away from any sources of fire. Mounting adhesive is also suitable for fixing large-format mirrors, but this work is best left to professionals.
Fixing the mirror on the wall with special mounting glue
Using a gun, glue is applied to the back surface of the mirror in strips 5–7 mm wide, at equal intervals of about 5 cm and at a distance of 4 cm from the edge.
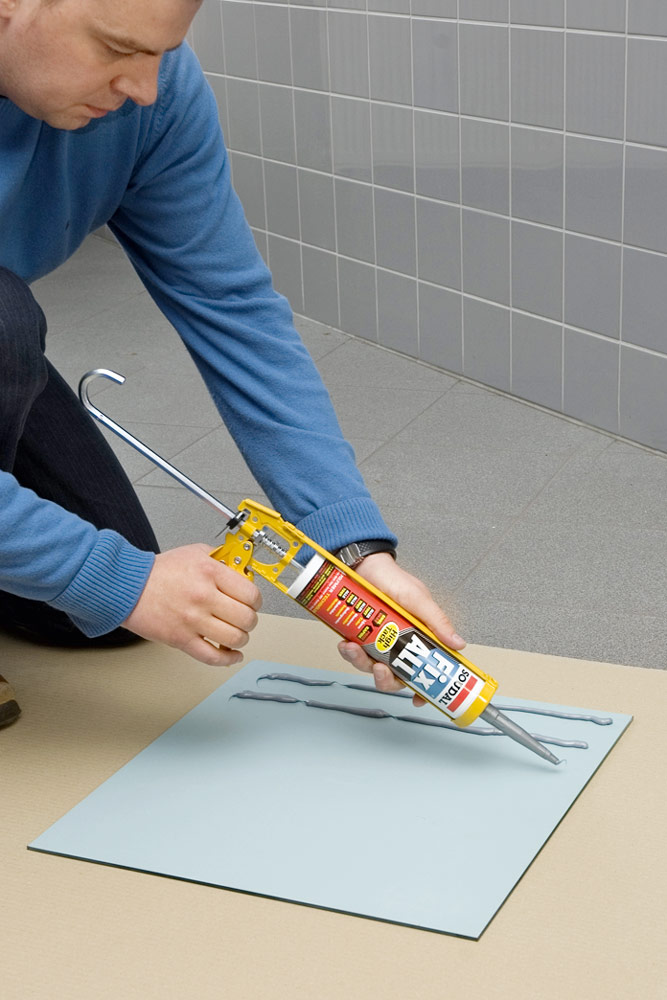
After this, the mirror is pressed against the wall and immediately disconnected. After waiting a few minutes, the glued surfaces are again firmly connected. Excess glue is removed with a Swipex (Soudal) cloth. In case of installation, it is fixed until the glue is completely cured (for 24 hours).

Review of adhesives for mirrors

Mounting tape(Tesa) 0.019 × 5 m (479 RUR). Photo: Unibob
Mounting the mirror with double-sided adhesive tape
Adhesive tapes will help you quickly and securely fix small mirror(weighing 2–6 kg) without such labor-intensive operations as drilling holes, installing fasteners, and cleaning the wall from traces of glue. The surfaces of the materials being joined remain intact and unharmed. Protective layer the tapes are removed immediately before fixation. By the way, it must be as accurate as possible, since it will be impossible to subsequently change the location of the mirror. If you need to remove a mirror from the wall, the easiest way to do it is steel wire or a fishing line that is passed behind the mirror and the base of the tape is cut.

Double-sided self-adhesive tape is placed on the back side of the mirror evenly across the entire plane in several sections so as to ensure good ventilation reverse side
There comes a time when the usual surroundings become boring. I want to change something, update something old interior, add some detail or make good repair. The best way update the room, make it brighter, perhaps even increase the space - attach a mirror to the closet. You have purchased new furniture, you need to glue a mirror to a cabinet door, and you don’t know how to do it correctly, let’s look at individual mounting methods.
The best way to update a room, make it brighter, and perhaps even increase the space, is to attach a mirror to the closet.

“Liquid nails” or silicone is applied to mirror surface parallel lines at equal intervals.
How to glue a mirror to a cabinet? How to do this job correctly? There are several ways to glue a mirror.
| Method name | Features of the method |
| Mounting double-sided tape. | This material must be chosen correctly. The adhesive tape should be high-grade - 3M, foamed, its thickness should be 0.8-2 mm (to even out unevenness). It is possible to work with it at temperatures from +10 to +25°C. Indicators higher or lower will not provide adequate grip. The tape consumption is 60 cm² per 1 kg of mass. |
| Usage " liquid nails» special glue or colorless construction silicone. | There are some nuances: it is better not to glue the mirror to “liquid nails” or other products that have a characteristic odor. The substance contained in them can lead to damage to the amalgam. It is better to purchase special adhesives for mirrors - “Titan” (the most reliable product), “Abro”, “Soudal”, “Bostik 2750”. A very high-quality and handy method is gluing a mirror to silicone. This is the best option. |
| Mechanical method. | Using U-shaped metal tabs, plastic stops or special screws. |

You have purchased new furniture, you need to glue a mirror to the cabinet door, and you don’t know how to do it correctly, let’s look at individual mounting methods.

The best option is to glue the mirror onto colorless silicone for construction.
Attention! Which gluing option to choose is up to you to decide. The main thing is not to rush, do all the work scrupulously, approach the matter responsibly, then the mirror will be attached firmly enough and will last a long time.
How to glue a mirror to a cabinet?
Remove the protective stickers from the tape.


Necessary materials
Before you start work, you need to prepare following materials: mirror, “liquid nails”, glue or silicone for gluing the mirror, double-sided tape, masking tape, degreaser.

There are several ways to glue a mirror.

Now you need to wait for the glue to dry.
Required Tools
The following tools will be useful: sandpaper, mounting gun, pencil, ruler or tape measure. If you are screwing the mirror onto the mount, then you will need a drill, a screwdriver, screwdrivers, regular drills, a diamond drill (to make a hole in the mirror), special mount for mirrors.

Which gluing option to choose is up to you to decide.

If you decide not to use “liquid nails”, but to attach them to the legs, then you need to make sure that they are manufactured accurately in height and, if necessary, install spacers.
Fastening process: step-by-step instructions
So, you stocked up on all the materials and tools, purchased a mirror the right size. It is preferable if its back side is protected with a special film, which, if the mirror breaks, will prevent fragments from falling off. Now let's get to work.

You can walk shallow sandpaper for better adhesion of the glue.

Before fixing the mirror, you need to place a soft layer, and then press the mirror with paws.
First, remove the cabinet door. To make it easier to work with, you need to place it in a horizontal position. Using a pencil, draw marking lines on the surface. Use a degreaser to clean the door, then the mirror. You can use fine sandpaper for better adhesion of the glue. Use a brush to remove all the dust.

Use a degreaser to clean the door, then the mirror.

If the mirror has ready-made holes, you can use special screws instead of the tabs.
We apply “Liquid nails” or silicone to the mirror surface in parallel lines at equal intervals. Between them, for auxiliary fastening, we glue strips of double-sided tape. The best option is to glue the mirror onto colorless silicone for construction. There is no need to use only adhesive tape, since a mirror glued in this way may fall after some time, especially when the room is very warm or you are doing work in the summer.

First, remove the cabinet door.

To prevent the glass from cracking, the mirror surface must be wetted all the time or a side made of plasticine must be made and water poured into it.
Remove the protective stickers from the tape. We fix the long edge of the mirror on the marking line. Slowly, we lower the mirror surface, trying to prevent displacement. It is better if an assistant works with you. He will make sure that the mirror lies flat, without going beyond the applied markings. That's it, the mirror is glued. Now you need to wait for the glue to dry. Optimally, a day is allotted for this. The door can be secured in place.

So, you stocked up on all the materials and tools and purchased a mirror of the required size.

The mirror should lie on cardboard or fabric.
If you decide not to use “liquid nails”, but to attach them to the legs, then you need to make sure that they are manufactured accurately in height and, if necessary, install spacers. They should be close to the mirror, but without tension. You also remove the door from the cabinet, lay it horizontally, mark where the holes for fastening the tabs should be, screw them, and bend them. Before fixing the mirror, you need to place a soft layer, and then press the mirror with paws.

The following tools will be useful: sandpaper, mounting gun, pencil, ruler or tape measure.

Gluing a mirror to a cabinet door is not that difficult; all the work must be done very carefully.
If the mirror has ready-made holes, you can use special screws instead of the tabs. In case there are no holes, they are drilled with a diamond drill in the corners. To prevent the glass from cracking, the mirror surface must be wetted all the time or a side made of plasticine must be made and water poured into it. The mirror should lie on cardboard or fabric. Plastic washers must be inserted under the screw heads.

Before you begin, you need to prepare your materials.

As a result, the interior of the room will be greatly transformed.
Gluing a mirror to a cabinet door is not that difficult; all the work must be done very carefully. As a result, the interior of the room will be greatly transformed. It is not necessary for the mirror to be rectangular or square. It can be of any original shape. It is important that it fits the overall situation.

The main thing is not to rush, do all the work scrupulously, approach the matter responsibly, then the mirror will be attached firmly enough and will last a long time.

It is not necessary for the mirror to be rectangular or square.

It is important that it fits the overall situation.
VIDEO: How to glue a mirror. Mirror swing door for furniture.
There are several ways to hang a mirror in the bathroom at different stages of renovation. This is not a difficult, but responsible event that requires precision and accuracy. Installation of a mirror in the bathroom is possible before and after tiling the walls. To do this, you can use metal fasteners or various adhesives. First you need to choose a mirror and decide on a place for it.
Mounting methods
There are several ways to securely install a bathroom mirror. It can be hung, glued to tiles or embedded in the wall. There are several options for how to install a mirror sheet without fasteners.
For example, a reflective plate is fixed with tile adhesive before tiling, and then covered with tiles. Or, when laying tiles, leave free space for the mirror element, into which it is glued to any suitable remedy. In this case, the thickness of the product must match the thickness of the tile.
There are many more ways to install an element on ceramic tiles. It can be glued with special glue, liquid nails, sealant and even double-sided tape.
The installation method is chosen according to the size and weight of the mirror. So, for large and heavy mirrors, fastening with screws is best. Medium-sized accessories can be glued, and light ones can be attached with double-sided tape.
At what altitude
Before you hang the bathroom mirror on the tiles, you need to decide on the height for it. It should ensure convenient but safe use of the reflective element for all family members. Optimal height installation is defined as follows:

Option 1 - using glue
You can glue a mirror to the wall in the bathroom using tile adhesive or a special substance designed for mirrors. This method is best suited for medium-sized accessories. Its main advantage is the absence of fastening elements on the surface of the canvas.

Before work, you need to prepare a place under the mirror - degrease and dry the tiles, as well as the back of the mirror.
If it must be installed level with the cladding, the tile is removed and the surface is leveled with putty and primed.
In this case, the thickness of the accessory should match the thickness of the tile (6-10 mm). To fix heavy sheets until the adhesive dries, you will need a support to support and prevent the mirror from slipping.
Which glue to choose
- Mirror adhesive must meet the following requirements:
- The substance must not emit toxic substances after drying and must not be toxic.
- The chosen product must be resistant to large changes in temperature and humidity.
- The composition should not destroy the amalgam.
- After drying, the glue should not change color so that dark spots are not visible through the surface.
- The glue should remain elastic after drying. If the mixture hardens, stress will develop in the glass in a room with elevated temperature and humidity. This may cause the accessory to peel or crack. The substance should cover the surface evenly.

It’s good if the mirror sticks quickly and you don’t have to hold it for long.
- According to the composition they are distinguished:
- Silicone products. These are chemically neutral substances that are adhesive to most surfaces. The products form a film that ensures reliable adhesion of the treated surfaces and the formation of a strong elastic seam. Their disadvantage is a slow hardening period.
- Hybrid - consisting of adhesive and hardening components. They provide a high-quality, elastic, moisture-resistant seam, while being easy to apply and dry quickly.
Glue Titan Tytan
Installing a mirror in a bathroom is often done using Titan. This is a specialized adhesive based on synthetic resins and rubber. It is suitable for attaching mirrors to any type of surface: concrete, brick, wood, drywall. The color of the composition is beige. Titanium dries completely in 72 hours and can withstand large temperature changes. 
The glue forms an elastic, but strong and waterproof seam, has high adhesion, and does not damage the amalgam.
Loclite glue
To attach mirrors to tiles, they often use means for gluing rear-view mirrors to the windshield. For example, this is Loclite glue. It consists of 2 components. One is based on a modified acrylic ester, and the second is an activator.

Before application, the compositions are mixed and applied in an even layer to the glass surface from the amalgam side. The product dries quickly, does not change color, and does not leave streaks.
What else can you glue on?
The bathroom mirror can also be glued to the following compounds:
- Abro two-component product based on epoxy resin consists of two components - glue and hardener. It has a transparent structure, is applied evenly to the surface, does not destroy the amalgam, and dries within an hour.
- “Instant installation” for mirrors does not destroy the amalgam, is moisture resistant, resistant to vertical shifts, has beige color. The product is adhesive to almost all surfaces.
- Ottoseal is an elastic one-component silicone adhesive for epoxy based with excellent adhesive properties to any surface. Resistant to high humidity, temperature, UV radiation. Suitable for use in baths and saunas. Additionally, it has fungicidal and bactericidal properties. It is not dangerous for amalgam, it is well fixed on the ceramic surface.
- Soudal 47A based on a weak solvent. This product is resistant to high humidity, withstands large temperature changes, has excellent adhesiveness to concrete, ceramics, brick, plaster, porcelain stoneware.
Installation technology
The technology for gluing a mirror in the bathroom is simple:
- Guidelines are drawn on the wall with a marker: horizontal at the base and vertical at the side.
- Before attaching the mirror in the bathroom, glue the borders, if provided, and leave them to dry completely.
- Glue is applied to the prepared back surface of the mirror sheet in a strip along the perimeter, retreating at least 2 cm from the edge to avoid it going beyond the element.
- Glue is applied in the middle using a mesh.
- Crosses for tiles are installed between the borders and the main canvas to ensure that the seam is even. The same must be done if a mirror sheet is glued between the tiles.
- After this, the mirror is gently but firmly pressed against the wall, starting from the lower reference line.
- Within 5 minutes after this, the accessory can still be corrected, then the glue sets, but the composition will finally dry within 24 hours.
After the glue has dried, the seam is filled with silicone sealant, white or colorless.
Option 2 - for liquid nails
You can attach the mirror using liquid nails. Thus, it is installed in niches if there is a plasterboard gasket between the wall and the mirror or on a tiled surface. The product must be moisture resistant and not destroy the amalgam.
Before applying the product, the surface is thoroughly degreased, and control marks are made on the wall - landmarks. It is best to completely circle the mirror. Then an adhesive substance is applied to its back side.
Liquid nails are applied around the perimeter, retreating 2-3 cm from the edge and pointwise or in a grid - in the middle. After this, the sheet is lightly pressed against the wall, torn off for 1 minute and pressed again. The composition will dry within 24 hours. During this time, it is better to fix the mirror with a support.
Option 3 - using screws Another way to hang a mirror in the bathroom is using screws with decorative caps. This option is used for large and heavy accessories. Often the mount is included in the kit, but if necessary, you can purchase it yourself, choosing those that fit the general appearance
bathroom. The number of attachment points depends on the size of the canvas. In addition to screws, you will need dowels and rubber gaskets
It’s good if the accessory already has holes. But if there are no holes, you can make them yourself using a drill and a diamond drill bit. During operation, the drill must be constantly cooled to avoid damaging the glass; the holes must be cleaned. You can entrust this work to a professional glazier.
The prepared mirror is applied to the wall and the points for fastening are marked with a marker. Then, using a drill, holes are drilled in the tiles, into which dowels are hammered. After this, the sheet is applied to the wall, aligning the holes and tightening the screws with plugs.
Option 4 - using double-sided tape
If the mirror is light and thin enough, you can use moisture-resistant double-sided tape to install it; in this case, we install it like this:
- We mark horizontal and vertical guide lines on the wall using a level.
- Degrease and dry the surface of the tile and the back side of the mirror sheet.
- Place double-sided tape on the back of the sheet in stripes.
- Between the strips of tape you can apply moisture-resistant silicone sealant for greater secure fixation.
- Filming protective film using tape and carefully, focusing on the control lines, fix the mirror on the wall.
Using double-sided tape, installation must be carried out carefully, because it will be difficult to fix something.
Conclusion and Conclusion
Any of the described methods will help to securely mount the mirror on the wall in the bathroom. This is a fragile material and can crack or break if handled carelessly.
If there is a fear of damaging it and there is no confidence in your abilities, you can invite a glazier to carry out the installation. He will be able to quickly and efficiently hang a mirror correctly in any way and on any surface.
Video instruction
Absolutely any room, be it a hallway or a bathroom, needs a mirror. However, when purchasing a separate reflective plane, problems with its installation often arise.
How to glue a mirror to a mirror, wooden surfaces, ceramic tiles, other materials? Numerous masters ask similar questions. If it is absolutely necessary to fix the plane of the product on a vertical surface, the following will help: practical advice and recommendations.
How to glue a mirror to a mirror?
To accomplish the task, it is enough to use polymer-based glue. Such effective one-component bases as “Instatic” and “Titan” are distinguished by their elasticity, resistance to moisture and temperature fluctuations. Therefore, when wondering how to glue a mirror to a mirror, preference should be given to this option.
Polymer adhesives allow you to reliably connect surfaces of the same type and different in structure without additional reinforcement. The result is the formation of a transparent, almost invisible layer.
The use of a polymer base will solve not only the problem of how to glue a mirror to a mirror, but, if necessary, will help to connect heavy metal and stone planes, polystyrene plates, ceramic parts or glass. Polymer glue protrudes universal solution for performing numerous tasks in construction and renovation.
How to glue a mirror to a wall?

The vertical surface must be carefully prepared for work, so first, all existing irregularities are first cleaned and the recesses are puttied.
Craftsmen who have more than once had to look for an answer to the question of how to glue a mirror to a wall recommend using special glue Bostik 2750MS for this. The substance has high adhesion to bricks, natural stone, wood, metal and plastic. Even after several years after installation, the product does not corrode the mirror amalgam.
To ensure reliable adhesion of the glue, some kind of support must be placed under the plane being installed. In this case, the mirror should be carefully pressed against the wall with your hands. Hardening of the adhesive composition, sufficient to hold the structure, occurs after 20-30 minutes, and complete setting occurs after a few days.
How to “mount” a mirror on a cabinet door?

Such a solution allows you to revive old furniture and update the interior. To reliably connect surfaces, it is better to select a small mirror.
First, you should determine the installation location by marking the appropriate boundaries with a pencil and ruler. The mirror is fixed to the surface using double-sided tape, which is placed around its perimeter. Next, glue is applied, which can serve as the same polymer base. After setting, the safety layer of tape is removed.
How to glue a mirror to the windshield?

Answer to this question simple enough. A special solution allows you to glue a mirror to the windshield. Only such a solution will neutralize the effect of aggressive environment and dampen mechanical vibrations during vehicle movement.
How to glue To do this, you must first place the car in a dry place, protected from direct sun rays room. The optimal temperature for effectively joining surfaces is in the range from 18 to 20 o C. Before gluing the mirror, it is necessary to thoroughly clean and wipe dry both surfaces.

In order for the connection of the mirror to the surfaces to give the expected result, several rules should be followed:
- You need to use only one type of glue, without resorting to experiments with combining separate compounds.
- It is extremely important to use an adhesive base with a valid expiration date. When placing a mirror on an expired substance, you should not expect it to be securely fixed.
- Before starting work, you need to make sure that the available volume of glue is sufficient for its successful completion.
- For several days, try not to touch the mirror again.
- Before performing the task, it is recommended to clean the surfaces, eliminating unevenness, removing dirt and remnants of old glue.
- If during the installation process the seal in the form of double-sided tape comes off, it is enough to temporarily strengthen the surfaces with superglue.
- For safety reasons, it is better to secure a product with impressive dimensions. mechanically, by building a reliable stand or placing the item on small, inconspicuous fasteners.
Finally
A mirror is an extremely fragile and expensive item. Therefore, it should be glued exclusively with high-quality and proven glue. In this case, it is necessary to follow the instructions indicated on the packaging and strictly follow the application technology. Only in this case is truly reliable and durable adhesion of surfaces guaranteed.
Based on the above tips, you can turn what would seem to be difficult task by connecting the mirror to various materials for simple fun. The procedure may take up a lot of free time, but will solve the problem for a long time.
If you don’t know how and with what to glue a mirror to any surface, then you should definitely read this article. Firstly, let's start with the fact that in everyday life there are many situations related to the construction of mirrors, in which the basis for gluing can be various surfaces. Therefore, we will consider several options that are most often encountered in life.
Attention! To glue the mirror, you can use special glue for mirrors, which does not spoil the amalgam on the back side. Sometimes craftsmen use liquid nails.
How to glue a mirror to a wall
First of all, it is necessary to prepare the wall surface.
- It is cleaned of irregularities.
- Prime using liquid primer deep penetration.
Now the mirror itself is being prepared. Several strips of double-sided tape are glued to it on the back side. They are designed to support the mirror until the glue dries completely. Now you can apply the adhesive itself. The best option- apply glue along the entire perimeter and over the rest of the area in stripes every 15-20 cm.
Now you can attach the mirror to the wall. You need to support it with something from the bottom edge so that the mirror does not move off the wall under its own weight. Usually after half an hour the support can be removed, but the glue will finally dry only after a day.
How to glue a mirror in the bathroom
Usually placed on the walls in the bathroom ceramic tile. You can also glue a mirror onto it without any problems. This technology not much different from the previous one. The only difference is final stage, in which a sealant is used. They close the gap around the entire perimeter between ceramic wall and the mirror itself. If the mirror has big sizes, and therefore the weight, then to ensure that it does not fall off at once, it is necessary to carry out additional fastening with self-tapping screws.
How to glue a mirror to a mirror
There is nothing complicated here either. Although you still have to work hard. Let's consider two gluing options.
- Bonding is done by surfaces. This is when there is a need to stick a new mirror onto an old one, which is not possible to remove. We act in exactly the same way as in the first two cases.
- Two mirrors are glued together with edges to increase the mirror area. This is a complex process that requires high precision. If both mirrors will subsequently be glued to the wall, then it is better to glue them separately, exactly placing them on the surface. If the prefabricated structure will be hung, both mirrors must be glued on their edges with the same adhesive. Note that this is a very unreliable mount, which is used very rarely.
How to glue a rear view mirror
In this case, you will need a special two-component glue, which can be purchased at a car store.
- First, the installation site on the windshield and the rear part of the mirror stand are cleaned. Usually all this is cleaned of the remnants of old glue. Then degreasing is carried out using alcohol. Be sure to dry the surfaces well.
- The bracket and holder are removed from the mirror to facilitate the design.
- A special mesh tape is supplied with the glue. A blank is cut from it to fit the dimensions of the mirror stand.
- The blank is glued exactly to the place where the mirror is installed.
- After which the glue is applied to the prepared plane of the mirror stand, and all this is attached to the mesh with slight pressure.
- Hold for about 15 minutes, then remove the glue that protrudes from the edges and leave it all for a day. After which you can hang the bracket and holder.
If you are interested in other fastening methods, then read the article


