And again a photo lesson on editing. This time I came across a gas hob from Hansa. Not a bad company, by the way, I had many years of experience with this company’s stove (albeit an electric one) - only pleasant memories.
The design of this panel is quite original - I liked it - it looks like free-standing burners are attached to the frosted glass...
Instructions are also included. I will provide images regarding the installation. The first scheme, in my opinion, is quite useless. 
The second scheme has much greater practical significance. We will be guided by it. However, it was not possible to do this fully, due to the specifics of the kitchen design. But more on that later. 
We take a carpenter's square and transfer these dimensions to the tabletop. Due to the specifics of the project, it was impossible to move the panel onto the adjacent box, so I simply moved it away from the wall as much as possible (as a result, instead of the recommended 100 mm, I ended up with 80 mm). 
The next step is to drill out the corners of the marking with a 8-mm drill and connect them with straight cuts using a jigsaw (it is better to use a file with a reverse tooth - the cuts on the front side are simply exceptional) 
Since the panel should go onto the wall of the box, I took out the box itself and made a centimeter cutout on its side wall. By the way, after installing the plate into the tabletop, it turned out that I had done it in vain; on the left, it is thinner by about 4-5 mm and does not extend beyond the thickness of the tabletop. But, guided by previous experience, I did just that in advance. 
The instructions don't say anything about the next step, but I always silicone the ends of the laminated chipboard in the places where the equipment is inserted. This case was no exception. 
Now let's take on the hob itself. We turn it over (trying to avoid the burners falling apart - they can be removed in advance))) and stick foam insulating tape around the perimeter (it is included in the kit)  Now we need the help of a professional, namely a gas engineer, to make the connection. You are prohibited from doing this yourself. But the lesson needs to be completed, so I’ll put the stove up, and then I’ll put everything back in place)).
All we have to do is push the slab into the cut-out niche, level it and screw it with special clamps. 
The instructions see this process as follows: 
True, the width of the tabletop did not allow me to do it as in the diagram, namely, to place one edge of the clamp in the cutout on the stove, and the second on the tabletop... 
But this did not affect the degree of fixation much... As a result, you should get something like this: 
By the way, this hood requires connection to an outlet for auto-ignition to function.
Modern kitchen sets allow you to independently install a gas, electric or induction hob. Such models can be used both together with an oven, that is, to be dependent, and separately, that is, to be independent. Despite some differences in their design, the general rules that should be followed when carrying out work are similar for all versions.
Preparing the bore hole
Marking
The appearance of the finished kitchen depends on how accurately the markings are made, and an error of even half a centimeter will force you to purchase a new countertop.
Marking can be done in two ways:
- put the device in place and circle it with a marker;
- calculate and mark the mounting location to the nearest millimeter.
Despite the apparent simplicity and attractiveness of the first path, there are a lot of chances to make mistakes and apply incorrect markings.
Preliminary sizing
It is much more reliable to mark the installation location through careful calculations:
- The boundaries of the interior space of the cabinet above which the hob will be placed are drawn on the surface of the countertop. Thus, the place within which the work will be carried out will be designated. The markings must be applied with a pencil so that the lines can be easily erased upon completion of the work. If the countertop does not allow you to draw clearly visible lines, then you should stick paper masking tape on its surface, and draw markings on it.
- It is necessary to find the future center of the hole into which the housing will be installed. To do this, diagonals of a rectangle are drawn on the tabletop, formed by the front and back parts of the tabletop and the drawn boundaries of the cabinet.
- The center of the hob will be located at the intersection of the drawn diagonals. You need to draw two straight lines through it: one parallel to the edge of the tabletop, the other perpendicular.
- On these straight lines you need to mark the dimensions of the built-in part of the housing. You can look at them in the technical documentation or try them on yourself. These dimensions should be increased by 1-2 mm to make it more convenient to install the device later.
- Straight lines are drawn through the marked marks (parallel and perpendicular to the edge of the tabletop). They form a rectangle, exactly corresponding to the recessed part of the body and located in the center of the tabletop.
- It is necessary to ensure that the minimum distance specified by the manufacturer in the technical documentation is maintained between the final marking lines and surrounding objects.
- The resulting rectangle must be outlined with a marker and the extra lines erased so as not to make a mistake when cutting a hole.

The marked rectangle corresponds to the size of the hob
Cutting a mounting hole
To cut out a seat for the hob, you can use the following tools:
- milling machine;
- jigsaw;
- drill.
The highest quality cut is obtained when working with a milling machine. A slightly lower-quality cut is made by an electric jigsaw with a fine-toothed file.

For work you can use a drill or jigsaw
The procedure for cutting a hole with a jigsaw is as follows:
- Drill holes in the corners of the marked rectangle (from the inside) with an 8-10 mm drill.
- Using a fine-toothed file, carefully make a cut along the marked lines. The body of the jigsaw cannot be kept suspended; it should be pressed tightly against the tabletop.

The hole is cut along the marked lines
But not every household has convenient tools. A much less beautiful, but nevertheless suitable for installation cut can be made using a conventional drill.
The procedure for cutting a mounting hole using a drill is as follows:
- Using an 8-10 mm drill, holes are made along the intended line. They need to be drilled from the inside of the marks so that the drilled areas are in contact with the intended cutting line. Holes must be made as often as possible so that the cut piece of the tabletop can be easily broken off.
- Rough edges of the hole must be aligned with the marked line. To do this, you can use a rasp or a small file for wood or metal. The resulting edges must be made as smooth as possible.
Attention! After the mounting hole is made, you need to insert the hob into it. The device should fit effortlessly and completely cover the cut hole with its body.
Sealing the mounting hole
The next step is sealing. It is necessary to protect the countertop from water during cleaning or cooking. A tabletop made of wood or chipboard can swell and deteriorate as a result.
Sealing is done using acrylic sealant for plumbing or nitro varnish. It must be carefully applied in a thin layer from the inside to the ends of the hole made. There is no need to apply sealant to the top surface of the countertop - a special gasket in the form of a sealing tape that comes with the panel will be used there.
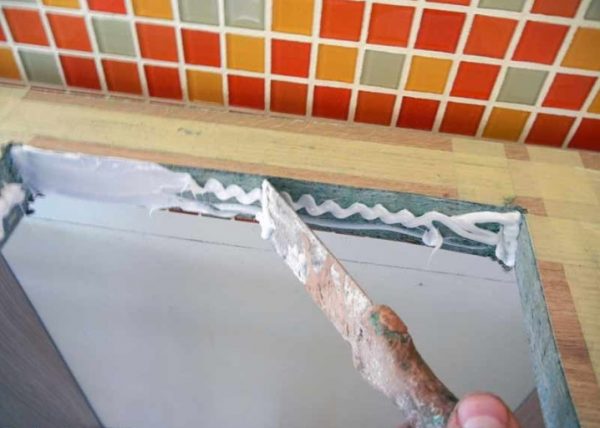
The ends of the table top are treated with silicone
Sealing tape sticker:
- An adhesive layer covered with a film is applied to the sealing tape. It should not be removed all at once, but peeled off gradually as it sticks to the surface.
- The tape is glued around the perimeter of the mounting hole in one piece. It is not cut at the corners, but simply glued with a turn.
- The end and beginning of the tape are connected end-to-end, without overlap or gap.
Some manufacturers equip hobs with aluminum seals. Instructions for installing them are contained in the documentation for the device.
Panel fastening
The hob is mounted as follows:
- The device is inserted into the mounting hole and centered so that the front side is parallel to the edge of the countertop.
- From inside the cabinet, the cabinet is attached to the tabletop with special plates included in the delivery set.
- Installation must be carried out in such a way that there are no gaps between the hob and the countertop.
- Use a utility knife to trim off the excess sealant from the top.

The seal is cut with a utility knife
Connecting an installed hob
Electrical panel
It is advisable to provide a connection point for the electric hob before installing the kitchen unit. The socket must meet all electrical safety requirements:
- have a grounding line;
- The supply copper cable must have a cross-section of at least 4 square meters. mm.
A hole is cut in the back wall of the base cabinet opposite the electrical outlet of such a size that you can easily insert and remove the plug from the hob by hand.
Sockets installed for self-connection come in two types:
- three-pin;
- four-pin.
If there is a plug installed on the hob cord, then to connect it, just plug it into the outlet. The power cord must be of such length that it is not too tight when connecting the device.

Plugs and sockets for connecting hobs
For models sold without a plug, certain steps will be required:
- If the socket is three-pin and there are four wires in the wire, then you will need to connect a two-phase model to a single-phase network. To do this, wires with black and brown insulation are connected in the cord. This connection is connected to the socket phase. The blue neutral wire is connected to the socket neutral, and the green-yellow wire is connected to ground. All connections must be securely insulated.
- If the placement of the wires in the socket is unknown, then using a multimeter you need to determine the phase and zero. If necessary, they are swapped so that they match the wiring in the plug of the device.
Attention! When installing an electric hob yourself, it is necessary to provide for the mandatory installation of individual RCDs and a circuit breaker. For example, for a 16A socket you need an RCD of at least 40A, and an automatic circuit breaker - at least 25A.
Induction hob
An induction panel is connected according to the same general principles as an electric one.
Many models do not have power cords, and only have terminals for connecting an external cable.

The connection diagram is printed next to the terminal block
In this case, the connection is carried out in the following order:
- Remove the protective cover from the back of the device.
- The external cable is passed through the cover.
- The cord is connected to the terminal plate according to the diagram supplied with the panel.
- If a jumper is installed connecting zero and ground, it must be removed.
Gas panel
Household gas is a source of increased danger, therefore special requirements are imposed on the kitchen area:
- Availability of ventilation hood.
- Air flow of at least 2 cubic meters. per hour for each kilowatt of panel power.
- The distance to the wall is at least 130 mm.
- The supply gas hose must be located in such a way that it is not subject to excessive heat and allows for periodic inspection by the inspection organization.

The hob is connected with a flexible hose
Attention! If the mandatory requirements are not met, the operating organization will not allow the installed gas panel to be operated.
The panel connection is carried out by a certified specialist in the following order:
- Sealing fum tape is applied to the threaded connections.
- Paronite gaskets are inserted into the gas hose.
- The hose is connected to the hob and the gas supply point.
- The joints are checked for leaks using soap foam.
- The power cord plugs into a spill-proof outlet.
To operate gas models, they must be accepted by the service organization responsible for this work in your area of residence.
You can install a hob into a kitchen unit on your own, carrying out the work carefully in accordance with the recommendations presented.
The first and most important stage of installation work is marking. The external attractiveness of the kitchen unit and the room as a whole depends on the correctness and clarity of the calculations used to cut the hole for the hob.
When making calculations, you should carefully check the result; if you make a mistake by even 1 cm, you can end up with a damaged tabletop, the cost of which is not at all small.
Carrying out marking
The installer's task is to place the panel strictly above the cabinet, taking into account that there is no margin in width.
Marking can be done in only two ways:
- Household option;
- Professional.
The household method does not require the use of special tools; the work is carried out “by eye”. The panel is placed in the center of the tabletop and outlined with a construction pencil. This method is unsafe and there is a risk of damage to the kitchen set.
The second option is suitable for patient collectors; a sufficient amount of time is spent on making calculations. This method minimizes the risk of error.
The calculation process is divided into stages:
- The process begins by moving the internal boundaries of the bedside table above which you want to place the hob. Lines are drawn on the tabletop to form a rectangle;
- Next, the center point of the existing rectangle is calculated. A coordinate system should be drawn from it. A cross is marked, one of its lines should be laid parallel to the front edge of the tabletop, and the second perpendicular to the same base as the first;
- The resulting coordinate system is used to measure the dimensions of the embedded part. Here you need to carefully measure the panel itself, taking into account the small margin, it will allow installation strictly in the center;
- After laying down the dimensions, you need to draw lines, there are four of them. The result is an even rectangular shape, the tabletop is prepared for the correct cutting of the seat.
The calculations have been made, the place for cutting is marked, then we move on to the next stage, which is no less interesting.

How to cut a hole
To carry out work to create a mounting hole for the hob, three types of tools can be used:
- Drill;
- Jigsaw;
- Milling machine.
To create an accurate and correct cut, it is better to use a manual router, but it is unlikely to be found in the tools of an ordinary person who is not involved in assembling furniture. The second option is a jigsaw, even if it is not available, purchasing this tool will not be difficult, its cost is not high.
There is always a drill in the house, but using it to make a hole makes it difficult to install the hob later. The cut edge turns out to be uneven - this requires additional work to seal the hole. This process takes a sufficient amount of time.


In order to cut a hole with a drill, you will need an 8 mm drill, or 10 mm is possible. The principle of operation is to drill holes at a short distance. Drilling is carried out until they become a single slot.
It is important to understand that work is carried out only on the internal side of the marking. It is required to place a stool under the cut-out piece inside the tabletop itself, this will keep the furniture safe and sound if the cut-out rectangle falls.
Making a hole using a jigsaw is much easier, but you will need a drill. Using it you need to make one hole, which will be the basis of the work. It is also possible to make a cut by hand, but there is a danger of making the cut inaccurately. The first cut can also be made with a jigsaw, but this requires some experience with this tool.
The main thing to remember is to take precautions. For the cut out part of the tabletop, it is necessary to ensure a safe fall - this will eliminate the possibility of damage to the furniture.
After cutting out the hole for the panel, the edges of the slot are treated with silicone. If moisture gets in, the countertop for the hob may become deformed - this will lead to damage to the appearance of the kitchen. A hole cut with a drill is more difficult to process, since the torn edges interfere with the correct application of the composition; you will need to devote a sufficient amount of time to this process.

Installation and fastening of equipment
Installing a hob into a countertop has its own sequence; for proper independent work, the main thing is to follow all the steps in order:
- The first step is connecting the gas hose to the panel - this will eliminate subsequent installation problems. The hose is equipped with a union nut where the paranitic gasket is attached. Next, the nut is very well secured to the threaded pipe, it is located at the bottom of the hob. To ensure reliable connection, it is advisable to lubricate the paranitic gasket using grease;
- The second stage is winding the sealing tape. It must be fixed taking into account certain requirements. Usually the sealing tape is a component of the hob; it has a self-adhesive base. The protective paper is peeled off from the roll of tape gradually - this will prevent the seal from tangling. It is fixed around the perimeter of the hole on the front side of the cabinet. A prerequisite is the integrity of the seal, so at the corners you should simply turn it and avoid cutting the tape. The two ends fit tightly to each other, eliminating the appearance of a gap;
- Next, the hob is installed in the machined hole. It is imperative to align the equipment so that it looks smooth and beautiful. After centering the device, you can begin mounting it. Let's see what the countertop looks like; under it in the four corners you should secure the hob using self-tapping screws and special plates. It should be tightened tightly enough to eliminate the possibility of cracks - this will ensure a high level of safety when using the hob.


Step-by-step process of working with a gas panel
To carry out the process, you will need to take a construction knife; it is very sharp, so you must follow safety rules. The gasket, which was previously squeezed out, is very carefully cut off from above.
Next, another part of the gas hose is connected, which goes to the pipe. A mandatory requirement is the installation of a shut-off valve. It is important to understand that the decision to independently work with replacing gas taps requires the owner to bear responsibility for working with gas equipment.
Here you must strictly follow safety rules and perform work in accordance with the prescribed requirements. If the gas inspection company finds a violation in the self-installation of the tap, then you will have to pay a fine.
The last stage of installation work is resolving the issue of power supply. A waterproof socket is required and must be installed before installing the hob. If the equipment is gas, then no additional devices are required.
Video: installing a gas hob
Distinctive features of installing an electrical panel
It is important to understand that it is better to entrust the connection of the electrical installation option to professionals. When solving this problem on your own, there is a danger of harming yourself. Modern panels powered by electricity are easy to use and durable.
When equipment is installed correctly, it rarely fails. If the panel stops working, then simply disconnect it for repair work. This will allow you to independently deliver the equipment to the workshop, which will save on the arrival of a specialist.


The installation of an electrical surface begins with a connection according to the written diagram. It can be found on the panel itself, only on the reverse side. When connecting yourself, you need to be careful. Even the slightest mistake can lead to wiring failure throughout the entire room. An incorrect connection may result in a lack of adjustment of the burners.
Some models have a separate wire that should supply electricity directly from the panel. In this case, a socket and plug are not required, and the connection consists of connecting the lead wire to the panel.
Next, the equipment needs to be turned over and installed in the countertop. This process is practically no different from installing a gas model. The main difference is that there is no need to install a gas hose and faucet.
After completing all installation steps, the panel can be checked for errors. If you carefully follow the prescribed diagram, the device should work properly and, most importantly, last for a long time.
Conclusion
Installing a hob yourself is a rather complicated process. But if you follow all safety rules, take into account the nuances and pay attention to the work when connecting the stove to power (gas or electric), then it is quite possible to carry out the installation yourself, significantly saving money on calling a technician. If you have doubts about your own abilities, then for safety reasons it is better to contact a specialist.
DIY electric hob. All that remains is to answer the question of installing a built-in hob in your kitchen furniture yourself. I should immediately note that this work will not be difficult to do with your own hands, without turning to the help of a master.
Each hob comes with instructions. with pictures, which contains enough information for installation. But the instructions, as a rule, miss several important points regarding cutting a hole for a niche, as well as where and how to install an electrical outlet for connecting the hob.
Gas and electric hobs are installed in almost the same way, only it is better to entrust the connection of the gas surface to professionals. But if you decide to do everything yourself, then keep in mind that there are different burners for liquefied and natural gas, and after finishing the work, check with soapy water for gas leaks.
Installing a hob into a countertop
To install the hob into the countertop, you will need an electric drill and a jigsaw. If almost every household has an electric drill, then most often you have to buy a jigsaw.
Take into account, that you need to be very careful with the glass-ceramic surface so as not to damage it during installation. So weigh the pros and cons, and if you decide to do everything yourself, act according to our instructions. If the furniture is made to order, then inform the furniture makers about the dimensions for the sink and hob. They will do the cutting during the manufacturing stage. This is the best option. After assembling the kitchen furniture, go straight to the fifth point.
Step-by-step instructions for installing the panel into the countertop:
- Open the instructions from the kit and look at the dimensions of the niche that needs to be cut in the countertop. If the dimensions are suddenly not indicated or there are no instructions, then it will be necessary to measure the internal size of the seat. Please note that the ideal gap between the hob and the countertop is 1 to 2 millimeters. But some people make 5-6 mm, but the panel can move during subsequent use.
- We make markings on the tabletop. We draw the lines along which we will cut with an electric jigsaw. To do this you will need a long ruler and a pencil. Often the panel comes with a cardboard template, which you just need to attach and trace around the inside with a pencil. Please note that in order for the tabletop not to break, its thickness must be at least 38 millimeters. Also when marking, take into account that the distance from the edge of the hob to the edges of the kitchen worktop on all sides and to the walls must be at least 50 mm.
- After finishing the marking Use a screwdriver or drill to carefully drill into the corners of our markings. A drill is used with a diameter of 8-10 mm, so that the jigsaw blade can then fit into the hole.

- Then take a jigsaw with a fine-toothed wood blade, insert it into the drilled holes and cut around the perimeter very carefully and slowly. When working, the jigsaw is pressed tightly against the tabletop.
- For protection from moisture and dirt, as well as to avoid the formation of fungus, stick the sealant from the kit on the cut areas around the perimeter, and if it is not there, then treat it with silicone or acrylic sealant. Carefully trim off the protruding excess with a sharp knife.

- Now slowly install the panel into the cut hole, if it turns out to be a little larger, then align it along the front edge of the tabletop.
 If the panel does not become free, just do not use force to install it. In this case, you need to take out the panel and trim the smallest side by a couple of millimeters.
 - Remained final stage fixing the hob using special clamps included in the delivery kit.
 They are screwed from the bottom of the tabletop and do not allow the panel to move in the gap between the panel and the tabletop.
Where is the best place to install an outlet for an electric hob?
Before installation To install a hob with your own hands, even at the assembly stage, I recommend moving the electrical outlet below the countertop so that neither the plug nor the socket for connecting it is visible in the kitchen. Read how to connect the hob in
A popular attribute of a modern kitchen is a built-in hob and oven. Recently, more and more consumers are giving preference to electric models, which are superior in functionality to their gas counterparts. You can install household appliances yourself. The main thing is to correctly calculate the installation space and take care of high-quality wiring that can withstand the high loads of the power line.
Electrical wiring requirements when connecting kitchen appliances
Before installing an oven or hob, you should pay special attention to the quality of the electrical wiring. Key points to consider:


Important! Grounding an electrical appliance ensures safe operation of the device.
Installation and commissioning of the hob
Preparing the installation site
To insert a panel into a kitchen countertop, you will need the following tools:
- electric drill;
- screwdriver;
- electric jigsaw;
- construction knife;
- Ruler and pencil;
- silicone sealant.
Do-it-yourself installation of an electric hob is carried out in the following order:

Further actions are to install the surface in the prepared hole and connect the equipment to the power line according to the diagram.
For reference. A detailed connection diagram is shown on the back of the electric hob (burner, built-in).
Diagram and choice of connection method
Schemes for commissioning kitchen panels and ovens in apartment buildings assume the use of one phase - a 220V network. In the private sector, it is sometimes advisable to install a three-phase network - such a connection redistributes the load when several burners are operating into 3 phases.

Symbols on the diagram:
- 1L, 2L, 3L - phases;
- N - neutral conductor;
- earth code or PE - grounding of an electrical appliance.
The hob is connected to the power supply in one of the following ways: through a socket/power plug or using a terminal box.
With the first option, you need to choose the socket and plug wisely. A stove power of 7-8 kW corresponds to a current of 32-38 A. The plug must support wiring with a cross-section of 4-6 mm2. Often, the RSh/VSh-32 connector is used to connect the hob. A similar connection is applicable in one-, two- and three-phase networks.

Advice. It is advisable to use a ready-made kit, since the plug of one manufacturer may not fit the socket of another.
It is better to give preference to white plastic models - they are of higher quality compared to black carbolite ones. Structurally, the elements are no different; the connection order is the same.
Connection via a terminal is considered by many to be simpler and more reliable. There are several pairs of contacts and screw fasteners located on a plate made of heat-resistant plastic. The wires are connected from two opposite sides, observing the color coding. Terminal blocks are selected according to the power of the electrical appliance.
Instructions for connecting the hob
Commissioning of the electrical panel through the terminal box depends on the number of network phases. If a three-core wire is laid, then a 1-phase connection diagram is used:

- Connect terminals No. 1, No. 2 and No. 3 with copper jumpers; connect a phase wire (black, white or brown) to them;
- connect the zeros (No. 4 and No. 5) to the neutral (blue) wire;
- Connect the corresponding yellow-green wire to the PE (ground) terminal.
A two-phase connection uses four wires. Their connection is carried out according to the following scheme:

- connect wires No. 1 and No. 2 with a jumper, connect a phase conductor to them;
- connect the second phase conductor to terminal No. 3;
- connect terminals No. 4 and No. 5 with a jumper, then connect the neutral conductor to them;
- secure the ground wire.
A five-core cable is used for a three-phase connection. In this case, connect terminals No. 1, No. 2 and No. 3 with three phase conductors; the subsequent procedure is similar to the previous one.
Algorithm for connecting a power plug to a kitchen hob:
- Disassemble the plug by unscrewing the fixing screw.
- Route the cable into the connector mechanism and secure it with staples.
- Remove 1-1.5 cm of insulation from the wires and strip the wires.
- Secure the wires to the plug terminals according to the diagram. The conductor cores must not extend beyond the terminals.
- Assemble the fork body and tighten the screw.
Connecting an electric hob with your own hands: video
Types of built-in cabinets by installation method
Based on the installation method, built-in ovens are divided into dependent and independent. Functionally, they do not differ from each other, but the installation technology is somewhat different.
Dependent Models supplied as one set with the hob. The work areas are connected by wires and have a single control panel, which is usually located on the front of the oven. Dependent cabinets are compact, which is especially important for small kitchens. However, when purchasing, you must take into account that if the control panel fails, both devices will stop working.

Independent have the ability to be installed separately from the hob. This device can be placed anywhere in the kitchen.
Distinctive features of independent models:
- unlimited choice of location for installing the oven;
- the ability to abandon the hob - modern oven models are equipped with functions for steaming, defrosting, etc.;
- high cost of equipment.
Procedure for installing and connecting the oven
Calculation of the dimensions of the “box” for the oven
Manufacturers of kitchen appliances have developed a unified standard that allows you to easily install the oven body in a designated section of the unit. The main thing during installation is to adjust the evenness of the oven. Minor distortions can reduce the heating efficiency. Leveling is done by adjusting the height of the legs; a building level is used for control.
To protect the device from overheating and premature failure during installation, a number of nuances should be taken into account:

- the optimal distance from the base of the body to the floor is 8 cm, but not less than 5 cm;
- air gap around the perimeter of the oven - 5 cm;
- distance to the back wall - 4 cm.
Important! Connecting an electric oven via an extension cord is prohibited. A separate outlet must be provided.
Installation and connection to the electrical network
After preparing the place and “trying on” the oven for installation, you can begin connecting to the electrical network. If the power of the stove does not exceed 3.5 kW, then it can be connected through a regular outlet. Otherwise, you will have to pay more attention to the new wiring and the choice of outlet.
Connection order:

Electric hob: DIY repair
The most common malfunction of an electrical panel is that the device does not heat up or one of the burners does not work. In this case, troubleshooting yourself comes down to the following steps:
- Check the voltage at the outlet. Often it is this electrical point that fails.
- Inspect the plug and cord. If mechanical damage is detected, it is enough to replace the plug.
- If the previous steps did not solve the problem, you will have to remove the hob. First you need to disconnect the wires and unscrew the fastening strips.
- Check the functionality of the transformer and thermal fuse. For this you will need a multimeter. If there is no voltage or if it differs from the nominal voltage, install new elements.
- Check the reliability of the wiring connections at all points: switches, control unit, burners or thermostat.
Advice. An affordable alternative to a multimeter is an indicator screwdriver.

The most common causes of breakdown of a 2-, 3- and 4-burner electric hob:
- fuse blown due to power surges - installing a network surge protector will solve this problem;
- a broken circuit on the heating element leads to the breakdown of one of the burners;
- sensor failure is the result of improper care and operation;
- overheating of the surface - thermostat failure.
When choosing a hob, you need to compare the main parameters of the equipment:
- Decide whether you need a dependent or independent plate. In the first case, the range of goods is significantly reduced.
- The second important point is the choice of material for making the stove in general and the burners in particular. Cast iron spirals are inexpensive, but take a long time to heat up and are energy-consuming. Many people believe that the best electric hobs are glass-ceramic. Their main advantages: creative design and high heating rate. A progressive version of glass ceramics is induction surfaces, which are energy efficient.
- Functionality of the stove. The presence of additional options makes cooking faster and more convenient. It would be good if the hob is equipped with: a timer, a heating function, a standby mode and a safety shutdown.
- The number of burners is determined based on the intensity of use of the stove and the dimensions of the kitchen. An electric 4-burner hob is a classic option, suitable for a family accustomed to regularly eating at home. To arrange a small work area, you can choose a compact 2-burner model.
Electric hobs: which ones are better. Reviews and tips for choosing a work surface.


