A spectacular and eye-catching bottle palm will serve as a excellent option cottage decorations, garden plot, areas in the yard or kindergarten. Made with your own hands according to a simple scheme, it will not only decorate the surrounding area, but will also help a person to recycle a large number of plastic containers.
How to make a palm tree from bottles with your own hands
Those who like to make their most incredible fantasies come true will enjoy the master class on how to make a palm tree from plastic bottles. For the tree, dark brown containers are suitable for stem blanks and green containers for leaves. If there is no green container, it can be replaced with the most different colors: blue, yellow, red. Containers of kvass, carbonated sweet drinks or beer are useful for trees.
The principle of creating a palm tree differs depending on what the craftsmen found. To form a trunk, you can use a round support made of wood, where the bottoms are nailed, or a cable with wire is suitable, where containers with cut off bottoms will simply be strung. The leaves are distinguished by their splendor and length. If you want to get palm fans, then they are cut, notching and bending, and elongated leaves strung on a cable.
The area of the leaves and trunk depends on the size of the bottles, but you shouldn’t get carried away and use 6-liter or 20-liter water containers. Wood made from 1.5 and 2-liter plastic containers looks much neater different colors. The corks from them will also serve as a material for decoration - they are used to decorate the base of a palm tree, you can use them to make a mosaic for flower beds and the walls of children's houses.
How to make palm leaves
To make a spectacular palm tree with your own hands, you need to pay attention to the manufacture of its leaves. To make them, you need:
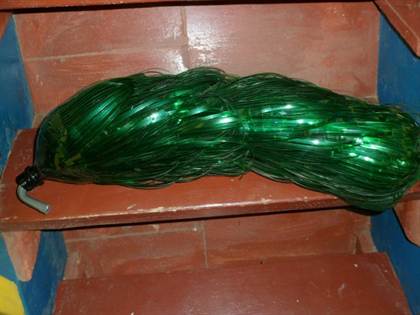
- Cut the green bottles in half with scissors, cut the upper part into longitudinal strips so that the neck of a narrow diameter remains intact half a finger from the cap. The thinner the cut plastic strips, the more magnificent the crown turns out and the more natural it looks in the photo.
- It is not necessary to take the same containers for leaves - this will not affect appearance. The resulting blanks must be strung on a prepared rigid high-voltage cable with a diameter slightly smaller than the neck to obtain one lush sheet. The number of leaves varies according to the prepared holes on metal pipe, used as a support. Then they should be secured to the stem blank.

Step-by-step instructions for making a bottle palm tree trunk
The next detail in the question of how to make a palm tree from plastic bottles will be the trunk. Step-by-step instruction:
- The trunk is made from dark brown dense containers, from which the bottom is cut off right along the contour.
- Then the resulting workpiece is cut to obtain inwardly curved petal segments that serve as an imitation of a tuberous trunk. They should be cut 2/3 of the way up, without touching the top.
- Do required quantity segments costs depending on the desired height plastic palm tree.
- When all the pieces are ready, you need to string them onto metal tubes. To do this, the container is seated with its neck down on another slightly shifted to obtain a beautiful lumpy trunk. The principle of stringing is similar to making a cone. After this, all parts are secured.

Connecting individual parts and installing a palm tree on the site
The last step on how to make a beautiful palm tree from plastic bottles is to connect all the pieces together. What should be done:
- Prepare a rigid, strong base from a metal sheet approximately 40*60 cm in size and at least 5 mm thick to support the weight.
- 2 metal rods with a length of 25 cm or more should be welded to the base or holes should be drilled for fastening. They need to put metal pipes on them required height- this will be the base of the tree. In this case, the diameter of the pipes is left slightly smaller than the neck of the bottles for the barrel.
- Top part the supports will externally resemble the drum of a revolver; for this purpose, 6-7 sections of pipes are welded onto them. Bottles for the barrel need to be assembled onto rods, and inserted into the holes of the “revolver” palm leaves. For fixation, the cable inside them is bent, fixed from the top and inside the neck of the outermost bottle. To stabilize the bottle structure and hide the unsightly lower part, the base is buried half a meter.

Olesya S.
Date palm, coconut palm, banana palm. Which one do you like? Today we will make an evergreen, beautiful palm tree from plastic bottles, which will decorate your estate and give you an exotic and warm mood. Feel the tropics right in your own backyard thanks to the very simple master class on how to make a palm tree with your own hands.
For the manufacture of exotic wood from plastic bottles you will need the following materials:
- Brown plastic bottles of the same diameter (approx. 2 l.), for the barrel;
- Green plastic bottles (allowed different sizes) for palm leaves;
- Scissors, stationery knife;
- Scotch;
- Plastic pipe or metal rod.
1. Let's start making the palm tree trunk. To do this, take a brown bottle and a knife. Remove the cork; you won't need it anymore.
2. Cut the bottle crosswise, with the bottom part being slightly larger than the top.
3. Cut the part of the bottle with the neck into six equal parts with scissors, reaching the beginning of the narrowing of the upper part, stop. Each cut part should be shaped into an oblong triangle or petals. To do this, round and narrow the cut parts.
4. Do the same procedure with the remaining half. Also use a hot knife or awl to make a hole in the bottom of the bottom half of the bottle with a diameter the size of the neck hole.
5. Make a fold at the base and bend the resulting plastic petals one by one.
6. Having opened all the petals, you get a hexagonal flower.
7. Do the same procedure with the other remaining half.
8. Cut the remaining brown bottles in the same way, make cuts and form petals. You will end up with many halves that will need to be inserted one into the other, with the neck facing down.
9. Let's start forming the trunk exotic beauty. To do this, take a metal rod or plastic pipe and thread all the blanks of the brown bottle onto it. Secure the lowest part with tape. When forming a trunk, it is important to distribute the bottles so that the petals occupy all the free space and do not leave empty seats(in a checkerboard pattern). The height of the palm tree depends on the number of blanks. The palm trunk is ready!
10. Let's start making palm leaves. To do this, take green bottles and a stationery knife. Remove the caps from the bottles; they are no longer needed.
11. Cut off the neck and bottom.
12. Then cut the resulting workpiece lengthwise into three identical parts, starting from the bottom, not reaching the top by about 2-3 centimeters.
13. Open the cut parts, leaving a hole in the center for attaching the greenery to the base of the trunk.
14. Bring the foliage of the palm tree to a natural and familiar appearance. To do this, make cuts on all sides of the petal, not reaching the middle by about 1.5 centimeters.
15. Round the petals a little and make the cuts diagonally.
16. Fold the resulting thin strips through one. Thus, the foliage of the palm tree will become more luxuriant.
17. Do the same with the rest of the remaining petals. For more lush greenery palm trees use a large number of green bottles.
18. Let's start assembling this exotic beauty. Place the made plastic greenery on the remaining pin of the previously prepared table. If the bottles are different in size, then place the large ones first, and then the smaller ones. To form a palm tree cap, you need to lay the bottles in a checkerboard pattern to get rid of unnecessary spaces of greenery. The last one green blank We attach it to the pipe with tape. To prevent the palm from being blown away by the wind, it is important to secure it by burying the bottom of the rod on which the palm blanks are threaded into the ground half a meter.
The palm tree is considered a symbol of summer and relaxation. But for most people, visiting a live palm tree is not enough Money. Therefore, you can combine business with pleasure and make such a decoration for your garden as a palm tree from plastic bottles with your own hands.
Original decor
For this we need:
- Plastic bottles 15 pieces Brown, with a capacity of 2.5 liters - for the barrel;
- Plastic bottles, 10 pieces green, with a capacity of 2 liters - for leaves;
- Any wires with a diameter of 12 mm for fastening;
- Metal sheet 0.5 cm thick;
- Two iron rods 25 cm long;
- Metal tubes 20 mm thick.
We will tell you step by step how to make a palm tree from plastic bottles in an easy master class.
Cutting leaves for the palm tree. Take a green plastic bottle and cut it into two equal parts. We need the top one.
Cut the top of the bottle lengthwise into strips 3 mm thick.
Please note that the shape of the bottle itself is not that important when making the palm tree.

This way we make all the green bottles that are available. We fix the prepared parts on the wire and connect them together. There should be more than one such preparation.
Let's start making the barrel. To do this, we take brown bottles. We make cuts along the bottles. The most important thing is that they should be wide. And we cut out the bottom as shown in the photo.


Next we produce welding work. For this we take a metal sheet and weld two iron rods to it as follows: the first rod at an angle of ninety degrees, and the second rod at approximately an angle of 60-70 degrees.

Metal tubes must be placed on the welded rods. The height you want to make the palm tree.

We weld metal bushings at the end of the rod. They are necessary in order to secure the leaves made there.

We attach the leaves to the metal pipe. It is better to bend them so that they look more like a palm tree.

The leaves have been collected, now we move on to the trunk itself.


Key points when making palm leaves:
- If you want your palm tree to have wide leaves, then to do this you must first cut off the bottoms of the bottle. Next, cut it into three parts. Can also be used yellow bottles, or both colors are possible. This way the palm tree will be more expressive and bright. The most important thing is to cut almost to the end of the bottle; you can leave literally half a centimeter;
- Using scissors, round the leaves to the base;
- Next we make fringe on the cut strips. This way we do it on both sides of the sheet. The middle of the sheet should be approximately one and a half centimeters. To make your palm tree more magnificent, you need to use scissors to bend the fringe in the following order: one cut up, and the second down.

Key points when making a palm tree trunk:
- Cut off the bottom of the bottles;
- We retreat half a centimeter from the lid and cut out eight petals;
- We turn each of them in the opposite direction;
- To save material, you can use the cut part. Just to secure it, you will have to make a hole in it.

Key points to consider when assembling a palm tree:
It is best to use a metal-plastic pipe as a barrel. And the most the best choice diameter is 20 mm. You choose the height you want.
It is best to collect the palm tree itself from below. The taller the palm tree, the less detail there should be a trunk, that is, for the bottom it is best to use the largest blanks. The method is the simplest and not complicated - glass to glass. It will be better if their arrangement is staggered.
The bottom itself is best secured to glue "Moment" , this will be the most reliable way. About 30 cm before the top of the stem, you need to finish assembling the stem and continue to secure the leaves. It is also recommended to use a staggered order.
Once you have collected the entire palm, it is necessary to bury the welded reinforcement in the ground to a depth of thirty centimeters. Then we put the finished palm tree on the reinforcement.

Table palm
To make it we will need:
- Bottles with a capacity of 1.0 liters, brown - 3 pieces;
- Bottle with a capacity of 0.6 liters of green color - 1 piece;
- Stationery scissors;
- Glue "Moment".
Let's get started, here are step-by-step instructions:
- We cut each of the brown bottles into four parts, preferably they should be the same. In each part we make cuts in the form of triangles. The size of which will be approximately one centimeter;
- Carefully bend the resulting triangles;
- Take a green bottle and divide it into three parts. We cut each part in the form of triangles. The part with the neck will be the largest of all;
- We assemble the palm tree. We assemble the barrel: first the bottom itself, then all the other parts. During assembly, all parts must be glued together. We make the leaves as follows: first we insert the largest part with the throat into the trunk, then middle part, and attach the bottom to the very top.
The palm is ready!

Video on the topic of the article
Olesya S.
Date palm, coconut palm, banana palm. Which one do you like? Today we will make an evergreen, beautiful palm tree from plastic bottles, which will decorate your estate and give you an exotic and warm mood. Bring the tropics right into your own backyard with this super easy DIY palm tree tutorial.
To make exotic wood from plastic bottles you will need the following materials:
- Brown plastic bottles of the same diameter (approx. 2 l.), for the barrel;
- Green plastic bottles (various sizes allowed) for palm leaves;
- Scissors, stationery knife;
- Scotch;
- Plastic pipe or metal rod.
1. Let's start making the palm tree trunk. To do this, take a brown bottle and a knife. Remove the cork; you won't need it anymore.
2. Cut the bottle crosswise, with the bottom part being slightly larger than the top.
3. Cut the part of the bottle with the neck into six equal parts with scissors, reaching the beginning of the narrowing of the upper part, stop. Each cut part should be shaped into an oblong triangle or petals. To do this, round and narrow the cut parts.
4. Do the same procedure with the remaining half. Also use a hot knife or awl to make a hole in the bottom of the bottom half of the bottle with a diameter the size of the neck hole.
5. Make a fold at the base and bend the resulting plastic petals one by one.
6. Having opened all the petals, you get a hexagonal flower.
7. Do the same procedure with the other remaining half.
8. Cut the remaining brown bottles in the same way, make cuts and form petals. You will end up with many halves that will need to be inserted one into the other, with the neck facing down.
9. We begin to form the trunk of an exotic beauty. To do this, take a metal rod or plastic pipe and thread all the brown bottle blanks onto it. Secure the lowest part with tape. When forming the trunk, it is important to distribute the bottles so that the petals occupy all the free space and leave no empty spaces (in a checkerboard pattern). The height of the palm tree depends on the number of blanks. The palm trunk is ready!
10. Let's start making palm leaves. To do this, take green bottles and a stationery knife. Remove the caps from the bottles; they are no longer needed.
11. Cut off the neck and bottom.
12. Then cut the resulting workpiece lengthwise into three identical parts, starting from the bottom, not reaching the top by about 2-3 centimeters.
13. Open the cut parts, leaving a hole in the center for attaching the greenery to the base of the trunk.
14. Bring the foliage of the palm tree to a natural and familiar appearance. To do this, make cuts on all sides of the petal, not reaching the middle by about 1.5 centimeters.
15. Round the petals a little and make the cuts diagonally.
16. Fold the resulting thin strips through one. Thus, the foliage of the palm tree will become more luxuriant.
17. Do the same with the rest of the remaining petals. For lush palm greenery, use a large number of green bottles.
18. Let's start assembling this exotic beauty. Place the made plastic greenery on the remaining pin of the previously prepared table. If the bottles are different in size, then place the large ones first, and then the smaller ones. To form a palm tree cap, you need to lay the bottles in a checkerboard pattern to get rid of unnecessary spaces of greenery. We attach the last green blank to the pipe with tape. To prevent the palm from being blown away by the wind, it is important to secure it by burying the bottom of the rod on which the palm blanks are threaded into the ground half a meter.
My youngest son, he is seven years old, loves to make things. It doesn’t matter what he works with - construction sets, plasticine or cardboard - any craft in his hands turns into something important and useful for him. He especially likes it when dad or mom participate in this process. Of course, we almost always don’t have enough time for such things, but if we get down to business, we work together and bring what we started to the end. The most serious of our collaborations was a palm tree made from plastic bottles.
How to make a palm tree from plastic bottles step by step with photos
Before the kindergarten was closed for renovations, all parents were instructed to do some crafts. The teacher told me: “Your vacation assignment is a palm tree of bottles.” Scratching our heads, we got to work. We collected brown and green flowers and found a couple of long iron rods, prepared drill.
We started with the trunk: the bottom of each bottle was cut off to a height of about 20 cm. The edges were cut into teeth for texture and bent a little to look like the scales of a palm tree trunk. In each blank I drilled a hole, the diameter of a long iron rod, which was supposed to serve as the basis for the barrel. 


We cut the green bottles in half and cut the edges of each according to the shape of the leaves. I left necks on one of the halves, and I also drilled holes of suitable diameter at the ends of the others. 
Having made all the preparations, we started assembling!

How to attach palm leaves?
We take an elastic rod, not thick, but hard. When we make our leaves for the plastic palm tree, we cut the bottles and insert them one into the other, neck into neck, but leave a cork on the last bottle. We drill a cork and thread a rod, bend the rod at the end so that the leaves don’t fall off, that’s all. 


That's all, dear readers, thank you for visiting and reading my site, I advise you to learn how to do


