This article is intended for beginners, that is, for those who are about to start learning something new, since any road begins with the first step. Just get started and take your time and try to enjoy the process of learning how to draw! Watercolor painting is both enjoyable and a little challenging. It all depends on your approach. Watercolor is one of the most versatile genres of painting, in which you can paint almost anything: from realistic concrete images to abstraction and impressionism. Beginners are advised not to start with the idea of creating a masterpiece, but with small steps, gradually and slowly.
Before you feel completely comfortable with watercolors, you will have to paint a lot. Don't give up if your first attempts are less successful than you would like. Mastering the watercolor technique requires a lot of effort and time, but it's worth it!
So, let's begin!
Steps
- Watch videos on YouTube and other portals to learn more about watercolor painting techniques. After that, try to draw something you really like. An interesting type of painting is Sumi-E or Japanese ink painting, which transforms beautifully into watercolor drawings.
- Many instructors begin their courses by teaching the wet-on-wet-paper technique, but it is preferable to begin by introducing the most common technique, wet-on-dry-paper.
- If you use quality embossed watercolor paper (such as Arches), don't throw away any sketches or failed paintings you made on it. You can always paint over them again with acrylic or gouache or use it as a background for pastel painting. This paper will also look better no matter what you paint on it, and if you paint something beautiful, your painting will last longer without yellowing.
- Try to find a type of paper that suits your painting style. Different types of paper have different characteristics. Arches paper does not have most of the disadvantages and is the most versatile, even allowing you to wash off a watercolor image, dry it and reuse it.
- If you use paint in pans, do not throw them away after the paint runs out. You can always reuse the ditches by filling them with paint from tubes, after rinsing them thoroughly, and you will have the opportunity to fill the ditches with your favorite colors without relying on the standard sets in which the ditches are supplied.
- Don't buy the most expensive paper or natural sable brushes. You can spend a large amount of money on the purchase, but this is not necessary! Quality synthetic brushes, a small palette of good paint (artist paint is better than student paint) and 300gsm cold pressed paper is most suitable for beginning artists. Buy a few supplies to start with and gradually add more as needed.
- Watercolor pan sets are convenient for painting outdoors or while traveling. They are not as easy to mix in large quantities, but they are very useful for wet-brush-on-dry paper work. For travel, it is better to choose a brush with a medium or large tip with a pointed tip, included in the sets of paints in cuvettes. However, to draw fine details you will need a smaller brush. A pocket-sized block of watercolor paper is ideal for sketching during travel, class, or lunch breaks. Some sets (like Winsor & Newton) include a water bottle, collapsible palette lids, and so on.
- One of the best manufacturers of watercolor paints is Winsor & Newton. The Cotman brand is designed specifically for use by beginners. It is cheaper and therefore you can experiment without worrying about high costs. Winsor & Newton Cotman accessories are of excellent quality and are suitable for students.
- The wet-brush-on-wet-paper method also works well over the wet-on-dry-paper method within the same painting.
- NEVER leave a brush in a jar of water with the bristles facing down. However, if you have a brush cleaner that has a coil spring, you can leave the brush in the water without the bristles touching the bottom of the jar. If you have brushes made in China, try to wring them out with your fingers and hang them on a nail or hook and loop on the handle, this will allow the brush to maintain its optimal shape.
- Do not use the same brushes for water-based paints (watercolor, acrylic, gouache) and oil paints (for oil painting, pastel). Once a brush has been used for oil paints once, it should always be used for that type of paint. Mark the handle of the brush with a labeled tape to avoid confusion.
- Wash your brushes with mild dishwashing soap or a special brush cleaner (such as Masters Brush Cleaner & Conditioner). This will remove any residual paint, but some colors may remain. In addition, this will extend the life of the brushes.
- Don't try to shape the brush with your lips. Use your fingers exclusively. Remember that some color pigments can be toxic and hazardous to health.
- Several tubes of multi-colored watercolor paints
- 640gsm watercolor paper that will not warp with too much water compared to other paper types
- Watercolor brushes - size 8
- Two cans of water
- A piece of white plastic or porcelain palette plate
- A roll of paper towels or old clean rags.
Place a sheet of thick paper on the table. Draw something very primitive with a simple pencil. For example, square or circle
Apply a small amount of watercolor of any color to the white surface of the palette.
Wet the brush a little. If the brush absorbs too much water, remove it with a cloth or shake it lightly.
Drip a little water from the brush onto the paint previously applied to the palette. One or two drops is enough, no more.
Dip the brush into the paint and water that has formed on the palette and pick up a small amount of paint. Next, paint over the geometric figure drawn on a piece of paper. If the paint is too thick and won't spread, dip your brush in water and try again. Continue experimenting with different amounts of water and paint in the mixture until you get the consistency you want. If you want light, dry shades with a dry brush effect, you will need less water. If you want juiciness and brightness, then, accordingly, more, etc. Completely paint over the geometric shape drawn on paper.
Let the drawing dry.
Take a piece of watercolor paper and secure it to the drawing board using special adhesive tape. Use a large brush or sponge to dampen the entire surface of the paper. After this, try applying several strokes of watercolor paint in different colors. See what results are obtained with different degrees of paper moisture when applying different colors of paint.
If you use paper that is too wet, you can end up with a very smooth and light color. Paint of different colors is mixed on paper, allowing you to obtain new shades. Try putting a blue stripe on wet paper next to a yellow or gold stripe, and then a red stripe. You will see how the colors mix, creating uniform color transitions.
Try letting the test design dry until the shine is gone and the paper is still damp. Now the applied stripes will still have soft edges, but will become a little more defined. Once the paint has completely dried, add details with a wet brush on dry paper.
To begin with, try to depict a very simple object that can be multi-colored. Mix up some sky blue paint. Draw a sketch of the hills and tree. First paint them with a wet brush on wet paper. After that, start adding some larger details with a wet brush. Finally, when the paper is completely dry, add fine details with a wet brush on dry paper. That is, the larger the parts, the moister the paper should be.
You can determine that the paper is completely dry by its temperature, which can be checked by holding the back of your hand over the paper, but without touching it.
There should be no cold coming from the leaf. In order to acquire the skill of determining temperature in this way, you will need to practice a little. But this is necessary, since any touch can lead to damage to the design and the appearance of greasy stains from the skin of the palms on its surface. Do not remove the adhesive tape until the paper is completely dry. The tape helps the paper not curl, keeps it straight and flat, eliminating the formation of unevenness caused by changes in humidity and exposure to paint.
You can use ready-made watercolor blocks in which all four sides of the paper are glued, like the top edge of a notebook. It's a little more expensive, but very convenient for a beginner.
Try drawing on paper with a white or wax pencil, or the tip of a candle, to see how the lines appear when watercolor paint is applied to them.
Try cutting out shapes from adhesive masking film and painting over the resulting stencil to get specific outlines.
Anything covered with stencil film will remain unpainted. Always start your watercolor paintings by painting in the darker areas and outlining the lighter areas.
Isolate or mask out anything that needs to remain white. Get used to the "negative image" as this will also help you get more accurate outlines of objects than if you draw them first and then outline the background. Try starting your image of the cup with its surroundings and the background behind the handle, leaving the details of the cup itself for last. You will feel a big difference in image accuracy! Try the "glazing" technique.
Once the watercolor is completely dry, mix a small amount of paint in a contrasting shade and quickly paint over the area. This will change the color and if done correctly will not blur the image. Light golden paint applied by glazing to illuminated areas of the landscape can make sunlight much more expressive. Read books and articles on watercolors and try to get new ideas from them.
Warnings
What you will need
Article information
wikiHow works like a wiki, which means that many of our articles are written by multiple authors. This article was produced by 13 people, including anonymously, to edit and improve it.
, Spain: pintar con acuarelas cuando eres principiante,Bahasa Indonesia: Melukis Menggunakan Cat Air untuk PemulaThis page has been viewed 98,448 times.
Was this article helpful?
The stone was probably the first object that a person consciously picked up. People also began to use it as a basis for creativity a very long time ago. Painting on stones is still very popular today, for example, in eastern countries.
It is considered good form to give a close friend a stone decorated with an original design for his birthday. In addition, stones, like everything that surrounds a person, have their own energy. It’s not for nothing that each zodiac sign has its own stone that protects against troubles.
But here we are talking about ordinary pebbles lying on the ground. Not every stone can become the basis for a painting. There are stones that are too porous, absorbing all the paint, and there are stones that are poorly worn in and have sharp edges. Therefore, for creativity you need to select smooth stones with a dense texture.


- Since the material for work was literally lying underfoot, the selected stones should be thoroughly washed and dried before starting the process.
- The field for creativity is quite miniature, so paint should be poured onto the palette just a little at a time.
- Acrylic paints dry very quickly, turning the brush into a hard scraper, so while painting the brush must be constantly returned to the glass of water. For the same reason, when changing color, the brush should be thoroughly washed and dried with napkins or a paper towel.
- Drawing on stone is a rather specific process. To avoid unpleasant surprises associated with paint getting on clothes, it is better to paint stones with your own hands in an old T-shirt and jeans, or wear a large apron that covers everything. Even a small drop of paint that has dried on pants will immediately ruin the item. You can, of course, try to scrub it off fresh, armed with an old toothbrush, but it is better to exclude the appearance itself.
- The same goes for the entire workplace. A faithful assistant in protecting the table surface from contact with paint and water is an old newspaper.
- But it’s easy to correct the mistake - the paint can be easily wiped off the surface of the stone if necessary, or painted over with a different color after drying.
Materials required for painting
Paints
This could be a watercolor set, jars of gouache or tubes of acrylic paint.
Each artist works in the manner that he likes, although painting on stones for beginners gives the opportunity to try their hand at all types. Experienced craftsmen still prefer to work with acrylic paints. The entire palette of bright colors fits perfectly even on an unprimed surface. And if you use metallic acrylic paints, the pictures will acquire a pleasant soft shine.

Pebbles can also become brighter and shinier after painting with paints intended for porcelain or ceramics. You can secure them by placing the painted stones in an ordinary oven for firing. But even without this procedure, the pictures take on a beautiful appearance.
Outlines, markers, pencils
In addition to paints, today there are a large number of tools in the form of outlines and felt-tip pens that provide additional touches and details to decorate the painting.

Flowers are applied in a three-dimensional outline
Few people can depict their ideas without preparation. Even experienced artists first draw a sketch of the image. For this purpose, special sketch pencils have been developed for dark and light stones, respectively white and black.
Brushes
Painting on stone is impossible without various types of brushes - from the largest, for painting the background, to miniature ones, capable of leaving the finest strokes on the surface. A set of brushes can be purchased at the appropriate store.

Varnish
The created miniature must be protected so that it can be admired for many years. To do this, the stone is coated with varnish. As a clear example, there is a painting on stones called “Master of the Forest” by Leonard Popov:

Stone coated with varnish has a characteristic beautiful shine
The process of painting stones
First, the issue with the primer is decided - to apply it or not.

Then the plot of the drawing is determined. It will be suggested to the author not only by imagination, but also by the shape, color, and texture of the pebbles used.
Before work, the stones are thoroughly washed and dried.
The background of the pattern is applied to the primed surface (if such a decision has been made).
The future contours of the plot are drawn with a sketch pencil.

When filling fragments with paint, the following options are possible: first draw the outline with a brush, and then fill the drawing with paint. Or draw the entire picture in color, and then use a thin brush to highlight the outline.


Even a professional artist’s hand may tremble. Any solvent will help correct an uneven line or erase an excess stain.


The last step in creating a stone masterpiece is varnishing the entire surface of the painted stone. Only in this case will the image be preserved in all its glory, even if the painting of stones was intended for the garden, and not as a gift.

True, if the design occupies only part of the pebbles, then you can preserve its natural appearance by varnishing only the painted area inside the outline.

After finishing the work, the scope of application of painted pebbles is varied. It can be a wonderful gift for close friends. A glass jug filled with colorful pebbles will decorate your interior design. Magnets glued to pebbles will allow you to create a unique composition on the refrigerator door. In general, there are no restrictions on the flight of creative thought.
Master class on painting stones for beginners
To reinforce creative lessons, original stone painting is offered; the master class will help you cope with it without much difficulty.

To create a cheerful family, you will need stones of a certain shape and size. The basis of the composition will be a large flat pebble. Elongated thin pebbles will act as big-eyed chicks.
All stone “sticks” are carefully glued vertically onto a flat base using any moisture-resistant glue.
In this article we will talk about how to decorate your home with your own hands. Our master classes will help you implement ready-made ideas, and a selection of photos with many cool decorations will help you get inspired to create your own.
Undoubtedly, accessories play a big role in interior design: vases, interesting details, multi-colored decorative pillows, figurines, etc. To prevent them from turning into simple “dust collectors”, it is not necessary to invite a designer. If you wish, you can handle this task yourself. The main thing here is to keep the decorations in a single style that does not stand out from the overall interior of the room or the whole house.
However, each room needs an individual solution. For example, frivolous decorations such as decorative brooms, amulets, fruits, and wicker baskets are not suitable for the living room. These accessories will look better as kitchen decor.
We sew a decorative pillow for the living room
One of the most functional decorations for the living room are pillows (see photo). In addition, they have great aesthetic value. They can be made from contrasting materials or matched to the main color of the interior. You can make such decorative pillows with your own hands. Even a novice needlewoman can handle this.
Almost any material you like is suitable for making pillows, but it must meet certain criteria:
- keeps its shape perfectly;
- be resistant to washing;
- be hypoallergenic.
Another concern is to choose the right material for the filler. It is better to give preference here to foam rubber and silicone. And one more thing: it is better to prefer dense material for a pillowcase, and its color should be light, if possible, without patterns. Here the optimal choice would be cotton.
Having decided on the material, we proceed to selecting the shape of the pillow. It all depends on your personal preferences, as well as on the interior of the room. So, if it is designed in a strict classical style, then pillows in the style will be inappropriate patchwork.
The most popular pillow shapes:
- square;
- round;
- rectangular.
Let's move on to sewing pillows.
Advice! The most successful seam for sewing covers and pillowcases is linen. We combine the parts and sew them right sides up. Iron them carefully and then sew them down. The crumbling edge of the material will thus end up inside the seam. This protects it from falling off.
Master class for children
The children's room provides a huge choice for imagination and bringing ideas to life, because children love bright and original things. And if you involve them in doing simple crafts under your guidance, then this process will turn into a real game.
Let's look at some ideas on how to make a toy with your own hands. It will become not only an original decoration for a children's room, but also a faithful friend for your child.
Materials you will need:
- fabric in two colors (it is advisable to choose one that will not shrink when washed);
- sewing supplies;
- buttons;
- filler (sintepon is suitable).
Advice! Select a pattern in advance or make it yourself to make the toy more neat.
Then cut out the pattern and transfer it to the material. In order to make the toy's ears, nose and paws, you can use fabric of a different color, maybe contrasting.
We sew together the parts of the head with our own hands. The front part of the head is formed by three parts. We sew the front and back parts, not forgetting to insert the previously prepared ears. We fill the toy with filler gradually, while assembling individual parts. And you will get a toy, as in the photo above.
Decorations for a private home
Paper home decoration ideas
We offer an original decoration option, for which you will need the following:
- decorative paper;
- ribbons, lace;
- paper decoration fabric for interior;
- photos;
- various available materials.
Using these simple materials you can beautifully decorate any piece of furniture, but we suggest decorating an old, unnecessary suitcase. This will be an unexpected solution for the interior of a living room, bedroom, or kitchen. And, in addition, it will serve for storing various things.
Just carefully cover the outside of the suitcase with paper and cloth. To decorate, you can chaotically glue photographs onto it, and decorate the edges with ribbons, braid, and lace. This suitcase, decorated with paper, can be made in any style (see photo).

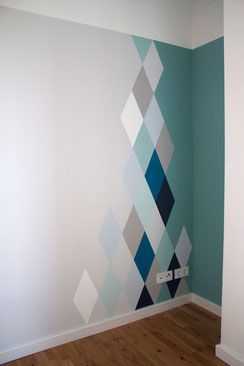
Geometric paper wall decoration: an abstract plot of voluminous pyramids in muted colors
Painting the walls is a great idea when you want to freshen up your interior, but not everyone wants to live among plain walls. We offer original solutions to decorate walls that are akin to designer interiors. In order for wall painting to be done at the highest level, it is not at all necessary to turn to professionals and pay a lot of money for their work. Here are a few ideas that you can follow to radically change the design of your room.
Original ideas for painting walls
1. Different colors of geometric pattern
Using masking tape and different shades of paint, you can play with the geometry of the room.
2. Incredible wall texture with a simple sponge
With this trick, even an inexperienced painter can achieve excellent results.


3. Imitation of brickwork using a rectangular sponge
Agree, it’s not difficult, but it looks great

4. Almost real wood in your room
This tree can be drawn using stencils

5. Light airy composition
Feathers on the wall make the interior of the room look lighter and no additional wall decorations are required. Such feathers are also applied to the wall using stencils.

6. Mountain peaks using Ombre technique
Ombre is a smooth transition from a rich shade to a lighter one. This technique can be successfully used in painting walls. This look is worth working for, but with great desire and patience you can get a great result.

Another example of mountain slopes using the ombre technique. A sheet of newspaper is used as a stencil.

7. Ombre technique
If you want to achieve an ombre effect without an additional pattern. Each shade of paint is applied separately, then the transition between colors is shaded.
8. A color transition on one wall using a geometric pattern will allow you to zone the space in an original and beautiful way
An excellent option for designing a color transition border between two different walls.
9. Decorative honeycombs of different shades will make the interior modern and original.

10. It is better to place a complex geometric motif on only one wall. This pattern is easy to make with masking tape and a roller.
11. Two in one: ombre technique and geometry. This method of painting imitates a wall panel and will become a bright accent in the interior.

12. Just let the paint dry
In this case, you will not need any brushes, stencils, or rollers. For smooth flowing lines, use a syringe, adjusting the width of the stripes only by the size of the syringe opening.
Decorate your home with a beautiful design that can be done very simply, but it will look very Beautiful .
No special skills required to make an original panel for your home, you just need to know a few secrets, and we will tell you about them.
1. DIY wall panel: abstract stripes on canvas
You will need:
Blank canvas (panel)
Acrylic paints
Brush or sponge brush
Scissors (to cut tape).

The secret to the beautiful design of this canvas is masking tape.
* First, think about what colors you will use. Experiment with colors to find a combination you like.
* Prepare the desired combination of paints and panels and start decorating it as you like (horizontal, vertical and/or diagonal lines).

*Get some masking tape ready. Cut several pieces of ribbon, 6-8 cm long. It is advisable that they are all approximately the same size.

* Stick all the pieces of tape on the panel in a certain order (choose the order yourself - in this example a chevron pattern is used), leaving some spaces on the panel free.

* When you have glued everything, prepare brushes or a special sponge and white acrylic paint. Start painting the areas not covered by the masking tape.
* When the paint has dried, carefully remove the tape (tape) and you will have an original drawing.
2. How to decorate a wall with your own hands: a flower on the wall

You will need:
Blank canvas (panel)
Acrylic paint (in this example it is gray)
Scrap paper (wrapping paper)
Hot glue gun (or PVA glue)
Brushes or sponge brushes
1. First paint your panel with acrylic paint. If your scrap paper is light in color, then the panel should be painted a darker color (as in this example).
2. Wait until the paint dries, and in the meantime, start cutting out the petals of the future flower from the wrapping paper. Here's an easier way to do it:


2.2 Now you can cut out petals from each rectangle, rounding the ends.


* Try using several types of paper so that the petals have different patterns.
* You can make petals of different sizes - large, medium and small. It is better to determine in advance how many petals, what size they will be, and how you will glue them onto the panel.
3. Cover the panel with a second layer of acrylic paint (the edges should also be painted). Wait for the paint to dry.

4. Start laying out all your petals on the panel, starting from the center of the flower. Some of them may need to be trimmed a little to make them look better. You can glue a paper circle in the center of the flower.
5. When you have arranged all the petals the way you like, start gluing them one by one.
The end result is a beautiful piece of work that can decorate any room in the house.
3. DIY wall decoration: 3D inscription on the panel

You will need:
Blank canvas (panel)
Volumetric white paint
Oilcloth
Wax paper
PVA glue and brush for it
1. First you need to figure out what kind of inscription you are going to put on the panel. When you have already decided on this, you should write your wish on a regular piece of paper. Can be printed on a printer.
2. When the inscription is ready, attach a sheet (or several sheets, if the inscription is long) with tape to a flat surface (a table, for example) and cover them with wax paper.

3. Start applying thick white paint over the letters that show through. Leave to dry overnight.


4. Carefully peel the letters off the wax paper and begin gluing them onto the panel. Use PVA glue (you can completely dip the letters in glue and then glue them - the glue will correct some unevenness on the surface of the letters). Leave to dry.


4. Original wall decor: favorite quotes on the panel

You will need:
Blank canvas (panel)
Acrylic paint (white in this example)
Masking tape (painting tape)
PVA glue
Old magazines
Sponge brush
Thick paper or cardboard
Scissors
Stationery knife (if necessary).

1. On thick paper, draw the letters you need, which will then need to be cut out. Draw the letters so that it is easier to cut out.
2. From old magazines, cut out many pieces of different sizes and with different colors and designs.

3. Start gluing excerpts of pages from magazines onto the tablet (panel). Glue it the way you like.
4. Wait until everything is dry and begin arranging the cardboard letters in the desired order.

5. Start painting your panel with a sponge brush with any paint of your choice. In this example, everything is painted white. You can also paint over the letters, but you will remove them later anyway.
* While you paint, hold the letters so they don't move. You can secure them with small pieces of tape.


5. DIY wall photo: collage of Instagram photos

You will need:
Square photos (it's better to print photos from Instagram)
Blank canvas
PVA glue or double-sided tape
Brush

1. Print and arrange your photos on canvas the way you like.
2. Start carefully gluing the photos using PVA glue. You can use thin double-sided tape (sometimes PVA glue makes the paper wavy).
* Scotch tape can be glued in the following way: cut two strips of a length corresponding to the length of the photograph and glue to the back of the image.
* You may need to trim the ends of some images a little after you glue all the photos evenly.
6. DIY Wall Decor: Glitter Canvas

You will need:
Canvas (in this example its size is 75 x 100 cm)
Simple pencil
Masking tape (painting tape)
Braid (fabric tape)
Buttons (to secure the tape)
Scissors
Sequins
PVA glue
A simple pencil.
1. Prepare a canvas and attach several pieces of ribbon to it with buttons. You can make as many vertical stripes as you want, as long as there is the same distance between them (in this example, 12.5 cm).


2. Now cut another piece of tape and attach it horizontally, leaving 12.5 cm from the edge of the canvas (the same distance as between the vertical strips).

3. Wherever the horizontal tape intersects the vertical ones, make marks with a pencil.
4. Unfasten the horizontal tape, count another 12.5 cm from the marks made (or the distance that you initially got) and fasten it again, and again make marks at the intersection of the strips.
* Continue moving the strip up and making marks. As a result, you will have the entire canvas covered with pencil dots.
5. Based on your marks, start applying masking tape as shown in the image (in a zigzag pattern).

6. Cover the uncovered parts of the canvas with PVA glue and sprinkle glitter on these places. Wait until everything is dry, shake off any excess glitter, and peel off the masking tape.


Here's what you end up with:
7. DIY wall painting: canvas decorated with papyrus paper
You can make this beautiful picture with your children.

You will need:
Papyrus paper (multiple colors)
Scissors
Brush or sponge brush
Figured hole punch (if desired)
* If you are using a shaped hole punch (in this example, the hole punch is hexagon-shaped), then it is better to cut several sheets of papyrus paper at once, because This paper is very soft, and it will be difficult to cut each sheet separately.
1. Cut out several parts from sheets of papyrus paper (in this example it is a hexagon Olniks, but you can cut out any other shape or even several shapes and shapes).


2. Wet your canvas a little and begin to carefully apply the cut out shapes to it.
* You can run a wet brush over the pasted shapes.


3. Wait until everything is dry and carefully remove the tissue paper - you will be left with multi-colored prints of the shapes.

The picture can be hung in any room, for example, in a nursery.
8. Original wall decoration: cut out a picture from canvas

You will need:
Stationery knife
Simple pencil
An example of a drawing (you can find any pattern on the Internet and print it, or come up with your own and draw it).
1. Attach your favorite pattern (printed or drawn by yourself) to the canvas with the design facing down and secure with tape.

2. Turn the canvas over - you should see the design on the reverse side - and trace the pattern with a pencil.
* It is better to lift the canvas and hold it near the window so that the light can pass through it.


3. Use a utility knife or scalpel to cut out some shapes from your design. Cutting canvas is quite difficult, but in the end you will get a beautiful painting.

* You can make two more paintings with other drawings and hang all three on the wall next to each other - you will get an excellent original composition.
9. Wall decor (photo): shadows on canvas

You will need:
Acrylic paint (any color, but always dark and white)
Brush
Jar of water
Palette
A piece of cloth (to wipe a wet brush).
1. Start by selecting the desired color or shades.

2. Once you have decided on the color, use a brush to apply the lines.

* In this example, the lines go from dark to light. Use white paint to thin the paint a little and create a lighter shade.
* You can draw anything, even if you are not an artist. Simple lines (horizontal or vertical), circles, squares, etc.


10. Drawing on the wall with your own hands: abstract painting

You will need:
Acrylic paints
Masking tape
Brush
1. Use masking tape to cover any areas of the canvas. You can simply glue the tape in strips the way you like.
2. Start painting uncovered areas on the canvas with any color.
3. Carefully remove the tape and look at the finished picture - anyone can make something beautiful.
You won't miss a chance with a successful result.


