Recently, heated floors have become very popular in construction. Therefore, the question: how to lay tiles on a warm floor is relevant.
The popularity of underfloor heating is increasingly gaining momentum.
There are several types of floor heating systems. To understand how to lay tiles on a heated floor, you need to understand the technology for constructing each of them.
Features of laying electric heated floors
Electric heated floors come in two types: in the form of heating sections and heating mats. They have different features that you should pay attention to.
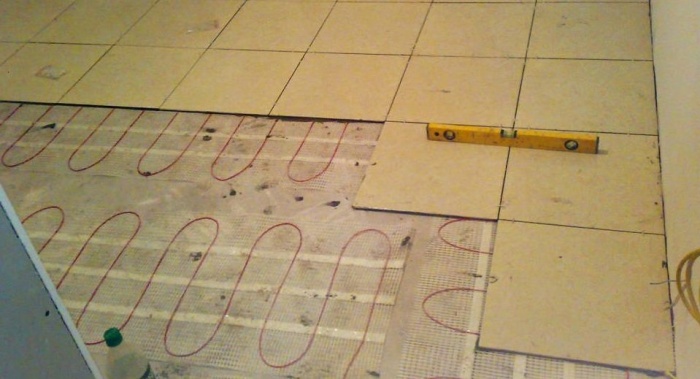
The system of heating sections involves raising the floor level by at least 70 mm, since it is laid in a concrete screed with a thickness of 30-50 mm. After the screed has set, you can begin laying the tiles (Fig. 1).

Figure 1. The rise in floor level with a heating section system must be at least 70 millimeters.
You can begin using such a floor heating system after 30 days or more, until the concrete screed has dried completely.
Do-it-yourself installation of heating mats is carried out on top of a cement-sand screed, and you can immediately lay tiles on them (Fig. 2). The main advantages of heating mats are ease and short installation time, space saving and rapid heating of the floor during operation. After laying the tiles on the heating mats, you can begin using them as soon as the tile adhesive has dried. The negative aspects of this system are that it can only be installed in areas without stationary furniture.
Features of laying infrared heated floors
When installing an infrared floor under the tiles, it is recommended to use additional material - plasterboard or glass-magnesite sheets.

Figure 2. Ease and short installation time are the main advantage of heating mats.
Laying an infrared floor under tiles consists of the following steps (see Fig. 3):
- cleaning the base and laying heat-insulating material with metallized lavsan (for example, Infraflex or Poliform);
- laying thermal film, which should be cut into the longest possible strips in order to minimize the number of connection points;
- insulation of all copper strip outputs;
- fixing the film panels with masking adhesive tape without overlaps;
- connecting the thermostat in a convenient place;
- supply and connection of connecting wires to the thermostat;
- connecting a temperature sensor located under the tile;
- insulation of all connections using a thermosilicone gun;
- connecting the thermostat to the electrical network;
- checking the performance of the heated floor;
- laying polyethylene film;
- laying plasterboard or glass-magnesite sheets;
- laying floor tiles.
Do not use foil as a heat insulator and do not lay a metal mesh when laying tiles. For floor heating to be effective, you need to place infrared film on at least 80% of its surface.
Features of laying water heated floors
The principle of installing a water heated floor is based on the installation of a pipeline system between the base and the tile. This system is the best option for country houses with large areas. It is prohibited to install water heated floors in apartments.
The method of laying a pipeline system for floor heating, in the same way as for a cable heated floor, involves pouring a cement-sand screed.
Installation of a water heated floor includes the following steps (see Fig. 4):

Figure 3. Additional materials when installing an infrared floor are plasterboard or glass-magnesite sheets.
- preparation of the base: dismantling the old coating, removing debris and dust;
- laying a leveling screed;
- laying damper tape around the perimeter of the room;
- laying thermal insulation (in most cases expanded polystyrene);
- installation of the pipeline system and connecting it to the collector;
- pouring a water-heated floor with a cement-sand screed;
- laying floor tiles after the screed has dried.
The main advantages of such a floor heating system are that the air is heated evenly throughout the room; a water heated floor can be the main source of heating. Disadvantages: difficulty of installation, reduced height of the room and the ability to use it only in private homes.
Preparing to lay tiles on a heated floor

Figure 4. The advantage of a water floor is that such a heating system evenly heats the floor.
It is necessary to make sure that the installation of the heated floor is completed and that the system is working properly. All cables and communications of the heated floor must be carefully hidden. Make sure that the base for the tiles is level, smooth and completely dry.
For laying tiles on a heated floor, regular tile adhesive is suitable. It comes in the form of a dry mixture, which must be diluted with water immediately before application, and in the form of a solution, ready for use. Dry mixture is preferable in terms of price/quality ratio.
You should also know that there are several types of dry tile adhesive mixture:
- basic - for smooth surfaces and small tile sizes;
- reinforced - for large tile sizes;
- universal - for all types of finishes and any surface;
- for special surfaces - used for application to metal and glass surfaces.
The technology for laying tiles on a heated floor with your own hands is no different from that on a regular concrete surface.
List of required materials and tools
- tile adhesive;
- primer;
- fugue for seams;
- solution container;
- drill with mixer attachment;
- tile cutter or grinder;
- notched spatula;
- rubber spatula;
- rubber hammer;
- crosses for seams;
- sponge and rags;
- tape measure, level, ruler, pencil;
- safety glasses, gloves, knee pads.
Stages of laying tiles on the floor
- Place the tiles on the floor "dry". This will make it possible to mark the cutting. It is important to consider the size of the seams.
- Clean off any dust and prime the back of the tiles and the floor.
- Dilute a small amount of tile adhesive according to the instructions on the package.
- Using a notched trowel, apply an even layer of mortar over a small area of the floor equal to 1-2 tiles, as it dries quickly and becomes unusable. You can also apply glue to the tile itself.
- Lay 1 row of tiles, inserting plastic crosses between them in order to create uniform seams between them. Check the laid row with a level. If the tiles protrude, they should be pushed back a little using gentle back-and-forth movements. You can use a mallet to knock it down a little. If it is located below the level, then it should be carefully torn off the floor and a little more adhesive solution should be applied to it. If the seams separate, you need to install wedges at the walls. For reliability, you can secure a row of tiles with masking tape.
- Lay subsequent rows of tiles in the same way, remembering to check the level for differences between them. Excess glue can be removed using crosses and the tiles can be wiped with a damp sponge.
- The last row needs to be measured and the elements trimmed, and then laid in the same way as the previous rows.
- After the glue has dried, you can begin grouting the joints. To do this, spread the fugu according to the instructions and apply it to the seams using a rubber spatula. Without waiting for the fugue to dry, remove it from the surface of the tile with a damp sponge.
Today, “warm floor” heating systems are no longer a luxury and are available to almost everyone. This article will describe step by step all the algorithms for performing actions on how to correctly lay a heated floor under the tiles, which will allow you to significantly save on the costs of building materials and repair work and not make mistakes.
The article describes in detail what materials need to be chosen, what tools to use from the start of preparatory work to laying the tiles.
The most common are water and electric floor systems. Below we will talk about the electric insulation option, materials and how to lay a heated floor under the tiles with detailed installation work.
What is needed
So, we choose the “warm floor” kit. Today, the building materials market is replete with a choice of different options for flooring systems to suit every taste and budget. They can be sold either separately or in a box. It is advisable to purchase the entire system without additional subsequent purchases, which may not only waste time, but also, as an option, mismatch of elements.
The set consists of:
- special mats in the form of a mesh film with a cable heated in it, the width of which is 45 cm;
- temperature controller mounted on the wall in a certain place. The device allows you to control the floor temperature;
- connection wires.
Important! The complete set of electric floors may vary, but not significantly. It depends on the manufacturer. For example, some may come with double-sided tape and corrugated pipe.
Also, given that the bathroom floor area is small, this will also have a positive effect on cost savings.

You should also additionally purchase:
foil penofol, which will minimize heat loss and subsequently minimize energy costs.
All ready-made kits can be purchased from 1 sq.m.
After purchasing all the materials for installing an electric floor, you should think about tiles. To tile the floor, you need to purchase the ceramic tile itself, tile adhesive, a spatula with teeth for the adhesive, grout for the seams, plastic crosses, and wedges for even seams. Next, we will consider in more detail the “electric heated floor under tiles” option, the installation technology of which requires careful preparation and attention.
Preparing the floor
Before laying electric heating mats, it is necessary to properly prepare it. Laying a heated floor under the tiles with your own hands is carried out exclusively on a leveled and clean surface, therefore it is necessary to sweep and wash the floor well.
Uneven surfaces on the floor are removed mechanically. If it is not possible to get rid of unevenness in this way, you should resort to screeding.

Laying tiles on a heated floor
Why are there such gender requirements? Because due to uneven surfaces there is a risk of bending the wires and, as a result, breakdown. As a result, the beautiful floor will either need to be dismantled or the floor heating will be lost altogether.
Installing heated floors under tiles
Preparing the kit
The components of a heated floor are a temperature controller and a heating cable. Cables can be single-core or double-core. The latter are safer, but somewhat more expensive than single-core ones.
Which electric floor to choose for the bathroom
There is no definite answer here, since the market offers a variety of models from hundreds of manufacturers. Therefore, it is better to choose models based on quality and long warranty. Also pay attention to the instructions on how to implement it, the diagram and all the materials necessary for installation. Some manufacturers also offer, in addition to installation elements, tools.
Before laying the electric floor, you need to clear the bathroom of all furniture and old flooring, after which it is necessary to prepare the surface for subsequent work. If necessary, the floor will need to be leveled with a screed, and then the floor will be cleared of debris.

To install an electric thermostat that regulates the floor temperature, it is necessary to prepare the mounting location. If necessary, you can run separate wiring to connect the floor. Moreover, such devices require a separate outlet from the electrical panel. After all the work on preparing the floor has been completed, you can proceed to laying the insulating material and laying the cable.
Laying insulation
As a heat-insulating material, it is necessary to use a lightweight material - foil penofol, the thickness of which reaches 14 microns in thickness, with an adhesive layer. The product has good properties, its thermal conductivity coefficient is 0.049 W/mK. The foil-coated thermal insulation product is sold in rolls, after which it is laid with the foil side up, and its joints are taped with construction tape.
In the corners of the bathroom you need to retreat 5-10 mm from the wall.
Laying the heating cable
The heated film floor is laid on the surface using construction tape attached to the floor. Manufacturers also offer options for heating cables glued to construction tape. Products are sold in roll form in ready-made kits.
The tape prevents kinks and maintains the distance between cable loops.
If the heating cable is purchased separately from the mounting grid, it must be purchased additionally. The cable should be laid on it in a zigzag pattern with a step of 20-25 cm. The heating cable is installed using mounting tape for “warm floor” systems.
In the corners where it is necessary to make turns, the mounting mesh is cut.

DIY installation of heated floors under tiles
If the electric floor set is complete, no additional steps to install the temperature sensor are required. If you bought all the elements and materials separately, you will need to distribute them so that, subsequently, you do not have to dismantle the screed you applied. Thermal sensors are always hidden in a corrugated pipe in the place where the heating cable exits to the outside, for ease of removal in case of failure.
Manufacturers also offer infrared floors as options for heated floors, which can be installed under ceramic tiles. Installation of IR floors is carried out according to an identical scheme described above.
Installing a thermostat
If this is your first time installing this system and you don’t know how to install the thermostat yourself, the instructions included in the kit will help even a beginner understand this simple task.
The temperature regulator is a switch that is mounted on the wall. The ideal solution would be to cut a groove in the wall for the electrical cable.

Installing a thermostat
To install a thermostat, you do not need any specific skills. Using electrical wires, a heating cable is connected to the temperature controller, and on the other hand, the temperature controller is connected to the network. As for the connection diagram, it is necessary that the system be connected separately from the electrical panel. Based on the power consumption of the heating floor, you need to correctly calculate the cross-section of the connected cable.
For example, a copper cable with a cross-section of 1.5 square can withstand power up to 4k W and a current of 19 A. A copper cable with a cross-section of 2.5 square - 5.5 kW and a current of 27 A.
If we take into account that 1 sq.m of underfloor heating consumes 150 W of energy, then a copper cable with a cross-section of 1.5 square meters can support a system with an area of up to 20 m2.
Checking for functionality
After laying the cable, you should check the entire system inside and out and make sure it is working properly. You should not neglect checking the system, otherwise there is a risk of failure of the floor heating.
The film electric floor is checked by applying electricity to the cable, as well as measuring the cable resistance with a tester. All parameters are often indicated in the passport supplied with the device by the factory. After all checks have been carried out, work is carried out on laying a screed up to 5 cm thick, or ceramic tiles are laid.
Laying the tiles
Laying tiles on a heated floor is carried out in the traditional way; the only thing is that for this option you should purchase adhesive intended for laying tiles.
Before laying the tiles, it would be better to first lay them out on the floor. This will be especially convenient if the tile has a certain pattern. In especially visible areas, a whole tile should be laid out, but its cut parts should be laid out in less visible places.
The tile is placed on the tile adhesive from the corner farthest from the entrance. The preparation of glue is carried out in a simple way - stirring the dry mixture with the addition of water. Next, using a notched trowel, apply the mixture to the heating mats. It should be remembered that the voids must be filled with glue, and the thickness of its layer above the heating elements must be at least 5 mm. The tiles are laid using crosses to ensure the gaps are even. The first tile should be checked using a level for evenness after laying. If you need to move the tiles, you can use plastic pegs to do this.

Next, during the process of laying the tiles, plastic crosses are installed on each side, after which the second and subsequent tiles are laid. After this each stage, do not forget to check the level of the horizon and the evenness of the tiles on the surface. If you need to cut the tiles in certain places, use a tile cutter or glass cutter.
After laying the tiles, you should wait for the glue to dry completely without removing the crosses. Often you should wait at least a day. After this, the crosses are pulled out and grout is applied to the seams.
Actually, that's all. Warm floor tiles have been laid.
Important! It is necessary to turn on the floor system only after several days, when the glue has dried and strengthened.
If you use a screed, you should not turn on the heated floor until the solution is completely dry, otherwise the solution will dry unevenly and many empty spaces and cracks will form in the screed. As a result, the operation of the heating cable will be of poor quality.
Important! You should not lay the cable where the furniture will be installed, so as not to damage it.
Conclusion
In order to carry out the installation work of the electric floor efficiently, you should adhere to the rules and advice of the experts set out in the article, and also do not forget about the instructions, performing all the steps step by step. Approach your work with full responsibility, from purchasing a quality product to laying tiles.
Laying tiles on a heated floor

Laying penofol for heated floors

Laying heated floors under the tiles

Laying tiles on a heated floor

DIY installation of heated floors under tiles

Laying tiles on a heated floor

Laying heated floors under tiles with your own hands

Lay the tiles on a warm floor
Many people prefer to finish their bathroom and toilet floors with ceramic tiles. But tile is a rather cold material, and walking on it barefoot, especially after a hot shower, is not very pleasant. To fix this problem, you can lay a heated floor under the tiles with your own hands.
There are several types of such systems, but most of them are installed according to the same scheme.
Design
This is the most important stage of installing heated floors. If the design and calculations are done correctly, financial overruns and cable overheating can be avoided. It is important to remember that the cable cannot be laid under such heavy objects as furniture; it must bend around them. Also, subsequent installation of the toilet involves drilling holes in the floor, so the cable should not pass where it could be accidentally drilled. In addition, the distance between the turns of the cable should be 10 cm, and between the cable and the walls 15–20 cm.
 Heating elements must not be mounted closer than 80 mm from each other or from the nearest obstacle
 Even at the project stage, it is necessary to determine the location of the heat regulator. For greater convenience, it is placed at a height of 1 meter above the floor, then you will not have to make too long a groove in the wall to lay the connecting cable.
Preparing the base
The first step is to remove any debris and dust from the surface being treated. To do this, you first need to remove the old coating using a hammer drill and visually inspect the base for cracks and other defects. If any are found, then it is necessary to seal them with cement-sand mortar, and cut off the protruding fragments with a grinder. The last step is to apply the primer in two layers.
 When preparing the concrete base, it is enough to putty and cut off the defects, but if the irregularities are significant, then a new screed is poured
 Laying a heated floor under the tiles is carried out only on a perfectly flat surface, so you should first make a screed. In this case, further work can be continued only after the concrete has completely dried (about a month). If you don’t have time for this, you should opt for a self-leveling floor.
It is not advisable to lay an electric heated floor on a wooden base, as this will lead to serious heat loss.
At this stage, the wall is also chipped; you can use a wall chaser or a hammer drill with a special attachment. The groove should go from the floor to the location of the thermostat. After completing the operation, you need to thoroughly clean the room, since gating leads to the formation of a large amount of dust.
 If you don’t have a wall chaser at hand, you can make a gutter using a grinder with a diamond blade, a chisel and a hammer
Note! If the system is installed in a recently renovated room, then it is better not to trench the wall, but to purchase a special plastic box for external installation.
Thermal insulation
This stage can be carried out even before the creation of the project. Modern manufacturers produce materials with high thermal insulation properties; all that remains is to choose the thickness.
- It is advisable to lay a thick layer of thermal insulation above the basement or ground. Also, serious insulation measures are needed for balconies, loggias and other unheated rooms; in this case, polystyrene foam or polystyrene foam is ideal. It is better to lay the material before leveling the surface; the layer thickness should be from 2 to 10 cm.
- A thin layer of thermal insulation is laid on a carefully prepared base. Typically, foil penofol is used for this; it must be placed with the reflective side outward to direct the heat upward.
 For a cold base, slab insulation is more suitable, and foil penofol is suitable for warm floors on floors
 The thermal insulation material is fixed at a certain distance from the walls: the thicker the layer, the greater the distance should be. The joints between the insulation and the walls must be taped with damper tape.
Installation of thermostat and temperature sensor
The regulator must be mounted in a specially prepared place near the cable groove; the connecting cable must first be closed in a corrugation. The corrugation is placed in a special tube, which is fixed in the wall. The sensor must be mounted at a distance of 40 cm from the edge of the wall between two turns of the heating cable, this is the only way to ensure that correct temperature data is obtained.
 The temperature sensor cannot be mounted next to the cable; it must be located clearly in the center between the heat sources
The connecting cable must be laid without kinks or creases, especially in the area of the baseboards. The edge that abuts the wall must be treated with sealant to prevent the solution from getting inside. The temperature sensor is also pre-packaged in corrugated material to protect the sensitive device from moisture and other influences.
Laying electrical cables or mats
First of all, you need to check the resistance of the heating elements and compare them with the manufacturer's readings. After this, secure the special tape that comes with the system to the base. There are fasteners on it, thanks to which the turns are located at the required distance from each other. Another option is to use a metal mesh: first, it is fixed to the floor using self-tapping screws, after which the cables are tied with clamps. Laying must be done with a snake and make sure that the cable does not end up in places where furniture and plumbing are installed.
 An important role in arranging the floor is played by the choice of the type of electric heating element.
 When using heating mats, the work is much simpler. It is enough to lay the mats on the floor, having previously checked their resistance, and connect the system to power. The requirements for the placement of the mat are the same as in the case of cables. To bypass furniture and plumbing fixtures, the mesh can be cut. After installation, you need to install grounding and automatic shutdown devices.
 The type of installation of heating elements is selected depending on the base
 Important! Many people want to use a heated floor system in a bathhouse, but experts have different opinions here: some say that with proper installation and arrangement of wire protection, it is possible to insulate a bathhouse. But we are still talking about electricity, so it is better not to use devices in wet areas.
Testing
Laying tiles on a heated floor is impossible without first checking the functionality of this system. It is necessary to fully connect everything, and then measure the resistance in the heating elements using a tester or multimeter. The data obtained may differ from the manufacturer's information by a maximum of 10%.
 Under no circumstances should you fill the screed without checking and testing the heating system.
 Screed arrangement
The thickness of the solution layer must be calculated taking into account the thickness of the heating elements used. In most cases, a layer of 5 cm is required for a cable floor, and 3 cm for a matte floor. Usually, a cement-sand mortar is used to fill the screed, but it takes a long time to dry. You can also make a screed with tile adhesive, which is especially convenient when using mats. Then the glue is applied in a layer of 2 cm, and the tiles are immediately laid on top.
 When installing a heated floor under a screed, its thickness ranges from 30 to 50 mm
 Laying tiles
Ceramic tiles are laid on a heated floor in the same way as on any other prepared surface. The only difference is that you need to use a special glue that can be heated. Such materials are marked with the words “Warm Floor” or the permissible temperatures are indicated on the packaging.
 Special heat-resistant compounds are used to lay tiles on heated floors.
 So, you need to do the following:
- Prepare the solution as directed on the package.
- Take a spatula, scoop up glue on it and transfer it to the surface. It is recommended to level with a shaped spatula, which fills voids better. This is especially true when the solution is applied to a heating mat. The presence of air pockets will cause the system to overheat.
- Lay the tiles at a distance of 2–3 cm from the wall and press them into the mortar.
- Attach special plastic crosses to the corners and secure the next tile. Thus it is necessary to treat the entire floor.
- A day later, fill the seams with a special grout, and then install the baseboards.
 Algorithm for laying floor tiles
 It is recommended to turn on the system after a week so that the glue has time to dry. For a successful result, you must have some experience in working with electrical equipment. Otherwise, it is better to contact specialists or a familiar electrician.
The video below will help you learn more about the process of installing a warm electric floor under tiles.
Installation of water systems
We are talking about installing a pipeline through which hot water flows, heating the floor covering. The liquid is supplied from the boiler through the manifold; it is responsible for equal distribution of water throughout all pipes located in different rooms.
In most cases, systems serve to heat not only tiles, but also many other surfaces, so it is not practical to install a system for one bathroom; it is better to connect all rooms at once.
 The layout of the water and electrical systems differs only in minor details
 Installation technology for water heating systems
First of all, it is necessary to think through some nuances and carry out certain calculations:
- Total floor area. Depending on this indicator, you need to purchase a certain amount of insulation, pipeline, mortar and reinforcing mesh.
- Total number of tiles. You need to find out the material consumption per square meter, multiply it by the area and add 10%.
- Required temperature. The type and power of the collector and pump, the number of circuits, and the total length of the heating main depend on this parameter.
First of all, you need to lay a waterproofing layer on the base; this can be polyethylene film or a special roll material. It must be laid after rough preparation. Then comes the installation of the thermal insulation layer; it is recommended to use penoplex or penofol. The materials are simply laid on the floor and secured to the walls with damper tape. After this, it is necessary to lay another waterproofing layer. If penofol was used, then additional insulation from water is not required, because the foil does not allow water to pass through.
 It is advisable to install slab types of thermal insulation under a water-heated floor.
 The next step is the installation of reinforcing mesh; it is better to use material with a large cell. The mesh is installed on self-tapping screws, after which the pipeline elements will be attached to it. Next, you need to connect the pipes to each other and secure them with clamps to the reinforcing mesh. The smaller the distance between the elements, the hotter the coating will be. Finally, the pipes must be connected to the supply and intake valves of the manifold.
At the end of the work, tape the lower part of the walls with damper tape, fill the floor with concrete and take a break until it is completely dry. After this, you can lay the tiles, as described in the previous section.
 For water heated floors, both traditional cement-sand screed along beacons and self-leveling floors are used
 In addition to the main components of a water-heated floor system, manufacturers sometimes include a thermostat in the package. It consists of a temperature sensor, servos and a thermostat, which are mounted on the manifold. With its help, you can control heat transfer and completely turn off equipment during the warm season.
Installing underfloor heating systems is a rather lengthy process that requires knowledge and experience. In addition, it is important to remember safety precautions, so novice DIYers are advised to strictly follow the instructions and work with a partner.
Ceramic tiles are most often used to finish floors in which heated floors are concreted. This material is an excellent solution, as it has a high level of thermal conductivity. Thus, the heat passing through it will practically not be retained or lost. However, before you start tiling the floor, there are some details you need to understand. In this article, we will tell you how to lay tiles on a heated floor.
What you need to know
When laying tiles on the floor, it is important to understand that in the case of heated floors, a special approach is required. Moreover, the technology directly depends on the installation method. For example, when installing a water heated floor, concreting is carried out. Laying tiles on a flat screed is very easy. It's a completely different matter when it comes to electric heating. The screed is not always filled. So, you can immediately lay tiles on the laid heating mats. It turns out that the heating element will be located directly in the tile adhesive. In the first and second cases, it is quite possible to do all the work yourself.
Features of the floor device

So, if you decide to carry out the work yourself, then you need to take into account several important nuances, which will be described in this article. The first thing you need to remember is that the height of the finish tiles should be at the same level as all other rooms. Therefore, even at the stage of manufacturing the heated floor, you should make the appropriate measurements.
Advice! If the floor height of other rooms is initially much higher, then the heating cake may be thicker. For example, you can increase the layer of thermal insulation, but not only due to the screed. In this case, the heating efficiency will be reduced to zero.
If the screed is already ready, then when laying tiles the minimum layer of tile adhesive should be at least 10 mm. Otherwise, the generated heat will not be dissipated over the entire surface of the floor, and the floor heating will be in stripes, only in those places where the heating cable or pipe is laid. Therefore, you should not strive to make as small a layer of tile adhesive or floor screed as possible. So, if you have already taken into account all these details, you can start working directly. Next, we provide you with step-by-step instructions for the entire work.
Instructions for laying tiles

First of all, you need to choose a special glue for combination with underfloor heating. The adhesive packaging must have a corresponding sign indicating the possibility of using the mixture with underfloor heating.
So, for work you will need the following set of tools and materials:
- Drill.
- Construction mixer.
- Rubber spatula.
- Grout for seams.
- Spatula with teeth.
- Floor primer.
- Special tile adhesive.
- Crosses to form a uniform seam.
- Rubber hammer.
- Tile cutter for cutting tiles.
- Roulette.
- Pencil and marker.
- Construction level.
- Container for mixing tile adhesive.
First of all, it is necessary to correctly calculate the required material. To do this, you need to know the floor area. Remember that you should not buy tiles and tile adhesive back to back. Be sure to make a small reserve of up to 10% of the amount received.
After this, the base is prepared. We will consider the option when the heated floor is already covered with screed. Considering that in most cases the screed is made on the basis of a cement-sand composition, its surface must be impregnated with a primer. You can use a deep penetration primer, for example, concrete contact. It would also be useful to do waterproofing. In order not to create an additional barrier to overcome thermal energy, it is better to use coating waterproofing.

After applying the primer, the floors should dry for about three hours. After this, apply a coat of primer again. This will increase the quality of adhesion of the tile adhesive to the floor. The next step is marking the floor. Here you should immediately decide according to what pattern the tiles will be laid. For example, diagonally, staggered, or simply in a straight line, seam to seam. Having decided on the scheme, you can apply markings to the floor to make laying tiles on the heated floor easier. Remember that the quality of heated floor heating does not depend on the method of laying tiles you choose. Now let's look at the technology of laying tiles on a warm floor.
Stages of tile installation
So, first of all, prepare the tile adhesive. Mix according to the manufacturer's instructions. There is a recipe on the glue packaging. By sticking to it, you will be able to prepare glue with the ideal consistency. Kneading is carried out using a drill and a construction mixer.
Advice! When the adhesive has been thoroughly mixed, leave it for 15 minutes. After this, stir again and it is ready to use.

If you do not have experience in laying tiles, then do not make a large batch. So, the glue must be applied to the tile itself. It is leveled with a notched spatula. Glue should also be applied to the floor. Apply glue to one square meter at a time. Additionally, apply adhesive to the edges and corners of the tiles.
One of the main features of laying tiles is that the space between the tiles and the floor must be completely filled with adhesive. There should be no voids. Therefore, you should strictly control this moment. Some experts intentionally put a few millimeters more glue on the tile, and then press it in. Due to these actions, excess glue comes out through the seam, which will indicate that the glue has completely filled the entire space.
So, according to the markings, lay the tiles on the floor. Press it in moderately. Immediately place a few more tiles. This will allow you to apply a level and level them on all sides of the plane. By lightly pressing the tiles, glue will come out of the seams. It should be removed immediately, as special grout will be placed in the seams. To form an identical seam, be sure to use crosses. When laying, glue may get on the front side of the tile. It must be removed immediately with a damp sponge or soft cloth. If you leave the glue on, it will dry out and then there is a risk of damaging the flooring.
Important! It is necessary to leave a small gap of up to 20 mm between the tiles and the wall. This gap will serve as an expansion joint. When exposed to thermal energy, the surface can expand. For this reason, this gap should be carefully monitored.
When the floor surface is completely tiled, it is unacceptable to turn on heated floors. Tile adhesive must acquire the required hardness under natural conditions. This is the only way to achieve ideal quality. During the laying process, you will also need to trim the tiles; for this, a special tile cutter is used; it can be mechanical or automatic.
After completing the masonry, when the tile adhesive has dried, all you have to do is grout the joints. For heated floors, it is necessary to use a special grout that does not allow moisture to pass through. This will be an additional barrier to moisture penetration. When grouting joints, do not rush. It is extremely important to carefully fill all seams so that there are no voids. When grouting is completed, the tiles must be thoroughly washed. But this should not be done immediately after grouting, because it can all be washed out. Wait a short time for the grout to set.
Advice! The resulting gap between the tiles and the wall should not be filled with grout. This expansion joint should be filled with silicone sealant.
Conclusion
So, here we have looked at all the features of how tiles are installed on heated floors. There are no special differences from ordinary masonry, however, there are some small nuances. If you listen to the advice from the article, you will be able to make a high-quality coating on top of the heated floor. As a result, during the heating season you will enjoy warmth and comfort indoors. We hope this article has helped you figure out how to handle all the DIY jobs. In addition, we invite you to watch the prepared video material. It will help you consolidate all the provided theory from this article. And if you have already had experience in similar work, then share it by leaving comments at the end of the article.
Publication date: 11/18/2015
Tile floor
Floor tiles have many advantages, including practicality, reliability, durability and attractive appearance. Long gone are the days when ceramic tiles were characterized by dull colors and were more reminiscent of public and uninviting spaces.
Floor tiles today offer a wide variety of not only colors, but also textures; they can imitate almost any surface, including wood and natural stone. But tiles also have a disadvantage - their surface is quite cold; for heating, the use of special underfloor heating systems is often recommended. Let's consider what options for such systems can be installed under tiles, what features distinguish them, and how to lay tiles correctly, following the technology and recommendations of experts.
How to prepare the base?
Before laying tiles and underfloor heating systems, it is necessary to properly prepare the base. Such work includes:
- inspecting the base and filling all cracks, defects and potholes with special compounds. After this, you should determine the horizontalness of the base using a building level;
- if necessary, a cement-sand screed is applied to the floor for leveling, which must dry completely before further work;
- after this, special hydro- and heat-insulating materials should be laid on the base, which will protect the heated floor from excess moisture and provide a reflection effect in order to avoid heat loss.
Installation of a heated floor system under tiles
Laying the well-known heated floor is possible using a variety of systems, but for floor tiles, electric floors (cable and infrared carbon) and water systems are recommended. It must be remembered that the systems used for apartments and cottages may be different, for example, water floors are not recommended for ordinary apartments for some reasons, which we will mention later.
Return to contents
Electric floors
For installation under tiles, it is best to use an electric heated floor with the installation of a single-core, two-core ultra-thin cable. In this case, the first two types should be installed only in a cement-sand screed.
Single-core cables are much cheaper, but they must be connected to the thermostat. Twin-core ones are more expensive, but they are also more reliable: they can be connected to rooms with any layout.
Among the disadvantages, laying a cement screed will reduce the height of the room by three to five centimeters, and subsequent laying of ceramic tiles will reduce the height by another four to six centimeters.
But the installation of mats does not require screed. This type of electric floor can be safely laid on an old layer of screed, provided that the base is perfectly flat. After installation, a layer of tile adhesive is applied on top and the ceramic tiles themselves are laid. This method is great for apartments with relatively low ceilings, for which the loss of this height is critical.
Infrared floors
When deciding to lay tiles on heated floors, preference is most often given to electrical systems, since they more closely meet all the requirements for such work. One of the modern varieties of such floors are infrared floors, consisting of thin plates that are sealed in a specially treated polyethylene film.
Depending on what material is used for the heating elements, such floors can be bimetallic or carbon. Specifically for laying tiles, it is permissible to use only carbon heated floors, which are not subject to corrosion, and if a particular area is damaged, the entire system will not shut down.
Such floors have another advantage: they practically do not change the height of the ceiling in the room, since their thickness is insignificant. This system operates silently and is controlled using a thermostat.
Installation of such a system under laying ceramic tiles is possible if a special heat-reflecting substrate and a fiberglass mounting mesh, which has cells measuring up to three centimeters, are first laid on the base.
During installation, it is advisable to use wide sheets from one meter with an energy consumption of one hundred and fifty watts per square meter of film. This film covers approximately 75 percent of the floor surface; places where equipment or furniture will be placed should be avoided. The system cable should be located directly below the surface of the tile. The connection of the wires must be parallel.
Water floor
In order to heat a large floor area under ceramic tiles, it is usually recommended to install a hydronic heated floor, through which hot water will circulate through the pipes. Such floors are distinguished by the fact that they can be connected to central heating, the system itself will not require maintenance, and the installation costs are one-time.
But there are also certain problems: such a warm floor cannot always be installed in the desired location. For example, in apartments such a system is very unprofitable for a number of reasons: when connected to a common pipeline in other apartments, the pressure drops sharply; also, during installation, it is necessary to place sediment for the pipeline in a convenient place, and in the event of a malfunction or leak, urgent repairs must be carried out, which involves complete dismantling of the floor covering and cement screed.
Local repair of such a system is quite difficult, although metal-plastic pipes are not subject to corrosion. It is also necessary to install a special device that will prevent the gradual accumulation of deposits on the inner surface of the pipes.
Installation of a heated floor before laying tiles cannot be done without taking into account the following requirements:
- the base should not only be cleaned and leveled, but also heat and waterproofing should be provided;
- when laying, it is necessary to provide space for placing the mini pumping station and thermostat;
- All pipe connections must be of high quality and reliable. Before laying the cement-sand screed, you should conduct a test run of the heated floor system and check for leaks.
Among the advantages of installing a water heated floor, it is necessary to note the ease of installation and energy savings, since a central system is used to obtain hot water.
Laying tiles on a prepared floor
You can lay tiles on the prepared floor only after the underfloor heating system has not only been completely installed and tested, but also the cement-sand screed (if any) has completely dried. You can use tiles of any variation for this: ceramic, porcelain stoneware or natural stone.

Laying floor tiles
The technology for installing tiles on the floor is practically no different from the usual one. First, the base for the tiles is marked according to the chosen method. For small rooms, the tiles themselves should be laid from the center, for large ones - from the corner.
The solution is applied in a small layer to approximately one square meter of surface plus the underside of the tile, after which the plate is firmly pressed to the floor for a few seconds. To ensure uniformity of the masonry and a beautiful pattern, it is recommended to use special plastic cross inserts, two of which are installed on each side of the tile. The thickness of the seams can range from one millimeter to three. The tiles are laid carefully, trying not to disturb the pattern of the future floor. The last thing to apply is grout for the joints.
As we can see, laying tiles on a heated floor system is not much different from the usual sequence of work. You can turn on the heating one to two weeks after all installation is completed.


