Stumps in the ground or uprooted are a good material for making various crafts.
The unusual appearance and high strength of wood make it possible to make from them not only outwardly beautiful products, but also functional furniture.
The main conditions for high-quality crafts are the maximum compliance of the hemp or tree roots with the purpose that they have prepared for them, as well as the correct processing of wood.
Crafts can be made from any stump, driftwood or roots, regardless of their condition, but it must be understood that it is desirable to make furniture from material not damaged by rot or decay because it has higher strength.
But even a rotten crumbling stump can serve as the basis for a figure or some kind of decoration.
First you have to use other people's ideas, but as you gain experience working with this material, you can see not only the stump or roots, but also what kind of craft for your home or garden can be obtained from them after processing.
How to work with this material?
Regardless of the shape and type of material to work with use standard actions:
- debarking;
- removal of affected areas;
- surface leveling;
- cutting;
- sawing;
- chiselling and cutting;
- grinding;
- connecting parts to each other;
- staining;
- painting and varnishing.
debarking
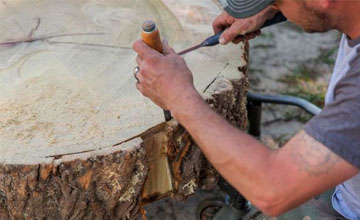 This operation is performed if there is dust / pests under the bark, or it spoils the appearance of the future product.
Filming her with a not too sharp chisel, prying and peeling pieces of bark to her.
Where the bark has exfoliated from the wood, it is hooked with a chisel and broken off in layers.
If the bark sits tightly on the wood, then the chisel is attached to the bast or cambium (layers of different colors between the cork and the wood), then with light blows of the hammer it is directed along the trunk, then a piece of bark is broken off.
This the operation must be carried out carefully, because if the chisel touches not only soft bast or cambium, but also hard sapwood, then it will be quite difficult to eliminate damage to the wood.
Removal of affected areas
If there are strongly rotten areas on the stump that spoil the appearance of the material, then they are removed in various ways. Surface defects, as well as the remains of the bark, removed with a manual metal brush. It will not harm healthy wood, but it will quickly clean off dust and rot.
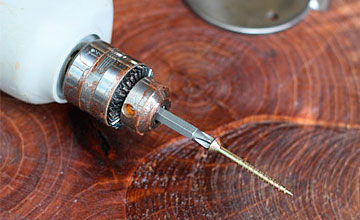
If the lesion has penetrated deeply, then its contours are outlined with a pencil or marker. Subsequent actions depend on the structure of the stump and the location of the damaged area.
If the material inside is empty(the core is rotten), then this area cut out with a jigsaw(wall thickness 2–4 cm) or chainsaw (wall thickness ≤4 cm). On a stump with a whole core, the contour is cut with an electric jigsaw, then carefully, in small pieces, break out the defective wood with a chisel.
If the depth of the lesion is greater than the saw blade of the jigsaw, then the rest of the affected material is removed with a chisel, first deepening the contour line with it, then removing it with strips 1–2 mm thick. You can not immediately use the chisel, because it is likely to go beyond the contour and damage healthy wood.
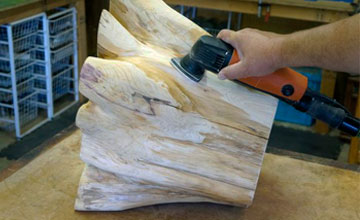 You can also remove the affected material using a metal brush mounted on a drill or grinder (angle grinder, angle grinder) with soft start and speed control.
The advantage of this method is that after it there are no clear edges, and the treated surface looks natural.
When using this tool be sure to use a respirator and goggles because the brush creates a lot of dust.
Surface leveling
This operation is performed if necessary. align protruding parts, for example, mounds or branches. Large irregularities, such branches or roots, are first cut off with a hacksaw or chainsaw, then the surface is leveled sharpened planer.
When leveling unevenness caused by wood wear, you need to move the planer only from top to bottom, otherwise there is a high probability of scoring, which is quite difficult to remove.
When leveling irregularities left after removal of branches or knots, care must be taken to move the planer from the edge to the center of the irregularity.
Another way to level the surface - cutting off excess wood with an ax. It is used only to level the destroyed wood. Optimal results are obtained by striking with a blade directed to the wood at an angle of 10-25 degrees in relation to the direction of the fibers.
In this case, the sharpened blade accurately cuts off the layer of wood and immediately forms a relatively flat surface directed along the grain.
 Small irregularities can be removed with a grinder with coarse sandpaper.
The grinder can be moved in any direction, this will not lead to scuffing, however, when working with it, avoid sudden movements or strong pressure.
This can lead to holes, because sandpaper, moving at a fairly high speed, quickly grinds even healthy wood.
The same method is also used to level the surface remaining after the removal of knots and branches, if the planer gives constant scuffing. You can also use an electric planer, it does not give scuffing, regardless of the direction of movement.
If it is necessary to cut off the roots, then the stump with the roots is placed on the deck, then they are beaten from above with an ax. And the direction of impact depends on the thickness root. Thin roots (1–3 cm) are cut at a right angle; when cutting thicker roots (4–6 cm), the blade is tilted at an angle of 45–75 degrees.
If the root is thicker, then it is necessary either periodically (every 3-6 strokes) to change the direction of the ax tilt at the same angle, or cut them off with a chainsaw.
Chopping off thick roots is permissible only in two cases, that is, when the remainder of the root:
- can be leveled with a grinder (it’s easier to immediately cut off evenly with a chainsaw);
- will be invisible on the finished craft.
slicing
The meaning of this operation is to cut one or more layers from the stump, which can then be used in various ways.
 In addition, a stump with a straight cut top or bottom can be used as a beautiful decorative stand, such as a dining or coffee table.
Such a stand will look especially impressive with a tabletop made of transparent plexiglass (plexiglas).
For cutting, the stump is fixed so that the line passing inside the trunk from the roots to the top is strictly perpendicular to the floor surface.
Then mark the cut line with a felt-tip pen, marker or spray paint. You can also use a plywood guide. To do this, take a piece of flat plywood 10 mm thick and cut a hole in it according to the size of the stump.
After the guide is put on the stump and fastened on the reverse side with furniture corners using self-tapping screws. When the guide is set, a chainsaw tire is moved along it.
Thanks to the large width, the guide prevents the chainsaw bar from deflecting and a clean cut is obtained. If the length of the tire is less than the diameter of the stump, then first cut through on one side, then on the other.
It is best to level the cut surface with an electric jointer- This tool is long enough to form a flat plane and does not scorch, regardless of the direction of travel.
You should not use a conventional or electric planer for this work, the first one cuts poorly across the fibers, and the second does not have the desired length and cannot form a flat plane.
Sawing
 If the need arises cut a piece of healthy wood stump or root, then they are cut with a small chainsaw.
Unfortunately, a chainsaw can only make rectangular cuts or cut out pieces of walls in stumps with a rotten core.
If you need to make a recess of a complex shape, you can remove the bulk of the material with a chainsaw, and fix the rest with a knife and a chisel.
It takes less time than a full cut, but requires great skill with a chainsaw.
Chiselling and cutting
The only difference between chiselling and carving is that when chiselling, part of the impact with a chisel (a chisel with a reinforced handle designed for hitting with a hammer or mallet) falls across the fibers.
The result of such an impact (cutting) is the separation of the fibers, so that their cutting to the point of separation does not lead to the appearance of scuffs after the cut.
Unlike a chainsaw, chisel can create patterns of complex shape, and a chisel or knife can not only remove a layer of wood parallel to the direction of the fibers, but also make various ones, including figured recesses.
grinding
This operation is used to make the surface of the wood as smooth as possible. for grinding can't use grinder, because any inaccurate movement can lead to the appearance of a recess in the hemp, which will spoil the appearance of crafts from it.
 That's why grind the material only by hand, using sandpaper for this different sizes, first the largest, then gradually move to the smallest.
If during the grinding process it is not possible to completely remove the pile, then the surface of the wood should be slightly moistened.
Thanks to this, the villi will rise, then move the sandpaper alternately from bottom to top (in the direction of the fibers), then across. You can switch to finer sandpaper only after completely removing the pile.
After every change of sanding paper it is desirable to blow the surface with air flow from the compressor or a vacuum cleaner and, placing it in a brightly lit place, inspect from all sides, periodically turning the craft. This will help to detect sanding defects that will reflect light differently.
How to connect different parts together?
Separate parts, which can be whole stumps, individual roots or even cut pieces of wood, connect using:
- castles;
- glue and dowels;
- threaded bushings and screws;
- studs with nuts;
- furniture corners;
- screws and nails.
Lock
Locks suitable for connecting rectangular or hidden parts. The type of lock is selected based on the configuration and dimensions of the parts to be connected.
It should be noted that quite serious carpentry and carpentry skills are required for such work.
In addition, the locks only hold the parts when exposed in certain directions, so they it is desirable to additionally fix in any way.
Glue and dowel
Glue and dowels used to connect flat adjacent surfaces. The smoother the surfaces, the stronger the connection will be, therefore, before gluing the plane, it is advisable to process it with a manual or electric planer.
 For gluing wood use the following types of glue:
- casein;
- acrylic;
- thermo;
- polyurethane;
- epoxy;
- carpentry;
- bituminous;
- nitrocellulose.
When working with any adhesive, it is necessary to strictly follow the instructions for use, which can be found in a container with it or a packaging box. If the dowel is placed outside, then a hole for it is drilled immediately after the parts to be glued are joined together, then a tightly fitting dowel is driven into it.
If the dowel is installed inside, then first, coordinated holes are drilled and the parts are assembled on the dowel without glue, then all the parts are smeared with glue and connected to each other. Nagel can be made from any suitable piece of wood by cutting it with a knife.
Threaded bushings and screws
Threaded bushings are used in cases where it is necessary to firmly attach parts that cannot be glued.
To do this, a hole is drilled under the bushing, the diameter of which is necessary for threading, then carefully, without warping, the bushing is screwed into this hole.
To make the connection more reliable, the hole and the external thread of the bushing are lubricated with PVA glue. After that, a hole is drilled for a bolt, screw or stud and the parts are connected to each other.
Studs with nuts
“This is the easiest way to connect several parts together. To do this, all the parts are put in place, then a through hole is drilled through each of them, a stud is inserted into it and fixed with nuts.
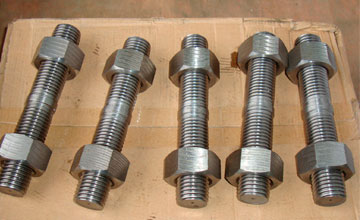 This type of connection does not prevent parts from rotating around the axis of the stud.
Therefore, it is used where such rotation is permissible or is prevented in any way possible.
Instead of one of the nuts, you can use a threaded sleeve, thanks to this, the stud will protrude from the interconnected parts only on one side.
Furniture corners
With furniture corners connect parts to flat surfaces located at an angle of 90 degrees to each other. Theoretically, it is possible to cut areas for corners in parts that are at different angles or do not have flat surfaces.
The corners are fixed with self-tapping screws, pre-drilling a hole with a diameter of 1–2 mm under them. A single corner will not provide reliable fastening, however, by installing at least 3 corners, they create a fairly strong fixation, comparable to high-quality gluing. At the same time, the connection with the help of nuts and bolts will still be noticeably more reliable.
Therefore, the only advantage of the corners is that they are installed in places hidden from view, so they do not spoil the appearance of the craft.
If, instead of a furniture corner, you use a steel corner with a shelf size of 30–50 mm, and also fasten it with several self-tapping screws in increments of 2–3 cm, then even with a length of 10 cm, such a corner will provide a very reliable fixation.
The only downside to this mount is that that excess load on the parts leads to the tearing of self-tapping screws from wood, after which the corner can no longer perform its function, and it must be transferred to an undamaged area of \u200b\u200bthe parts.
Self-tapping screws and nails
 In most cases, the use of screws and nails does not cause difficulties or problems.
If they need to attach a part of small width and thickness, then it is necessary to drill a hole in it according to the diameter of a nail or self-tapping screw.
Shouldn't be used this method of fastening in cases where when the nail or the self-tapping screw will not enter across, but along, because this way the wood will not be able to effectively hold them.
If the parts need to be connected in this way, then it is better to use a bolt or screw and a threaded bushing.
Staining
Stains do not paint wood, but change its color from the inside., because of which, even after fine grinding, stained wood retains its color. Most stains come in the form of water or alcohol solutions, which are sold in hardware or hardware stores.
The color of stain and stained wood does not always match, in addition, it depends on the breed, so you need to carefully read the instructions for the drug.
Mordants water based safe, so goggles and rubber gloves are enough to work with them, and they can be used in rooms with natural ventilation. You can work with alcohol stains only in the air or in rooms with forced ventilation.
Painting and varnishing
Unlike morbidity painting does not change the color of the wood, but creates a thin film of a certain color on its surface. Any type of paint can be used to paint wood. Water-based paints should be used with caution, as they can lift the pile and spoil the appearance of the finished hemp product.
 It is necessary to work with paints based on organic solvents either outdoors or in a room with good forced ventilation.
wood can be coated with any varnish, which not only give the surface a glossy effect, but also reduce the ability of wood to absorb water.
Thanks to this, she suffers less from rot and harmful bacteria.
What can be made from tree stumps and snags?
Here is a short list of what can be done from the above and below ground parts of the stump:
- flower beds;
- stands for flowers in pots;
- stools;
- decorative armchairs;
- coffee tables;
- decorative lamps;
- candlesticks;
- figures of goblin, brownies, animals or various monsters;
- decorative ornaments.
We prepared a selection crafts from stumps and driftwood, as well as a brief description of each such product for home and garden.
Armchair
To make a chair large stumps are suitable, the diameter of the upper part of which exceeds 70 cm. In this case, you get a classic chair with armrests and a back.
To increase the comfort of the seat, armrests/backrest can be covered with foam and cover with leatherette, so that they become softer.
If the stump is of a smaller diameter, then the armrests / back of the manufactured furniture can be made from roots that are attached to the wood in various ways.
Bench on wheels
Such a bench is useful in the country, and for its manufacture you will need the above-ground part of the stump and furniture wheels. Using a chainsaw, the stump is cut so that the upper and lower cuts are parallel to each other and perpendicular to the center line.
 Then both surfaces leveled with an electric planer and grinder.
To remove the bark or not, you will have to decide on the spot, it depends on the appearance of the material. Cleaned wood can be decorated in any suitable way.
If on the top of such a bench put foam rubber and beautifully cover with leatherette, then you get a soft comfortable ottoman, which you are not ashamed to offer guests.
A coffee table can be made in the same way, however, you will need a stump with a large difference in the circumferences of the above-ground and underground parts. In this case, the underground part, located above the lateral roots, will be the top, and the wheels must be attached to the upper cut.
decorative table
The main problem that arises in the manufacture of tables from stumps is related to the search for material for the tabletop. After all, it is quite difficult to find a stump with an upper part diameter of 80 cm or more, and then make an even cut of the required thickness from it. That's why countertops are often made from other materials, such as:
- board (shield of boards);
Opaque materials can be fixed with countersunk pins or furniture corners, however, it is advisable to use adhesives based on suitable solvents (toluene, dichloroethane, ether, etc., depending on the type of plexiglass) to fix plexiglass.
Epoxy-based adhesives and suitable degreasers can be used to fix the glass top. You can also first make an epoxy cap, then level it until it is flat and glue it with special glue for glass.
Flower bed for the garden
A flower garden can be made from a stump uprooted or sticking out in the ground. The disadvantage of the material in the ground is that it is more difficult to process due to the fact that you have to bend down a lot, and in order to cut out drawings on it, sometimes you have to lie down on the ground.

The uprooted material is lifted to the workbench, where it is much easier to work with it. Large stumps (30–40 cm diameter at the top) serve as a decor in the country as a flower garden for 5-15 years depending on weather conditions and other factors.
If, however, a drainage hole is drilled in the stump and the plants are planted not in wood, but in a pot, which is then placed in a prepared recess, and the stump itself is treated with hydrophobic / aseptic materials and varnished, then its service life will be tens of years.
Decorative lamps
For a lamp, the underground part of the stump is best suited, from which it is necessary to remove excess roots. If you put such a stump on the roots, and fix a lamp with a lampshade on the upper part, you get stylish table lamp.
If you turn the stump upside down and install a lamp between them, you get an equally stylish lamp that casts unusual shadows.
His Can be placed on a table or wall mounted(for this you will have to make a plane adjacent to the wall).
Painted garden furniture
For the manufacture of such furniture can be used how logs(a tree trunk sawn into pieces), and various parts of the stump, including deep roots. Wood is cleaned before painting from dirt, bark and damage, then impregnated with antiseptics and dried, after which they are painted with any paints.
Bottle rack
 Bottle rack It will be appropriate to look not only in a country house, but also in the kitchen or in the living room.
Obviously, the larger the stump, the more storage space for bottles can be made from it.
Desirable clean the wood from bark and any damage The more unusual the shape of the stand, the more attention it will attract.
If the surface of the stump sand, sand and varnish, you get a very stylish product that harmoniously fits into the interior.
birdhouse
Such birdhouse will be appropriate not only in the garden, but also in the residential area of a country or country house. From spring to autumn, birds nesting in it will delight with their singing.
For the manufacture of it is advisable to use healthy wood. In the stump, the inner space is first hollowed out, then a bird hole is drilled. The roof can be made from bark or other materials.
Candlestick
Few things are better for creating an atmosphere of mystery and romance than upside-down candlestick stump.
It will need to remove all the bark from it, as well as sand thoroughly, coat with stain and flame retardants, that is, substances that reduce the combustibility of wood.
Then the candlestick is varnished and equipped with a reliable stand.
House made of stumps and clay
Stumps, like wood logs, are a good material for building houses, because wood has low thermal conductivity, so the house will be warm, and also passes steam well, so that the rooms will always have the same humidity.
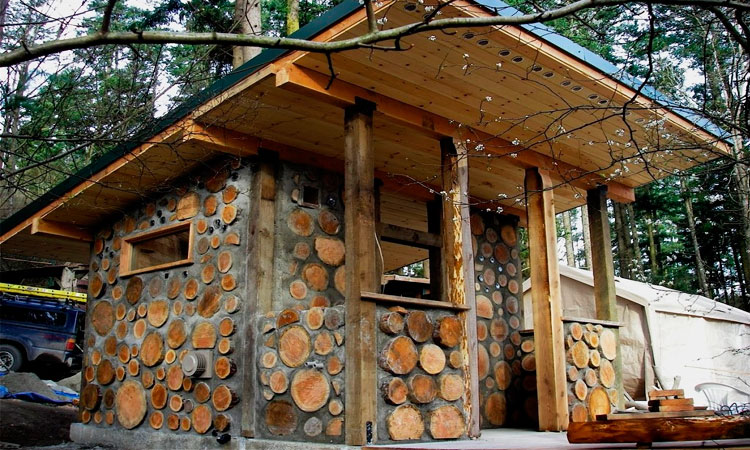
Due to the rather large distance between adjacent wooden elements, a house made of stumps and clay very resistant to fire, so it will not catch fire from a short circuit or a cigarette that has fallen on the floor. For such construction, it is better to use stumps with a minimum difference in the diameters of the upper and lower parts.
Toy house made of rotten material
Such a house will be a wonderful decoration not only for a garden or vegetable garden, but even for a living room or a children's room.
Rot eats away the stump from the inside unevenly, therefore after removal of the affected areas, the material takes on rather bizarre shapes and you can pick up a stump from which you get a beautiful and unusual toy house.
The main conditions are:
- complete removal of damaged wood;
- high-quality drying of the stump;
- antiseptic treatment.
 Stump after wood processing it is desirable to cover with furniture or parquet varnish, because they create a waterproof film and do not emit toxic substances.
The roof can be made from earth sown with grass, so the house will take on some resemblance to the hobbit hole shown in various films.
A small house can also be made from an intact stump without cracks and dust. The roof is often made from bark, and windows and doors are made from various children's toy sets.
Other application
Uprooted stumps are made from the same wood as tree trunks, so can be made from them:
- firewood, including for (due to the higher content of juices and resins, such firewood gives food a stronger flavor and aroma);
- chips for;
- for various purposes;
Conclusion
Stumps uprooted from the ground are a good material for making various crafts. The creation of most of them does not require a high qualification of a carpenter, joiner or woodcarver, but enough knowledge gained at school in labor lessons.
Now you know how to process any stump and make a table, a lamp or any other beautiful product out of it that attracts the attention of neighbors and acquaintances.
In contact with
Often in the summer cottage there are stumps from cut down trees. They spoil the appearance of the garden, interfere and do not bring any benefit. Uprooting stumps is a laborious task that not everyone can do. However, if you approach the problem creatively, you can do without radical measures. We are talking about creating a stump-flower bed with your own hands. Thus, you kill two birds with one stone - decorate the cottage and get rid of the need to do hard work.
What stumps are suitable for flower beds
To create a flower bed, almost any stump is suitable. The only exceptions are very rotten rotten stumps infected with woodworms and other pests. Pine and spruce are of little use for a flower garden, because their wood is very short-lived, and the resin contained in it can inhibit plants. The best option would be the remains of oak, maple, elm, fruit trees. The thicker the stump, the wider and more magnificent the flower bed will turn out.
The second life of an old tree
An untreated tree is short-lived. In order for the flower garden to serve for more than one year, the wood should be impregnated with special antiseptics, painted or varnished. The method of planting also affects the life of the stump. If the earth is poured directly into the cut out recess, then the tree will inevitably begin to collapse. To prevent rotting, use pots that are inserted into holes.

A simple thumbnail for beginners
Technology for creating a flower garden in hemp
Having chosen a suitable stump, you can proceed to the next, more interesting stage. It is important to follow all recommendations.
What to plant in an unusual flowerpot
The choice of plants depends on the location and size of the hemp flower bed. The larger the size of the sawn tree, the larger the flowers can be planted in it. Small stumps are suitable for composing compositions only from miniature plants.

You can create a composition from several stumps
For a hemp flower bed located in the sun, it is very easy to pick up tenants. It can be any light-loving plants with a not very powerful root system. The ideal option is beautifully flowering annuals. If the stump is in the shade, you need to look for shade-tolerant species. It can be periwinkle, lilies of the valley, violets.

Flowerbed-stump in the garden
Step-by-step instructions for creating a hemp flower bed
Step by step instructions will help you figure out how to make a flower bed in a stump at their summer cottage. This process is quite laborious, but the result will be impressive.
- Stump preparation. The main task when creating a flower bed is to remove the wood in the center of the stump. This can be done with a hoe or a chisel. However, a neat hole can only be obtained with a chainsaw. If you intend to insert a pot into the flower bed, you can not do without a saw.
- Drainage and wood processing. To drain excess water, several inclined holes are drilled in the walls of the stump. After that, the wood is treated with an antiseptic primer or painted. So that the stump does not lose its decorative appearance, only the inner surface can be processed, leaving the outer walls in their original form.
- Filling the flower bed with earth. A layer of gravel is covered at the bottom of the excavation, and a nutrient soil mixture is laid on top and lightly tamped. If a pot is to be used, this step is skipped.
- Making a flower arrangement. Flowers can be sown directly into the ground. But it is much more convenient to use ready-made seedlings. Tall species are located in the center, and undersized or ampelous ones along the edges of the flower garden.

Flowerbed-stump with falling flowers
The most interesting ideas and photos of stump flower beds
A flowerbed-stump can be decorated in completely different styles. Everything will depend on your imagination, taste and availability of the necessary plants.
It looks very nice in life and in the photo a hemp flower bed with falling plants. Ampelous petunia, nasturtium, morning glory - these are just a few species with which you can arrange a flower avalanche.
A wide low stump can be arranged in the form of a rocky garden. Saxifrage, succulents, fat woman, as well as decor made of pebbles and pebbles will come to the rescue.

Succulents in a stump
From the old stump, located at the playground, you get an unusual fairy-tale house. For this, a roof is knocked down from planks on a stump, a door and windows are made out. Decorate the composition with undersized plants.
As you can see, a non-standard approach to things works wonders. Even such useless things as pieces of wood and stumps in skillful hands turn into a true decoration of the garden.
Decorative trimming of stumps and saw cuts of trees in a summer cottage A cut of trees in the garden leads to the appearance of rough and not very pretty stumps. There are two ways to solve the issue - to study the uprooting of stumps and get down to business, or to decorate the stumps after sawing and revive a quiet garden a little.
Decorating and decorating stumps is a great way to save yourself the trouble of uprooting, especially if there are no opportunities for this.
So, we forget about working with an expensive chainsaw, we exclude cutting down roots and physical fatigue, and just consider the most that will help transform the stumps of old tree cuts.
Decorating a saw cut tree with homemade figurines
We have a great idea that absolutely everyone can bring to life. In the photo below, you can see an interesting picture - small fairy-tale lumberjacks are operating over a tree trunk. You can make such babies from plastic or tin, or you can just buy figurines in a toy and souvenir store.
You can place the figurines and their accessories on the trunk using self-tapping screws, nails, wire or clamps. As a result, you get no longer a bare tree trunk, but a really soulful picture.

We decorate the stump with pots of plants
Surely, many of us grow flowers not only in the palisade or specially equipped flower beds, but also in pots, on vertical beds. Our next proposal will be decorating the stump with just such flowers, in pots. You can place some nice clay or plastic pots around the stump with already grown flowers, or you can plant them again. In addition, there is always the opportunity to decorate the stump with moss, beat it in a fabulous way, for example, by adding ferns, bright flowers, animal figures around, turning a small space into a real forest.

Finished stump decorations
Landscape designers, garden shop vendors, and ordinary entrepreneurs who want to make some money have long come up with garden figures. They are intended for partial or widespread decoration of the garden, lawn, plot as a whole. It is these colorful and funny products that are perfect for decorating a stump.
In the image below, a cheerful plaster frog, which majestically "conquered" the stump and remained on it forever. In addition, the stump of an old tree is decorated with improvised items, ordinary country garbage, and painted in cheerful colors. To tell the truth, this is for only two hours of free time and for the amount that could be spent on just a few chocolates.

How to make a mushroom from a stump?
The classic form of transforming an old stump in a garden is a mushroom. It can be a white mushroom or a fly agaric - you choose, but we are starting from a more cheerful mood.
A little lower is the simplest option, which is great for summer residents who do not have the desire to spend money on such fun. Yes, it is an old and dilapidated basin that no longer holds water and cannot be used for household chores that becomes a mushroom hat. The stump itself forms the leg.
The inverted basin is fixed with a couple of nails to the saw cut, painted in the color of the mushroom that you have chosen, and the stump is tinted in the color corresponding to the name of the mushroom or your mood. You can add decor, plant flowers or herbaceous plants nearby, but you can leave the mushroom in this form.

DIY stump chair
Here we digress a little from fun and fun, and move on to serious, and even adult things. The example presented by us is only possible for real professionals with a certain amount of time and the availability of a tool.
Correct cut of the stump
A comfortable seating height will be from 40 to 60 cm, but do not forget that each chair has a back. Therefore, the seat is at a height of, say, 50 cm from the ground, and the back and cut are at a height of 100 cm. It is at this mark that the chainsaw cuts.
Now the chair is subject to decorative finishing, since we have only a rough version in front of us. Finishing occurs with the help of special tools - chisels, mallets, hammers, hacksaws, grinders, and possibly with the use of professional tools. The result depends on your efforts, desire and time, but we got such an interesting option.

Fairytale stump castle
One of these already exists in our previous article on the design of a summer cottage, but today we decided to install the castle a little higher. How to make it, decide for yourself - with your own hands or purchased. But the installation of a castle (or maybe an ordinary house or a forest hut) is simple. You need to nail or screw the base under the structure with screws. It can be a figured board or a piece of chipboard impregnated with a protective varnish.

Agree, it is much more pleasant to watch living pictures from plants on the territory of the summer cottage, and not forms and compositions that cause more surprise and misunderstanding than joy and delight. Therefore, we propose to try the option of decorating a cut tree with living plants. These can be herbaceous plants, small annual flowers, or even some ornamental plants. It is them that we will land in a stump.
On the saw cut of the stump, we make a hole, which, according to agricultural technology, is enough for the root system of the selected plant. This may be a flowerpot-sized depression. Next, pour some nutrient substrate or garden soil with fertilizers inside, and plant the plant inside. How it will look after a while, see below!

Garden figure from a stump
Making garden figures, sculpting or carving is very interesting, but today our task is less creative. We just need to come up with an image for a stump that will match the design of the garden or flower bed. Often colorful characters, famous cartoon characters and so on come to mind, but doing this yourself is quite difficult. And this means only one thing - we will simplify everything as much as possible, paint the stump, create an elementary image that does not require investments.

If there is no time or money for grandiose ideas, you can do it as shown in the photo below - just paint the stump in cheerful colors, install flowers from plastic bottles on the cut plane (we studied products from plastic bottles not so long ago), plant plants nearby.

Here is such a completely fearless scarecrow that can be made from the trunk of an old tree. The stump is not suitable for this, but when sawing, you can make the cut a little higher, then everything will work out for sure. To form the image, we use fantasy, old clothes and accessories, perhaps some additions. As a result of pleasant work, we get a wonderful creation that will amuse your guests and relatives.
If you have similar ideas or are ready to surprise us with something more exclusive and even exotic, please leave your thoughts in the comments, for which we will be very grateful.
Cache-pot from wooden cuts (video)
Today we have considered another way to spend time in the country with pleasure and profit, but there are even more ideas, interesting ideas and implementation of plans for decorating and decorating the cottage with our own hands ahead!!!
We decorate stumps and cuts in the garden (photo)


![]()


HomePlot What to do with an old tree in the garden. Design and decoration options
What to do with an old tree in the garden. Design and decoration options | Construction portal
A dry old tree in the garden is always an unpleasant sight.
The first thought that arises when contemplating it is to cut it down, but quickly. But does a tree have to be flowering and fruitful?
Not at all!
It can be an excellent base for garden crafts and decorative designs. It is enough to show a little imagination, and in your garden, instead of plants disfigured by time and adverse factors, real masterpieces, skillfully created by your own hands, will flaunt.
- Useful tips from experienced gardeners
The view of experienced gardeners
According to experienced owners of private estates, trees of all ages must be present in the garden. Only then can it be considered integral and harmonious - as a patriarchal family in which representatives of many generations live.
The famous English gardener and architect of the eighteenth century, W. Kent, practiced planting dead trees in gardens. He revered them for their unique decorative qualities and believed that they “breathed” with a sense of the authenticity of being. According to V. Kent, dead branches with unique curves and cracked bark are by no means ugly, but genuine beauty.
Another well-known gardener of the eighteenth century, S. Switzer, even said that it was better to burn down your own house than to “raise your hand” on a tree of venerable age. The man was firmly convinced that landscape planning should be carried out taking into account the natural state of the area, and not obey not always appropriate human fantasies.
The second life of an old tree: ideas for a summer residence and a garden
An obsolete plant in the capable hands of a nature-loving gardener easily turns into a fantastic decoration of the site. There are tons of options on how to update an old tree - and we are happy to share them with you.
decorative sculpture tree
You can make a decorative sculptural tree from a dried plant using bright paint - one or more colors. True, the “old man” should be well prepared beforehand:
- cut down unnecessary branches;
- strip the bark of the tree to the trunk;
- grind the trunk;
- treat the trunk and "significant" branches with a special impregnation to protect the wood.
After these manipulations, you can safely paint the "craft" with the prepared composition and open it with varnish for outdoor work. You can choose absolutely any color for an old tree: just consider the features of the surrounding “environment” and the appropriateness of experimenting with shades.
Original tree-flower bed
If desired, an old tree easily turns into a tree-flower bed - just place hanging baskets with flowers planted in them on its branches. As in the case of a sculptural craft, the processing of an old tree before such an important “transformation” must be done without fail - all the same pruning of branches, stripping the bark and applying impregnation are very important for a high-quality end result.
What are the advantages of such a solution for the garden? Baskets can be changed periodically - and with them the appearance of the whole tree will change.
"Seat" for garden figurines
Garden figurines look great on an old tree. Having placed the figures higher, it will be possible to admire them even from afar. Very often, old trees are decorated with nests with storks, as well as seals and cubs. Such a “new life” of an old tree is a joy for the eyes and for the soul!
You can also use for the "composition" figures of garden elves. Little elves peeking out of the hollow or crevices of a tree trunk are an incredibly fabulous sight. If you have children or grandchildren, they will definitely be delighted with such “decorations”.
garden lamp
An old tree can be successfully used as a "base" for garden lighting. Simply purchase special electric lamps and mount them on a tree - and enjoy the evenings with an original and attractive "illumination".
In winter, the lamps can be replaced with a garland.
Liana tree: beauty and exclusive
You can also make a withered tree an exclusive decoration of the garden by this method: cut off the extra, in your opinion, branches of the “old man” and plant a climbing plant near it. Choose unpretentious small-flowered clematis - they will stretch up to 15 meters in length and cover the entire surface of the tree with beautiful flowers and foliage. Imopea, ampelous nasturtium, echinocitis lobed can also be a good option.
The practical use of the old tree
Not only aesthetic, but also practical benefits can be obtained from an old tree. Assign to it the role of a natural support for Amur grapes, curly beans or even pumpkins. Another plant that will definitely "make friends" with a dried tree is the Far Eastern actinidia. The brightly colored leaves of flowering actinidia will give the tree an incredible picturesqueness.
Paintings on wood - masterpieces available to everyone
If you have artistic ability (or at least paint and creativity), you can create an amazing drawing on the trunk of an old tree - a real work of art.
How to make a picture on a tree: the order of work
- “Bare” a section of the trunk - clean the bark. It is best to do this after rain, as the bark becomes wet and separates well. If there has been no precipitation for a long time and they are not “planned”, just pour plenty of water on the trunk. The most convenient tool for cleaning the trunk is a special metal scraper for wood.
- Scrub the surface of the barrel with a wire brush and then sandpaper - this will turn it into a decent canvas.
- Large surface defects should be filled with wood putty. Significant depressions are best filled with mounting foam, and after drying, remove its excess with a knife.
- Rinse the barrel to remove small particles.
- Leave the surface to dry for a while.
- Prime the stem.
- Start drawing. You can choose almost any paint for an old tree. The classic solution is oil paints.
- After completing the drawing, wait for the paint to dry completely.
- Cover the "decorated" surface with varnish for exterior work - preferably in two layers.
What can you draw on a tree?
Yes, whatever! True, images of natural motifs will probably not be particularly relevant for the garden - they will simply merge with the environment. But animals, fairy-tale characters and all kinds of abstractions will be a worthy decoration of your possessions.
Do you still doubt your artistic talent? Don't miss out on this great idea. Patterns are for you! For example, national patterns of different countries look very interesting in the garden.
You can always make original garden furniture from old trees - tables, benches, benches, chairs. The easiest to make benches are logs.
And a dilapidated plant after a little processing is a wonderful creative hanger on which you can store various garden tools, tools, work clothes.
Attach eyes, nose, mouth, ears, hands from handy materials to the trunk of an old tree - and you will see a mischievous living creature that will delight everyone passing by with its appearance.
As you can see, there are a lot of ideas for decorating an old tree in the garden - choose any that you like. Easy creativity!
What material to prefer?
Of course, when building small-type architectural forms in a garden or park, natural materials look advantageous - stone and wood. They are harmoniously combined with the surrounding plants, flower beds, wooden buildings, dry streams of stone, pebbles and sand. But buildings made of metal and concrete look no less attractive.
A small bridge over the stream, made of artificial stone and decorated with wrought iron railings, looks quite natural surrounded by greenery.
Classifying designs according to the material of manufacture, there are several types.
Wooden bridges
They are great for a suburban area with already installed buildings and wooden decor - a bathhouse, gazebos, tables, benches, a well. To make wood last longer, choose one of the most valuable species - larch, cedar or oak. Special antiseptics, impregnations and varnishes increase the service life and give the tree the desired shade.
Wooden bridges are traditionally decorated with carvings: they give the balusters an original shape, cut out a pattern on the supporting beams, and decorate the railings with ornaments.
stone bridges
Beautiful, noble and almost eternal buildings. When installing a garden bridge with your own hands, do not forget about the weight of natural stone. For the installation of structures made of sandstone, marble or granite, construction equipment may be required, therefore, sometimes a lighter analogue is used - artificial stone.
When building a structure made of stone - natural and artificial - you should select elements that are similar in shape and color and in harmony with the surrounding objects.
metal bridges
Forged structures are exquisitely beautiful, especially when surrounded by flowers and greenery. They require special attention and timely processing, as the metal is susceptible to corrosion.
A forged bridge will cost less if you order only a metal base, and do the wooden elements (flooring, railing details) with your own hands
concrete bridges
They look monumental, last a long time and, with appropriate decoration, can decorate a garden with a lot of stones or plants. Finishing with colored tiles, stone chips or acrylic paints will advantageously hide gray concrete.
It is hard to guess that this original bridge is made of architectural concrete: its surface is stylized as stone and painted with acrylics.
The combination of several materials will make the garden bridge unique, help to give a little personality. Metal and wood, stone and wood are well combined.
The main purpose of bridges is to cross a reservoir, but often they are installed on the territory of a personal plot with a completely different purpose - to enrich and diversify the design.
The wooden bridge is part of the backyard composition. Stylistically, it is combined with a garden gazebo built from the same material.
Good places for mounting decorative structures are the following objects:
- small lakes, artificially created ponds, streams;
- natural ditches and ravines;
- flower beds and separately decorated flower beds;
- paths and paths.
The traditional placement of the building above the reservoir is subject to certain rules. A crossing over a stream or pond is installed in the narrowest place, since a small structure is much stronger, and it looks more decorative. Country bridges for a garden with a dry stream are characterized by such qualities as compactness, miniature size, and elegance. The material for their manufacture must be combined with the surrounding coating: they are, as it were, a continuation of the tracks.
A miniature bridge of the simplest design, thrown over a dry stream, favorably enlivens a monotonous composition of stones, greenery and flowers.
This bridge is an example of how different materials can be organically combined: paving slabs, natural stone, wood, mosaic tiles
When installing small architectural forms, including bridges, it is necessary to take into account the style chosen for the garden. Suppose wooden structures, simple and slightly rough, are ideal for a country-style garden plot.
The choice of form and design of the structure
Before drawing up a sketch, it is worth considering all the existing forms and their options, and then making a choice. You can conduct the following experiment: take a picture of the proposed installation site of a decorative bridge for the garden, print a large photo and try on various designs cut out of paper. It will be seen which shape design fits perfectly into the overall picture.
According to their configuration, bridges can be divided into several types:
- Direct - they are optimal for self-production;
- Zigzag - these are guests from the East, where the violation of the straight line is a protection from evil spirits;
- Arched - look artistic and suitable for any style;
- Step-by-step - ideal for dry streams and shallow ponds;
- Stepped - resemble two staircases with wide steps, united by a common platform;
- Suspended - complex structures that require compliance with safety rules.
Here is a photo selection of each of the options:
When building direct bridges from any material, it is necessary to consider a drain for rainwater; in this case, these are the gaps between the floorboards
The ideal material for the construction of a zigzag bridge is wood - both piles and flooring are made of wooden elements treated with impregnation and antiseptic
The "humped" form of the arched structure is achieved in different ways. One of the most common is to give the load-bearing beams a certain curved shape.
Large flat stones are best for creating a step bridge. The distance between them should be comfortable for stepping over.
The stepped structure can become a kind of observation point: from the top platform it is convenient to view the surrounding landscape, admire the sunset
If you decide to choose a suspension bridge, then it is better to stop at a small structure firmly fixed on piles driven into the ground.
Master class: making a wooden bridge
The easiest way to decorate a backyard area is to create a composition from a pond and a wooden garden bridge, and both objects can be made by hand. Let us dwell on the construction of a flip-over structure made of wood.
To install the simplest structure, a concrete base or piles driven into the ground will not be required, but if the bridge connects the high banks of the stream, then additional reinforcement will be required.
When installing a wooden bridge across a pond, you should carefully strengthen the parts of the banks that serve as supports. For strengthening use natural stone and concrete
According to the installation method, garden bridges are divided into several types: I - on concrete supports; II - on concrete supports and piles; III - on piles
The basis of the bridge are two slightly curved beams with a cross section of 0.2 m x 0.35 m and a length of 2 m. They can be made from straight blanks, using a jigsaw and a chisel, removing excess wood. A flooring of boards (3.5 cm), evenly distributed along the length of the beams, is attached to the beams.
By drawing up a drawing of the bridge indicating the required dimensions, you can greatly facilitate your work. The length of the structure depends on the size of the object over which it will be placed.
Between the boards, it is necessary to leave gaps 1-2 cm wide. All parts are dried before installation and treated on all sides with impregnations and antiseptics.
When drawing up a drawing, it is necessary to take into account every little thing, for example, consider fixing at the junctions of balusters with beams or railings with balusters
The design of the railing may be different. The simplest is curved arcs mounted on several balusters. The railings are decorated with bamboo inserts, thick hemp rope or carvings.
Decorated railings are a way to add variety to a simple bridge design. It was worth adding rounded elements on the racks - and the bridge acquired a more decorative look.
A simple decorative garden bridge, without decorations and frills, can complement a park area stylized as a wild forest.
Several raw boards, a railing made of crooked poles on one side - and we get an original stylized bridge, as if hastily knocked together
The video demonstrates an example of landscape design, where almost all the structures are made by the hands of the owners of country estates.
How to decorate trees in the garden in the country (4 photos)
Decorating garden trees
In order to revive the decor of the garden a little, you need a desire and some free time. Garden trees can be decorated with almost any improvised items, while material costs will be minimal. With the help of a few ideas, you can perfectly decorate the trees in the garden or in the garden. Such trees will not go unnoticed and will become the pride of the owners of their summer cottage.
Paintings on the trees
If you have artistic abilities, a tree trunk can be turned into a kind of canvas on which a picture painted by yourself will look good. This type of tree decor is becoming more and more popular. Some owners of a summer cottage deliberately dig dry tree trunks in the garden to make such fakes out of them.
In order to create a picture tree, you must first clean the bark of the tree. This is best done with a metal scraper and preferably after rain. Since wet bark is cleaned much easier. If it has not rained long enough, the trunk can be well watered. Then the barrel must be cleaned with a metal brush, and then with an emery. Small defects in the tree trunk should be puttied. If there are significant cracks or cavities in the trunk, mounting foam can be used to eliminate them. Then rinse the barrel again and leave it to dry. After the trunk dries, a layer of primer is applied to it. Now you can start painting the tree. When the finished painting dries, it must be covered with two layers of waterproof, frost-resistant varnish.
garden tree-painting
Tree - "planter"
From an ordinary garden tree, you can make a beautiful exotic plant. To do this, you just need to hang a few pots with flowering plants on its branches. Such a tree can delight the eyes of its owners from early spring to autumn. For such purposes, pots with petunias are best suited.
Old garden tree decorated with pots of petunias
Houses for fairies, elves and gnomes
For those who love fairy tales about gnomes, elves and fairies, houses for these fairy-tale characters will decorate the trees in the garden. Moreover, it is very easy to make such an element of garden decor with your own hands. At the roots of the tree, you can make a small door - the entrance to a fabulous house, or supplement it with various windows, steps, paths, balconies and even a small garden.
To make a small door located at the roots of a garden tree more noticeable, it can be painted red, orange, yellow, blue or green. The door will look more magical if you make it not the traditional rectangular shape, but round or oval. If the composition does not seem to be fully completed next to the door, you can install several small windows made in the same style with the door. Wooden or stone steps can also lead to the door. You can lay out a narrow path of small pebbles. In order for the fairy house to be more visible, the doors can be installed not at the roots of the tree, but a little higher. In this case, the trunk can be decorated with a small balcony and steps that wrap around the tree. And around you can make a mini-garden of small things and flowers.
The fairy house can be stylized as a birdhouse and installed on a stable tree branch. In this case, the fake will look like a real home of fairy-tale characters. A tree decorated in this way will appeal not only to children, but also to adults.
Fairy house on a garden tree
Feng Shui wind music as an element of decoration of garden trees
Such a Feng Shui talisman as a wind chime, which is also called a windmill or wind chimes, is perceived by some simply as an element of the decor of garden trees or house interiors, and some sincerely believe that it can attract good, positive energy to the house. In any case, wind music will never become superfluous elements in the garden. Moreover, you can easily make wind chimes with your own hands from almost any materials that are at hand. If you connect your imagination, you can create original Feng Shui elements and decorate trees in the garden with these fakes.
To decorate the autumn garden, wind music made from dry leaves and various beads is perfect. Wind music from shells will look original on garden trees, which will remind you of a past vacation at sea. Chinese talismans made of cutlery, flower pots, coins and banknotes, tin cans, various beads and metal sticks look interesting. For those who are fond of Chinese philosophy, it is better to decorate the tree in the garden with classic versions of a windmill made of bells or bamboo.
Wind music on a garden tree
Idea # 1 - "stump on a spring day"
Of course, the old stump itself will no longer bloom, but this does not mean that flowers cannot grow on it. This will really happen if you plant low annual flowers, herbaceous or even ornamental plants on a stump. Their presence will greatly ennoble and enliven the saw cut of the tree.
All these modest flowers look very impressive in a single bouquet, which, like a vase, holds the simplest stump.
To bring this idea to life, you need a minimum of costs. We level the surface of the stump, after which we make recesses in the stump. They should be such that the root system of the plant you have chosen can develop freely. A reference point can happen, for example, a flower pot.
You can simply make one recess in the stump, if you remove the core from it. This is easy to do when we are dealing with rotten stump. From the tools we will need a saw or a chisel with a hammer. If the stump appeared on your site relatively recently, it is better to use the core burning method.
Surely such a stump will become a real decoration of your garden at the very beginning of the last spring month and on the eve of summer
In the center of the stump, you need to drill a hole deep enough so that kerosene can be poured into it. In this case, the side surface should not be less than 7 cm, so that after removing the core, our structure remains intact. Fill with kerosene and plug the hole in the stump with a cork.
After about half a day, add kerosene and again tightly close the cork with a cork. Leave the stump alone for one to two weeks. Then remove the cork and set fire to the core of the stump. When it burns out, the resulting flowerpot should be treated with an antiseptic so that the flower bed lasts longer.
Drill holes inside the recess to prevent stagnant water. Now we put garden soil mixed with nutrients inside, after which we plant seedlings or bulbs. When a lush hat of flowers forms on a stump, it will not look old and unsightly at all.
If you are not sure about the strength of the walls of your new stump pot and are afraid that they may start to crumble, they can be reinforced with mesh
You can see the most diverse options for what you can do with your own hands from a stump in the country in this video:
Idea #2 - stump as garden furniture
To make some kind of furniture out of an old stump, for example, you need a good tool and some skills for such work. But tools today are not a problem. And as for skills, we can say this: all great masters were once apprentices. So let's at least try. What are you ultimately risking? Only an old stump.
Option # 1 - a stump as a chair
Let's say you just marked a tree for cutting. It would be nice if he had a thick trunk. We remove the branches, moving from the thin upper ones to the stronger lower ones. Now that you have the trunk in front of you, you need to mark it.
If we want to make a chair, it is more convenient to place the seat at a height of 40-60 cm from the ground. Let's say it will be 50 cm. We put a mark with chalk at this height. But the chair still has a back. We add another 50 cm to it. At a height of 100 cm, we will also put a mark with chalk. At this mark, a cut will pass, which is best done with a chainsaw.
It is difficult to say how much the chair shown in this photo is of natural origin, but it is it that well illustrates the result of the work described in this section.
Now we will form the back of the chair. To do this, we need to make a horizontal cut at the level of the seat. That is where our first chalk mark is located. We make a cut to a depth of 2/3 of the trunk. We saw through from the side in which the chair will be turned in the future.
To form the back, make a vertical cut from the top until we reach the previous, horizontal one. The piece of the trunk cut in this way is removed.
The base is created, you can start decorating. For this work, we will need different devices from a grinder to a chisel. It all depends on how exactly you decide to decorate the resulting chair. In any case, it will no longer be a stump sticking out in front of everyone, but a comfortable chair, sitting on the seat of which you can have a good rest.
Option #2 - original table
When you made the chair, you chose not to part with the tree bark. Now we have to make a garden table, the leg of which will be the stump itself. And this time it is better to get rid of the bark. To do this, we can use a chisel or chisel. We will work as carefully as possible: after all, we do not want to damage the wood at all.
This photo clearly shows how exactly you need to nail the holders to which the tabletop will be attached in the future.
On the side of the stump we fill two perpendicular wooden planks. We fix on them four holders perpendicularly fastened together in pairs. We make a tabletop from boards, and fasten them together with planks.
The tabletop can be made round. To do this, it is enough to draw a circle, using for this purpose an impromptu compass made of a pencil, rope and a nail. We drive a nail into the center of the tabletop, to which a rope with a pencil at the end is tied. We draw a circle and delete everything that went beyond its borders.
The tabletop, fixed on the leg, which was once a stump, needs to be treated with special protective compounds, and it is better to close such a table for the winter
We nail the finished tabletop to the holders with nails or fasten it with self-tapping screws. The finished product must be impregnated with a protective solution that will prolong its life.
Option #1 - unusual sculpture
Implementing the next idea is not at all difficult. And now the dry frame of your tree is sawn by little men, similar to green grasshoppers. It is easy to make such babies yourself, using wire, pieces of tin or plastic for this purpose. Similar fairy-tale characters can also be purchased at a store selling souvenirs and toys.
The figurines are made very cleverly, and the whole composition leaves an amazing positive impression: the little men must be securely fastened so that they are not damaged by bad weather.
These funny figures can be screwed to the trunk using self-tapping screws, wire or clamps. Such a comic composition will decorate your garden and attract the attention of your friends and neighbors.
Option # 2 - decorative fly agaric
If you think that making a fly agaric from a stump is easy, then you are absolutely right. All you need is an old enamel or iron bowl and an aerosol. The bowl needs to be cleaned and painted with red spray paint. After it dries, draw white circles on a red background, exactly like the spots on the fly agaric hat.
Numerous other items can be placed next to the handsome fly agaric, which help to revive the composition, make it complete.
The stump also needs to be painted white. It would be nice to draw a cheerful grinning face on it. But here's how fantasy tells. It remains only to put on an elegant hat on the leg and boldly declare that the fly agaric is ready! By the way, it is not necessary to make a fly agaric. It could also be white fungus. The fly agaric just looks prettier.
To complete the picture, we suggest that you lay out pebbles, for example, green, at the foot of your mushroom. They, like a frame for a picture, will create a border for your work. However, you can do without them.
These porcini mushrooms are also made from stumps, only in a completely different way: both the stem and the cap of the mushroom are carved from the wood of the stump itself and painted in the appropriate colors.
If a person is not deprived of imagination, then even from a dry stump he is able to make a whole work of art - a fairy-tale castle or a tower inhabited by the most amazing fairy-tale characters. Such a craft can become the pride of the owner of the site, if you work on it with a soul.
A cute Japanese-style house is complemented by a small hut, most likely designed for a traditional tea ceremony.
The stump itself can serve as the main part of the castle, on which all additional decor will be attached. In order not to miss anything, we propose to make a sketch of the future structure and subsequently try to follow it.
Decorating details can be sawn from a piece of fiberboard or plywood. They should be attached to the stump with self-tapping screws. All components must be impregnated to protect them from decay. In addition, they can be painted in the desired color.
Such a cute house with figurines will be very popular with children, who will undoubtedly immediately adapt it for their fun games.
Sometimes in the trunk of a dry tree, quite low from the surface of the earth, there are hollows, growths. All these details, despite their natural origin, are easily used in the composition. For example, small toy ladders with funny gnomes on them can hang from a hollow. And on the growth, you can place a toy piano with a pianist squirrel.
Do not forget to pay attention to the roof of the structure. An old leaky bucket will do just fine for her. By the way, artificial or live plants, knocking out of a hole in the roof of such a structure, will look very attractive.
This video is about a variety of characters made from stumps:
Idea # 4 - decorate the stump with flowers in pots
We have already told you how to decorate a stump with flowers that are grown in it, but there is another option for such decoration. If several branches are preserved on the stump, you can hang the same flowers on them, but grown in pots. They can look very impressive.
Even if there are no branches, a flower pot can be placed on the stump itself or around it, creating a special aura of flowering and ongoing life. Stumps look great as decorative plant pots when sanded well to allow the wood to show its texture.
Despite the simplicity of this composition, it looks very impressive and emphasized in a rustic way: for country style, it fits perfectly.
But at the same time, one should not forget that a tree located in an open area needs protection - impregnations that will resist decay.
Everyone can create garden figurines from stumps, only real artists end up with wonderful works of art that amaze with their realism. If you are driven by the desire to simply decorate your site, then you can create a simple image that does not require special skills.
Of course, this magnificent deer singing in the spring forest is skillfully carved from an ordinary stump by a high-level professional
Making a simple figurine from a stump is not at all difficult. Those who sculpted snowmen in childhood can apply the accumulated experience in this case. The role of the hands will be performed by twigs, instead of the nose and mouth we will attach knots, Eyes can be made from brown bottoms from plastic bottles. The role of the pupil will be played by a cork from the same bottles.
All this is attached to the hemp with self-tapping screws. On the horizontal surface of the cut, you can simply lay out pine cones that will imitate hair. Here is such a watchman for the garden, which we made in haste, is ready.
But any student can make such a funny watchman for a summer residence, and it is for this that such a garden sculpture is valued
If it so happened that you had to cut down a number of country trees, do not be sad. This situation also has its positive side. But you now have a large number of stumps located close to each other. And this is quite good. Make a fairyland out of them for your kids by putting into practice all the information that you have already received in this article.
It will be just a wonderful place to play. First you have to peel each stump from the bark. To do this, you will need a chisel and a hammer. The chisel must be inserted between the bark and the trunk of the tree, and then gently tap on it with a hammer. The bark will move away from the trunk and soon the stump will completely lose it. Now it can be carefully sanded using medium grit sandpaper for this purpose.
Such an owl could easily become a companion of Baba Yaga herself and settle in her hut, flying out of it from time to time to hunt
Be sure to remove the wood dust formed during the work with a damp cloth. The tree prepared in this way should be treated with an antiseptic that will protect it from decay.
Now the stump can begin to decorate. Let's choose a large stump to turn it into a real house of Baba Yaga. Let's take the chalk and outline the location of the future windows and doors of the grandmother's hut. Holes in wood for doors and windows can be made using a chisel and hammer.
We will need pieces of boards from which we have to make doors and shutters on the windows. These details of the future structure can be painted right now, while they are not yet nailed into place. The doors and shutters should be nailed to the places indicated on the stump with nails whose heads have been bitten off. Finishing the decoration of the hut, you can collect branches and snags of an unusual shape in the area to stick them around the house of Baba Yaga. Let them portray the dense years.
On smaller stumps, you can depict the heroes of various folk tales or funny cartoon characters. You can decorate these stumps and draw the intended characters on them using outdoor paints. The images outside will wonderfully complement the flowers planted right inside the stumps. How to do this was described in detail at the beginning of the article. You can limit yourself to pots with plants.
Another wonderful composition, made by a professional artist and sculptor, creates a great mood inherent in a small fairy-tale corner of your garden.
We will turn a couple of stumps into children's chairs. To do this, we will not even cut out a massive back. If you have old chairs, take their backs for this work. They should be carefully freed from varnish, and then, using ordinary nails, nailed to the stump seats. Ready-made chairs just need to be painted in bright colors that children will definitely like.
Just turn the small remaining stumps into a flock of fly agarics, using bowls or basins of the appropriate size as their hats. Now you know exactly how such fly agarics can be made. Everything, improvisation on the theme of a fairy tale is ready.
Idea #6 - "Green Monster"
Another idea of how you can ennoble a stump may also interest you. For this purpose, you need a hefty stump with a powerful root system, which lurks in a shady place. If there is one in your area, you can consider yourself lucky.
A large moss-covered stump looks mysterious, as if it came into your garden straight from Twilight or some other saga.
Buy a moss variety suitable for your climate at the store. You need to plant moss on a stump. In order for it to start, you will periodically have to sprinkle it with water. Now it is important that the moss grows. When this happens, you will be able to fully appreciate the grandeur of the resulting creation.
Summer residents begin to think about how to decorate a stump in the garden with their own hands most often after trying to clear the site of unnecessary trees. Ugly tree stumps and stumps may remain on the site, which will need to be disposed of.
A flower bed from an old stump can become a key element of decor in the landscape design of a summer cottage.
Usually getting rid of stumps is carried out by uprooting them from the ground. If there is no need for a flat area, sometimes it is decided not to remove the remains of trees, but to turn them into decor items. Particularly interesting can be elements made in kindergarten in the form of fairy-tale characters and other funny gizmos.
Use for decorating hemp flower pots
Decorating saw cuts with the help of original figurines, purchased or home-made.
Not only in front gardens and flower beds you can grow flowers - both vertical ridges and pots are suitable for this.
Try to decorate an ugly stump that you really don’t want to remove from the site with potted flowering plants. Put a suitable size pot on the cut, set a few pieces around.
If the stump is very clumsy, with twists, bends, it is possible that in some of them it will also be possible to strengthen containers with plants.
Flowers in pots can be already planted or re-grown.
The stump is additionally decorated with moss, it’s nice to add a fairy-tale theme to it - bright large flowers, perhaps even artificial ones, a fern, place animal figures next to it. This will help turn a relatively small space into a fairytale forest.
Often, old stumps and logs remain in suburban areas, which take up space without bringing absolutely any benefit. Many summer residents use the remains of former powerful trees as seats, but this, firstly, is not convenient, and secondly, it does not look as beautiful as it could. And if the logs can still be disposed of, then uprooting old stumps left over from large trees is quite difficult, and sometimes even impossible.
But there is one that will help you solve this problem forever. Having made original flower beds from stumps and logs, you will not only get rid of unnecessary elements of landscape design, but also decorate your site in an original way. It is this idea that “House of Dreams” shares with its readers today. You will learn how to make original flower beds from old stumps and logs, and how to harmoniously combine them with other landscape elements.
We create an original flower bed from a stump with our own hands
The old stump, in fact, is already a ready-made basis for creating a flower bed. It is only necessary to free its core and fill the space with earth, or install a pot with soil of a suitable size. However, in order for a stump flower bed to serve you for a long time and faithfully, some nuances should be taken into account:
- firstly, only a healthy stump is suitable for creating a flower garden. If the wood is affected by a dangerous disease, for example, thyrostromosis, it is better to remove it along with the root system, replacing the soil, otherwise the disease may spread to other plants;
- secondly, due to precipitation, pests and other external factors, the wood will dry out over time, and the flower stump will lose its decorative properties. To increase the life of the original flower bed, the stump cuts must be well sanded and treated with an antiseptic. Oil paint can also be used as an antiseptic, which, moreover, will allow you to change the appearance of the stump;
- thirdly, an old stump is most suitable for creating, the core of which has already dried up quite a bit. If you want to create a flower bed from a freshly cut tree, you will have to wait a bit, because. it will be very difficult to pull the core out of it.

How to make a flower bed from a stump


Beautiful flowers on a stump photo
To make a flower bed from a stump, you need to release its core as much as necessary for the root system of the planted plants. The easiest way is to pre-plant the plants in a pot or a suitable container, and then simply install it inside the stump.
If you want to grow plants directly in a stump, first pour drainage into the bottom of its recess, which will protect the plant roots from rotting.

Beautiful flowerbed from an old stump

Flowers on stumps photo
As a rule, the depression created in the stump is not large, so choose plants with a compact root system for decorating it. For example, any bulbous flowers, geraniums, sour, pansies, petunias, etc. are perfect for this purpose. In a flower bed from an old stump, climbing plants also look very beautiful, which during the flowering period will decorate it with a lush crown.


Do-it-yourself flowerbed from a stump
We make a beautiful flower bed in a log
If there is no old stump on your site, but you are already on fire with the idea of \u200b\u200bmaking an original flower bed with your own hands, use an old log for this purpose, which is likely to be found close to your property. The advantage of creating such a flower bed is that the log can be easily placed in any convenient corner of the garden or plot, it can be moved to wherever you want, and the stump will only have to be uprooted.
The process of creating a flower bed from logs is also quite simple. You only need to clean the core of the log with an electric saw or other tool, and then clean all the cuts well. Since a flower bed in a log is larger than a flower bed in a stump, here you can grow several species at once, combining perennials and annuals. To protect the inhabitants of the flower bed from decay and disease, cover the resulting space with polyethylene and lay a layer of expanded clay on it.

DIY log flowerbed

When making a flower bed out of a log with your own hands, beat its natural shape. For example, a neat rectangular recess can be cut in whole wood, thanks to which the flower bed will take the form of an elongated flowerpot and become a concise architectural product. If the log is so old that its core has completely dried out, cover it with earth and plant absolutely all open holes with flowers, which will make your flower bed a harmonious and bright object of landscape design.

Beautiful flower beds from logs photo


When growing flowers in a log, consider how they will look not only during the period of active flowering, but also in the off-season. Ideally, plants should be selected so that they cover the widest period of flowering - from early spring to late autumn. If you want a flower bed in a log to delight you exclusively in the warm season, select the composition of plants depending on their color combinations, leaf shape, etc.


Flowerbeds from stumps and logs in the landscape design of the site
Unusual flowerbeds made of stumps and logs look very beautiful, catchy and original, but I want each element of the site to match the overall style of landscape design. If you are making a flower bed from a stump or a log in a wild part of the garden, then you can leave the material in its original form, because. various cracks, chips and scuffs will harmoniously merge with the surrounding nature. If you want such an original flower bed to decorate the central part of the site or a recreation area in the garden, the bark of the log and stump can be completely cleaned, and then the wood can be sanded to a flat and smooth surface.


Original flower beds and flower beds photo


Flowerbeds original photo
This object looks beautiful in combination with other architectural forms of the landscape and. For example, a flower bed of stumps or logs can be placed near a wooden, dining table, rotunda, play area, etc. To complement the originality of the flower bed, decorate the area on which it is located with wooden figurines and other garden attributes.
If desired, flowers similar to those growing in it can be planted around the flower bed, so that your decoration will harmoniously fit into any landscape style.


Cutting down trees in the garden leads to the appearance of rough and not very pretty stumps. There are two ways to solve the issue - study the uprooting of stumps and get down to business, or decorate the stumps after sawing and revive a quiet garden a little
We decided that it would be interesting for summer residents who are always busy with difficult work to be distracted in order to put the garden in order without spending physical strength on it. Today we will analyze the problem of stumps in the garden without uprooting and organizing rutaria, which we have already talked about earlier. We will simply decorate the stumps with improvised items and tools, ennoble the site and give it an even more interesting and fun look.
We propose to convert the stump into a chair that can be used in the garden for relaxation. How to do it, read now!!!
Correct cut of the stump
If there is an old and thick tree in the garden that should be cut down, it is great for our undertaking. Immediately you remove the upper branches, then the thicker ones below, and so on, according to all the rules for cutting down large trees. But as soon as you get to the main stem, you should stop and work a little with the dimensions.
A comfortable seating height will be from 40 to 60 cm, but do not forget that each chair has a back. Therefore, the seat is at a height of, say, 50 cm from the ground, and the back and cut are at a height of 100 cm. It is at this mark that the chainsaw cuts.
Now a vertical cut, all the way to a horizontal one, to remove a piece of the trunk from the place where the seat of the chair is formed.
Naturally, all such work takes place with preliminary marking and compliance with all safety regulations.
Decorative trim, seat formation
Now the chair is subject to decorative finishing, since we have only a rough version in front of us. Finishing occurs with the help of special tools - chisels, mallets, hammers, hacksaws, grinders, and possibly with the use of professional tools. The result depends on your efforts, desire and time, but we got such an interesting option.
Fairytale stump castle
One of these already exists in our previous article on the design of a summer cottage, but today we decided to install the castle a little higher. How to make it, decide for yourself - with your own hands or purchased. But the installation of a castle (or maybe an ordinary house or a forest hut) is simple. You need to nail or screw the base under the structure with screws. It can be a figured board or a piece of chipboard impregnated with a protective varnish.
After, on glue or on screws, we install all parts of our structure, slowly and confidently moving towards the result. At the end of the work, you can get something similar to our example!
Decorating stumps with live plants
Agree, it is much more pleasant to watch living pictures from plants on the territory of the summer cottage, and not forms and compositions that cause more surprise and misunderstanding than joy and delight. Therefore, we propose to try the option of decorating a cut tree with living plants. These can be herbaceous plants, small annual flowers, or even some ornamental plants. It is them that we will land in a stump.
On the saw cut of the stump, we make a hole, which, according to agricultural technology, is enough for the root system of the selected plant. It can be a recess the size of a flower pot. Next, pour some nutrient substrate or garden soil with fertilizers inside, and plant the plant inside. How it will look after a while, see below!
Garden figure from a stump
Making garden figures, sculpting or carving is very interesting, but today our task is less creative. We just need to come up with an image for a stump that will match the design of the garden or flower bed. Often colorful characters, famous cartoon characters and so on come to mind, but doing this yourself is quite difficult. And this means only one thing - we will simplify everything as much as possible, paint the stump, create an elementary image that does not require investments.
The result is a wonderful depiction of a face on one half of the stump, as well as a saw cut decoration.
The simplest decor of a saw cut and a stump trunk
If there is no time or money for grandiose ideas, you can do it as shown in the photo below - just paint the stump in cheerful colors, install flowers from plastic bottles on the cut plane (we studied products from plastic bottles not so long ago), plant plants nearby.
Funny stump figure, garden scarecrow
Here is such a completely fearless scarecrow that can be made from the trunk of an old tree. The stump is not suitable for this, but when sawing, you can make the cut a little higher, then everything will work out for sure. To form the image, we use fantasy, old clothes and accessories, perhaps some additions. As a result of pleasant work, we get a wonderful creation that will amuse your guests and relatives.
Easy uprooting of stumps
Any gardener knows that uprooting stumps is a difficult and labor-intensive business. The constant struggle with weeds on the site is just as difficult and ungrateful. Today, alternative and rather uncomplicated ideas for uprooting stumps are possible.
Of course, if you plan to create a summer cottage design with stumps or adapt a stump for growing oyster mushrooms and other mushrooms, then you can leave the stump. However, there are situations when a stump, for example, in a small area, is not at all appropriate. In this case, the chemical method of uprooting stumps will help us out.
In America, there have long been special preparations for the chemical uprooting of stumps, but they are not yet found in our country, so let's turn to the experience of our ancestors and apply the method that the peasants used back in the 18th century
The tree is cut down in autumn at the very surface of the earth, a hole is made in the central part of the trunk 1-1.5 inches in diameter and 10-12 inches deep. This hole is stuffed with finely ground saltpeter in the amount of 10-15 spools, topped up with water and, having tightly hammered the hole with a wooden plug (cork), leave it in this form until spring. In the spring, the bushing is knocked out, the hole is filled with kerosene and lit. The trunk and root burn out at the same time to the ground, leaving no trace behind them, except for ash.
I remind you that vershok = 44.5 mm, and spool = 4.3 grams.
Of course, in America this process of chemical burning of horses is faster, but in our situation this method will help us out perfectly.
It should be remembered: this method is not suitable for burning on peat soils and where there are a lot of stumps and they are often located. In these cases, an underground fire may start.
Weed control in the area
The most effective method of control will be the use of ... alcohol to control weeds. The thing is that irrigation of the soil with a weak, 6% solution of ethyl alcohol causes a rapid growth of weeds.
This method gives us a certain freedom of action, allowing us to remove weeds mechanically, while cultivated plants have not yet emerged. Indeed, in the future, germinating along with horticultural crops, weeds will take nutrients from them and it will be more difficult to deal with them.
So if, in October, at least a couple more warm weeks are expected for the germination of weeds, then you can apply it this year. In the spring, spraying with alcohol should be carried out a month before the emergence of cultivated plants, so that the weeds have time to grow and be plucked. Such an alcoholic method will ensure the absence of weeds for many years to come.
Another interesting way is weeding tomatoes in dutch. The thing is that ... rabbits are released into the beds, which naturally eat juicy weeds, while leaving the tomatoes untouched.
These are the "well-forgotten old" ideas that will greatly facilitate our not always easy work in the garden and in the summer cottage


If you have a garden plot that is quite a few years old, then surely you from time to time have to deal with stumps on the plot that remain from trees.
We suggest that you do not puzzle over what can be made from a stump in the country, but simply plant flowers in it. And you will not only have an original stump flower bed, but also a magnificent unusual decor of a summer cottage.
Take your time to uproot stumps on the site, but see how to decorate a stump in the garden with your own hands. We are sure that one of the ideas will surely appeal to you.
How to make a flower bed from a stump
To make the stump look beautiful in the country, remove the core from it. It will be good if the core is rotten enough. If not, then make a few holes with a drill and pour a stump remover (potassium or sodium nitrate) into it. They fall asleep in the fall and tie it with polyethylene. But here you need not to overdo it with dosages, otherwise you will destroy not only the core of the stump, but the whole of it.
After removing the core, cover it with fertile soil and plant flower seeds. It can be either or. Tulips in stumps look great.
It will be very interesting for children to find out which gnome lives in their dacha in a stump. Such a stump in the garden will please them very much.

Mushrooms will create an excellent decor of the site and a forest atmosphere.

Any ornamental green plants are a great idea for decorating a tree stump in the garden.

You can decorate a stump from a large tree in different colors.
![]()
Any succulents in the country or stone roses will feel great in a stump flower bed.

Spring irises are always welcome.

Petunias, and other wonderful tree stump decorations.

They are planted in a flower bed from a stump in the fall, and in the spring they enjoy the beauty.

If you are lucky and live in your own private house or country house, then use these ideas! Such a flower bed from a stump can appear even in the city yard in the presence of a stump. Decorate your garden and inspire friends and neighbors. With a little imagination, even an old stump can blossom!
I have a new doll! New Baba Yaga. It is boring to send her to a new house on a prosaic stupa. New Yaga wanted to sit on a real forest stump.
1.
So what do we need!
1. Cardboard (well, what was it, sorry).
2. PVA (where without it), "Crystal Moment" (a few drops).
3. Scissors.
4. Toilet paper is the cheapest (0.5 roll).
5. Acrylic paint.
6. Threads (I have woolen threads about 1 meter).
7. Acrylic putty (optional).
There was no corrugated cardboard, so the old box will come in handy. We determine the size of the future stump. I have 16 cm in height so that Baba Yaga can sit comfortably. Cardboard length 42cm + 2cm top hem + 2cm bottom hem.


We cut the cardboard with scissors along the corrugated board wave (on one side, not through) for the convenience of bending the cardboard into a cylindrical shape. At the top and bottom of the stump, cut the edges into a triangle and hammer inside the resulting cylinder.

We glue the part of the cylinder that will be the back cut with cardboard in the form of a stump. The bottom of the stump has the remains of a thick root, so we glue cardboard to the bottom, resembling a projection of a flattened root.


Now the fun begins! Toilet paper relon comes into play. Dilute PVA glue with water in a ratio of 1 hour. glue and 2 hours of water. We tear off about 20 cm of paper from the roll, crumple it into a voluminous bundle, dip it in liquid glue and apply vertical “sausages” to the future stump. These will be blowing bumps in the bark.


At the roots of the stump, "sausages" will be more powerful and voluminous.

Let dry well. Looking forward to the result. The battery dried up overnight.

The next day, I applied acrylic putty diluted in water to the stump and applied it with a thicker layer to the upper cut of the stump and scratched the emission of annual rings with a stick. I think that the putty was superfluous, it was possible to get by with just acrylic paint (one thin layer) and simply mark the rings when painting.
On the plot you can find a lot of stumps from dried or fallen trees from the wind. It takes a lot of effort to uproot the stump and free up space, but do not rush to get rid of the driftwood. The dacha is open space for creativity, so many amateur gardeners have already found use for stumps sticking out of the ground. In this article, we decided to offer a few ideas on what you can do with your own hands from stumps. Photos of wooden ones will inspire you to create creative products that will decorate the landscape.
Furniture from stumps and snags
In addition to plants and a garden path, there is a place to relax on the plot. Garden furniture must be durable, stable and withstand aggressive environmental influences. Wooden garden furniture has a fairly high cost, so it is best to do it yourself.
 If you have a large tree stump in your garden, try carving a comfortable chair out of it. Depending on the size of the hemp, the chair will turn out either for an adult or for a child. With a chainsaw, it's easy to cut out the seat, backrest, and even armrests. You can also use the stumps themselves as a place to relax. If necessary, they should be treated with sealants and painted.

A snag from an ugly and curved piece of wood will turn into an original decor. A large driftwood can be used as a table leg and to decorate chairs.

The sanded and varnished driftwood will add zest to any room.
 Here is another photo of the original furniture made of snags and stumps:

If you have wood carving skills, the stump will become a beautiful flower stand in minutes.
 Carvings with pyrographic effects will decorate any area. To make a flower pot from a stump, you need to cut out the middle completely from it and fill it with earth.
 Depending on the size of the stump, you can plant a different number of plants and make an original flower bed with your own hands.

Do you want your garden to be decorated with beautiful decorative figurines? Take an iron bowl, paint it with enamel - this will be a mushroom cap.
 Now put a hat on a stump and it will turn out. The stump will be a good basis for sculpture, the main thing is to show imagination.
 A small selection of photos of crafts from a stump and snags

Such houses will not only decorate your garden or summer cottage, but can also be an excellent home for birds if you place them a little higher.
 These crafts can scare away unexpected birds from renting and attract the attention of guests with their originality and beauty!
 It’s better not to joke with these formidable stumps ....
 And this one just lay down and rests for himself ... you can say it opens the beach season.

Watch a useful video: crafts from stumps and snags
Wood is a valuable material for decoration, so do not rush to uproot stumps, try to give them a second life.
Rutarium will allow you to make furniture for summer cottages from snags, stumps. Also from these materials you can make flower girls, sculptures with your own hands.
Rutarium is an interesting trend in landscape design. He will help turn the cottage into an unusual corner. Stumps, various snags, an old tree are suitable for this.
DIY stump crafts
If you got a plot with the root system of a tree and its low above-ground part, do not uproot this element. To make crafts from stumps for a summer cottage, you will need:
- stumps or one;
- colored chips;
- antiseptic;
- stones;
- flowers;
- the soil;
- tassel.

- To make the stump craft last as long as possible, take out the dust from the inside. Dry this inner hole. Remove the bark from the stump.
- Paint this natural wood element inside and out with two coats of antiseptic. When it is completely dry, you can start decorating the flower girl.
- Pour fertile soil inside the hemp, plant undersized flowers. Mulch the surface with ordinary or colored wood chips. Put stones next to the stump.

Inverted glass or plastic bottles can be used instead of stones. The latter have their necks cut off.
If you do not know how to arrange the northern part of the territory in the country, then place the rutar here, plant shade-tolerant flowers in it.
Not only hemp is suitable for adaptation, but also all kinds of snags.

If you have an unnecessary log for a long time, saw through it from above, take out part of the wood, remove the bark. Also treat the surfaces with an antiseptic, then pour fertile soil, plant unpretentious plants.
Take a closer look, maybe a snag found in the forest reminds someone? In the photo, she looks like a fairy-tale dragon, you just need to work out the details so that they become obvious. To do this, use a hatchet, hacksaw, wood carving tools.
Crafts from snags can be not only in the form of flower girls, check out the following ideas.
How to make furniture for a summer residence, wood sculptures?
See what results the craftsmen achieve. Having marked some details of the silhouette, you can make such a Bigfoot or a good-natured Leshy.

To make this type of chair, take:
- driftwood;
- board;
- rope;
- stain;
- varnish for wood for outdoor use;
- brush;
- self-tapping screws;
- saw.
- To make the chair reliable and stable, choose only strong, not light snags, oak ones are perfect.
- Saw off parts from them that will turn into legs. The two front ones are short, the back ones, together with the back, are long. Make the base of the seat, put a couple of boards here, attach them with self-tapping screws.
- From strong snags, make armrests, secure them with self-tapping screws and rope. For the backrest, a reliable cross member is taken, which is fixed in the same way. Two small snags are attached vertically to the center of the back.
- It remains to cover the chair with stain, when it dries 2 layers, apply three layers of varnish with intermediate drying.

If you want to emphasize the natural structure of the tree, then do not varnish it, but just walk with an antiseptic, it can be transparent. See what wonderful chairs are made from stumps. The table is made from the same workpiece, only the top is attached to the top.

But what can be done from a large hemp by sawing off its upper part. Then thick intricate snags will turn into table legs.

A bench made of wood will also turn out to be unusually interesting, openwork and even fabulous.
To do this, take:
- two strong boards, preferably floorboards;
- driftwood;
- self-tapping screws;
- glue for wood;
- antiseptic;
To securely connect them to the legs, attach snags here with self-tapping screws. Additionally, they can be fixed with pins by sawing holes of such a diameter in two connecting elements into which glue is poured.
In the same way, fix the back, consisting of many snags. Sand down some elements if your design needs it.

Almost the same type you can create a massive sofa. But its legs and base are logs.

You can leave the product in this form or paint it with varnish, it also turns out very beautiful and unusual.

Not only individual items will come out of the old tree, but the whole set. Coated with antiseptic and varnish, it will be able to stand outdoors in the air.

On such country furniture it is so pleasant to sit in the shade, eat food here, arrange holidays.

If you use a spray of golden lacquer to decorate furniture made of driftwood, create, for example, a chic shop that will look like an old one with a copper tint.

If you only have an old stump, remove the bark from it, take out the dust, prepare it as described above, put tempered glass on top, you will get a wonderful wooden table.

He may come out different. If you have a longitudinal saw cut of a tree, process it, attach the legs from below, put glass on top. Instead, you can make a countertop from.

Rutarium from snags: a master class
We continue the topic of how a rutarium is created. In order for the crafts to come out beautiful, you first need to prepare the snags. For this you will need:
- soda ash;
- bleach for linen;
- iron brush;
- Plastic container;
- sandpaper.
- Pour hot water into the container, if it has a volume of 10 liters, then add two glasses of soda ash, stir. Put driftwood here. Place weights on top to prevent them from floating up. It can be plastic cans of water.
- After two days, the pieces of wood will soften, then clean the surface with an iron brush. Since the wood will be uneven in color at this stage, rinse the blanks. Pour 10 liters of water into the same 10-liter plastic bowl, add one and a half cups of bleach. Place snags here for two days.
- After this time, lay them out in the sun for 3 days. Then, using sandpaper, you need to grind the unevenness of the place.

Now you need to fold these blanks in order to use them for crafts if you wish, for example, to make such a three-dimensional star.

For her you will need:
- plywood sheet;
- jigsaw;
- driftwood;
- hot glue;
- star pattern.

Sawing pieces of driftwood to the desired length, glue them to the star, starting from its outer edge.

Then, gradually move towards the center, try to cover all the plywood with chocks.

Wait for the glue to cool, then cover your work with spray paint of the desired color. The silver star looks great.

For such crafts from snags, the door of a country house is perfect. Attach the finished work here so that the star decorates the building. You can make another rutary.
See what a wonderful wooden shelf you get.

For her you will need:
- strong snag;
- rosewood varnish;
- iron brush;
- construction hooks;
- corners;
- brush.

If you like, you can cover the hooks and corners with gold paint, when it dries, use these elements.
Screw on building hooks to hang mugs or wine glasses on them. Attach the driftwood shelf to the wall with metal corners.

From snags, wonderful things are obtained not only for the street, but for the home. Watch the following master class, from which you will learn how to make a flower stand with your own hands. For this creation you will need:
- small log;
- snag;
- shells;
- leg-split;
- river pebbles;
- hot glue;
- self-tapping screws;
- saw.

First you need to prepare the wooden parts. To do this, remove the bark from a wooden log. This must be done very carefully so as not to damage your hands.

Saw circles about 5 cm thick from the log. You also need to remove the bark from the snag. If this blank is of the wrong type, then bleach it in the same way as it was described earlier.

While the driftwood dries, you will have time to decorate the flower stand. On the side surface in a circle from above and below, glue the rope with a hot gun. Using it, attach pebbles, shells. Paint the surface with varnish in 2 layers.
In the same way, decorate other pallets where the plants will stand, including the largest one, which will become the basis for the flower girl. Attach a snag to it, attach the circles to the tops, on which the planters will stand.

Paint the driftwood also with varnish in 2 layers, let it dry. You can decorate the flower stand with artificial greenery.

In some places, glue shells on hot glue, you get a very beautiful picturesque stand.

Do-it-yourself rutary in the city
If you do not have a personal plot, you live in a city, trees were cut down here, interesting snags, stumps remained from them, then you can decorate the yard using this idea. To carry out this venture, you will need:
- stumps and snags;
- dye;
- brushes;
- seedling;
- fertile soil.

If it is difficult to take out the middle part of the tree cuts, then just paint them, for others, remove this middle part, fill it with earth, and also paint these blanks to make them look more positive. In this case, you can use not only white, but also any others.
From the branches of cut trees, make a semblance of a well, putting four pieces in a row. Here also fill the soil and plant seedlings of flowers. If there is little sun in the yard, then use shade-tolerant plants, such as hostas, vines, ivy.

If there are a lot of snags available, you can make interesting sculptural compositions from them. For example, these horses.

If you know how to carve wood, then try making a rutary with a sculpture of a funny man.

DIY wood figures
They can also be made to decorate the yard in the city or in the country. Such a rutarium looks great, adds personality to the site, it is clear that a jack of all trades lives here.
If you want to know what kind of wood is best to carve a sculpture, then check out the following information.
- Linden is one of the best materials. Such wood is cut softly and easily. The structure of this tree is light, it almost does not warp or crack.
- Aspen is also easy to work with. Products from it can even not be varnished, then after a while they will have a beautiful silver color. But crafts made from such wood are prone to chipping, so it is used to create large sculptures.
- Alder lends itself well to cutting and processing, resistant to cracks. Therefore, it is also an excellent material. Take note of this when you do the rutaria on the site.
- If you want to make elements of fine art here, use walnut, it is very decorative, does not warp and is resistant to chipping.
- Birch is not processed so well and warps. Therefore, if you want to carve wood, use this to create small parts and souvenirs. But the birch is well painted and has a beautiful relief.
- Large carvings can be made from oak, they will be durable. But such dense wood is difficult to cut, so you have to make an effort or use an electric tool.
- Of the large ones, this is an ax, a hacksaw and even a chainsaw.
- Using cutters with a blade width of 1.5 cm, you can cut small elements that are in hard-to-reach places. There are many cutters, each designed to perform a specific function.
- Tesla is suitable for the initial processing of small parts.
- Also for wood carving, knives, jambs and chisels are used. The latter perform any notch, designed to work out the details. The cutting edge can be of various shapes.
- The Bogorodsk knife is perfect for carving wood sculptures. It is named so in honor of the village in which such work has long been performed.
- The drill is suitable for drilling holes.
- To make the surface of the product smoother, use a rasp, grinder and sandpaper.

The photo shows how woodcarving is performed. You can see the stages of creating a sculpture from this material using the example of carving a bear.

This is preceded by the following work:
- creating a sketch on paper, it needs to be drawn from various angles;
- then this sketch is transferred to the workpiece, which is best used as a rectangular bar;
- if you want to avoid mistakes when carving a sculpture from wood, then mold it first from plasticine or clay, make adjustments;
- now you can move on to rough cutting, which is carried out with a hatchet or saw;
- small details you will create with a tesla;
- and the cutter and chisel will allow you to cut off extra corners.
Next, the details of the bear's nose and sternum are worked out. Then he will acquire ears, front paws and hind legs. At the next stage, they are marked more clearly, and a stand for a wooden sculpture also appears.
For the next step, you need to use chisels, a Bogorodsk knife, and jambs that will help make facial features, bear claws, and fur more realistic.

At the final stages, you will need to sand and sand the wood sculpture, then cover it with stain and varnish. You can use special wax.
If you want to see how a bear is carved out of wood with a chainsaw, then check out the next master class.
If you want to know what a rutarium can be in your country house, then turn on the following video.
Another one will clearly show how you can decorate the yard with the help of sawn trees.


