This is the simplest product that can be easily made with your own hands; drawings for it do not need to be designed on a computer; a drawing sketched with an ordinary pencil or pen will also work here. Any scraps can be used as material, so the cost of such an item will be very small.
How to make a corner shelf with your own hands?
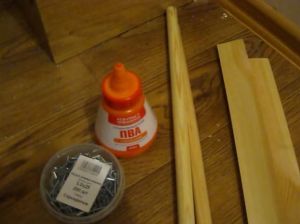
- Our main material will be regular board, purchased in hardware store. Its width in each case is selected individually, based on your plans.
- Additionally, we will take semicircular slats for decorating the shelf, PVA glue with a dispenser, and 3.0x25 mm screws.
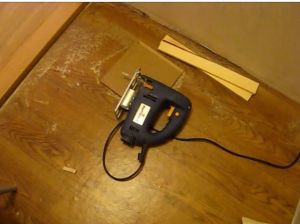
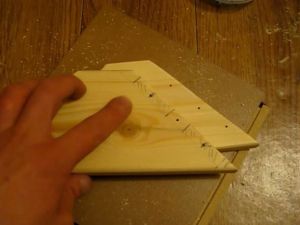
- We mark our strip at an angle of 45° and saw it into blanks.
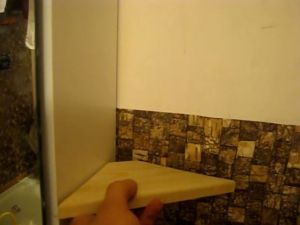
- We put the first piece against the wall, if everything is fine, then we need to make three more pieces.
- You can cut with a hacksaw, jigsaw or other convenient tool.
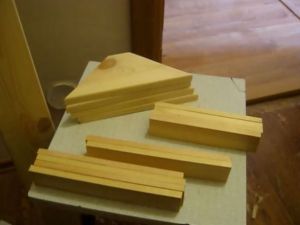
- In total we make four corner platforms and ten vertical racks for the shelf. Cleaning the surface sandpaper.
- Let's start assembling the structure. You can attach the parts to the wall and figure out how everything will look in place.
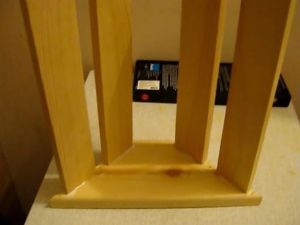
- In the lower compartment of the shelf we will have 4 racks, in the middle - two racks, in the top row there are 4 more racks. We fasten the racks with screws, enhancing the quality of the assembly with PVA glue. We mark the board. To prevent it from cracking, we drill holes for the screws with a drill bit of a slightly smaller diameter than the diameter of the screw.
- The bottom of the shelf is ready.
- First, we screw the screws halfway into the lower platform, then we coat the strip with PVA, wait a while (1-2 minutes) and finally tighten the parts with screws. Carefully wipe away any remaining glue.
- We assemble the remaining parts of our structure in the same way.
- We will decorate the shelf with elements cut from slats of a semicircular section.
- The DIY corner wooden shelf is ready. We attached decorative fencing, who did not allow our things to fall, painted everything with gold paint, and installed the product in place.


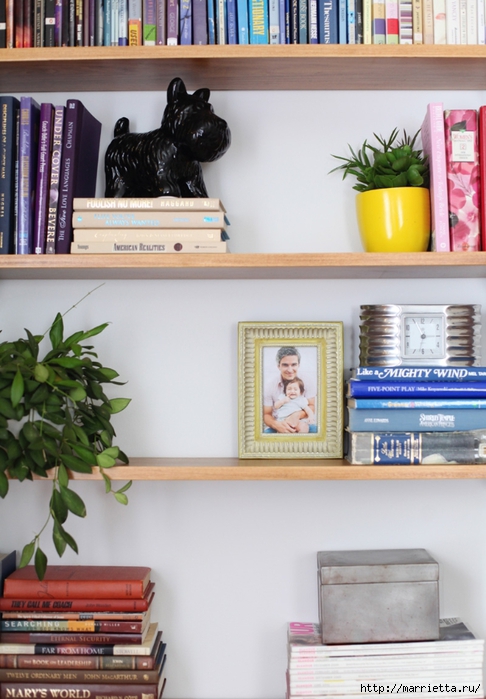
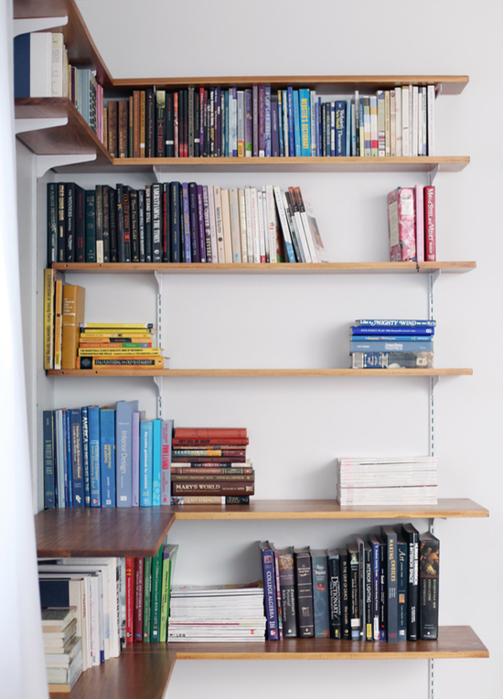
Corner wall shelves are quite easy to make yourself. Such products serve well in the office, kitchen, and bathroom. You can place flowers, books, jewelry, and various trinkets on them. This thing is very functional and there is absolutely no need to buy it if you can make it yourself.
Every person wants to mount a shelf on the wall so that it fits perfectly into the overall design premises. This problem is not at all difficult to solve. Absolutely anyone who has free time and a set of necessary tools can nail a shelf to the wall.
The nuances of fastening shelves
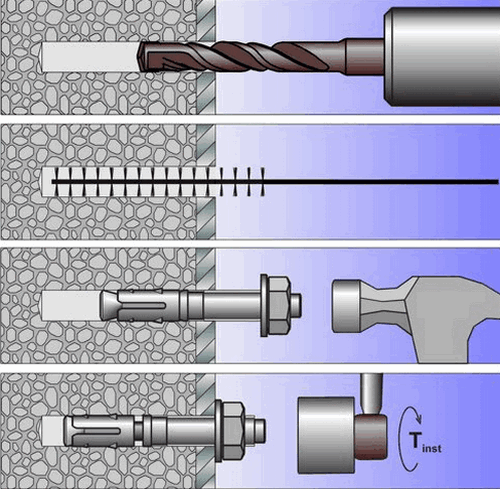
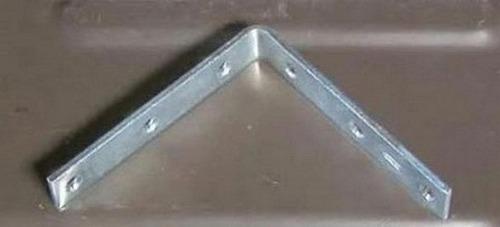
As the main support for the shelf, you can choose an anchor bolt, thanks to which you can reliable fastening interior item.
Its dimensions are as follows:
- diameter up to 12 mm,
- length – 180 mm.
There must be a thread on one end of the anchor bolt in order to screw the anchor into wooden surface, and on the other hand, to screw it into a metal coupling.

As a base for the shelf, you can take a piece of board from a window sill with artificial turf.
The dimensions are as follows:
- thickness – 25 mm,
- width – up to 200 mm.
There are only two options for mounting:
- classic,
- hidden.
A hidden option for fastening shelves is needed in cases where decorative elements Absolutely incompatible with protruding fasteners. Attach shelves to this option just as easy as the traditional one.

Sequence of work
Before you attach the shelf to the wall, you need to know that the thicker the shelf, the thicker the support should be. A hole is drilled in the end part an average of 5 mm below the surface. All holes for shelves in the wall must match, otherwise attaching them will be quite problematic.

![]()
Attaching the shelf to the wall:
- A strip of the required length is considered a template. It is applied to the end of the shelf and a hole is made required diameter, and then applied to the wall.
- The next step will be drilling, which must be done with maximum precision.
To attach the shelf you will need:
- electric drill,
- threaded coupling,
- brackets,
- lath - template,
- carpentry glue,
- screws.
Installation of a corner shelf (video)
Store shelf mounts
A shelf that you bought at a hardware store can be very difficult to attach to the wall. Be sure to read the instructions that came with it. Most likely, everyone will be in it necessary recommendations about how to screw the product onto the wall.
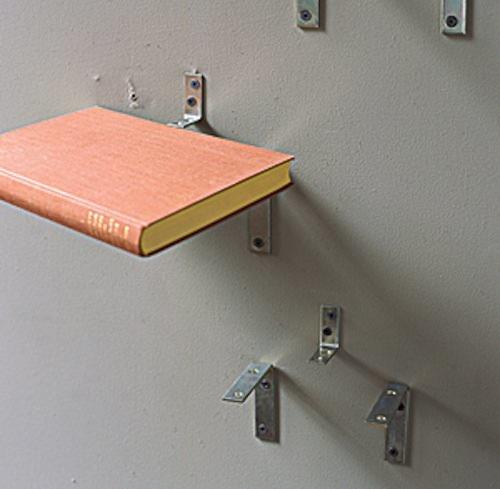
Next you need to understand what type of fastening the shelf has. Usually, complete with a shelf and instructions, it also includes elements that are used to fasten the product. It is also necessary to select brackets, thanks to which the shelf will be secured.
Bracket options may vary:
- fastenings that do not extend beyond the shelves;
- flat brackets with pear-shaped holes at the end.
To fasten a shelf from a store to the wall, first take careful measurements, which were given above.
Steps to attach the shelf to the wall:
- Based on the possible dimensions of the shelf, you will need to decide on the place where the fastening will be made. Choose the right place so that other furniture in the room does not interfere.
- With help building level you need to control the position of the product.
- Nests are first created in the walls so that after this procedure the shelves can be safely attached. These nests are made with a puncher or drill, and then dowels are driven into the resulting holes.
- After this, the shelf is mounted on the wall.
- The final stage is screwing the fastening elements into the holes.
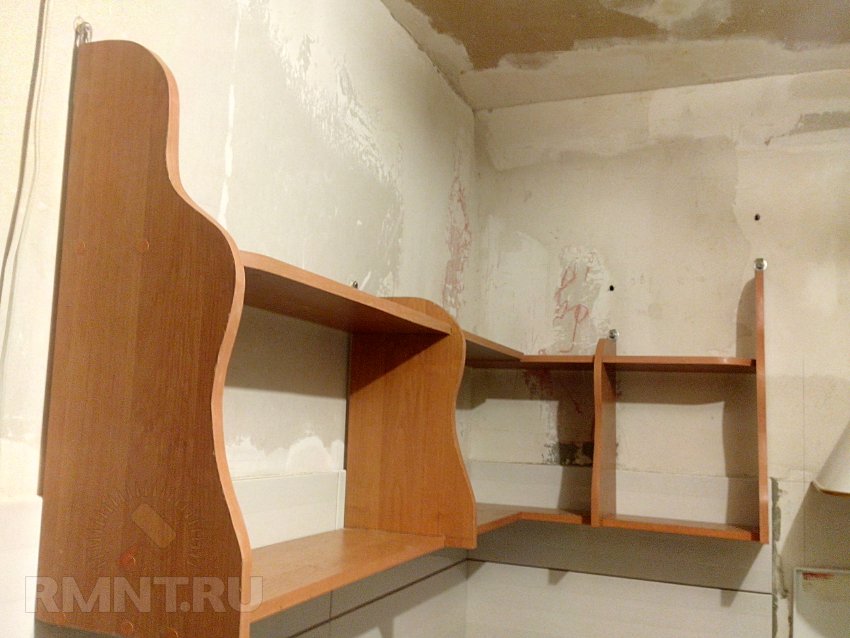
You can make it yourself, let alone the very basic details of room furniture. This master class will show you how to quickly assemble corner shelf for the kitchen from laminated chipboard scraps, and will also talk about some of the features of assembling cabinet furniture.
Working with cabinet furniture is an activity that anyone who knows how to hold a tool in their hands can do. All you need is desire. Scraps were used to make a kitchen shelf chipboard sheets, 5 hours of time spent.
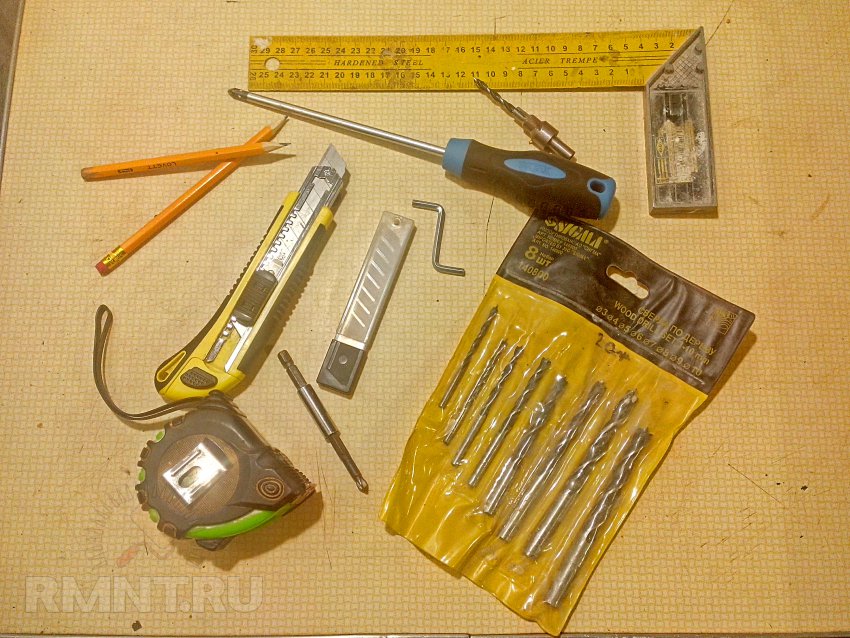
Tools required for work
We will need the following electric tool:
- screwdriver;
- iron;
- belt sander (to give the ends a perfect look).
List of hand tools:
- screwdriver or bit for a PH-3 screwdriver;
- set of drills on wood;
- hex key 4 mm;
- assembly knife with replaceable blades;
- marking tools: pencil, tape measure, square.
Consumables that can be purchased at a furniture fittings store:
- edging tape of the appropriate color - at least 10 m;
- confirmations - 16 pcs.;
- screws - 8 pcs.;
- plugs - 16 pcs.;
- hinged hinges- 4 things.
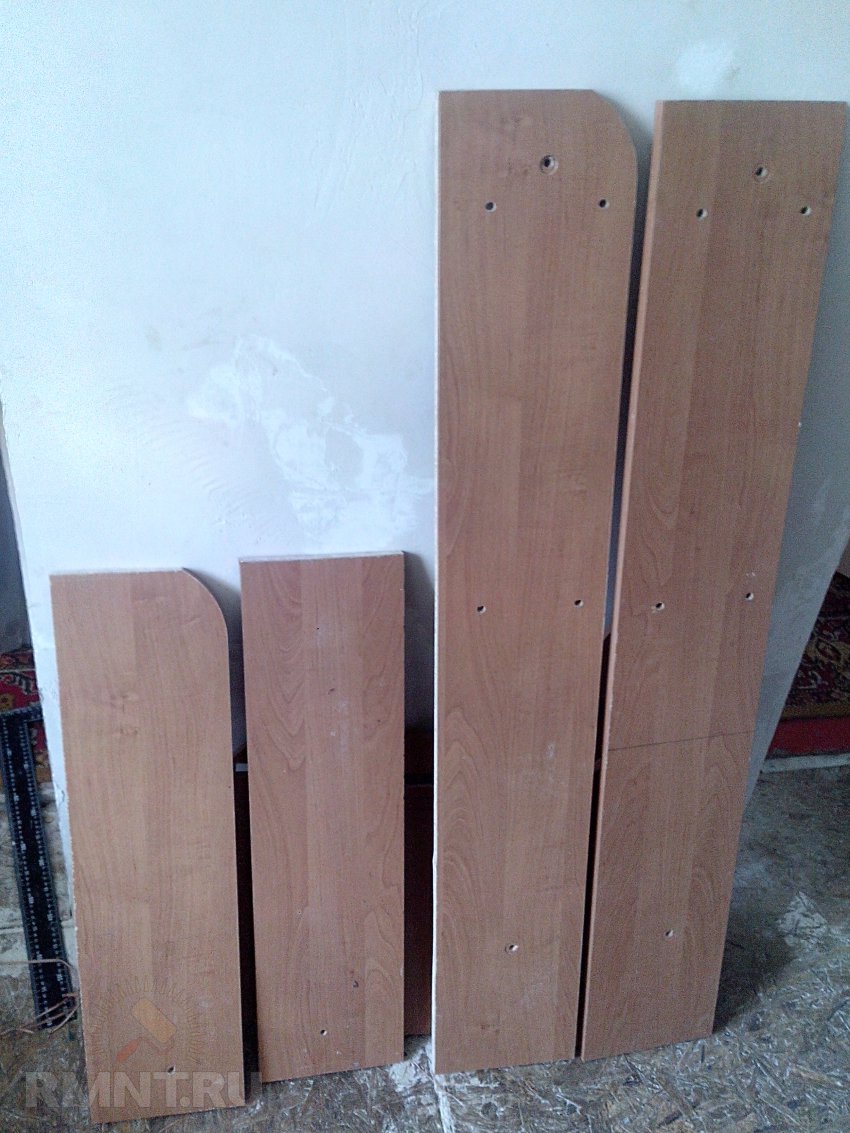
Let's get to work. Sketch and detailing
Making furniture always begins with drawing a sketch followed by its detailing:
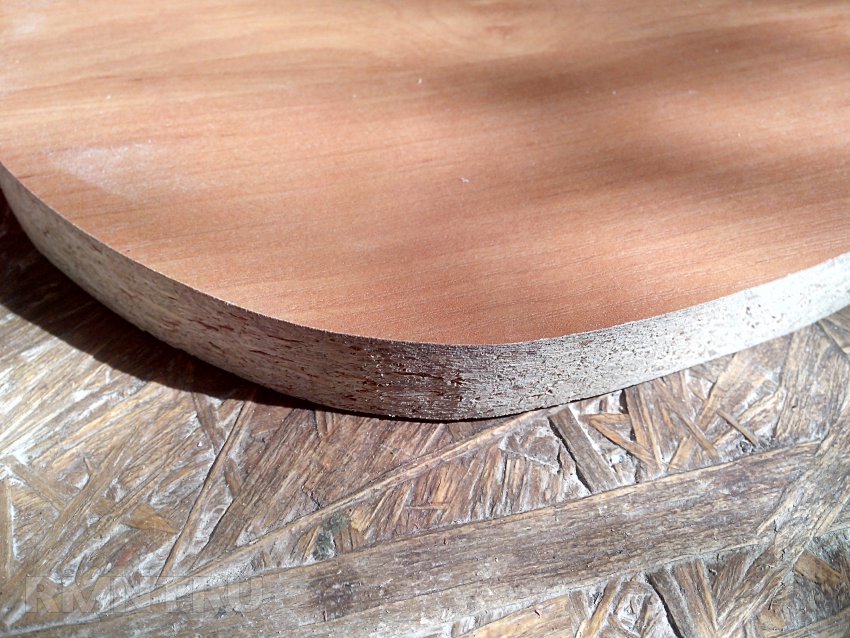
- shelf with a radius of 190x900 mm - 2 pcs.;
- shelf with a radius of 190x1100 mm - 2 pcs.;
- stand 600x265 mm - 2 pcs.;
- stand 440x265 mm - 2 pcs.
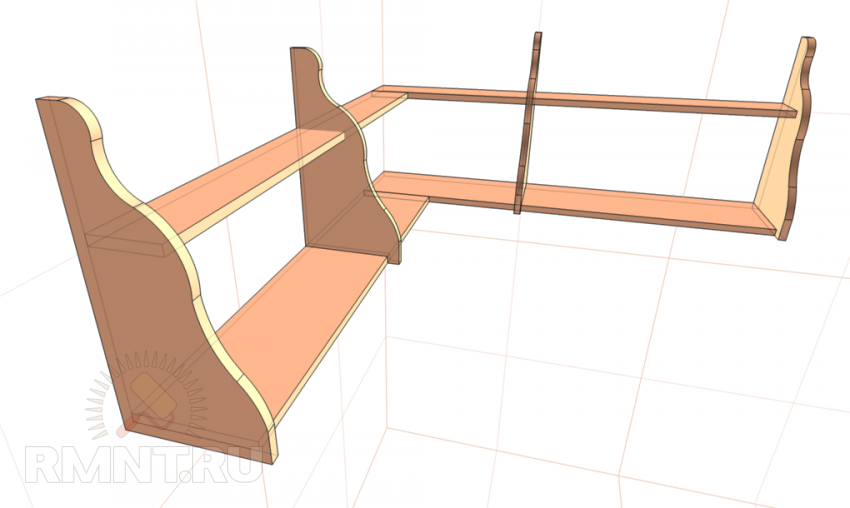
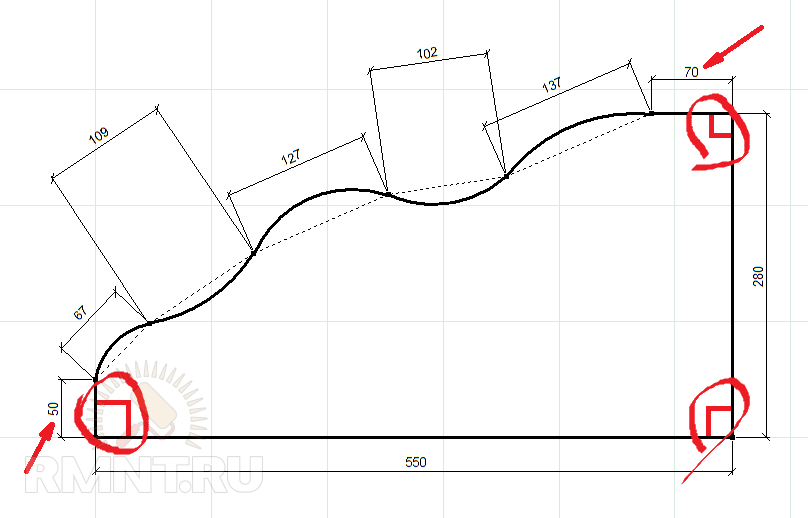
Radii and chords of bends in the drawing:
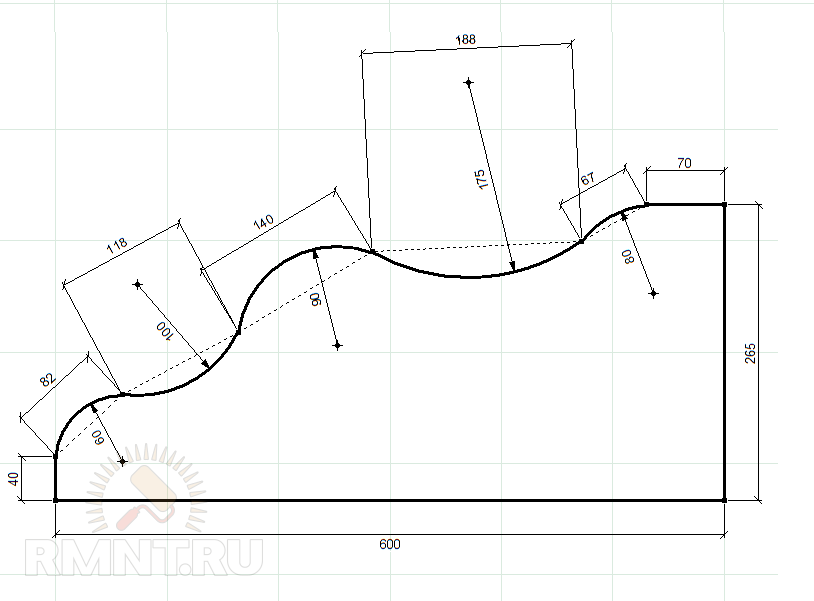

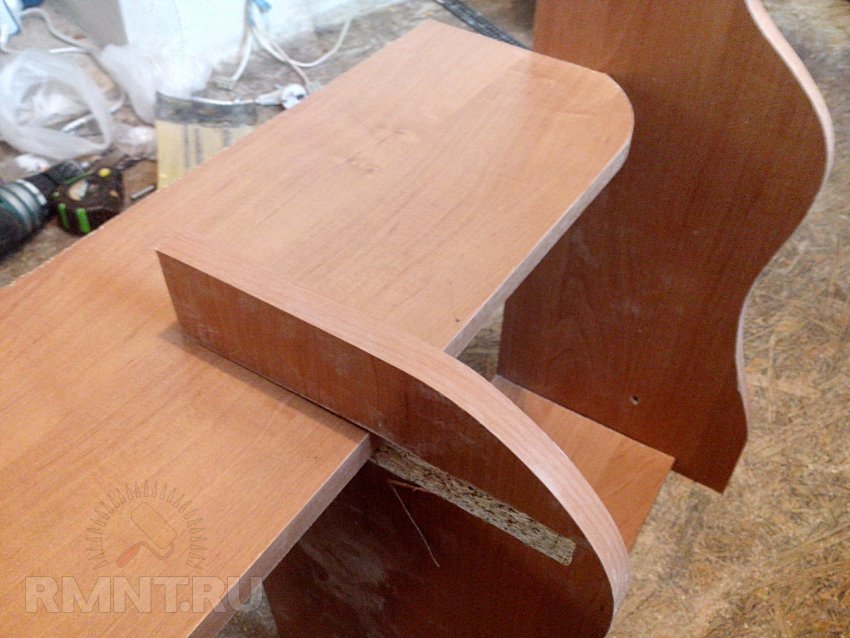
Making shelf sidewalls
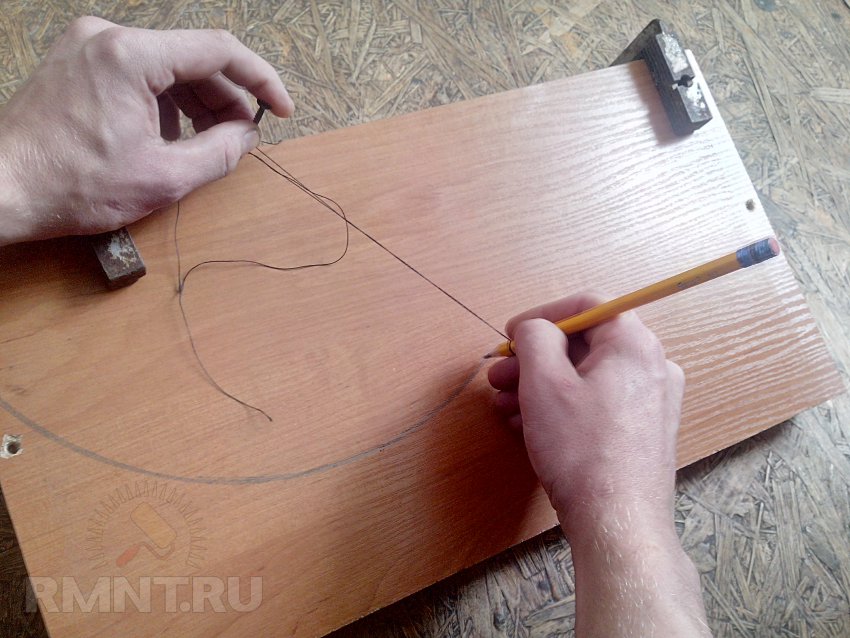
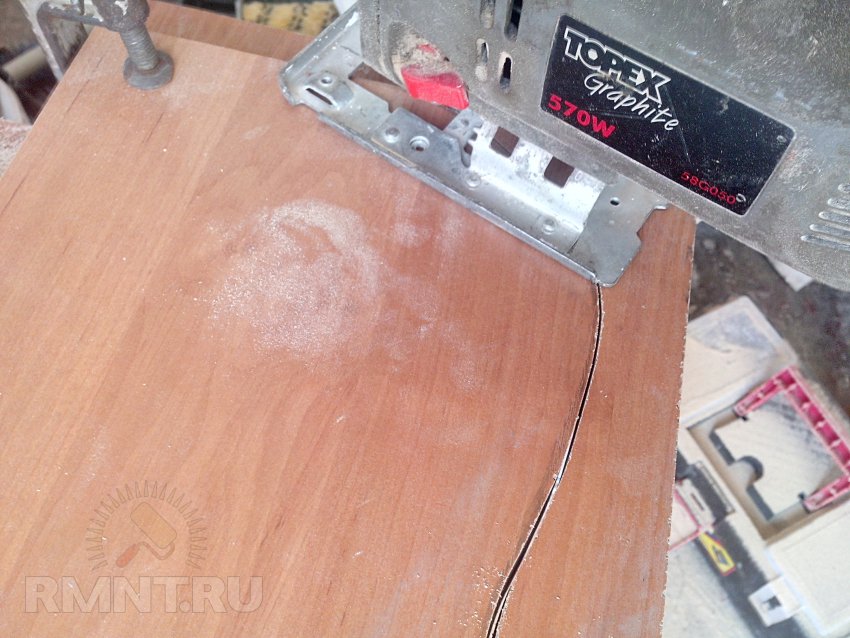
Let's make the sides of our shelf. On the existing sections of laminated chipboard you need to mark the contours of the shaped parts.

This is easier to do with an improvised compass.
You should start bending not from an arc, but from a flat area of 30-100 mm, otherwise there is a risk of getting an untidy joint when gluing the edge.
Two identical parts can be cut along one contour by fastening two laminated chipboard sheet clamps.
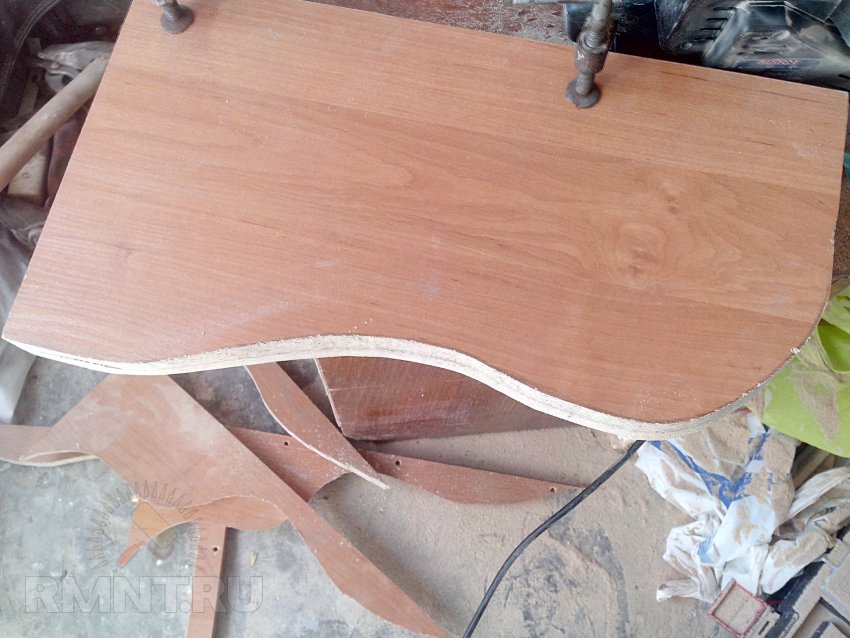
The inner post does not have a top protrusion; it is slightly shorter than the outer one.
Even when using a high-quality file and jigsaw, unsightly chips like these may appear on the edge.
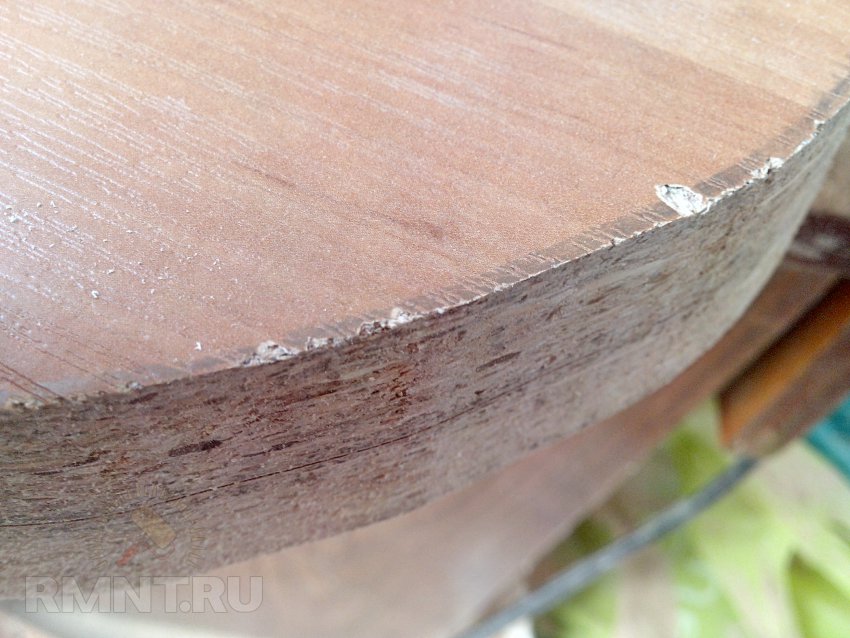
You can get rid of them by treating the ends grinder with sanding belt K80 or K100 grit.
After sanding the edge looks like this.
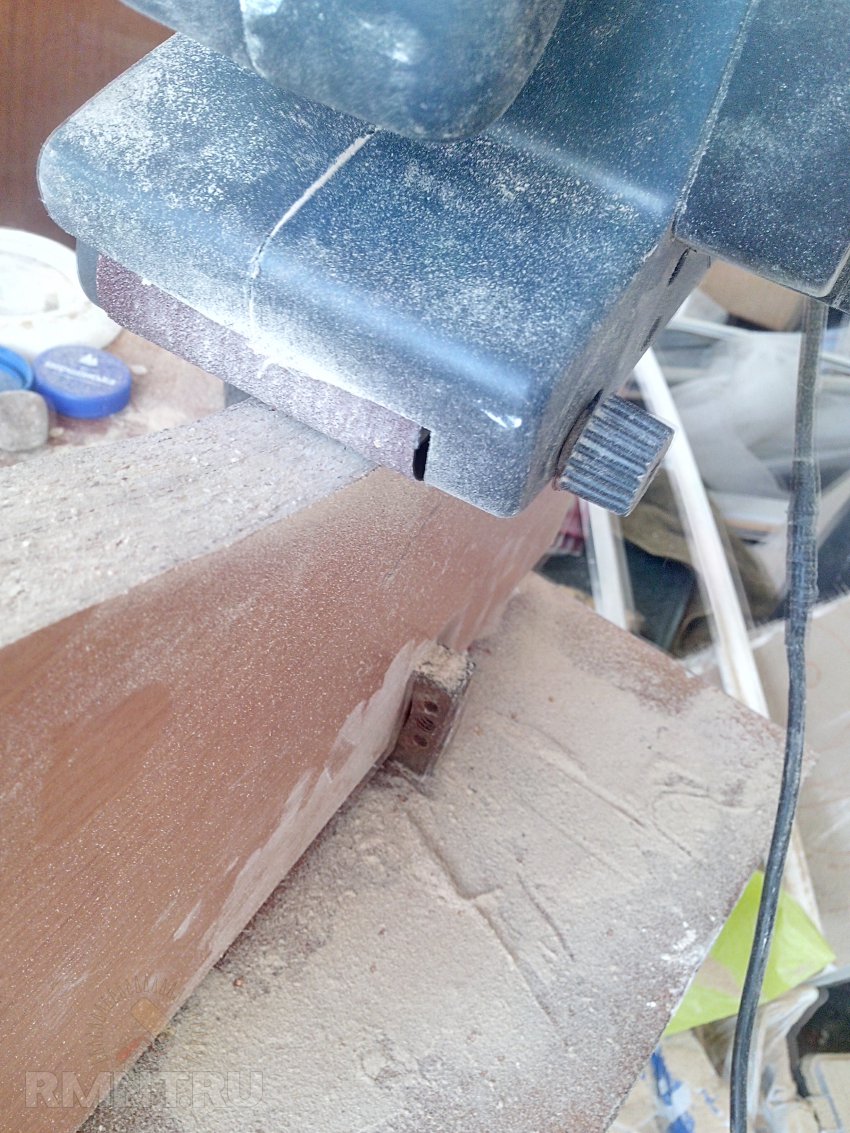
Edging
The parts are ready for pasting. The tape is glued with a hot iron, heating and pressing it firmly against the cleaned edge.
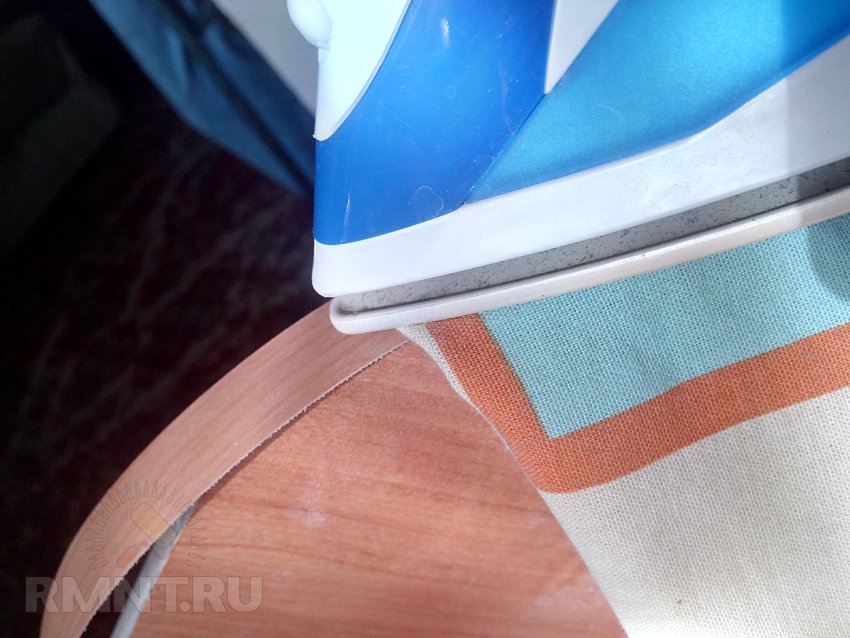
When pasting, you need to consider several important points:
- Choose the right temperature - between the I and II stages of the thermostat.
- Place a cotton cloth under the iron to prevent the edge from becoming shiny.
- On the inner curves, press the iron only with the nose and make as little movements as possible.
The tape is 3 mm wider than the end, it is laid on both sides, and the excess is cut off with a mounting knife.
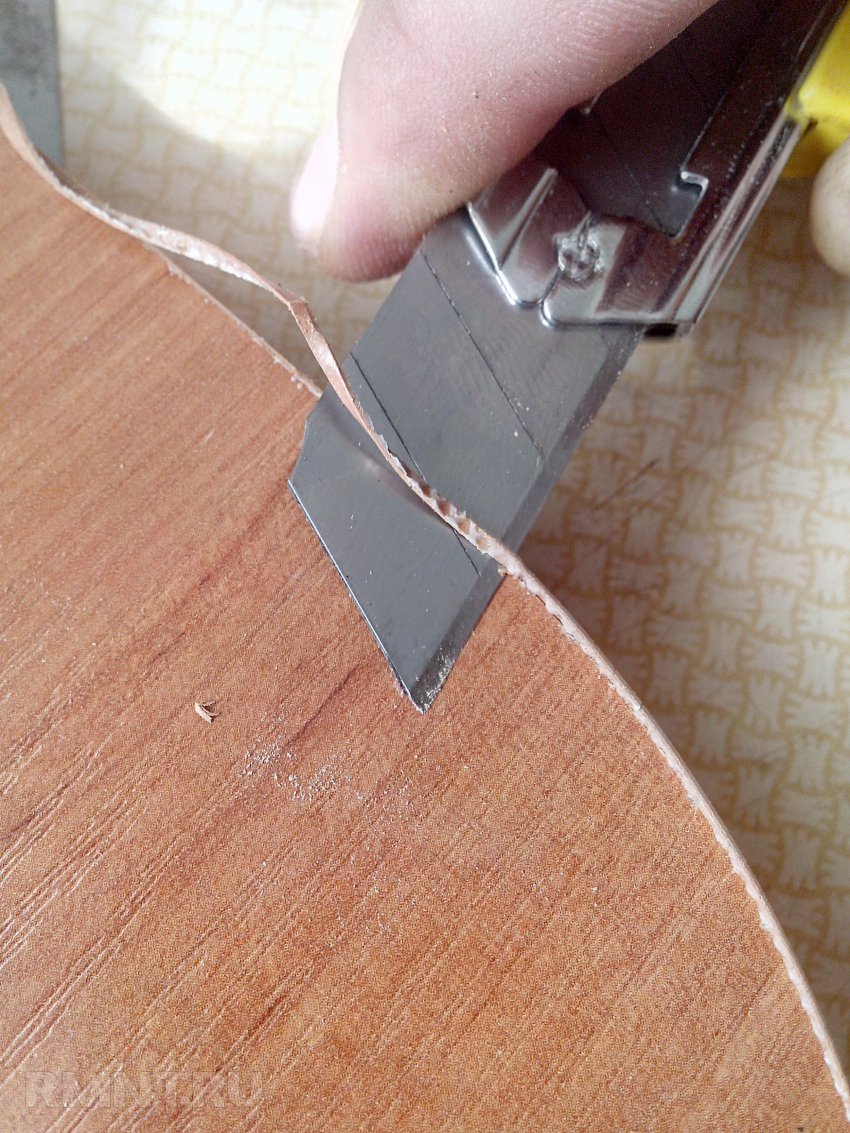
After cutting the tape, the edge should look like this:
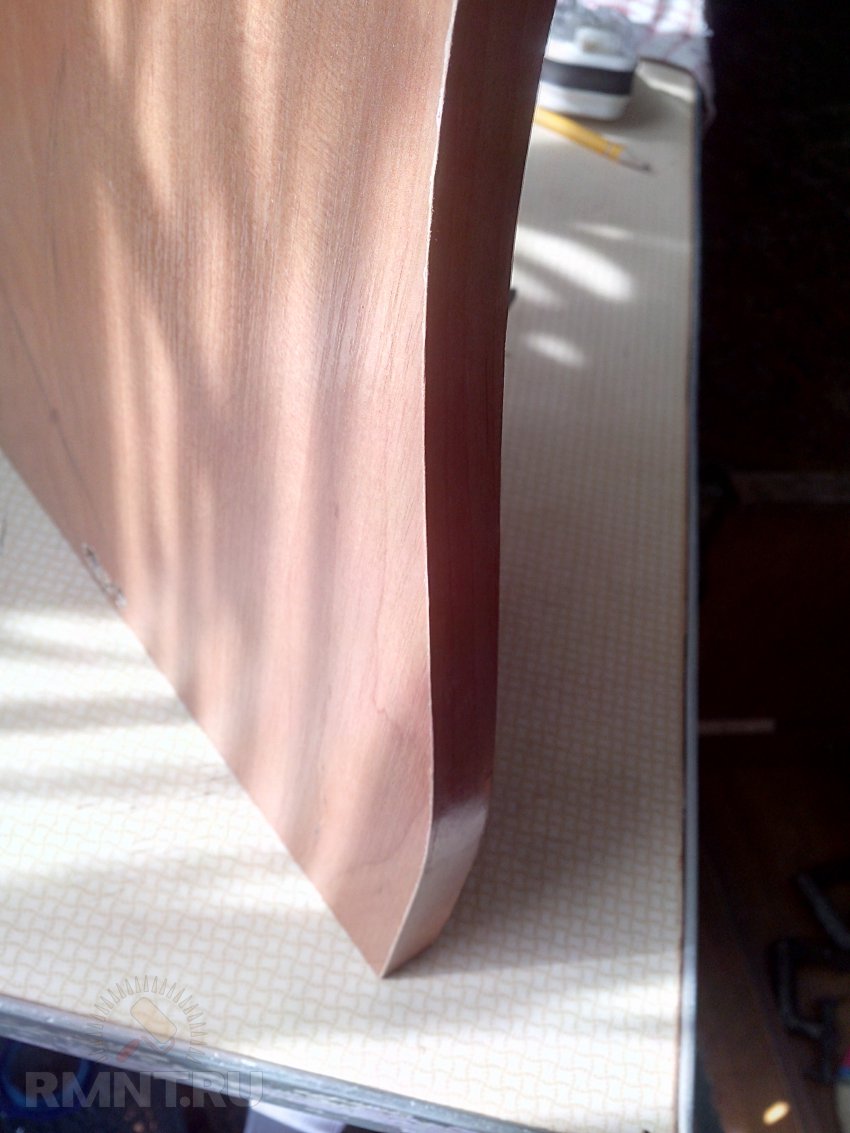
After cutting, the corners can be treated with fine-grained sandpaper - this will eliminate the contrast white stripe from glue. The result will be two pairs of vertical posts.

Assembly of the finished product
For crossbars, rectangular pieces of chipboard of the same length are suitable. It is important to choose the right width: the shelf should not protrude beyond the vertical stand.
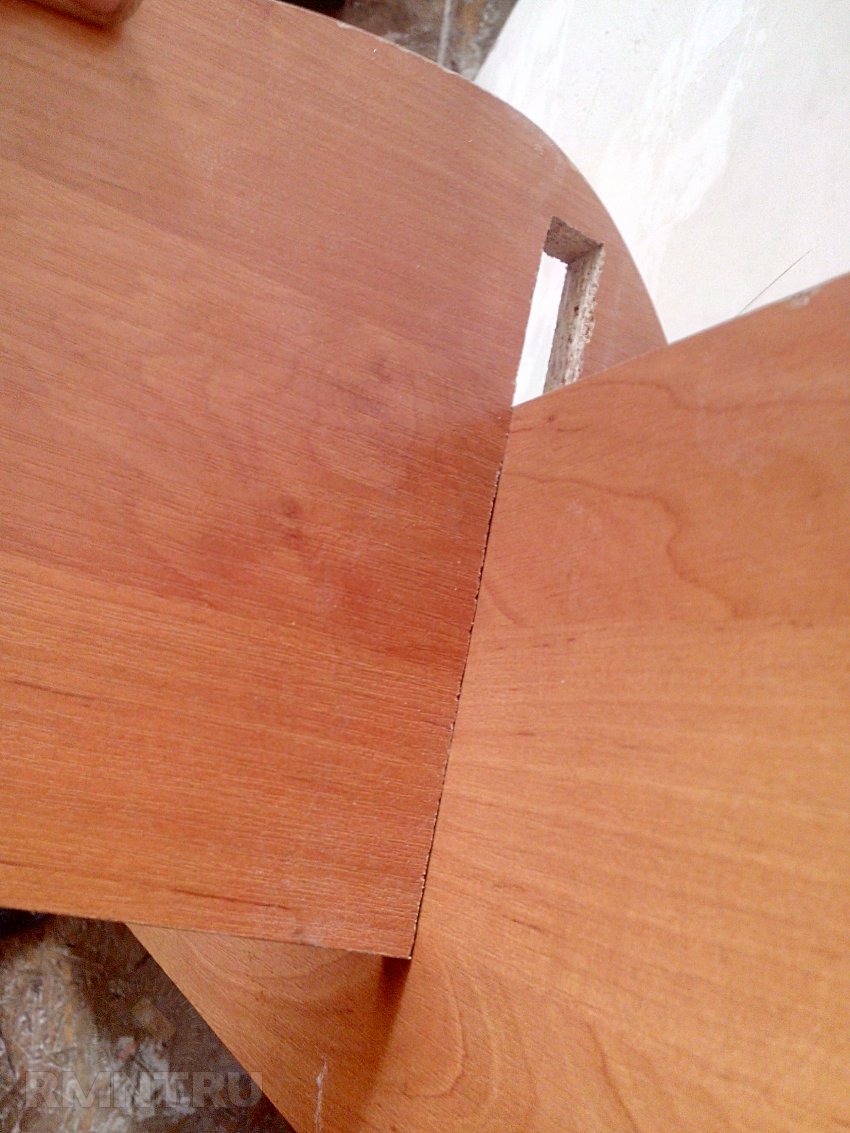
To give the design originality, the internal stand was additionally cut in two places to the depth of the shelf.
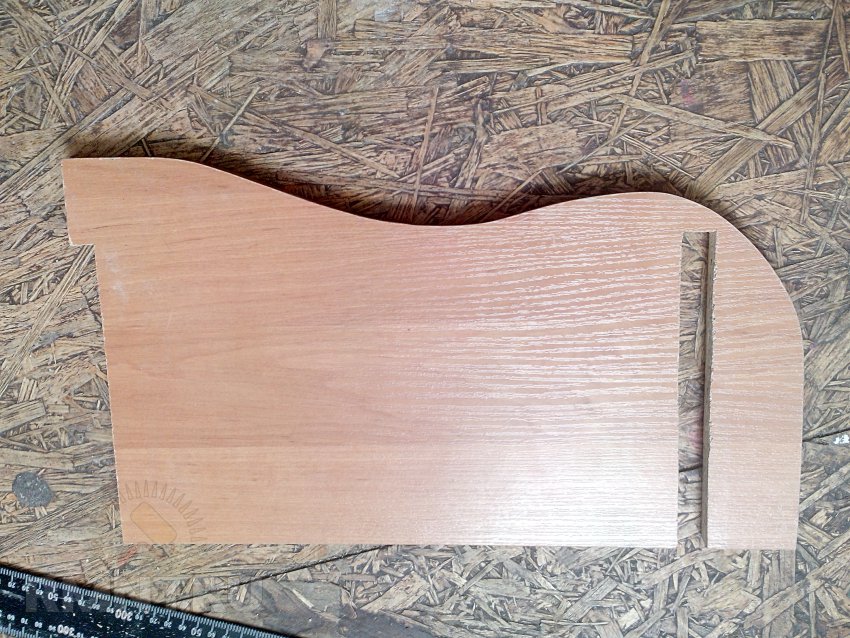
The shelf board will be inserted and secured into the slot.
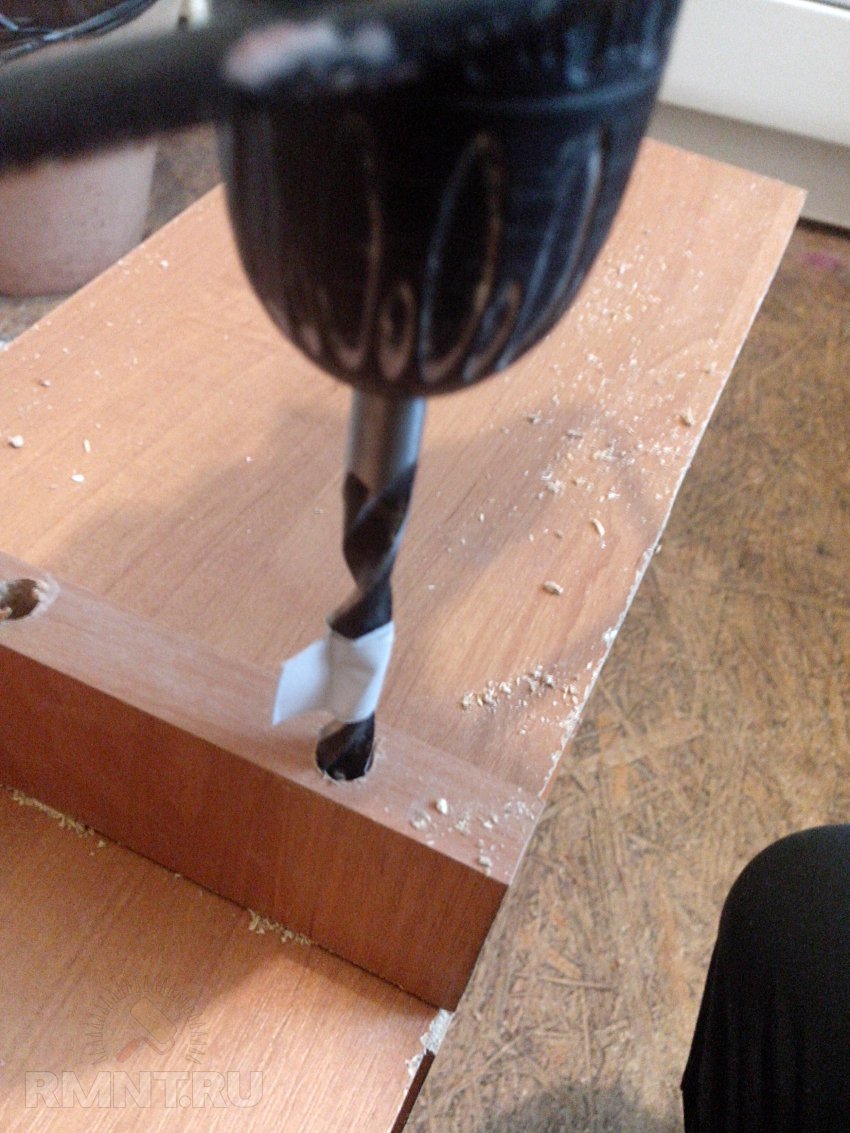
First, the lower shelf and the outer stand are fastened with confirmations. For correct positioning, use a square or corner clamp.
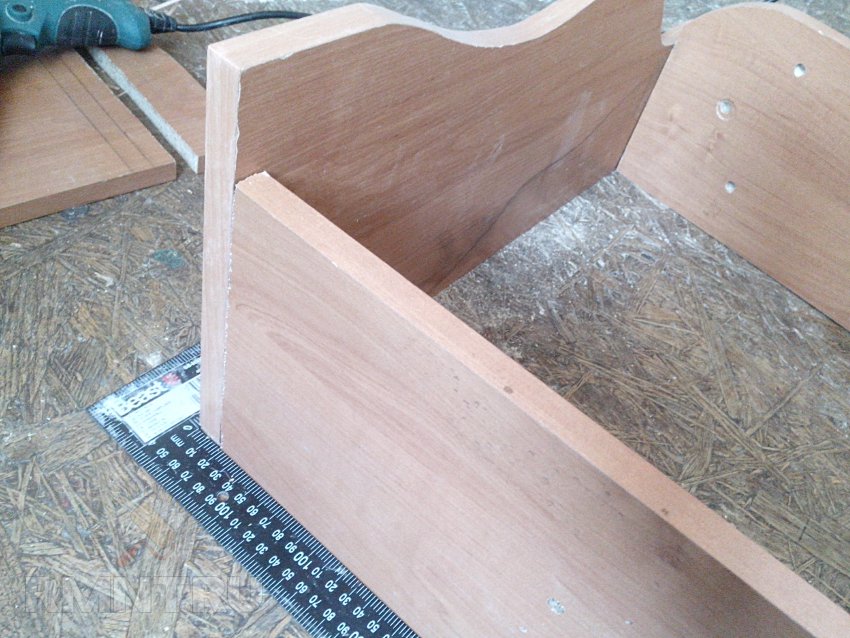
At a distance of 8 mm from the edge, a hole is made using a confirmat drill; the second stage of the cutter should go no more than 2 mm deep.

After drilling, the parts are fastened with confirmat. Tightening must be done all the way until the joint between the parts disappears. A slight cracking sound when tightening is normal.

The next step is to attach the internal vertical post at an arbitrary distance from the external one.

Then you need to install the top shelf. First it is attached to the outer stand.
We drill and fasten it with confirmations.

Please note: when drilling, you must keep the drill strictly perpendicular to the surface of the part, otherwise a “bump” will appear after tightening the confirmat.

The fastening was done in a rather original way top shelf to the inner rack. Even the elongated confirmations were not enough to fasten all three elements, so the groove was made by hand with drills.
For clarity, see the photo with the drills used, their diameters: 6, 7.5 and 10 mm.

First, a hole was made to the full depth with a 6 mm drill, then two countersinks were made: 7.5 mm for the head and 10 mm for the flange. The confirmat is screwed into the finished groove, which will now reach the array of the lower part of the rack.
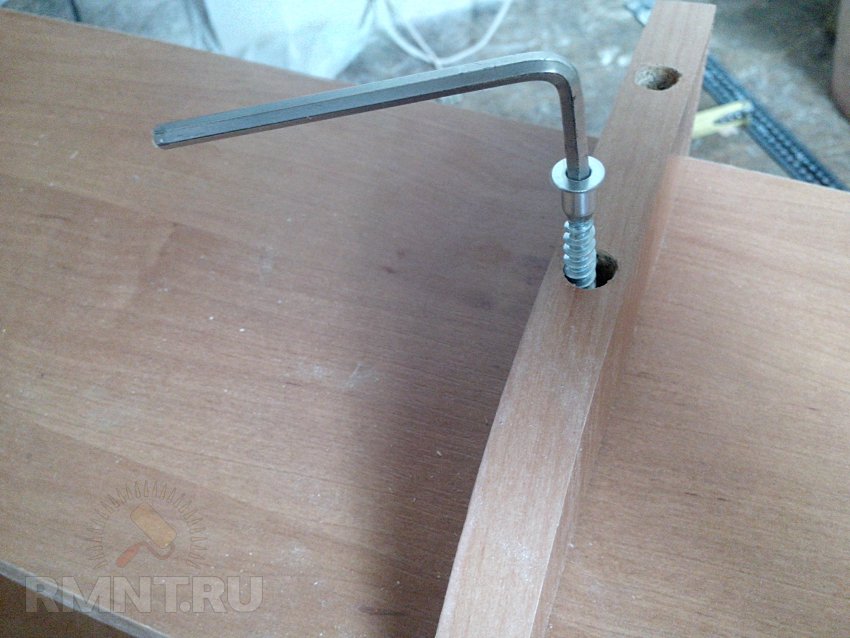
The length of the Z-shaped wrench was not enough, so a longer L-shaped wrench was taken, extended for convenience with a regular bit holder.

Now all that remains is to secure the awnings. Black screws are not suitable for this - they can burst under load. However, they are convenient for making the first pass for more convenient screwing in furniture screws.
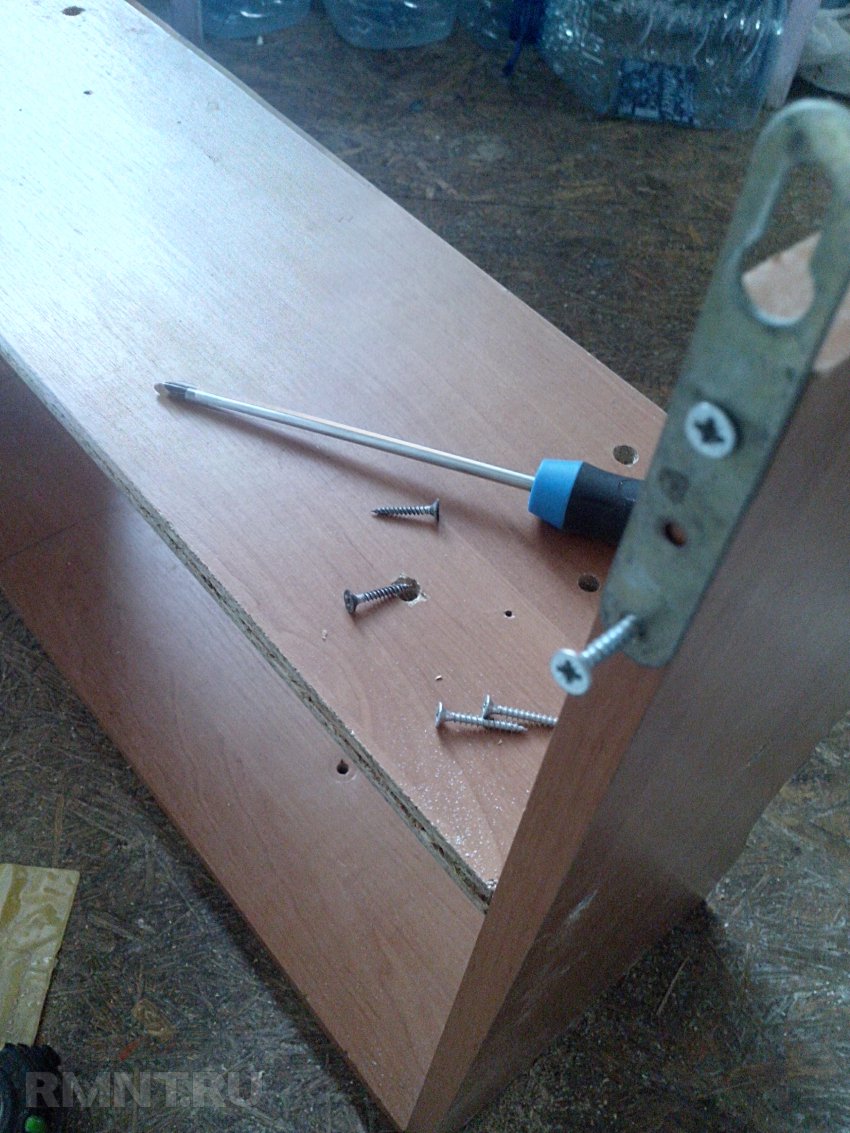
After gluing the decorative plugs, the shelves can be hung in place.

On corner connection no additional fastenings were used, since the chipboard board has sufficient bending strength. But purely for aesthetic reasons, the shelves can be connected to each other with dowels or a metal plate.
Redrick Adlynx Shewhart, rmnt.ru
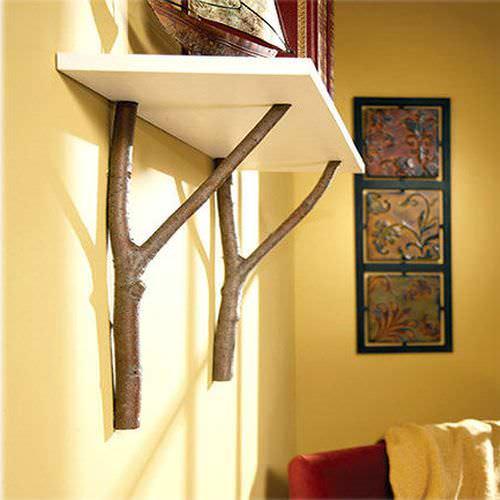
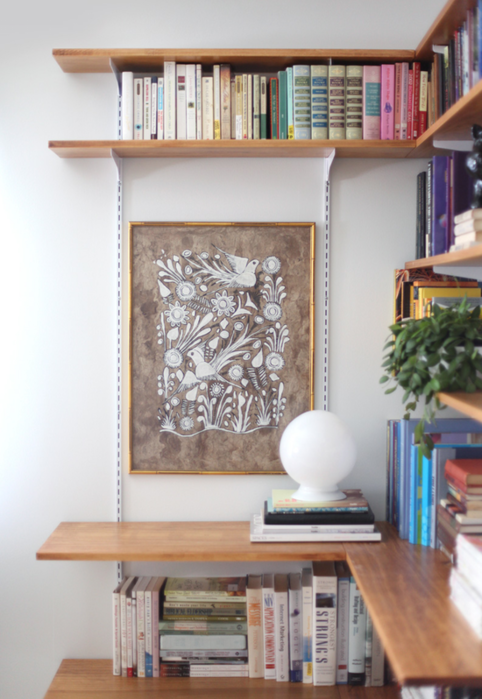
I have always dreamed of having such a corner with corner shelves for books and handicrafts. Found it interesting option, which is distinguished by its ease of creation, and also by its lightness and airiness of design. As it turned out, this is not difficult to do; you will need a system of rail supports to work. The design of such a system, as in the photo below, consists of four metal vertical rail posts with brackets inserted into their slots or grooves. You can find racks in stores different colors or with a protective coating. The structure can support shelves made of different materials, natural and artificial. You can use both ready-made and homemade shelves. The racks can be easily rearranged even with shelves attached to them. Having three or more racks allow the use of shelves various lengths and post them on different levels, ensuring optimal use of available space
Below I suggest you familiarize yourself with the method of installing adjustable shelves, which you can make to your taste, of any size, different designs. I don't think I should do this corner structure It will be difficult, the main thing is to have a drill, brackets and stands on hand. And the shelves themselves can be ordered upon purchase, boards or chipboards can be purchased already cut according to the right sizes. By the way, so that the shelves fit beautifully into the interior of your home, the racks and brackets can be decorated forged elements, which can be ordered from the Kuznitsa company. The company produces custom-made forged fences, forged gates and gates for country house or plot. On the company's website you can view a photo gallery of very beautiful finished works.


So, the fasteners that hold the racks with brackets on the wall are subject to significant loads, so use additional fasteners. For solid brick or plaster walls, use screws at least 38mm long into plugs that are inserted into drilled holes. In partitions with wooden frame determine the location of the vertical posts, located one from the other at a distance of 400 mm. Then screw 38mm long screws into the studs through the plasterboard. For hanging shelves on plasterboard walls You can use fastenings for hollow walls.
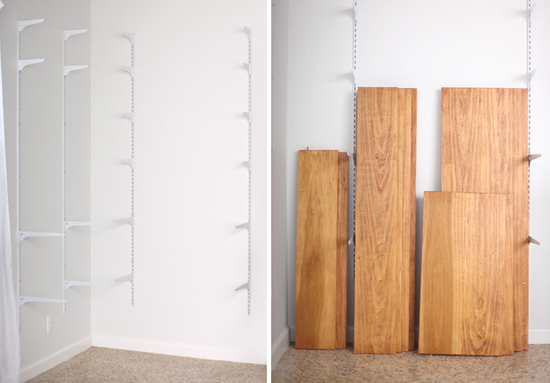

As with brackets designed for fixed-height shelves, the distance between the posts depends on the material of the shelves, their thickness and the expected load. With the simplest method of hanging shelves, their rear ends are spaced from the wall. To ensure that the rear ends fit against the wall, make cutouts in them. Having determined the locations of the posts and the distances between them, attach the first end post to the wall and use an awl to mark the position of its topmost screw. Drill a hole and, if necessary, insert a plug (see Fig. Useful tips). Screw in the screw halfway.

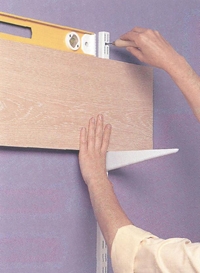
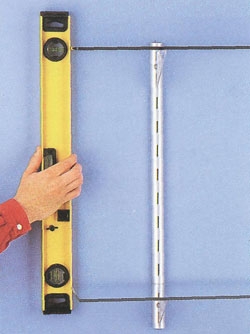
Apply a spirit level to the stand and position it strictly vertically. Mark the positions of the remaining screws and drill holes (insert plugs if necessary). Attach the stand to the wall.
To accommodate the second end post, insert the brackets into the slots at the same height in both posts. Place the shelf on the bracket of the first post, place a level on top and install the shelf horizontally. Press the second post against the wall, mark the position of the top screw and attach the shelf as described in paragraphs. 1×2.
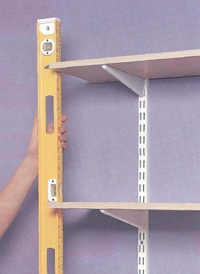

Attach all intermediate posts. Insert the brackets into the slots in the posts. Check that they are placed correctly in height - the brackets of one shelf should be at the same level. If necessary, cut the shelves to length - the cut edges can be covered with veneer.
After placing the shelves on the brackets, align the ends of the shelves with a spirit level or plumb line.
If the shelves are not in a niche that makes them safer, it is better to attach the shelves to brackets. Drive the screws into the underside of the brackets while holding the top of the shelf with your other hand. The screws should not go deeper into the shelf than two-thirds of its thickness.
Cutouts in shelves
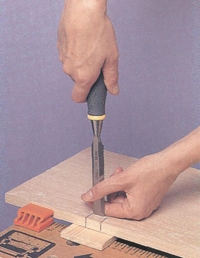
Using a mark, make side slits along the basting lines. Securely secure the shelf to the workbench by placing a piece of wood underneath it. Holding the chisel perpendicular to the surface of the shelf, press down firmly, then tap it with a wooden mallet. Remove a small layer of wood by pressing the chisel (blade bevel facing up) toward the edge of the shelf. Select all the wood from the cut.
Exists wide choose ready-made shelves, the basis of which are support posts with slots attached to the wall. Brackets are inserted into these slots at the required height, onto which the shelves are placed. Due to the fact that the length and height of the shelves can be easily changed, such systems are ideal for installation in inconvenient places, such as under a sloping ceiling. They can be used for more traditional way in the form of separate wall shelves or rack.
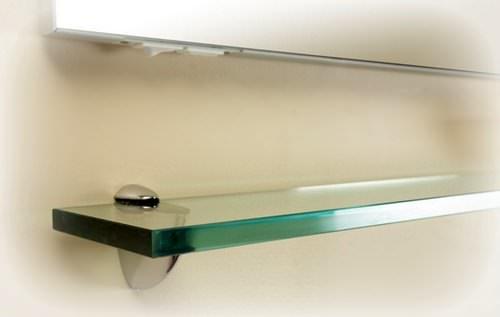
There are shelves designed to be installed almost anywhere in the home. They can be moved by changing the distance between them. The basis of most of these systems are consoles that are attached to the wall. Brackets are installed in these consoles to support the shelves. In order for them to hang evenly, it is important to accurately install the consoles level. System designs and types of shelves may vary, but the most widely used wooden shelves. Usage glass shelves in the example given, it gives an excellent decorative effect.
It is extremely important to fix the racks strictly vertically and at the same level, otherwise the shelves will turn out to be slanted and have an unsightly appearance.

Adjustable shelves are ideal for installation in areas with sloping ceilings because the position of the ends of the shelves can be adjusted to match the angle of the ceiling.

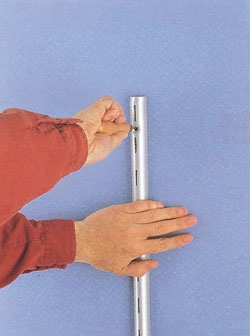
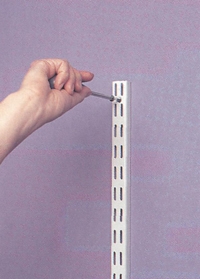
Using a spirit level, mark vertical guide lines on the wall. The length of the lines must exactly match the length of the racks used. Manufacturers usually indicate at what distance from each other racks should be mounted for a given type of shelf.
Pressing the stud against the first vertical line, use an awl to mark their position on the wall through the screw holes. You can try to do this with a pencil, but usually the pencil will not fit into the screw hole.
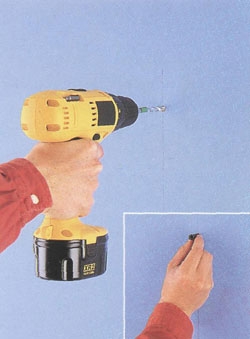
Set the stud aside and drill plug holes in the wall at the marked locations. The diameter of the drill must correspond to the size of the plugs. After drilling the holes, insert plugs into them.
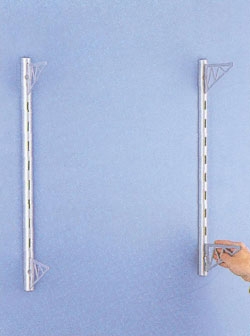
Place the stud back against the wall, placing the screw holes over the plugs, and screw it into place. When screwing the stand, use a spirit level to ensure accuracy of installation.
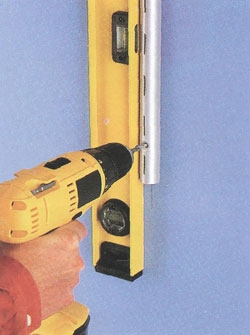
Attach the next post to the line and install it strictly vertically. With a spirit level on top of both posts, position the second one level with the first. Mark and drill holes. Insert the plugs and screw the stand.
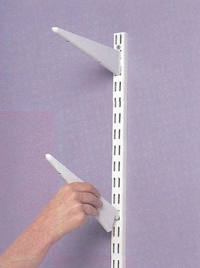
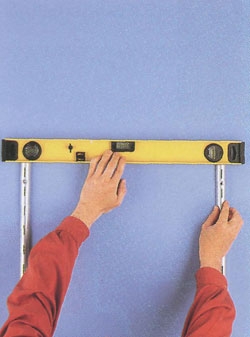
Insert the shelf brackets into the slots in the racks corresponding to the required height of the shelves. Bracket designs may vary slightly, but typically there are two to four clips on the back of the bracket that fit into the slots in the runners.

Once the shelves are placed on the brackets, they can be secured with set screws. If using glass shelves as shown here, place protective pads on the brackets, followed by adhesive pads holding the shelves in place. Place the shelves on the brackets and use a spirit level to check the horizontality of their ends. The height of the shelf can be changed by simply moving the corresponding brackets.


