If you want to update kitchen space, But family budget You shouldn’t suffer much from this, then you can implement several ideas on how to do everything yourself for a minimum of money. In addition, you can watch a video about this.
In general, there are several options. Let's consider the most optimal ones.
Film
If you need to update your headset with minimal movement and without dust, then you should try the option with self-adhesive film. The material can perfectly transform furniture, but you need to be prepared for the fact that it is quite capricious. We are talking about the gluing process. The surface must be perfectly flat (without small bulges and depressions), clean, grease-free and dry. At the same time, gluing such a film will require certain skills in order for the result to be decent. At a minimum, you need patience, accuracy and perseverance.
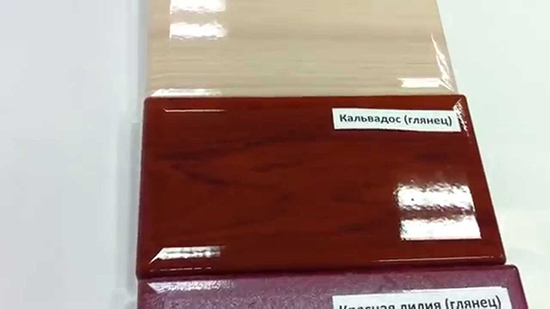
The film may be different color, imitate wood or stone, which allows you to get an exclusive finish. An important advantage of this material is its low cost and resistance to moisture, temperature and mechanical stress.
First you need to take measurements of all parts. If I only paper facades, then only theirs. It is better to carry out work on the floor. That is, it is better to remove the same facades. This will make gluing more convenient, which means the result should be of better quality. We use a sharp stationery knife as a tool for cutting the film.
After preparing the surface (if this is not done, the film will bubble in problem areas) you can begin the gluing process. You need to slightly peel off the protective paper from the back of the film. Next, we apply the material to the furniture and carefully smooth it over the surface. To do this, you can use a rag or a special scraper. Then gradually remove the protective paper and glue the film. It is important to be careful and patient here. If small bubbles still remain after gluing, they can be pierced with a thin needle.
If something goes wrong, you can peel off the area and try again. The film sets in a few hours.
When the gluing process is completed, you can install new fittings, then the furniture will really be transformed.
There is no need for special care for this set; it is enough to periodically wipe it with a damp cloth.
Replacement of facades
There is a more radical way to update kitchen set– replace facades. To do this, you need to take measurements from existing ones and order new ones. This is an economical option. After all, such a procedure will cost much less than purchasing the entire headset.
Thanks to individual orders, facades can be made to suit every taste. It is only important to take into account the design so that there is a combination of colors, textures and other elements.
You can install new facades yourself. To do this, you must first remove the old ones. At the same time, you need to stock up on new fittings in advance, then the update will be of high quality.
Painting and molding
Another way to update your kitchen furniture. The molding is an invoice decorative element, widely used in finishing, for example, ceilings. For the facade, thin planks should be used.
To perform the operation, the facades and their fittings must be removed. Remove dirt and wipe the surface dry. Next you need to prepare the moldings of the required length. Do not forget to make the appropriate angles. Using wood glue, glue the planks to the facade.
It is better to apply paint, like a primer, with a spray gun. If you want to get some kind of design, you can make a corresponding stencil. The paint will have to be applied in several layers to get an even color.
Installation of facades can be carried out after complete drying. To understand which facade to attach to which cabinet, you must first apply digital marks.
Decorative inserts
If you want to make a certain finish, and the facades old kitchen they don’t really fit with it, they can be decorated accordingly. For this you can use pieces of wallpaper, tiles or rattan.
Tile
To glue tiles to the facades of kitchen units, you should use a special glue. The tiles can be framed with moldings.
Rattan inserts
First you need to take measurements to purchase required amount rattan fabric. Before use, the material should be thoroughly moistened with cool water and left for 30 minutes. During this, you can start preparing the strips to secure the canvas around the perimeter.
After soaking with water, the canvas needs to be laid out on a flat surface, and we do the cutting. You can cover either the entire facade or only its middle. It looks stylish.
We secure the canvas using a stapler. The remaining paper clips can be covered with strips that are nailed with small nails.
There are many ideas, the choice is huge
Any of the ideas presented for updating your kitchen set can be easily implemented with your own hands. This will not require large financial costs.
Over time, all furniture elements, unfortunately, lose their visual appeal or simply become unusable. Arises urgency situation updates. New furniture today it costs a lot of money, but budget options they look simply terrible. Many people have a question about how to update a kitchen set without special financial costs.
In fact, this is not difficult at all, because modern market offers a huge range of different finishing materials. Any designer who knows even a little about furniture will advise updating the tabletop, buying new facades, repainting the old ones in a different color, or using a special self-adhesive film for finishing. Using the simplest means at hand, everyone can visually transform their kitchen furniture.
Read in this article:
One of the easiest ways to update your kitchen set is to stick film on the facades. At the same time, everyone has a choice of many textures that imitate appearance almost all types of finishing materials. This film does not allow moisture to pass through and has a very impressive heat resistance. When finishing, you will have to be patient and exercise maximum care so as not to spoil the appearance of the updated kitchen facade.
Necessary materials:
- Roulette;
- Knife for cutting cardboard;
- Ruler;
- Plastic scraper;
- The film itself.
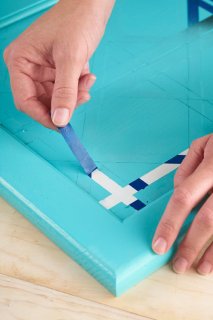
First, you need to clarify the dimensions of the surfaces to be updated. To make gluing more convenient, it is recommended to first dismantle each facade and remove all fittings. Each surface must be thoroughly cleaned of accumulated dust and dirt.
On the back of the self-adhesive film there is a special grid, thanks to which the upcoming cutting will not be so difficult. It is necessary to make marks corresponding to the dimensions of each facade. It is recommended to leave a margin, even if the accuracy of each measurement taken has been checked. If you select a film with repeating patterns, you need to ensure the accuracy of their location before cutting. After this, the material can be cut using a ruler. with an ordinary knife for cutting cardboard.
A few centimeters of the protective coating is removed and the film is glued to the surface of the facade. After this, it is necessary to remove all surface irregularities and formed air bubbles with a plastic scraper. A plain surface will not hide a single flaw, so special care is needed. The remaining air bubbles can be pierced with a needle or trimmed with a sharp knife. Self-adhesive film It will stick properly only after 2-3 hours. Therefore, there is no need to panic if the material was not applied evenly to the façade the first time.
Replacement of facades
Replacing facades is one of the simplest and most expensive ways to update a kitchen set. Therefore, you need to choose a design in accordance with your financial capabilities. When a mass-produced set is installed in the kitchen, which is still in demand, choose suitable facade it will be very simple. If installed model has long been outdated and out of fashion, will have to be done individual order. In this case, it is possible to choose suitable material and design changes.
Most cheap option – facade slabs made of MDF, covered with a plain PVC film. One of best options is paint coating. This method of finishing MDF facades is more expensive, but the surface looks better and the choice of colors is much wider. Most expensive option– purchase of facades made of solid wood. Many companies are engaged in the production of such products, so there should be no problems with the choice.
The installation of new facades begins with the dismantling of old ones. After this, the response mechanisms of the hinges are twisted off the body and new fittings are installed. Installation of facades is not difficult. Anyone who has dealt with repair work, you can easily figure this out.
Molding and painting
Another way to update an old kitchen set is to paint the facades. Outdated furniture can be easily and quickly transformed into a new stylish product. Molding is a set of unique decorative elements used for visual finishing of a wide variety of surfaces.
To finish the facades you will need:
- Marker;
- Wood glue;
- Semicircular molding;
- Self-tapping screws, hinges, handles for facades;
- Miter saw;
- Dye;
- Spray.
Before dismantling the facades, it is necessary to make appropriate marks on them so as not to confuse the places of attachment to the body when the restored products are installed. The doors are removed, the drawers are pulled out, all the hinges and handles are twisted. After this, each surface is wiped with a damp cloth to remove dust and dirt. It is recommended to carry out painting work outdoors, making sure that no foreign objects or materials get on the surface of the facades. The working surface is wrapped with film, and only after that the door is placed on it.
Decorative molding is cut into pieces of suitable length and filed on each side at an angle of 45°. All planks are glued in the form of a frame in the center of the facade using wood glue.
Before updating the old one kitchen furniture, the sprayer is filled with a special primer composition, which must be applied from a distance of 15-20 cm. When the mixture is completely dry, deck paint is poured into the spray gun. When processing, you can use stencils. After the paint has dried, the facades can be hung in place in accordance with the previously made marks.
Rearranging sections
Many people wonder how to update a kitchen set with their own hands without any financial costs? Rearranging sections is a fairly effective way. The visual design of the interior of the room will change, and your wallet will not be emptied.
But this method can be used in the kitchen with big amount sections, since washing and hob must remain in their places. With a small number of fronts in a kitchen set, there is not much to move; the feeling of novelty after such a rearrangement can be very dubious. It is also recommended to select some element to decorate the kitchen interior from items located in another room. Enough spacious kitchen can be placed small sofa, coffee table or some kind of rack.
Textile update
To change the image of any room, just hang textile elements in the form of small curtains in several places. Typically, such materials are rarely used in the kitchen, so it appears real opportunity give the room a special flavor. Instead of a facade, a curtain can be hung on any cabinet, but you need to use a similar decorative element where it will be convenient.
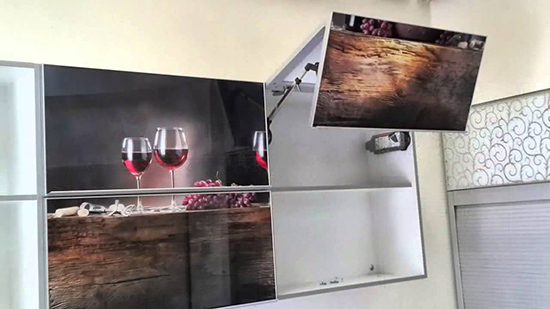
Glass facades
Not the cheapest, but very effective method change your kitchen beyond recognition. Can choose suitable look aluminum frame. Then order visual design taste. The most expensive type of glass finish will be the same in cost as painted glass MDF facades. You can insert a mirror into the frame, on which a sandblasted pattern is engraved. Many people order photo printing from the back of the glass. This way you can print any image, for example, family photos. Painting glass is also very popular, but similar option may not look its best in the kitchen. Typically, a façade of this type is installed on sliding wardrobes.
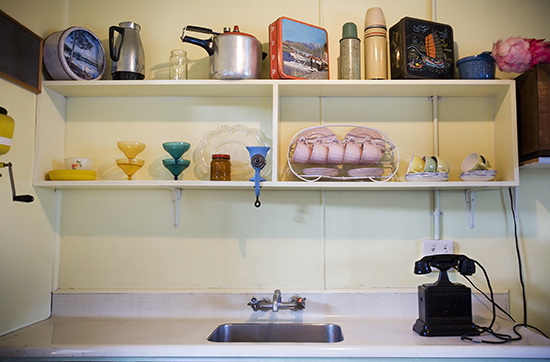
Open shelves
There is another recommendation on how to update an outdated kitchen set without financial expenses with your own hands. They will add more lightness and a feeling of spaciousness to every kitchen. open shelves on the upper sections. With this design solution It is important to pay attention to what items are placed on these shelves. Transparent jars with bright contents, beautiful flowers, dishes are perfect for remaining visible all the time.
Various ways to change colors
The old paint on some kitchen cabinets sometimes wears off. Many designers purposefully achieve a similar aged vintage effect. If white sections of the kitchen unit are installed, you can choose some suitable new shade to paint the wall. Modern Orange color, for example, will help to achieve a radical transformation of any kitchen.
How to update an old kitchen set with your own hands? Several methods are used, which will be described below. The desire to know what to do and how to update the kitchen cabinets using simple and cheap means arises in many people when they look at the old kitchen cabinets. Many people cannot afford to buy new kitchen equipment, so remodeling is preferred.
With the help of decoration, any old furniture takes on a new life.
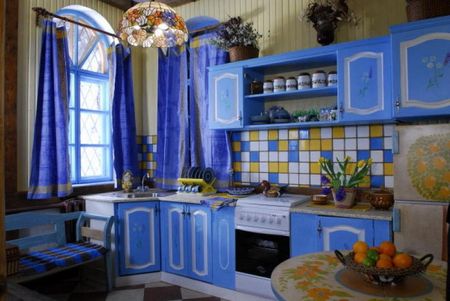
How to update your kitchen set with your own hands using self-adhesive film
The simplest and cheapest option is to cover old cabinets with film material. To do this, you need to choose a film with an imitation of marble, wood, tile, stone. It all depends on the taste of the kitchen owner.
Usually for such work they choose a material that is resistant to high temperature, waterproof, transferable mechanical influences vinyl film. When using it, the appearance of kitchen cabinets will be long years please the owner.
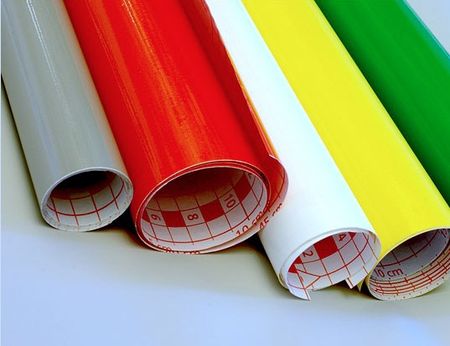
To get started, purchase film material. The main tools are scissors and a stationery knife; you will also need a ruler. The technology for doing this work is as follows:
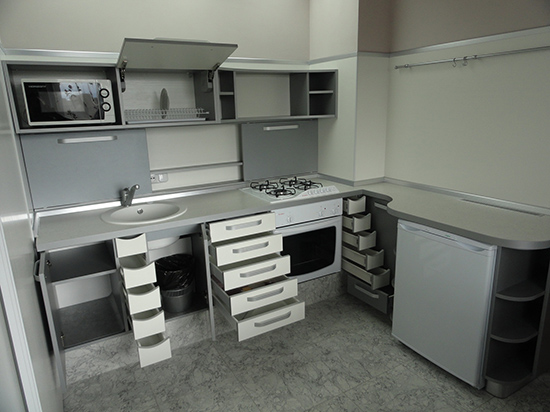
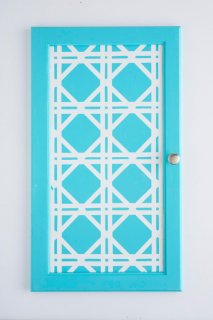
![]()
Figure 1. The easiest way to transform old kitchen furniture is to cover it with self-adhesive film.
- Take measurements of cabinet fronts, their sides and drawers. In order to produce high-quality pasting of surfaces, it is necessary to remove and lay the facades on a horizontal, flat surface.
- Then remove the handles and other fittings and thoroughly wash all parts of the set with a damp sponge. Special attention should be addressed to remove grease stains. There should be no dirt or dust left on the surfaces to be pasted; it must be smooth, dry, as even and clean as possible. If these conditions are not met, then over time the film will begin to bubble and peel off from the sticker area.
- For correct cutting of the material, use applied with its reverse side centimeter grid. Celebrate required sizes for every detail. After this, to the results obtained, you need to add a margin of 2 cm for the places where you plan to bend the film. If you select a material with patterns that repeat, then you need to ensure that their repeats match on the front surfaces.
- The film is cut using a stationery knife and a ruler. If you need to cut out a curved pattern, then this is done according to preliminary markings (pencil or marker) using scissors.
- Peel off a few centimeters of the protective coating of the film and press it to the facade with an adhesive layer. Using a plastic scraper, smooth this area to remove any remaining air from under the material. The film is glued gradually, 6-9 cm at a time, and each glued area must be carefully treated with a scraper. There is no need to rush. If a monochromatic pattern is chosen, then all surface irregularities may appear, but with variegated colors they are less noticeable. The film must be smoothed from the center to the edges. If small bubbles have formed, they are pierced with a thin needle. For large formations, they are cut with a knife and the material is carefully smoothed. If the sticker is applied unevenly, then the film is removed from this place and glued again.
- The above operations must be carried out with all facades, drawers, and shelves. If the kitchen owner wants to give it a different look, then you can change the handles and all the fittings. After this, all parts of the kitchen set are returned to their old places.
- If the furniture is still durable, but you want to refresh the appearance of the kitchen, then you can use special vinyl stickers, which are attached to the cabinet fronts. They tolerate cleaning with a damp sponge well and do not require special care.
The obtained result is shown in Figure 1.
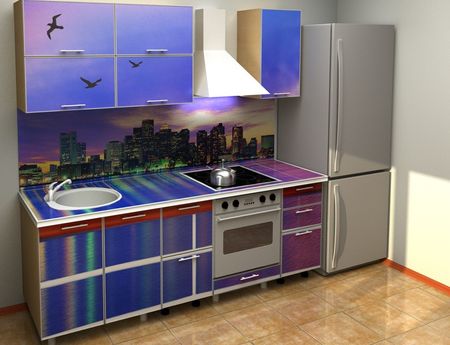
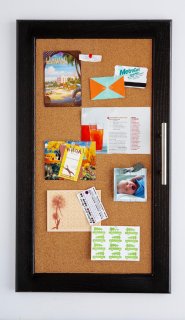
Another method of updating kitchen furniture is painting and molding.
To quickly transform old kitchen cabinets and change their decor, you can use methods such as painting and molding (decorative components that are used to finish various flat surfaces).
For this method of finishing cabinet facades, you need special semicircular slats, which can be purchased at hardware store. Technological process this work is:
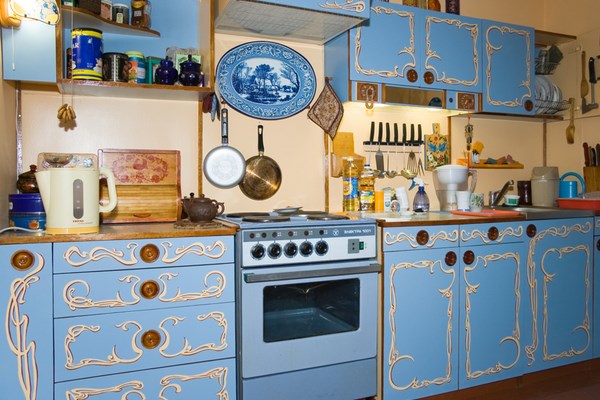
Figure 2. One of the most common types of restoration old furniture is painting.
- First, you need to number all the parts of the kitchen unit so that nothing gets mixed up during installation after the work is completed. Then the facades, all fasteners and fittings are removed. Use a damp sponge to remove all dust, dirt, and grease stains. Since varnishes and paints will be used, the work must be carried out on outdoors, for example, on the balcony. A film is laid on the working surfaces, and the facades are laid on top.
- Use a miter saw to cut the molding to the required length, and its outer edges are filed at 45 degrees. The prepared planks are installed on the facade using wood glue. This simple operation requires care.
- Use a pencil or marker to mark the places of fastenings and fittings. Holes are drilled in these places with an electric drill.
- Then you need to prime the surfaces of the facades. The primer is applied using a spray gun or paint brush. We must wait for it to dry completely. Apply two layers.
- After this, the main paint (deck) is applied. If you need to make an original pattern on the surface, you can use stencils. It is possible that after the finishing layer has dried, various flaws or irregularities will appear. You can reduce them by applying another layer of paint. You can paint with a spray gun or a paint brush.
- The alteration ends with the installation of facades and the installation of new fittings.
The updated headset is shown in Figure 2.
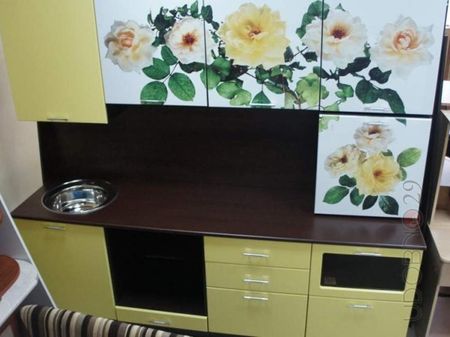
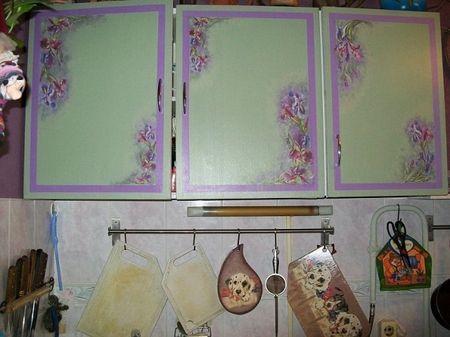
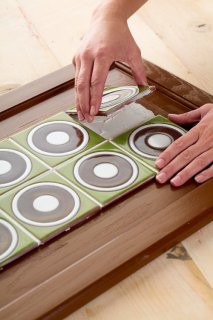
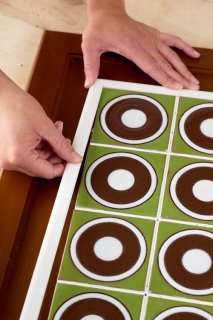
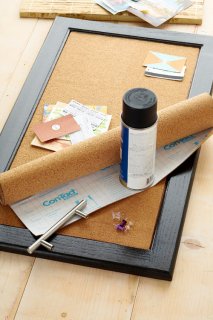
Decorating old kitchen furniture with ceramics or decorative inserts
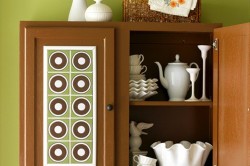
Figure 3. Unusual way updating the kitchen set - using ceramic tiles as decor.
For this they use ceramic tiles, for example, tiles. To get started, you need to remove all the cabinet doors and clean them thoroughly. The surface must be flat. If you wish, you can paint it any color you like. suitable color. Using appropriate glue, the tiles are glued to the facades.
To give the ornament a finished look, you need to glue strips around the tiled surface (in the form of a framing frame).
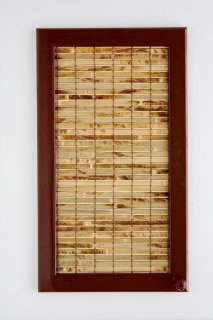
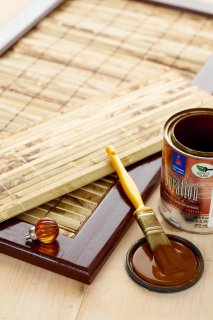
It is advisable to choose the thinnest tiles so that they have relatively little weight. If you install large plates, then when using cabinets, their doors may warp and come off. Rattan inserts can be used as decoration on the doors of kitchen furniture. The technology for this work is as follows:
- The front parts of the doors are measured to determine the exact amount of rattan. The canvas is bought in a store; its color should match the color of the kitchen.
- The rattan roll is placed in the bath and well moistened with water. The material should lie there for ½ hour.
- Cooking wooden planks, with which the rattan will be pressed around the perimeter. If you need to change their color, they are painted acrylic varnish. To eliminate flaws and irregularities, the wood must first be sanded. The varnish is applied in layers (from 3 to 4), which are dried in turn.
- The rattan is removed from the bath and cut to size with scissors. Using a stapler, the canvas is secured to the facades. They try to fasten the paper clips along the edges - then they will not be visible.
- To ensure that the frame joints fit well together, they are cut miter saw at an angle of 45 degrees. When installing them, the contact points of the individual planks are painted with acrylic varnish.
- Using furniture nails without heads, the strips are attached to the fronts along the edges of the rattan material so that they can cover the staples. It is necessary to take into account the fact that the canvas increases in size in water, and after installing it on the door kitchen cabinet it dries and stretches.
- If necessary, you can change handles and other fittings. These elements are chosen to match the rattan fabric.
The resulting modification is shown in Figure 3.
What materials and tools will be needed to complete the work?
- Vinyl self-adhesive film.
- Moldings.
- Deck paint, primer.
- Tile.
- Rattan inserts.
- Acrylic lacquer.
- Furniture nails.
- Adhesive for wood and ceramic tiles.
- Spray gun or paint brush.
- Furniture stapler.
- Miter saw.
- Electric drill.
- Hammer.
- Sandpaper.
- Scissors and a stationery knife.
- Ruler, pencil (marker).
You can update old kitchen furniture yourself relatively easily if you have the skills simple tools, desire and fantasy.
If a person has never done such work and does not own the tool, then it is better to entrust this task to professional specialists.
Some interesting ideas remodeling kitchen furniture. At home, with your own hands, you can turn nondescript standard furniture into bright, original, suitable for the interior.
Painted or old wooden surface need to be thoroughly cleaned of dust and grease stains, rinse the surface warm water with soap (add a few drops of ammonia) or other detergent and dry. Then lightly process with fine-grained sandpaper. Fill the holes with a special wood putty.
Sand the dry surface with medium-grain sandpaper and wipe off the sanding dust with a damp soft cloth. Prime the surface with universal paint and lightly sand the dried surface. We select paint for the background and ornament. This example uses silky-glossy latex, applied in two layers.
The kitchen in the bottom photo is painted in White color. Doors top cabinet replaced with glass ones. Selected metal handles. Additional color is provided by dishes, curtains, and chairs.
Black and white version of the kitchen. The lower cabinets are painted one white, the other black. The doors of the upper cabinet are glazed.
The kitchen is painted white. A brown pattern is applied to the middle of the door and near the drawer handles.
In this version of the kitchen, the middle part of the doors is painted in a soft light green color. A colored stencil is applied on top. The color of the ornament on the doors echoes the bright blue color of the tiles.
The furniture is painted in a gentle purple colour. A white acrylic pattern is applied on the doors using a stencil. The legs and backs of the chairs can be painted white, and covers can be sewn on the seats.
A bright pink kitchen with yellow stripes on the doors and thin, long metal handles. The upper cabinet doors have been removed and bright porcelain adorns the shelves. There are no doors underneath the sink either. The shelves are covered by a curtain mustard color on a metal cable. Idea from BHG.com
10 MASTER CLASSES ON KITCHEN CABINET DECORATION:
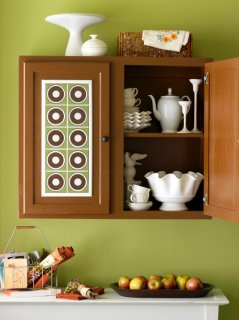
This simple cabinet was used as a starting point for 10 decorating options. You can buy similar inexpensive furniture or change your old one.

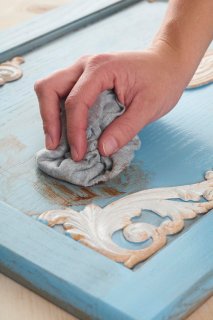
1. Antique cabinet
Give your cabinet a vintage look with blue paint topped with a burnt umber glaze. Lush appliqués found in the home center's woodworking aisle add extra character.
Necessary
- Cornflower blue paint
- Brushes
- Vignettes
- Cream paint
- Wood glue
- Burnt umber glaze
- Rag
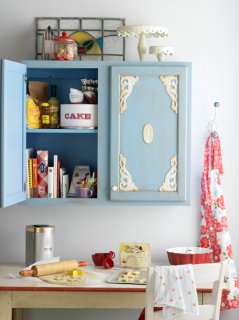
Paint the cabinet two coats, semi-gloss, acrylic paint. Using wood glue, place vignettes at the corners and in the center. Apply glaze to water based over the entire surface using an old brush.
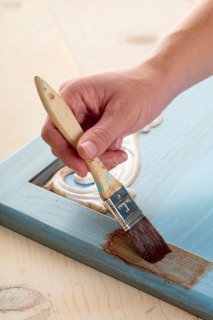
Wipe the glaze with a rag to create the desired effect.
Use tiles for decoration. You will only need a little of it.
Necessary
- Brown and white paint
- Brushes
- Decorative tiles
- Mastic
- Liquid solution
- molding
- corner 45g
Paint your closet doors desired color, dry thoroughly. Center the tile on the cabinet door. Apply wood sealant and then adhere the tiles according to the manufacturer's instructions.
Secure the molding at an angle of 90 degrees. using wood glue. Touch up with paint if necessary.
3. Bamboo cabinet
Bamboo adds just the right Asian touch to this simple cabinet
Necessary
- Drill
- Jigsaw
- Brown paint
- Brush
- Bamboo fabric
- Scissors
- Wood glue
Remove the panel cover using a drill and jigsaw. Paint the frame with brown paint. Cut the bamboo sheet to the required size and glue it to the back.
4. Wardrobe with a geometric pattern
A little paint, masking tape, and classic geometric designs are all you need to freshen up this cabinet.
Necessary
- White paint
- Brushes
- Masking tape
- Ruler
- Spray paint
Paint the doors with white paint. Using the ribbon, create the design you want. Spray paint a different color and remove the tape once dry. If necessary, touch up with a small brush.
5. Cork doors
A wonderful space for pictures, new recipes, or upcoming events comes from the cork doors of this cabinet. Very easy to update!
Necessary
- Black paint
- Scissors
- Cork self-adhesive
Paint the cabinet black (use two coats if necessary). Cut the cork sticker to fit the door panel. Remove the protective paper covering and glue the cork.
6. Doors for recording
A fun idea to make a writing board out of closet doors. middle part covered special paint For school boards, edges - green paint. Use protective tape.
Necessary
- Green paint
- Protective tape
- Board paint
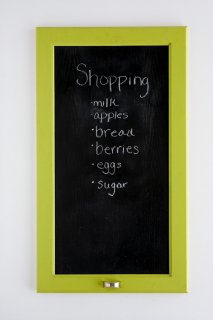
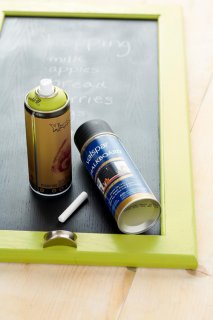
7. Mesh doors
This cabinet has a very modern look but doesn't break the bank. It uses a radiator screen.
Tip: Removing the center section of cabinet doors provides many options for replacing the panel with glass, metal, fabric or clapboard.
- Painting the front panel
- Covering the headset with self-adhesive film
- Replacement of facades with new ones
The kitchen is one of the most popular and visited rooms in an apartment or house. It is the place where the whole family, all its generations, gathers. You can do without any other room in the house, but you can’t do without the kitchen. But such popularity also has its downsides: if a shabby, old set, which was once the pride of the family, but now no longer causes anything but irritation, then all the attractiveness will gradually disappear. This means something needs to be changed. Buying a new kitchen set is not always possible, but if you have the desire and strength, then you can remodel the kitchen set with your own hands, saving money and showing your creative talent.
Figure 1. You can decorate your kitchen set using stenciled patterns.
As you can see, updating the appearance of the kitchen with the help of film is quite simple, but the appearance of the furniture will change beyond recognition, filling the room with new bright colors(see Fig. 2).
Self-adhesive vinyl film requires no maintenance, is durable and reliable, and its colors will never fade.


