Almost every housewife has one of these in her kitchen. necessary thing like a meat grinder. But in order to use it successfully, you need to know how to assemble this meat grinder. The equipment of any devices of this type is very similar, so it is not difficult to understand this issue, but there are still some points that must be taken into account when assembling the device. Otherwise, in the worst case, you can render the thing unusable.
How to assemble a manual meat grinder
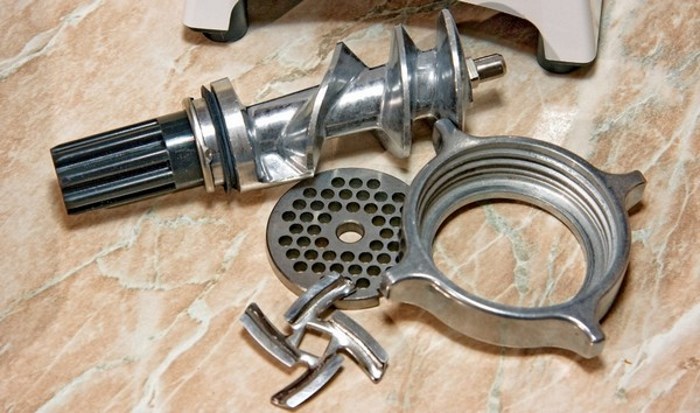
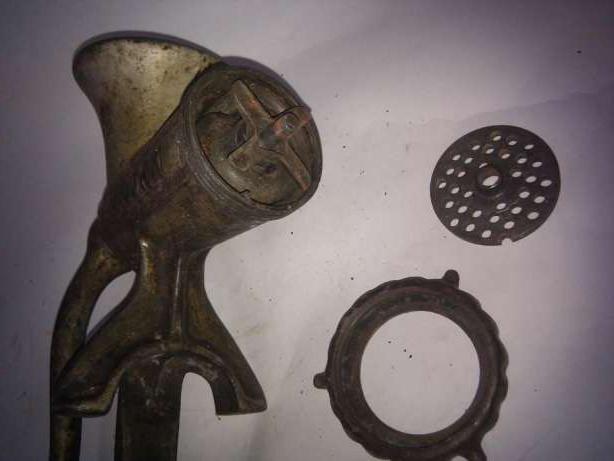
Many housewives still prefer to use a manual device, since the design of this type is more durable. To understand how to properly assemble a meat grinder, you first need to understand what parts it consists of:
- the housing inside which the entire mechanism is assembled;
- a screw shaft, which serves for initial grinding and movement of meat inside the housing;
- a knife that produces final chopping of meat;
- a grid through which the product is passed at the outlet;
- a locking cover securing the mechanism;
- a handle that rotates the shaft;
- tray for more convenient loading of products.
First step
Installing the screw shaft into the housing. It must be installed there forward with the end on which there is a mount for the handle. After installing it in the body, you need to make sure that the end with the fastening is on the outside and a handle can be attached to it. Before installation, it is allowed to lubricate it with sunflower or other vegetable oil to reduce the friction of the component parts of the mechanism against each other. You should not immediately attach the handle, as this will create some inconvenience during further assembly.
Second step
Installing the knife on the shaft. The knife has two sides - flat and convex. It should be fastened in such a way that the convex side “looks” inward, and the flat side is on the outside. With another fastening option, the meat simply will not scroll and chop.
Third step
Installing the grille and securing the mechanism. The grille is attached behind the knife, on the same side, covering it. A lid is screwed on top - a clamp that secures all the parts in the body and does not allow the grille to rotate.
Fourth step
Fastening external parts. A handle is screwed on the back side, and a tray is attached to the top for loading products. The device is now ready for use. To use it, you need to screw it to the tabletop. There should be no problems with how to do this - the unit has special mount.
How to assemble an electric meat grinder
The electric analogue of the manual mechanism is more convenient in that it does not require physical strength on the part of the user. In addition, its speed is much higher. It is assembled in almost the same way as the classic one. The only difference is that on the side where the handle is attached to a standard hand-held device, the electric device has a special mount with which it is mounted in a housing with a motor.
Meat grinder equipment
The device can be equipped with additional parts. For example, gratings with holes various diameters, double-sided and single-sided knives. These parts are necessary to ensure the ability to obtain minced meat of varying degrees of grinding. How to assemble a meat grinder with a complicated configuration? Just like the simpler one. The only thing is that when using them, you should remember that any knife must be installed with the flat side outward, and the entire structure must be secured with a locking lid.
A meat grinder is used relatively rarely, but in any case it is necessary to be able to assemble it correctly. Once you acquire the necessary skills, the entire sequence of assembly operations is performed automatically, but when you see this unit for the first time in disassembled form, you may not immediately understand how to prepare it for work.
Types of meat grinders
There are two types of meat grinders - mechanical and electric. The latest varieties provide varying degrees of grinding of meat and other products. Manual Views meat grinder in traditional version They have several attachments, which also allow you to vary the size of the resulting minced meat.
Upon detailed study design features it becomes clear that in principle they are similar. Having mastered the algorithm for assembling a conventional meat grinder, you can quickly understand how to install its electric counterpart.
Main details of the device
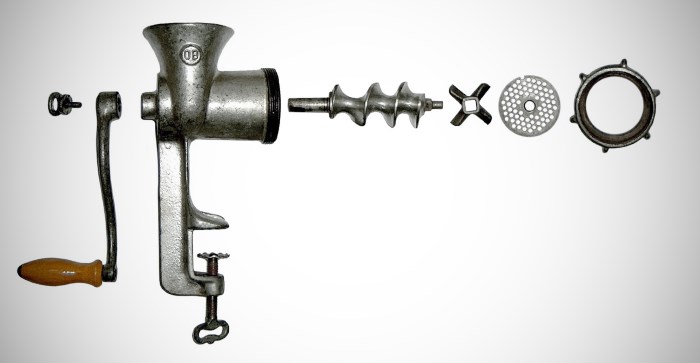
The manual version of the meat grinder has the following structural elements:
- body equipped with a clamp;
- a helical auger that helps move the product to the knives;
- tightening ring;
- pen;
- lattice.
The body is most often made of steel, although cast iron can be found. The knife is made on one side with a convex surface. The second side is flat and has cutting edges. To ensure a secure fit, the central hole is shaped like the tip of an auger onto which the knife fits. Usually this is a square. The grille easily takes the desired position, thanks to the side slot that fits into a similar-shaped protrusion on the inside housings.
Correct assembly
To assemble the meat grinder, you first need to insert the auger inside the body, orienting it so that the threaded end comes out of the rear, narrower hole. A handle is put on it, which is fixed to the meat grinder with a special screw. On the other hand, a knife is installed in it. It is directed with the flat side outward, and its convex surface, accordingly, will look inside the body. The grille does not have a clearly defined orientation, so it can be placed on either side, always aligning the side cut with the protrusion.
A tightening ring is screwed on top. There is no need to apply excessive force to it and twist it very tightly. This can complicate the work process, and then it will be difficult to disassemble the meat grinder to wash it. All that remains is to securely fix the meat grinder to the edge of the table using the clamp screw.
Important point! Do not mix up the sides of the knife as this will result in the meat not being cut. Due to the rotation of the screw, it will be squeezed out through the holes of the grate for some time, and then the mechanism will simply stop, as it will be completely clogged.
Nuances of assembling an electric meat grinder
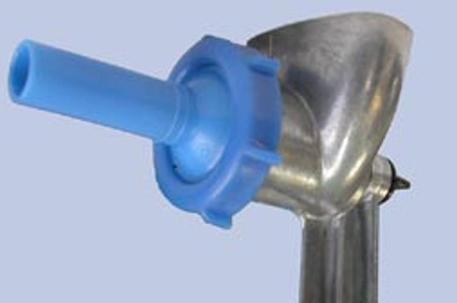
Analyzing the assembly process of an electric meat grinder, it should be noted that there is no clamp on the body, which is equipped with a motor. The kit includes a funnel with a safety pusher that guides the meat into the receiving hole. The screw is fixed directly in the housing with a special nut.
The assembly of a complicated electrical model can be performed according to the following algorithm:
- an auger is placed in the housing;
- a ring with three or four slots is put on the auger;
- a double-sided knife is placed;
- a grille with medium-diameter holes is attached from the kit;
- a second knife is installed;
- then comes the grid, in which there are the smallest holes;
- the clamping ring is fixed.
The accepted orientation of the knives is maintained - their flat side is directed towards the grate.
![]()
Some assembly features after repair
If, to repair an electric meat grinder during operation, it is necessary to remove the reduction gears located in the transmission unit, then you need to know that one of them is fitted with an interference fit and will require a vice or heating of the parts to work with it. The second method is used less frequently, since there is a risk of damage to the motor rotor winding.
There can be two or more gears and each of them is mounted on its own shaft. The gearbox parts are cleaned of dirt from old grease using a rag, the gear seating areas are lubricated with Litol, and a special silicone compound is used. After this, they are installed (the power must be turned off) and rotated manually to control the functioning of the mechanism.
If the commutator motor was removed, then after the repair it is necessary to make sure that the brushes have been removed. The collector is cleaned with alcohol, the shaft bearings are lubricated with Litol.
The shaft is installed first, and then the brushes, after which the motor can be fixed to the housing.
Nowadays, a variety of electrical appliances are increasingly used in everyday life, but such a simple mechanism is found in every home. And in some cases, with its help you can do the work faster and better. For example, it is very useful if you need to grind a small amount of meat or need to use different attachments. So, read here - how to assemble manual meat grinder. Step by step photos will make the process simple and clear.
Parts and their purpose
To understand how to assemble a manual meat grinder, let's figure out what parts it consists of. This is important so as not to be confused later.
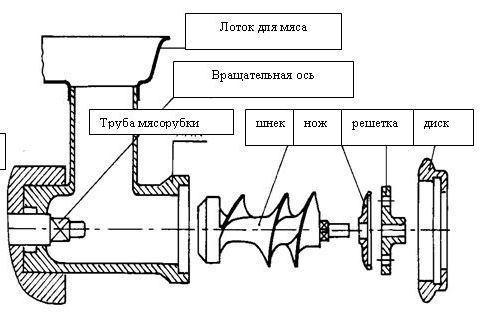
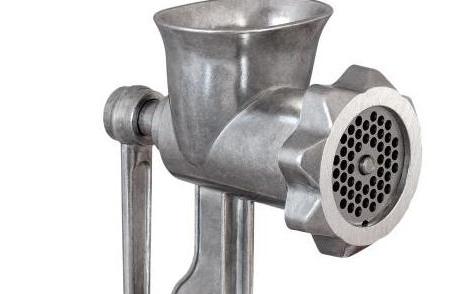
So the whole device is metal carcass(pipe, casing) and whole set parts of different sizes.
At the top there is a receiving tray, into which we load all the products for processing. From the tray, our semi-finished product enters a pipe where there is an auger on a shaft (for convenience, we will simply call it an auger), it delivers the meat to the knives, and it is they who grind it into minced meat. Then, through the small holes in the grid (it is held in place by a disk), the chopped minced meat falls into the bowl.
For the process to proceed, you need to manually turn the auger. We do this using a handle located at the back.
Now let's figure out how to assemble a manual meat grinder. The photo will help you with the assembly step by step. It's not difficult at all.
Assembling the shaft
It is better to start assembling by placing the parts on the working surface of the table, this will be more convenient. Only when we have completely assembled it will it be possible to screw it to the tabletop.
First you need to insert the auger into the meat grinder housing. The casing (we remind you) is the largest part of the meat grinder that is attached to the countertop. We insert the auger into it from the front at big hole. In this case, the shaft should be passed through a narrow hole on the other side of the casing. Here it will be secured with a screw; there is a special thread for this (but we are not touching the screw yet). To understand how to assemble a manual meat grinder, look at the photo carefully.
Insert knives and grate
Although assembling a meat grinder is quite simple, there are a number of points that you need to know about so that the mechanism works properly and the meat is ground quickly and without unnecessary effort.
You need to place knives on the wide edge of the auger in the wide hole of the pipe (they are connected to each other and form a single whole system). Here you should be very careful: if you attach the knives incorrectly, our mechanism will work, but its productivity will be zero. It is of very poor quality and will take a long time to grind the minced meat and get clogged all the time. Therefore, it is important to know how to assemble a manual meat grinder, the main thing is to insert the knives correctly. See photo below: the knife should fit snugly against the grate, therefore, with the flat side facing outward.
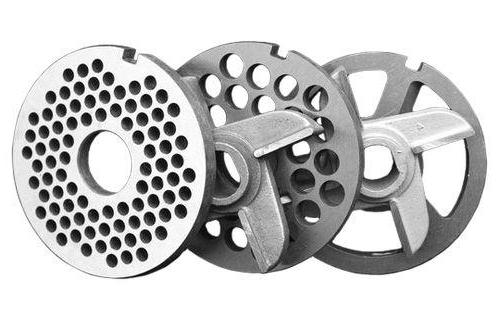
As you can see, the side on which there is no peculiar strip (rounded and smooth) should go inside the casing, and the side with the strip should go to the grille.
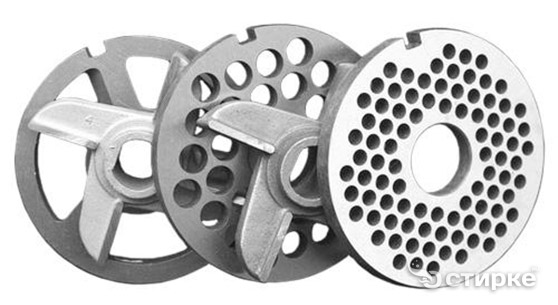
Now all that remains is to install the grate. There are several of them in the set, and the size of the cell will determine how finely we cut the meat. The larger the cells, the larger the pieces.
Please note: there is a recess on the grille - it should fit into the protrusion on the casing. If this is not done, you can ruin not only the minced meat, but also the grill, and even the mechanism. The protrusion will fall off due to the effort, and the grate will not fit tightly to the knives. And this will lead to poor operation of the mechanism.
If everything is done correctly, the grille will fit very tightly to the casing and will not protrude outward.
All that remains is to screw the disk. It needs to be screwed all the way. When assembled correctly, this part should look like this.
Screwing the handle
To complete the assembly of the meat grinder, you need to screw on the handle. It is attached using a special bolt, for which there is a thread on the reverse (narrow) side of the casing. The screw must be tightened until it stops.
Some models use special plastic gaskets for sealing. They need to be inserted from the outside into the narrow hole before tightening the bolt. But be careful: in some models they are located just inside.
So we figured out how to assemble a manual meat grinder. Now we need to check whether we did everything correctly.
Checking correct assembly and installation
To check the correct assembly, you first need to install our mechanism on the tabletop. For this purpose there is below special device: a square metal plate or special legs for support and a screw at the bottom.
When installing, the plate should be positioned above the tabletop, and the screw will press it firmly to the plane under the tabletop. Knowing how to assemble a manual meat grinder and having assembled it, you need to check the correct assembly. To do this, let's take some meat and process it. If the work goes quickly, everything is installed correctly.
If you need to install a nozzle
In order to do homemade sausage, you will need a nozzle. Installing it is a little different than assembling a meat grinder with knives. Next, we’ll look at how to assemble a manual meat grinder with an attachment.
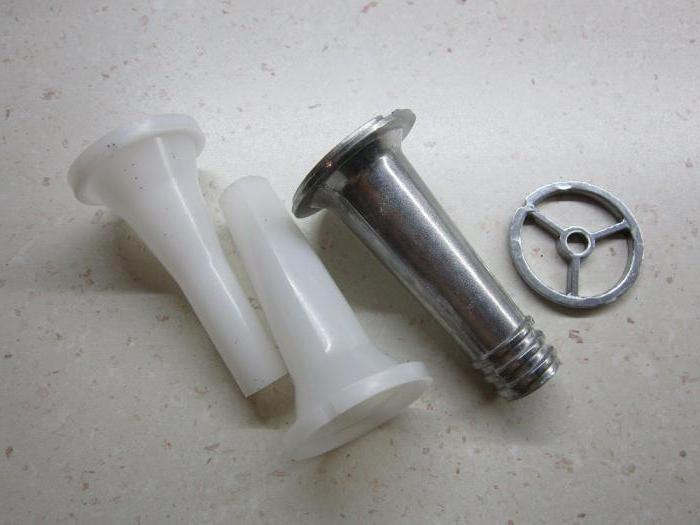
To do this, having inserted the auger into the casing, we will immediately install a special grill (it is in our photo). We won't insert knives. Then we will add a special nozzle (there may be several of them in the kit). Don't forget that there may also be a chamfer (protrusion) to hold the attachment in place. Then we screw the disk.
That's it, our meat grinder for preparing sausage is ready.
Let us add that you can make homemade sausage only if you have a specially prepared intestine (it is put on a nozzle and held with your hand).
Every housewife strives to diversify her family’s diet. And the easiest way to do this is with meat. A meat grinder is one of the most indispensable items in the kitchen. No food processors or blenders can supplant it when you need to prepare juicy and soft meatballs, rolls, cutlets, and casseroles. Let's try to understand its structure and understand how to assemble a meat grinder.
How is it structured?
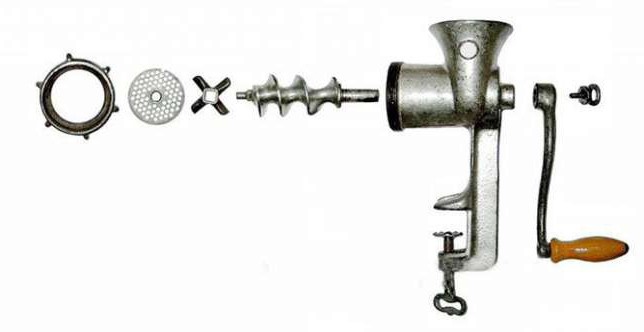
A manual unit for preparing minced meat consists of the following parts.
- Body with meat receiver. Made from high-strength metal alloy.
- Screw shaft. It has a spiral shape and is designed to feed meat to the cutting part.
- Knife. Actually, this is the tool that grinds foods and turns them into minced meat. In classic models, 2 types of knives are used: with wings and disk ones.
- Lattice. With its help it is possible to regulate the degree of grinding of the product.
- Clamping nut. Serves as a fastening element for all parts of the device.
- Lock and handle.
Important! A classic “Soviet” style meat grinder is attached to the table using a presser foot. To prevent the structure from falling, it must be screwed tightly. To prevent the device from slipping, it is advisable to place a small piece of soft textile between the table top and the foot. IN modern models High-strength plastic is used to make the foot. The fastening is more reliable.
The general design of an electric meat grinder is similar to a mechanical one. The differences are as follows:
- The body and meat receiver are made not of metal, but of durable plastic. An electric motor is built into the body, which acts as a handle. All you have to do is press the button and admire the process of making minced meat.
- IN selected models(not in all!) The meat receiver is attached to the body.
- The device is equipped with an additional pusher that moves the product to the auger.
- There is no clamp on the body.
- The design of the knife is slightly different than that of mechanical models. It is equipped with special bulges for fine cutting.
- The screw is secured with a corrugated plastic rod.
Algorithm for assembling a hand-held device
Let's look at how to assemble a meat grinder by hand. Before you begin assembly, be sure to check that all parts are perfectly dry and clean. If this is neglected, the device will quickly fail.
The assembly order is as follows:
- Place the auger shaft inside the housing, with its wide part located on the handle side, and the narrowed part on the knife mounting side.
- Place the handle on the rod and secure it with a screw.
- On the opposite side of the auger, install cutting tool, flat side out. If the device uses circular knife, then the grooved part of the knife should be located near the grate.
- After installing the knife into the meat grinder, put a mesh on the end of the rod. Make sure that the mesh is adjacent to the cutting part as tightly as possible.
- Connect the entire structure with a clamping nut.
Now you know, at least theoretically, how to properly assemble a manual meat grinder.
Electric meat grinder assembly procedure
Now we will talk about how to assemble an electric meat grinder. If you have the skill of assembling a manual meat grinder, you can fold the electric device without much difficulty:
- Connect two housings - gearbox and auger. There is a special groove for connection.
Important! If you did everything correctly, a characteristic click will be heard. If the parts are not connected tightly, the motor will not be able to correctly and fully influence the screw shaft.
- When you insert the auger, make sure that it fits into the hole provided in the housing.
- Attach the cutting tool and the grid, connect the parts using a clamp nut.
- After the loading bowl is installed, the device can be used.
Disassembly and cleaning
After you have used the device, you must disassemble and clean it. Under no circumstances should the device be washed when assembled. It is simply unrealistic to thoroughly wash the device from minced meat residues, and if we are talking about electrical appliance, such negligence can also cause a short circuit.
The disassembly procedure is as follows:
- If the design is equipped with a removable meat receiver, you need to remove it from the neck of the meat grinder.
- Unscrew the clamping nut.
- Remove the grill and cutting part. Unscrew the screw that holds the handle.
- Remove the auger from the housing.
- Wash all parts. To clean the grate more thoroughly, you can use a match or toothpick.
- Place the washed components on a napkin and leave to dry.
Important! Assembling a meat grinder - manual or electric - is unacceptable if the parts have not yet had time to dry. A mechanical meat grinder can rust, and a short circuit can occur in an electrical appliance.
Disassembling and assembling a meat grinder is not a difficult task at all. One or two workouts are enough, and you will cope with this task without difficulty.
A meat grinder cannot be called an essential item. However, this device is found in almost every kitchen. And everything seems to be fine, but the tool needs to be assembled to work. For men, this process does not raise questions or difficulties: the stronger half of humanity can easily cope with any mechanics. But among the wonderful housewives, not everyone knows exactly how to assemble a meat grinder correctly. Meanwhile, everything is quite simple. You only need to remember the sequence once, and then everything will happen by itself, without errors or questions.
In this article you will learn about:
Types of meat grinders
Meat can be turned into minced meat using different devices: blender, electric or manual meat grinder. Not many people like minced meat obtained in a blender, as it is more like a puree.
Using an electric meat grinder, you can change the consistency and degree of grinding of meat. Handheld devices Sometimes they also give this opportunity, but usually the mechanics for grinding products are designed as simply as possible and produce fairly coarsely ground minced meat. This product is considered the most optimal for many dishes.
By the way: the mechanisms of an electric and manual meat grinder are very similar. If you know how to assemble a manual meat grinder, then assembly electrical device will not cause any difficulties.
What does the meat grinder mechanism consist of?
The manual device consists of the following elements:
- housings with clamp;
- auger;
- handles with screw for fastening;
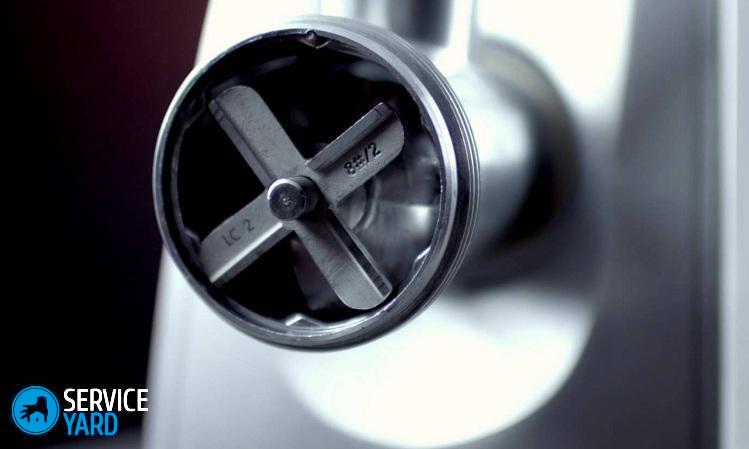
- a cross-shaped, propeller-like knife;
- round lattice with holes;
- fastening ring.
There is no clamp on the body of the electrical device, and the mechanism itself is inserted into the housing with the motor. The meat receiving hole is supplemented for safety purposes with a funnel with a pusher.
From the auger on one side to longitudinal axis a thick rod with a hewn surface protrudes - this is where the handle is attached to mechanical models. On the other side along the axis there is a thinner rod; a knife and a grid are strung on it.
One side of the knife is usually convex and the other is flat, with shiny cutting edges. In the center of the knife there is a polygonal hole (usually a square). The hole shape is designed for the axial rod on the auger. The grille has a central hole and a small cut on the side. The cut corresponds to a protrusion on the inside of the unit body.
Assembly procedure for a manual meat grinder
The screw is inserted so that the thicker side fits into the hole in the body. In manual models, a handle is placed on the outer rod and secured with a special screw. IN electric models the auger is fixed in the housing.
A knife is placed on the thin end of the auger. This point is most confusing for those who do not know too well how to properly assemble a meat grinder: which side should the knife be put on the auger?
The correct answer is that the convex side is inward, the flat side is outward. Next, the grate is attached to the auger. Moreover, it is imperative to align the cut on the grille with the protrusion on the body. The entire structure is fixed with a ring that is screwed onto the threads around the grille. For easier movement, you can drip a little vegetable oil on the thread of the ring. A few more drops of oil should be applied to the hole in the housing through which the thick end of the auger passes.
Important! Watch the position of the blades: if you confuse the convex and flat sides of the knife, the food simply will not be chopped. The movement of the auger will only push them through the grate until the entire mechanism jams.

Operating mode of electric meat grinder
If you remember how to assemble a mechanical meat grinder, then you don’t have to worry: an electric one is assembled in almost the same way. You just don't need to attach the handle. Instead, the working structure is inserted into the housing and secured in it with a special nut. Electrical engineering will do all the work for you, all you have to do is manage the process.
Additional items
Some models of manual and electric meat grinders suggest the possibility of preparing a more or less crushed product. For this purpose, the kit may include additional structural elements:
- double-sided knives;
- gratings with a set of holes different diameters;
- extra rings and extra knives.
The assembly order, accordingly, changes slightly. To obtain more finely ground minced meat, additional knives and grates, separated by special rings, can be inserted into the unit. The instructions included with the device must include a picture diagram describing how to assemble an electric meat grinder with additional accessories. structural elements. Typically the build order looks like this:
- insert the auger into the housing;
- put a ring with the largest slots on the auger (usually 3 or 4);
- put on a double-sided knife;
- grille with middle holes;
- second knife;
- grille with the smallest holes;
- clamping ring.
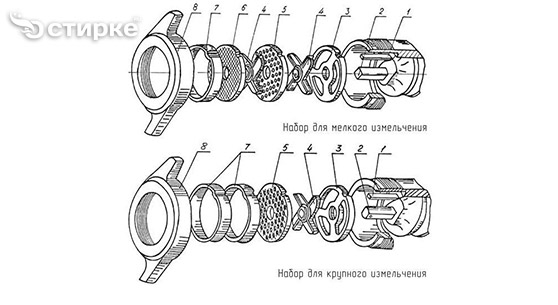
In all cases, the knife should be flat on the grate. If the design provides for multifunctionality, there may be other assembly options. For example, to prepare cookies, instead of a regular wire rack, rings with shaped slots are put on, and a knife is not used at all. Instead, a thrust ring made of metal or plastic is inserted into the body.
When you purchase a meat grinder, try not to lose the instruction manual. Usually this document contains pictures-diagrams indicating the sequence correct assembly exactly your device. Until assembling the unit becomes a habit for you, it is better to have a similar diagram before your eyes.


