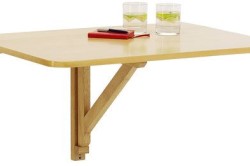
A folding table is an indispensable piece of furniture in small apartments. You can make such a table with your own hands from chipboards, MDF and wood.
The folding table is irreplaceable species furniture for small apartments.
Tools you will need sandpaper, drill, 5 and 8 mm drills, jigsaw, brush, screwdriver, hammer drill, hammer.
Preparatory work
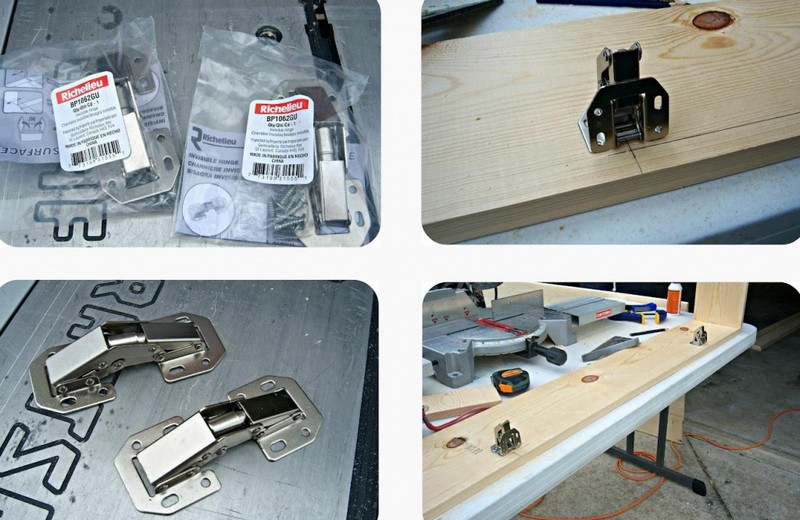
Experts recommend finding first reliable system, which can support the table in open position. To install the table yourself, you will need to buy corners with a shoulder of 350x550 mm. These parts are cut out of plywood or chipboard. They are attached to the hinges with screws. Otherwise, you can buy special factory mechanisms.

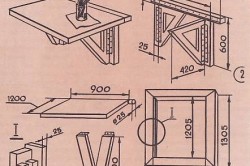
A drawing of the product is pre-prepared. If desired folding table can be made with shelves and legs. The main thing is that the furniture frame has the same width and is securely fixed to the wall. For this purpose, anchor bolts are used. The main furniture elements will need to be made from laminated chipboard 18 mm thick. TO components products include (mm):
- countertop – 650x1100;
- bottom and top of the shelf – 150x1100;
- partitions and sides – 150x500;
- 2 niches – 150x400;
- small partition – 150x241;
- rear part – 11x95x535.
The accessories you will need are butterfly hinges, anchors, 5x70 confirmats, and 4x16 self-tapping screws.
Self-assembly

It is recommended to cut parts to order. You can do the same with gluing the edges. The next stage involves assembling the shelf. The details are tightened using confirmations. You will need to make through holes in the plane. To do this, use an 8 mm drill. Holes are made in the end using a 5 mm drill (60 deep). Then the hardboard is installed and the piano hinge is installed (maintaining a uniform distance from each edge).
The last element must be mounted from the bottom of the shelf, which is attached to the sides and partitions using confirmations. The distance from the bottom of the niche to the floor level should vary between 700-730 mm.
To assemble the mechanism with your own hands, you will need to mark the forged corners along the holes in the corresponding hinges.
To do this, use 7 mm metal drills. The hinges are fixed with screws and nuts, the length of which is 350 mm. If necessary, holes of the same diameter are drilled in the hinges. You should only buy mirror mechanisms.
Then indent from the bottom edge wall shelf(down 10 mm). The mechanisms are attached to the wall. Plywood is screwed to the bottom of the tabletop (parallel to the wall surface). In this case, a distance of 350 mm is maintained from the side that will be fixed to the shelf. The piano hinge opens. The tabletop is placed on the corners. If the structure is smooth, then screw 4x16 screws into the 2 outer holes of the hinge. The folding furniture is ready for use. Finishing work are carried out taking into account personal preferences and financial capabilities. If desired, you can use the services of a professional designer.
- Product on a stationary frame
- Kitchen table "invisible"
- Folding table-cabinet
In modern Russian apartments The kitchen is often of such a size that it can barely fit 2 people. In such conditions, it is necessary to save free space. And the way out of the situation could be a folding table for the kitchen, made independently. If necessary, such furniture is removed into a special niche on the wall, and when unfolded, 6-8 people can fit behind it.
An indispensable solution for a kitchen with a small area is a folding table.
Making a kitchen table with your own hands is not difficult at all. Even a novice master can handle this work. But before starting work, it is necessary to draw up a competent drawing of the future product, indicating all the necessary dimensions.
Product on a stationary frame
For the little one folding table Only one frame support can be used.
Before you start assembling the folding table, you need to decide on the type of fastenings for the tabletop and legs. They depend on the dimensions of the future furniture. If you are going to make a small table, then you can get by with ordinary furniture hinges and 1 support. This piece of furniture can be used as an additional tabletop, which can be removed as soon as it is no longer needed. If you want to make a full-fledged dining or kitchen table, then it will need more reliable supports.
Preparing preliminary drawings similar design, you can take into account your sizes. But the assembly principle itself and the proportional ratio of the sides should remain the same. Otherwise, the furniture may become unstable.
Before making a folding table for the kitchen with your own hands, check the location of the existing ones in the room wall cabinets. The fact is that the basis of the tilting structure is a fairly large frame (90 * 147.5 cm). It is assembled from timber, whose thickness should not be less than 2 cm. Otherwise, the frame will not support the weight of the structure. Therefore, the wall cabinet should not interfere with folding or disassembling the table.

In order for the tabletop to be light enough and not sag under the weight of objects placed on it, it is additionally reinforced with a frame, which is fixed from below along the perimeter of the product. This element is assembled from timber with a cross-section of 5*2 cm. The tabletop itself is attached to the supporting frame using a regular piano hinge.
When assembling such kitchen tables, the greatest attention should be paid to the legs. IN in this case they are 2 bars (70.5 cm long and 4*4 cm in cross section). The supports are attached to the tabletop using the same hinges. To fix the legs in the unfolded state, use a standard folding steel strut or a straight special furniture tie. In this case, it is enough to place the clamp on only 1 leg.
When folded, these elements are held in place by vertical pins passed through drilled holes in the frame. But this same role can be taken on by an ordinary hook or furniture latch.
Return to contents
Kitchen table "invisible"
Drawing of a folding table “invisible”.
The disadvantage of the previous model is that the external frame mounted on the wall will always be visible. But you can make a kitchen table with your own hands so that when assembled it will resemble a decorative panel.
When folded, the legs of the furniture are retracted behind the tabletop, leaving it visible inner side, painted or covered with finishing plastic. To assemble such a table, you need to prepare 4 main parts:
- wall fixing frame;
- table top;
- supports – 2 pcs.
The table is attached to the wall using piano hinges. But this model has 1 significant drawback. The countertop area cannot be made large, otherwise the structure will not support the weight. Therefore, such a table can only serve as an additional work surface. And you can fix it at any convenient height. Usually it is mounted at a distance of 70-80 cm from the floor.
But to make something like this kitchen table it will take a little more time. Since it is necessary to form grooves in the frame boards into which the holding rod fits. It is attached to the tabletop at one end and has a diameter of 25 mm. For this model, it makes more sense to provide not folding legs, but a V-shaped support, which is supported by a strut in the folded position.
In this case, the fixing wall frame must be thick enough. Then, when folded, the support will “hide” between the wall and the tabletop.
We have proven more than once that making something original and beautiful table everyone can. Just look at Coffee table made from scraps of boards, or on a table consisting of shelves and a tabletop, and even from a wooden reel, you can also make a small table. But today we will not stop there and praise already completed projects, we'll go ahead and do DIY folding table.
Cutting boards for the base
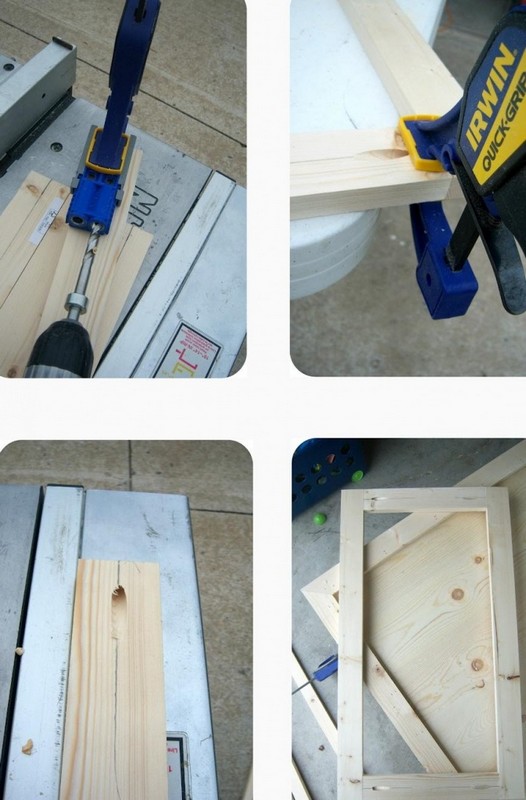
Let's do hanging box for the table. To do this, take 2 boards 2.5 cm thick and 20 cm wide and 130 cm long. Cut two boards of similar length and width to a length of 76 cm. Stepping back 1 cm from the edge, we make three holes into which we will screw screws and connect boards. But before twisting the boards, you need to apply glue to the ends.
We twist the base for the table
As you can see, in addition to the main hole for the screw, we slightly deepen and widen the hole for its head. This way the head can be easily sunk into the middle of the board. We twist all the boards in a circle and get a rectangle that will hang on the wall.

Forming a hinged lid
By using circular saw we cut 4-5 boards (depending on their width) into lengths of 125 cm. We connect them together using the technique described in the process of building the bed. Before twisting the boards together, we also apply glue to the ends. Carefully sand both sides of the folding table top.

Door lock
The next step will be to install a door stop that can open 180 degrees and will fix the hinged table cover in a horizontal position. We try on the clamps with the lid closed and fasten them with screws.
The hinged lid will fit completely into the table box. To prevent it from falling inside, we will glue two stoppers from edged boards, left and right. In the photo they are sandwiched at the top. As soon as the glue glues them securely, cut off the rear protruding parts.

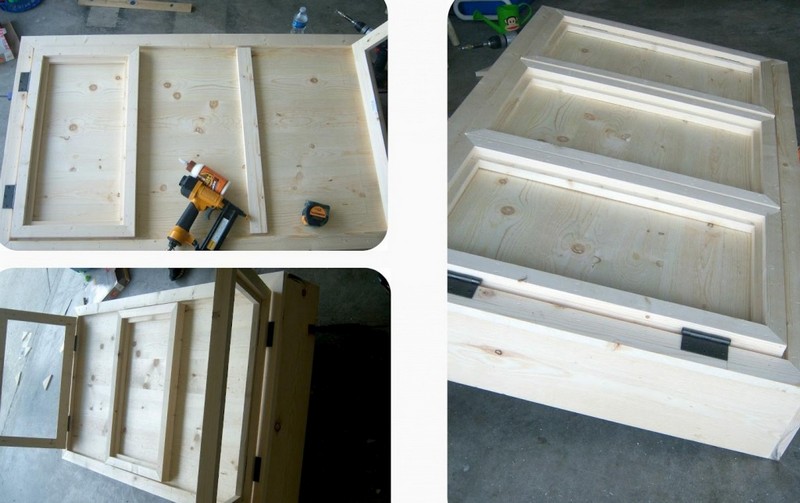
Hinged lid frame
To play beautifully closed lid, take a board 5 cm wide and cut the corners at 45 degrees, having previously measured the dimensions of the box. We nail the 4 cut boards to the hinged lid.

Folding table legs
From boards 5 cm wide and 2.5 cm high, cut out 4 boards. We measure inner size hinged lid, which is framed and cut 2 boards to these dimensions. We cut two more boards of the frame to 40 cm in length. By analogy, we make another frame for the other side.
We screw our frame legs to the frame of the hinged lid, and in the middle we nail a decorative analogue, frames.
Screw it to the wall
It is very important to choose correct height for mounting this folding table. It must strictly correspond to the height of the legs. Once you have screwed the table to the wall, check that it is installed correctly, open and unfold it.

Ready table
The internal organization can be absolutely anything. And the sizes of the compartments can also be different, so see details on this issue we won't stop. Our façade is painted with black paint, but inside there is an untouched pattern of the wood structure. This table will help you properly organize the space in the children's room and will save a lot of space, as well as delight high level functionality.

Interesting video.
A great idea for a folding table that is easy to implement on your own


