There are several ways to complete this part of the job.
You can use beads instead of knots. This will make it easy to adjust the shape of the pot, although it will be a shame if your pot just fits the pot without adjustment.
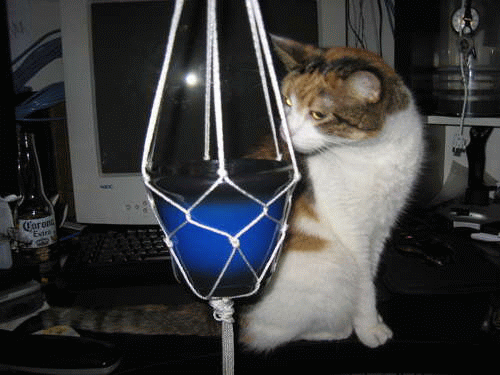
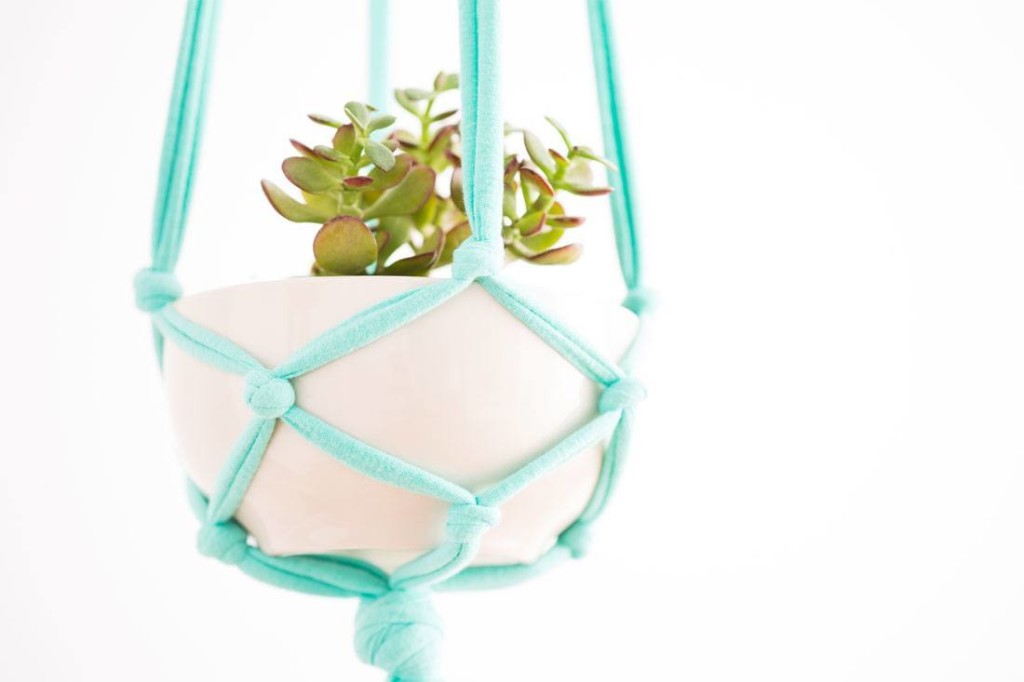
You can also use knots for weaving. Of course, they will quite limit you in adjusting the size of the pots. However this the best option to make weaving beautiful shape and the most pleasant outlines.
Also, not every node can be used. Let's call it the “golden mean”.
Now let's move on to the theory of weaving.
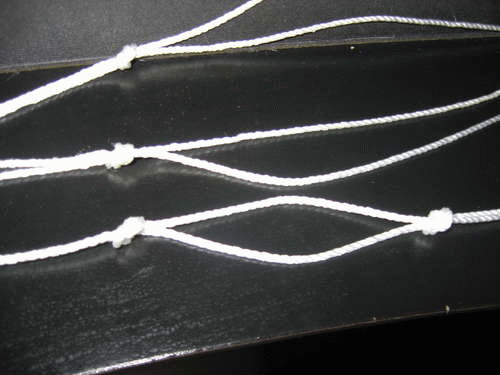
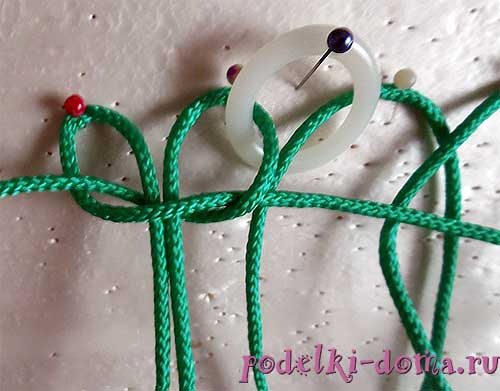
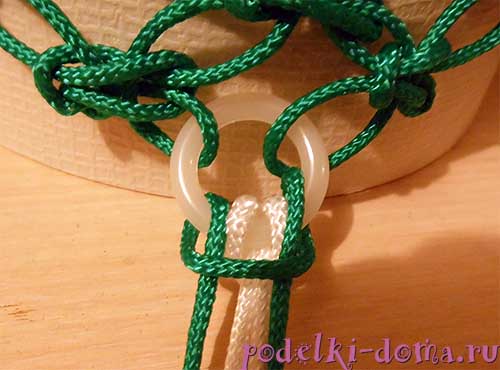
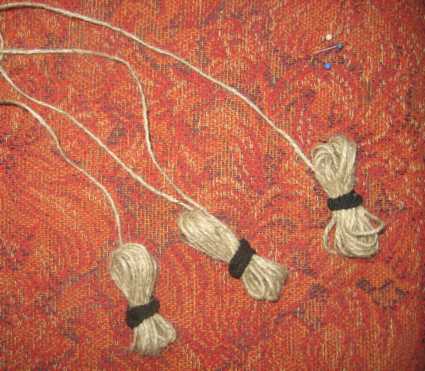
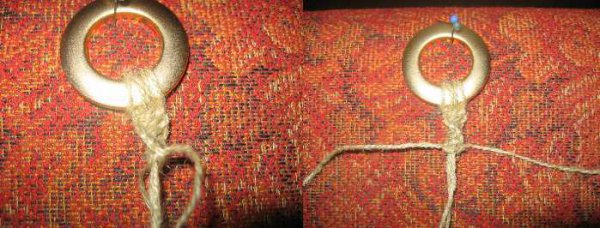
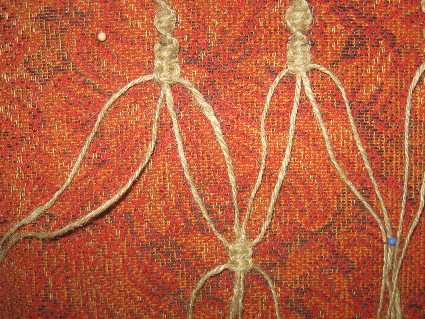
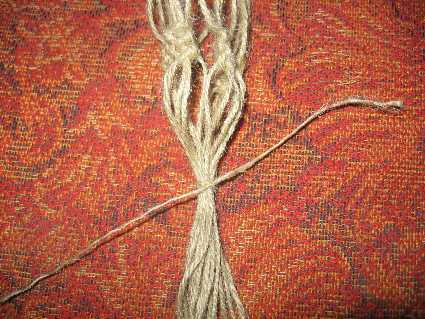
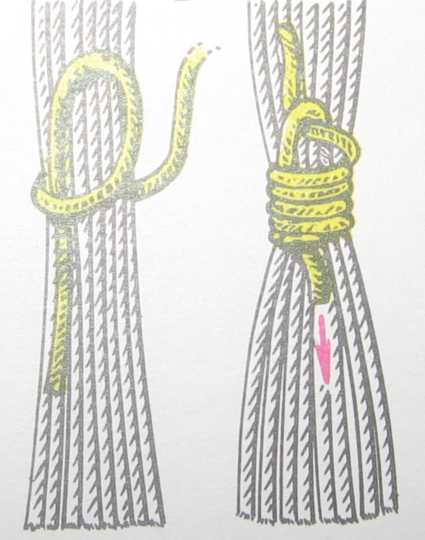
Divide your warp threads into two parts: even - to the right of the ring, odd - to the left, to maintain the balance of the warp (photo 1).
Ring:
1 | | 2
3 | | 4
5 | | 6
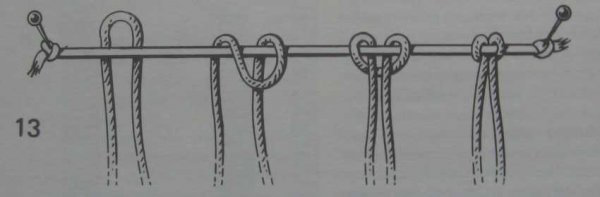
You will now work around an imaginary basket, starting with thread number 1. The most easy way performing weaving (without using clothespins and clamps) is as follows:
1. Mark all levels of weaving on the first warp thread, that is, tie knots, distributing the entire thread into several levels.
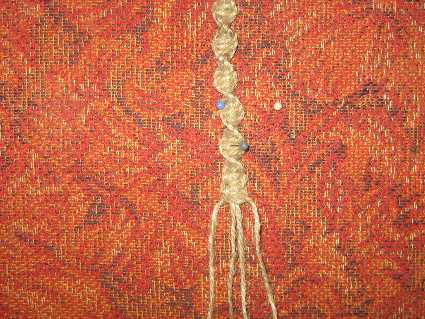
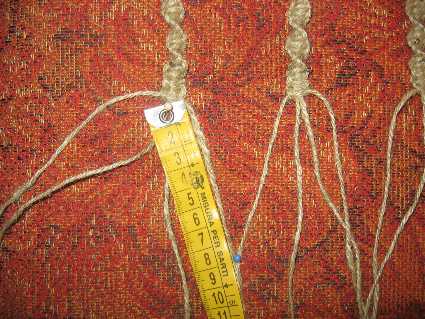
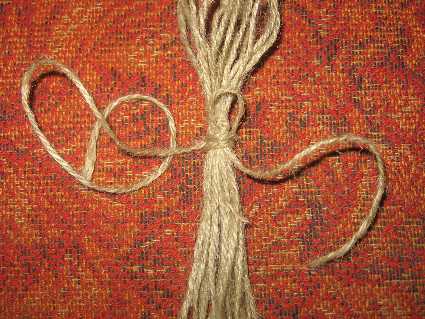
2. The distance between the levels can be any; the greater the distance, the larger the diameter of the pot that will fit in the finished flowerpot (photo 3+4).
If you first make a longer distance between the levels, and then gradually reduce it, moving towards the bottom of the product, the flowerpot will take a cone-shaped shape.
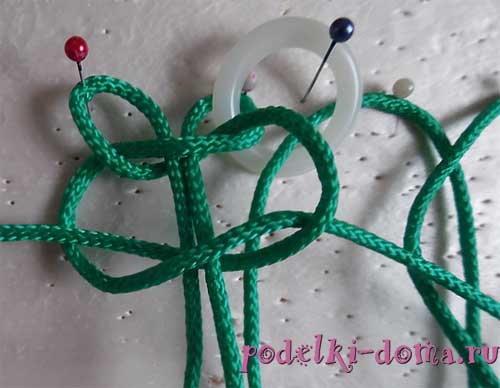
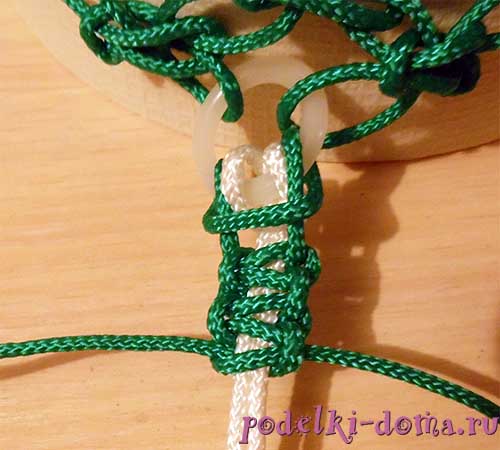
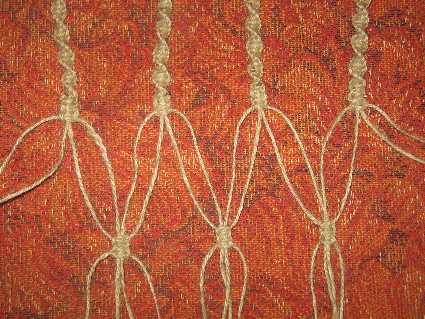
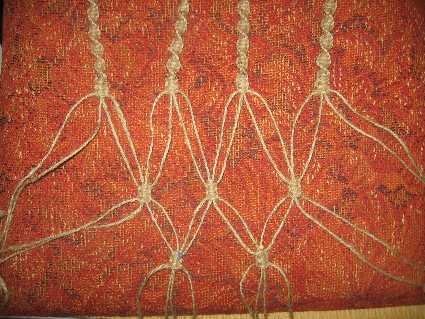
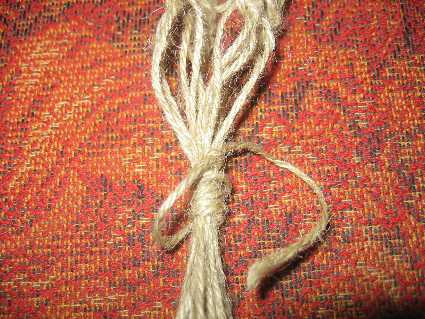
3. At this point, you already have the first level of weaving on all warp threads, consisting of “lower” knots. Now proceed to the next level, intertwining the ends of adjacent threads (see photos 5-7).
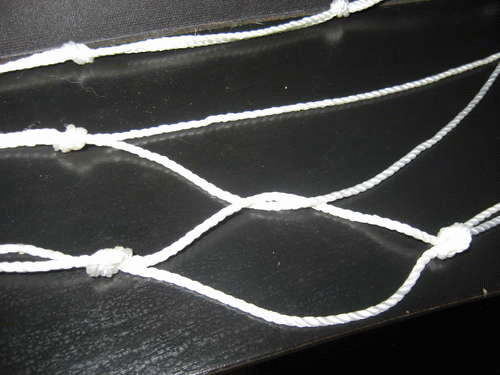
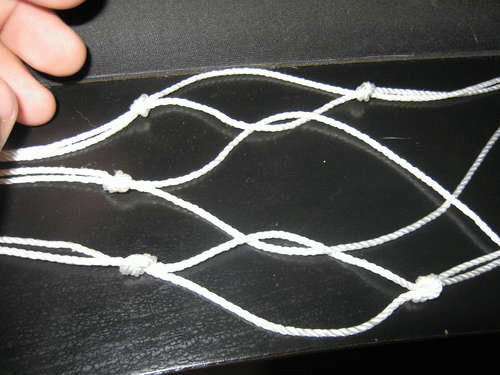
You can either make nodes, labeling each new level or use beads, clips, or any other method to secure the weaving.
4. Securing each new site, weave further.
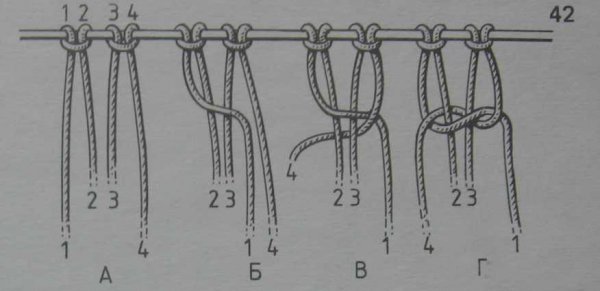
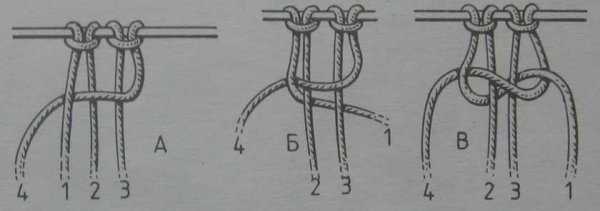
The diagram (weaving pattern) is presented below. Remember that each warp thread has two ends. Therefore, in the diagram, the threads are designated by serial numbers, and their ends by the letters A (left) and B (right).
1 3 5 6 4 2
AB AB AB AB AB AB "First level, nodes"
AB AB AB AB AB AB "second level, nodes"
(2b)A BA BA BA BA BA B (1a) "braiding"
AB AB AB AB AB AB "last level, nodes"
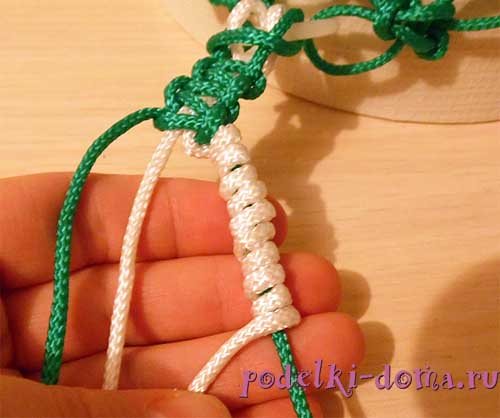
Step 6: Tie a Knot
You have woven the last section and are now ready to place the plant pot.
1. First, place the empty pot in the woven planter and determine how it will ultimately be positioned there.
2. Now take the pot out of your “braid” and tie all the loose ends of the warp threads into one knot at the level where the bottom of the pot will be.
3. Keep the knot loose until you have finally installed the plant pot. If your pot is small, leave the knot loose enough so that later, when the plant grows, you can replace the pot with a larger one and adjust the pot to fit the new container.

4. Place the pot back in the planter to see if it fits well enough.
5. You may need to make some changes and touch up the plant pot, depending on how well all the weave sections are formed. In any case, don't worry too much; after all, the plant doesn't care about the aesthetics of the basket in which it hangs. The plant would rather be shocked by the fact that it is not in the ground, but dangles much higher than it.
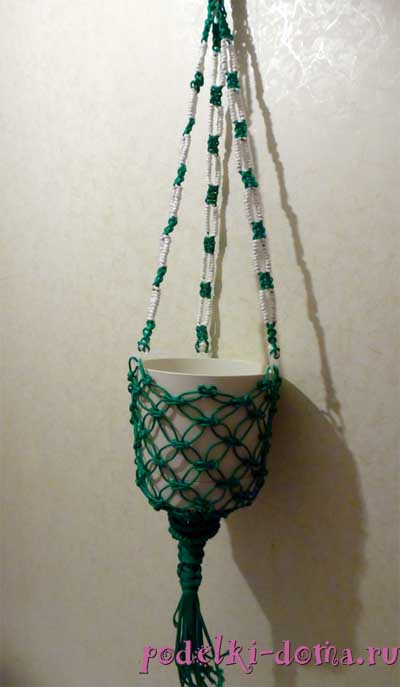
So, jokes aside, I hope that some of you found my project from the “Very Skillful Hands” series useful or just thought it was a fun idea for a rainy day, or at least agree that a homemade planter would be great for “anyone.” something" as a gift.
Good luck to you too with your projects. I would be grateful to everyone for constructive criticism and useful additions to my project. You can also use my experiment as the basis for your own version of Very Skillful Hands. I think next time I'll experiment with the number of warp threads and the placement of the knots on the planter.
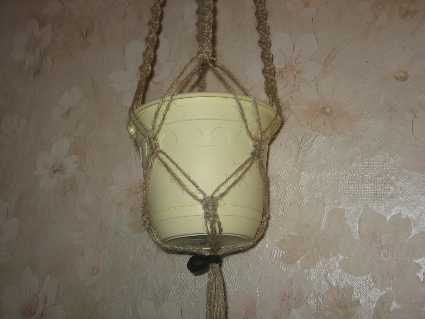
How to diversify the interior of a country house or a private house without spending a large amount of money? Great solution Flower pots made using the macrame technique will become such a problem. Creating such pendants with your own hands will not take you much time, but they will definitely add charm to the room. rustic style. Macrame pots can also be used in modern apartments, replacing plastic or clay pots with a small round aquarium made of clear glass, you can place a bouquet of wildflowers there. It will take very little time and materials to make such a decorative and very functional item.
The nuances of making a macrame pot
So that the flowerpot woven using the macrame technique will serve you long years, and making it brought you a lot of pleasure, you need to familiarize yourself with some of the nuances. They concern not only the choice of threads, but also the use of other materials in the weaving process.
Tips for making flowerpots using the macrame technique:
- Flower pots can handle quite a lot of stress, so the threads you choose to make them must be very durable;
- It is most convenient to hang the finished flowerpot not by a woven loop, but by a metal carabiner; in this case, the risk of fraying the threads is significantly reduced;
- The choice of thread thickness directly depends on the weight of the pot for indoor plants: the heavier the vessel, the thicker the thread should be;
- If you want to knit a flowerpot for clay pot, to measure the size of the product, it is better to use a plastic analogue of the same volume, otherwise you risk breaking the pottery;
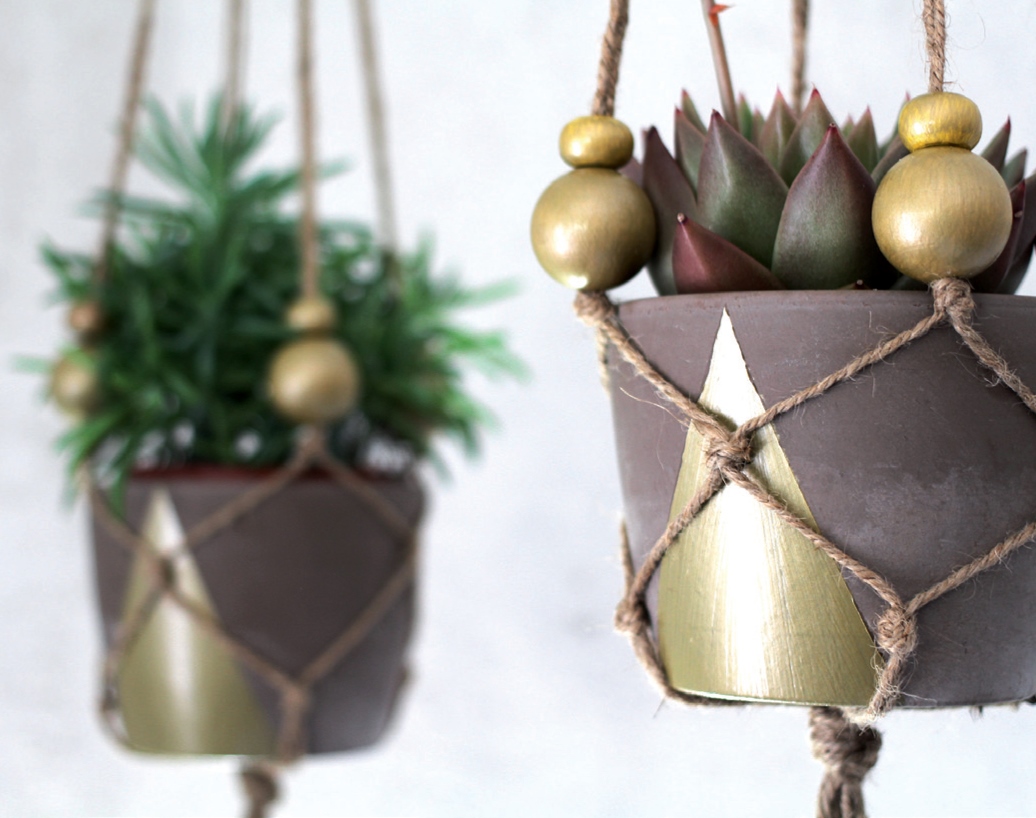
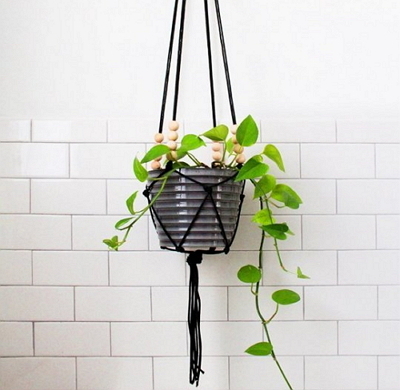
- To decorate macrame pots, you can use multi-colored large beads, fringe or fluffy tassels.
- The shade of the threads must be chosen in accordance with the color of the interior and the flower pot itself.
These tips will allow you to make a stylish and high-quality product in a short time, which will greatly facilitate the design of the interior of the room. The most important advantage of wicker flowerpots is that you don’t have to free up space on the windowsill for the pots placed in them.
DIY macrame flower pot patterns: tools and materials
Before you start knitting a pot, you need to purchase some materials. One of the advantages of the macrame technique is that the main components of such products are threads, which are relatively inexpensive.
A win-win option for pots would be thick threads of white or beige colour, they are suitable for absolutely any interior. Also, a hanging stand for pots, woven from cords with a gradient transition of shades, will look unusual.
In addition to threads, in order to weave a flowerpot, you will need a number of tools and accessories, some of which you can make yourself or find at home.

Materials and tools for weaving a simple flowerpot:
- Thick threads - approximately 40 meters;
- Tailor's pins;
- A special pillow or any homemade device for pinning the product;
- A ring on which all the weaving of the flower pots will be lined up;
- Rubber bands for money;
- Flower pot;
- Scissors;
- Soldering iron or lighter.
Instead of a macrame pillow, you can take an old chair seat from soft upholstery or sew similar design on a rigid basis independently. Eyelets for curtains, metal key rings, or any other fittings of a suitable shape and size can be used as a ring for a flowerpot.
Weaving patterns for macrame pots for beginners: learning to knit knots
Today we will look at how to weave a simple flower pot. To make it you will need the skill of weaving only two knots.
We weave knots for flowerpots in stages:
- The left-hand flat knot is quite simple: take 4 threads and mentally number them from left to right. Throw 1 thread over the 2nd and 3rd threads, place the 4th thread on the part of the first one located on the right side and thread it under the 3rd and 2nd threads, and then thread it through the loop formed from the first thread, pull the ends 1 and 4 threads in different sides, tightening the knot.
- A square knot must be knitted by alternating a left-sided and right-sided flat knot on 4 threads. A right-handed flat knot is tied in the same way as a left-handed one, but the threads must be numbered from right to left.
Before you start weaving flowerpots, novice craftswomen need to take lessons from more experienced needlewomen, or practice weaving posts from square and flat knots independently, based on the description we provide. To better see all the mistakes made in the process of knitting knots, use a thick, light-colored cord.
Patterns for weaving pots for macrame flowers
You can knit flowerpots using the macrame technique based on the pattern or detailed master class. It is more convenient for beginners to work with detailed description, and for professionals a clear image of the product will be enough.
Thematic magazines present a huge number of different patterns for weaving flowerpots, but often they are not accompanied detailed description work process.
If you have mastered the skill of weaving the knots described above, then it will take you no more than two days to make a flowerpot for a pot of any size.
Master class on making flowerpots step by step:
- Cut 8 six-meter lengths from a skein of thread.
- Attach them to the ring To do this, fold each thread in half, place it under the ring so that the resulting loop looks out of the eyelet hole and pull the two free ends through this loop. Do this operation with all threads.
- To prevent them from getting tangled, the loose ends can be rolled into balls (each thread separately) and tightened with money rubber bands.
- Divide the threads into groups, each of which will have 4 cords.
- Take the first 4 threads and weave them into a 50 cm column of flat left-handed nodes. During the knitting process, the column will twist, acquiring a beautiful weave.
- Weave 50 cm columns from the remaining three groups of threads. These will be the handles of the pots.
- Now you need to make some kind of jumpers under each handle. To do this, weave a column of two square knots under each handle.
- From the first handle, separate threads 3 and 4 on the left, and from the second handle, take threads 1 and 2. Measure 8 cm down from the jumper on each of these threads and tie them into a column of three square knots.
- Take threads 3 and 4 from the second handle and 1 and 2 from the third, measure 8 cm down and tie a column of three square knots.
- Take threads 3 and 4 from the third handle and 1 and 2 from the fourth, tie a column of square knots using the same principle as for the other handles.
- Now connect 3 and 4 threads from the fourth handle and 1 and 2 from the first handle into a column of square knots.
- Mentally number the columns.
- Take threads 3 and 4 from the first column and 1 and 2 from the second, measure down the thread from the column 6 cm and tie the threads in a combination of 3 square knots.
- From the second column take 3 and 4 threads, and from the third 1 and 2 and, as in the previous paragraph, tie them into three square knots.
- Now we separate threads 3 and 4 from the third column and 1 and 2 from the fourth and tie 4 square knots from them.
- We take the remaining free threads from the first and fourth columns, also measure down 6 cm, and connect the fabric, tying them into 3 square knots.
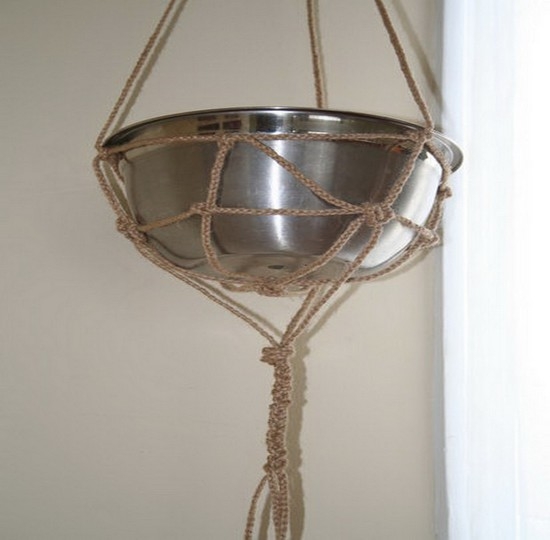
- Place the pot inside the planter and decide where the final braid will be.
- Tie the threads tightly together with a strong cord.
- Take a 50 cm thread, fold it in half, attach it to the braiding area with the loop facing up and wrap it around one of the ends, carefully placing the turns one under the other. Pull the end of the working thread into the loop and shade it with the auxiliary thread. Cut off the protruding ends.
- Trim the ends of the pots and decorate them with knots or beads.
This flowerpot, although woven quite simply, looks interesting and stylish. Having spent very little time, effort and money, you will receive an exclusive accessory for your home.
Macrame weaving for beginners: flowerpots (video lessons)
If you wish, you can weave a flowerpot similar to the one we described. wall panel or a curtain for the door. Don't be afraid to use your imagination, and needlework will bring you a lot of pleasure.
Many craftswomen ennoble their nest with handmade crafts. Everyone loves comfort and peace in the home, when visiting. Therefore, macrame flower pots can help enrich your interior for the better.
As you know, the macrame style is quite common among DIY crafts, so it will be easy and simple for you to create your own small masterpiece without leaving home and having a little patience and time.
Not every person has the size of his home to accommodate hanging pot, or a bulky craft. But there are many alternative ways out of the current situation with a small workspace in your living space. In the photo below you can see a compact and beautiful macrame flower pot. 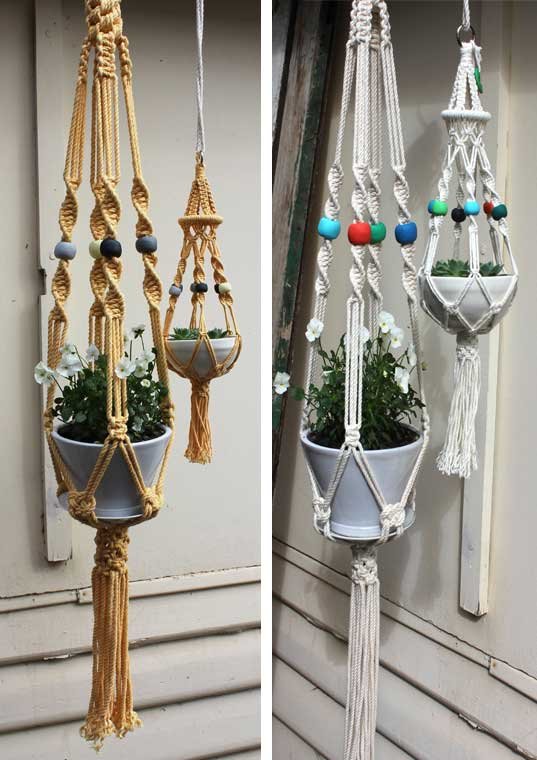 The threads for your craft can be extended. Depending on how long the craft you need. The easiest way to connect is a material that melts. If your threads are not so flexible, you can tie them.
What the material will be is your choice. It all depends on your desire and imagination. Of course, it’s good if it is not easily soiled and durable. This will improve its performance. The material must be pliable. If you want to get a clear pattern, you must weave the pots tightly enough. But basically, the future of macrame flower pots is entirely your choice.
You will need:
- Material - threads, approximately 20 - 25 meters.
- Scissors
- Working surface
- Pins or paper fasteners
As you know, one of the most common knots is the double flat knot. It is not only simple to make, but also beautiful. It consists of two simple nodes - a right-hand one and a left-hand one. Schemes for making such knots will not be difficult for a beginning craftswoman.
Today, macrame is often used to decorate rooms and give them a more formal look.
Initially, macrame was called knot weaving. And only in the last century they began to call it the capacious word “macrame”.
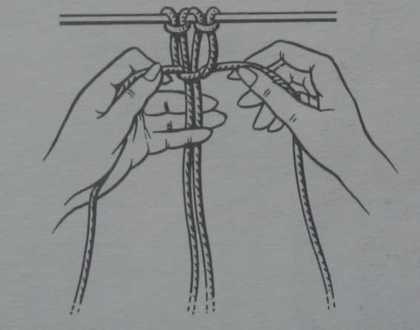
Step #1
We attach the threads to the support. They must have 4 ends.
Step #2
We place the right thread on top of the left one, which in turn is located across the warp.
Step #3
We form a loop from the left thread.
Step #4
We pull the end of the right thread under the warp. We pull it into the loop from the left thread.
Step #5
Slowly pull the outer threads and you get a knot.
Step #6
In order to weave a right-handed knot, we perform these operations in reverse.
Step #7
By tying these knots we get a double flat knot.
Step #8
Thus, by continuing weaving you get a support tape for the flower pots.
Step #9
When the support tape is ready, take it as a base for the pot. How to knit a pot will be clearer if you have a pot on hand. This will make it easier for you to figure out what size your macrame pots will be.
Step #10
There are many knots in the macrame technique. It will be useful to study the instructions for making some of them. For example, the “Josephine” knot will help continue the craft.
Step #11
When you decide on the choice of the knot you need for your craft, tie it around the pot. Secure your product under the bottom with a tight knot flower pot.
Step #12
If you still have thread left, trim it with scissors and possibly fluff it up. 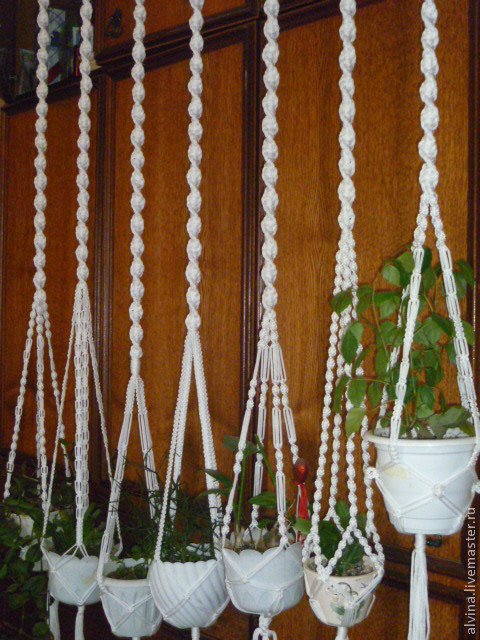
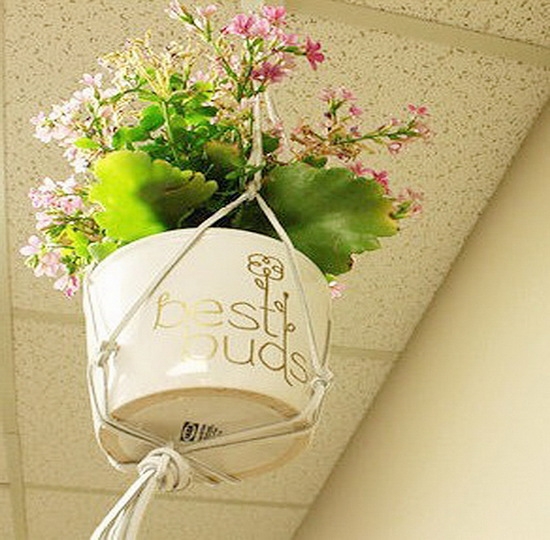
Flowerpots are common as interesting detail interior It can serve as an unusual decoration.
To make such a decorative craft with your own hands, you will need:
- White cord
- Glass vase
- Scissors
- Scotch
- Artificial daisies
Instructions for making flowerpots
Step 1
We collect 8 threads and bend them in the middle.
Step 2
We wrap them with another thread and secure them.
Step 3
We cut the thread with which we wrapped the assembled cords.
Step 4
We divide the bundle of threads into 4 groups, each bundle has 4 threads.
Step 5
We weave with a double-sided knot.
Step 6
Tie the ends of the thread, trim and secure with a lighter. It is possible to decorate the ends with a brush.
Secure the vase into your new planter and place decorative daisies inside the vase.
What is a pot? This is a decorative container in which a pot of flowers is placed. This way you can hang the plant and at the same time decorate the pot. You can make your own macrame flower pots. It will help to figure out how to do this step-by-step instruction.

Let's start simple
What you will need:
- 3 strands of 4 m of white cord;
- 3 threads of 4 m and 18 of 4 m green cord;
- 3 small rings;
- 1 large ring for fastening;
- Pins;
- Scissors;
- Flower pot.
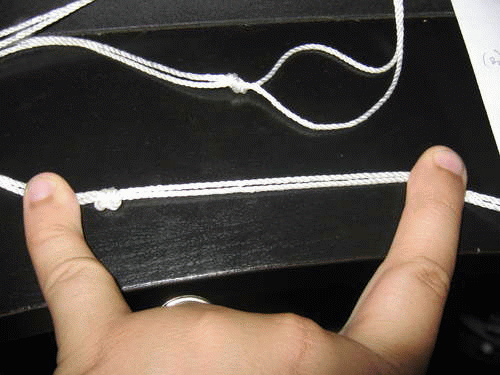
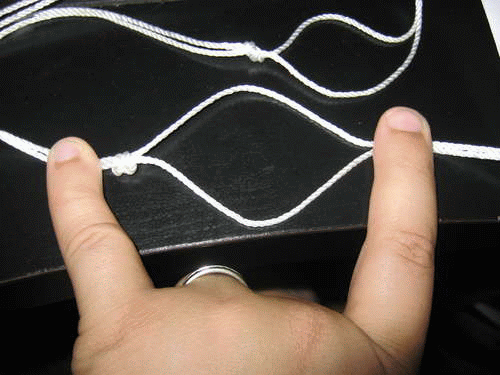
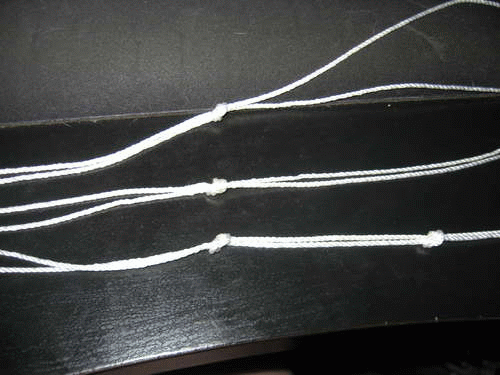
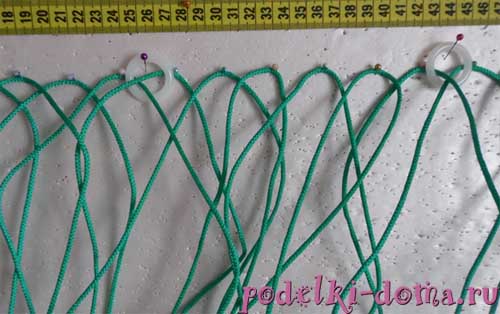
You need a flat surface 60x60 cm for weaving. Fold 18 pieces in half and attach with pins to the surface, every 3 cm. Secure the rings in 3 places, as in the photo.
Weave a double flat knot.
Tighten the loose ends. Also weave knots on other ropes. Then place the nodes in a checkerboard pattern. Leave the outer two ropes free.
Remove the pins and wrap the pot with the blank. Continue weaving in reverse order to complete the rows. Weave flat double knots more tightly at the bottom of the pot, the ends of the segments should be closer to each other.
Bringing the knots closer, tie several rows with grosgrain knots. Gather the loose ends and weave several double flat knots, one after the other.

Fasten the pieces and trim the ends. Tie 4 meters of white and green ropes onto the rings.
Tie 3-4 double flat knots from the green pieces.
Take the white ropes and evenly wrap them around the green ones.
Again weave 3-4 knots in a row. Alternating these methods, bring the handles to the desired length. Connect and attach them to a large ring. The excess should be cut off. The flowerpot is ready.
Second option
Other designs for macrame pots are discussed here.
Cut 8 threads of 5 m each. Fold so that one end is 3.5 m and the other 1.5. Attach to the ring. To do this, you need to fold the thread, place it under the ring with the loop facing up, bend it forward, thread it through the ring and tighten it.
Fold another thread, first 1.5 meters, and then 3.5 m. Attach it in the same way as the previous one. The result will be the following order: 3.5 – 1.5, – 1.5 – 3.5. To make it easier to weave, wind the ends and secure with an elastic band. From the edge, 3.5 separately, one and a half together.
Secure the ring to the pillow with needles. Now we need to weave the arms. For knitting, use a left flat knot.
Threads 3.5 are working, one and a half are knotted.
Tie knots one under the other. They will begin to turn, do not interfere with them in this. When the cord unfolds edgewise, tighten it as in the photo.
Weave 50 cm in this way and secure using a right flat knot.
Weave: right - left - right knots. One pen is ready.
Weave 3 more pieces in the same way. Now it's the basket's turn. Make it from flat knots in groups. A group consists of left, right, left, right and left nodes. You can call them a jumper.
Place the laces at a distance of 4-5 cm.
![]()
Measure 8 cm from the lace to the jumper.
Prick this place with a needle and weave a jumper.
So 2 more things.
Now measure 6 cm, secure and weave the first and second jumpers.
Attention! Connect the workpiece panel. Maintain a distance of 8 cm and weave over the canopy, completing the circle. Then 2 jumpers of the second circle with a distance of 6 cm.
Try on the pot and use a rubber band to mark where to make the braid.
Separate the threads and tie one thin one at the place of the braid.
Cut 50 cm of thread. Fold one end 10 cm and the other 40 cm. Place it to the bun, loop up. Wrap the bundle with a long thread, from bottom to top.
Make 6-8 turns. Thread the long end into the loop and tighten.
The plexus must be inside. Trim the ends.
That's all. Ready.
Video on the topic of the article
Here you can watch a master class on how to knit flowerpots using the macrame technique.
Many people have probably heard about the macrame weaving technique. Original things are created from threads, iron rods, plastic tapes, fabrics. Macrame is based on weaving with knots. Various types knots allow you to create decorative items of indescribable beauty. Many needlewomen make flower pots. Such suspended structures They allow you not only to free up space in the room, but also to decorate it in accordance with designer innovations. Do you also want to do macrame?
A flower pot would be a great trial piece. But first, you definitely need to master the basics of this art.
Macrame for beginners: DIY flower pots
Before you start weaving a flower pot for a vase or flower pot, you need to familiarize yourself with a number of features of this technique. Experienced needlewomen, as well as those for whom macrame has become a favorite hobby, are happy to share their advice with novice craftswomen:
- for weaving you need to use only strong threads, for example, twine;
- to secure the flowerpot you will need a carabiner;
- to measure the width of the weave, you can use any metal utensils required diameter, otherwise you risk breaking the flowerpot;
- calculate the load correctly; it is better not to place a flowerpot that is too heavy in a flower pot;
- there is no need to use glue or tape for fixation; all fixing elements are made in the form of knots;
- Before you start weaving flowerpots, familiarize yourself with the technique of making knots;
- For decoration you can use metal rings and fringed fabrics.
Flowerpots woven in macrame style will decorate any interior. You can not only free up space on the windowsill, but also place flowers according to your preferences. You can attach flowerpots to cornices, special hooks in the ceiling, or shelves. It all depends on the size of the pot and its weight.
In this article we want to present some of the best master classes on weaving flower pots for macrame flowers. You can find weaving patterns in any manual on the macrame technique. The main thing is that you must master the methods of tying knots and braids, otherwise even weaving the simplest flowerpot will not be possible.
Simple flower pendant in macrame style
Before you start weaving flower pots, be sure to purchase strong twine; it should not crumble. We will also need any adhesive tape for temporary fixation of weaving in order to correctly calculate the diameter of the flowerpot.
Necessary materials:
- twine thread - 50 m;
- scissors;
- flowerpot;
- adhesive tape.
Step-by-step description of the process:
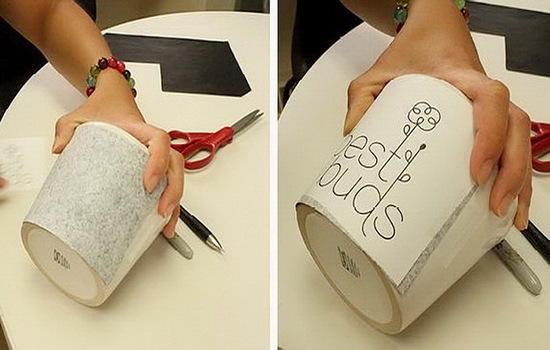
If you want to make a simple, not too elaborate flowerpot, then making a few knots will be enough. So the woven threads will not cover the entire area of the flower pot. You can decorate the front walls of the flowerpot with applique.
Necessary materials:
- metal rings;
- copy paper;
- hook;
- drawing for applique;
- cord (suede or harness);
- golden or other colored marker;
- flowerpot
Step-by-step description of the process: