I want to make my home beautiful and original. The most reliable way is unique homemade jewelry. One of the very interesting ways is a bas-relief on the wall. This is a three-dimensional image sculpted from plaster or any other similar material. Gypsum in its pure form is used very rarely - it hardens too quickly, not allowing time for processing. Most often, gypsum plaster mixtures are used. They come with additives that make the job easier. With them, you can make a three-dimensional wall panel with your own hands, even without experience.
General technology for creating bas-relief
To make a bas-relief on a wall, you must first prepare it: clean it, level it. You can start working on a flat and completely dry surface. When you are planning to make large bas-reliefs, it is advisable to prime the wall - for better adhesion of the composition to the wall.
The bas-relief on the wall can be of varying degrees of complexity. This one is difficult. It's clearly too much for beginners. But you know what can be done in the future
For the first experience, it is better to start with small products - such as medallions (round or square) with simple relief images. As a basis for such products, it is best to take moisture resistant. You can make a frame under it (from a profile, for example). In this form, the volumetric composition can be moved from place to place. This makes it easier to master the basics of technology.

This is all technology in general terms. There are nuances that are worth dwelling on separately. The first concerns the application of a starting layer of putty on the walls and transfer of the design. In more complex compositions, the bas-relief on the wall begins with transferring the contours of the design. This is done with a pencil or chalk (if you know how to draw) or with the help of an image printed in the required size and a carbon copy placed on it. Then we cover the places where we will apply putty with primer (for better adhesion), and then using palette knives (small spatulas of different shapes) we apply the first layer of material. The further sequence of actions is similar to that described.
Materials for creating a bas-relief
The most common question among beginners is: what putty is best to use for making bas-relief? In principle, any finishing gypsum putty will do. Each master has his own favorite brands and compositions. Here are a few to recommend:
- Knauf Uniflot. Very durable and flexible. It can be used to form a deep relief - it will not fall off even without reinforcement. Disadvantage: expensive.
- Fugen. A little less durable, a little worse to cut. Much cheaper than Knauf Uniflot (almost three times). You can also make a relief without any problems.
- PUFAS. This is a gypsum putty with cellulose fiber. Processing time is about 60 minutes, applied in a layer of any thickness, cuts well, and is easy to sand.
- “Rotband” for the lower layers and “Shitrock” for the upper ones.
- "Akryl Putz" (Poland). Ready-made acrylic putty. It is good because it “sets” slowly; it takes an hour or more to work on the details (depending on the humidity in the room).
In addition, impregnations are required. They are selected based on the starting characteristics of the material. There are compounds that strengthen crumbling materials, penetrating deeply and binding particles of materials to each other. This is necessary, since gypsum panels weigh a fair amount and create additional load. Without preliminary preparation, they can fall off from unstable foundations. You can use moisture-protective primer concentrate from PUFAS. It is suitable for all mineral substrates, including wood and wood-based panels. The moisture-proofing composition Aquastop is suitable for loose substrates.

In addition, the following compositions are used:
- before starting work - to improve adhesion to the wall (or base) material;
- for layer-by-layer processing - when creating a deep relief, when one layer of putty is applied to the already dried one applied earlier;
- for finishing impregnation before painting - to level out the absorbency and so that the paint lays evenly, emphasizing the relief, and not hiding it.
For layer-by-layer processing, primers are needed that create a sticky, rough surface on the surface. In this case, you can put a new layer of putty even on an already dried surface. Ceresit deep penetration primer and PUFAS impregnating primer are suitable for these purposes. They can also be used for finishing before painting.
Tools
Tools for creating a bas-relief are needed for two types of work - for applying putty and for removing/cutting off excess mortar. Therefore, the set of tools and devices is quite extensive. To apply putty or decorative paints use:

These are all the tools you may need. Necessary items: trowels, spatula, chisels. Palette knives are very convenient; it can be difficult without scalpels and a pastry syringe. But stacks are a tool for perfectionists - for precise modification of the relief.
Making a bas-relief from gypsum plaster: photo report
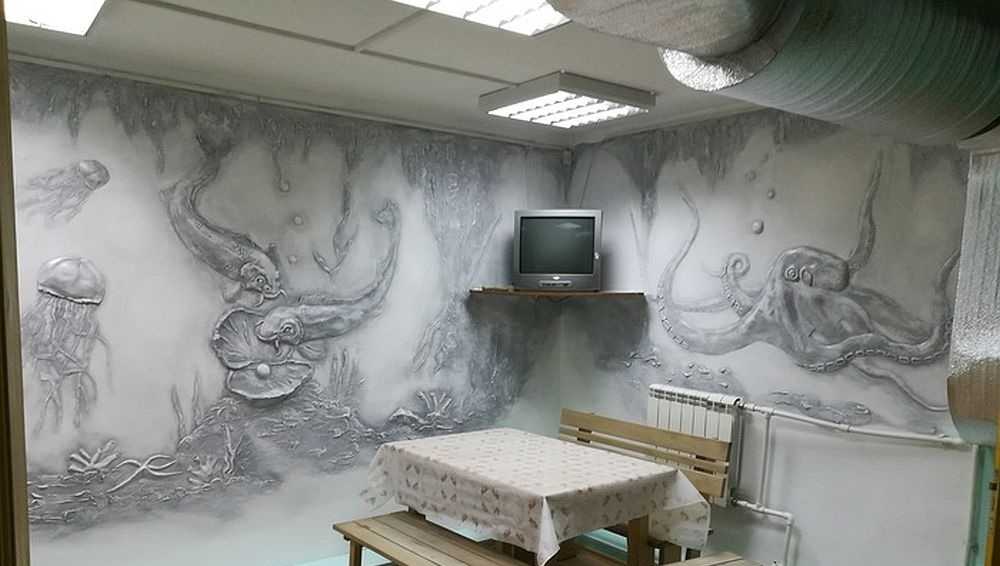
For the relief painting on the wall, a marine theme was chosen - with fish, octopus, algae. A great option for getting your first experience! A light pattern that can be formed gradually.

Preparatory work
The drawing is transferred with a pencil onto a previously leveled and primed surface. To make the bas-relief, gypsum plaster SHEETROCK (with finer grinding) is used. When diluting the solution, a smaller amount of water is added: take 0.5 liters of water per kilogram of mixture (instead of 0.6 as recommended). When mixed in this way, the composition turns out to be somewhat harsh, but this is the best one for making a relief image on the wall.

Immediately mix a small amount of the solution: gypsum plaster quickly loses its elasticity (15-17 minutes) and you need to have time to not only lay out the entire volume on the wall, but also level it and give it the desired shape. For the first time, knead 300-400 grams, lay it out, give it some shape. If during the process you feel that you can handle more volume, knead a larger quantity.

We spread the solution little by little with a palette knife, filling the contour of the algae, cutting off the excess, smoothing it out as much as possible
With this tactic - small portions of the solution - most of the time is spent on mixing the putty. It is better to knead in a container with high sides - a bucket or pan. However, the frozen solution is difficult to remove from them. If you have an old ball in the house, you can cut off the top and mix the putty in it. Even small particles can be easily removed from such a container.
Pour the powder into the container, add clean cold water, mix quickly with a spatula, then bring the mixture until smooth, leave for 5 minutes, then mix again. There should be a homogeneous thick paste without lumps or irregularities. The holding and “setting” time is indicated on the putty packaging; if you use a different composition, follow the manufacturer’s recommendations.
Formation of small parts
It's easier to start with shallow terrain to begin with. When forming small parts, take a small amount of mortar on a trowel and apply it to the desired location, trying to smear it well so that the adhesion of the mortar to the wall is good. If the wall is coated with a primer that improves adhesion (the surface is slightly rough and sticky to the touch), there will be no problems. If the parts are very small - such as jellyfish tentacles - it is more convenient to apply the solution with a palette knife.

Making a bas-relief of a jellyfish from plaster or acrylic putty is not much more difficult...
Having laid out the mixed portion of the mortar on the wall, we immediately begin leveling and forming the relief. We work with the tip of a trowel, palette knives, knives, chisels, scalpels - everything that is at hand and that can give the surface the desired shape. If during the process the part has already dried, but has not yet been finished, you can moisten it with a spray bottle and try to finish it after a few minutes. When you achieve the desired degree of perfection, clean the mixing container from the remaining solution and mix a new portion. Note: the container must be absolutely clean. The smallest particles will leave scratches.
Forming the main reliefs
When making a bas-relief that protrudes beyond the wall by no more than 2 cm, no reinforcing structures are required. For larger thicknesses, in those places where a layer thicker than 2 cm is planned, self-tapping screws are screwed in. You can use them to guide you when applying plaster, and they will support the solution, preventing it from slipping.

The fish and shell have a larger volume - in some places more than 2 cm. Here we screw in self-tapping screws for reinforcement
In this bas-relief, the most prominent parts are fish and a shell with a pearl. We screw screws into the places where the thick layer will be laid. We roll the pearl separately, molding it into a ball and placing it on a self-tapping screw.

The thickest place is the head
In places where the relief is supposed to be deep, you can apply the solution not at once, but in several layers. In this case, it is not at all necessary to smooth the layers. The more uneven the surface is, the easier it will be to apply the next layer. When the required volume has been achieved in a certain area (for example, the head of a fish), we begin work on small details - eyes, whiskers, gills, etc.
When working on small parts, mix no more than 100-200 grams of solution - while cutting, leveling, the solution sets, so large portions are simply not needed.

After the putty pattern on the wall is ready, it is left for a couple of days until completely dry. Then you can start sanding - take sandpaper with medium grain, process it, achieving the desired smoothness. When the relief is ready, we sand it with fine-grained sandpaper.

Two days or more, elements with deep relief can dry. Smaller ones - algae, waves, jellyfish - dry out faster. You can start with them. While you are polishing them, let the thicker parts dry as well. After sanding is completely finished, remove the dust with a thick brush. If desired, you can vacuum it. Next, we coat the decorative plaster panel with a deep penetration primer.
The last step in making a bas-relief on the wall is painting. Everyone chooses the coloring method for themselves. In this case, a regular water-based emulsion was used (the primer was for water-based paints). At this point, we can assume that you have made a bas-relief on the wall with your own hands. In this case, we got a large composition on two free adjacent walls.
One tip: bas-relief on the wall looks better with specially designed lighting. So before leveling the wall, bring out the ends. After you have leveled and primed the surface, install those lamps with the lamps that you will use to illuminate the relief picture in the future. It is in this light that you will need to sand the volumetric panel you made from the plaster mixture. Only in this case everything will look good. Because if the work is carried out under different lighting, when installing standard lamps you may find a “nightmare and horror”.
Bas-relief on the wall: photo ideas
Without experience, it is very difficult to understand what and how can be done using ordinary gypsum plaster. In fact, three-dimensional paintings made of plaster can be of a wide variety of themes, but the most common are flowers, trees and landscapes (urban, country). In this section we have collected a number of the most diverse bas-reliefs on the wall. With their help, you can come up with a theme for artistic modeling on the walls. In essence, the process is similar to working with plasticine. 


- Relief graphics are more often used by people who have artistic taste and are not afraid to improvise. This type of wall decoration is applied directly to fresh plaster. The procedure is carried out using special sticks pointed at the end. Moreover, the drawing must be created before the solution hardens. After this, the masterpiece is painted with colors as your imagination tells you;
- Modeling from decorative plaster allows you to create an imitation of a wall made of stone or brick. You can also reproduce complex objects such as the convex parts of people or animals. Sometimes entire works are created, as shown in the photo.
There are combined panels created from a decorative mixture. In this case, several application technologies are used. Such paintings are decorated not only with paints, but also with natural minerals.
Materials and tools
Decorative plaster is used to create a wall panel. To decorate it, special paints of various colors and shades are mainly used. In addition, depending on your imagination, you can use additional elements such as beads, pebbles of different sizes, seashells, ribbons, etc.
When starting work, first of all you should prepare all the necessary tools. This is a container for mixing the solution, spatulas of different sizes, rollers, paint, and tape. Depending on the method you choose to create the panels, you will also need stencils, wooden sticks, and glue.
.jpg)
Preparatory work
First, we select a place on the wall where the panel will be created. Here you need to make markings in advance. Before you begin creative work, you need to carefully inspect the wall and prepare it for the further process.
The base must be clean, smooth and without any defects. It is better to remove paint or old wallpaper that almost no longer sticks to the wall using a spatula or other sharp tool.
After this, a thin layer of primer can be applied to the cleaned surface using a spatula for this purpose. When the putty is completely dry, it is better to clean the problem areas with sandpaper. Now you need to treat the area intended for the panel with deep penetration primer for better adhesion of the materials used.
.jpg)
Creating a background for a panel
To create the main background of the future image, you can use Venetian plaster. It is prepared on an acrylic base with the addition of special additives. This mixture is intended for finishing interior walls.
Before treating a section of the wall, the Venetian should be given the desired shade using dye. Venetian plaster can be applied to a base of any material, as well as to old durable paint.
The solution must be applied with a spatula, and the layer height should be about 2 millimeters. For beginners it can be even more. The surface, in this case, should have tubercles and pits of different sizes. Such a surface can be made using a simple sponge. When the treated area has dried, it should be lightly sanded, after which we apply any decorative coating: gold, silver or mother-of-pearl. This coating is applied in a thin layer using a brush or plastic spatula.
.jpg)
Panel creation technique
In order to start creating an image on the wall, you need to prepare another type of decorative plaster that will create volume. Volumetric plaster must be elastic and contain sand. You also need to prepare a stencil or template with any pattern that matches this type of room.
We remove the protective layer from the stencil and apply the adhesive side to the location of the panel. Now we fill the stencil voids with a height of 2 mm to 4 mm with decorative plaster. After removing the stencil, you can add some elements to the image using various tools and devices. While the plaster has not yet hardened, you can add various additional decorations to the main design: buttons, beads, pieces of glass, small beautiful stones and other interesting objects. In this case, you need to work carefully so as not to spoil the overall appearance of the picture.
It is recommended to paint a decorative plaster panel with paints that are specified in the instructions for the plaster mixture used. The wall panel is painted with ordinary painting brushes. Some natural elements, such as stones, can also be painted if desired.
.jpg)
When decorating panels, you can also use pieces of fabric or leather, for example, for people’s clothing. It is worth noting that even thin leather in a wall panel made of decorative plaster looks a bit rough. Therefore, it is necessary to clean the skin well with the back of an ordinary kitchen knife, practically leaving only a thin layer of it.
When choosing a pattern for a decorative panel, you must take into account the interior of the room where it will be installed. The panel, the pattern of which matches the pattern on the curtains, pillowcases or cape, looks interesting. Such a panel decorates a wall that does not have any furniture or any other decor. In addition, it can visually change the size of the room.
Panels made of decorative plaster are becoming increasingly popular in wall decoration. All kinds of visual effects, the play of light and shadow, and the relief of the design can amazingly breathe new life into familiar walls. And the simplicity of the panels allows you to create real masterpieces with your own hands.
Selection of performance technique
To achieve a particular visual effect, various methods of wall processing are used. In works based on decorative plaster, there are three main techniques for making panels:
- Stencil panel. It is characterized by the greatest ease of use. It is enough to watch the master class once to reproduce the same thing yourself.
The painting is applied using pre-cut designs or stencils (examples can be seen in the photo). The technique is good for a repeating motif.
- Relief graphics. Creative people who love improvisation are keen on it. The master class demonstrates performance using ordinary wooden sticks on a fresh layer of plaster.
- Modeling. Can imitate brickwork and natural stone. Or it can be more complex convex figures depicting objects, animals, people and entire panoramic paintings (visible from the photo).

Materials and tools for panels
The main material will be decorative plaster and different colors. The most unexpected things can become additional ornaments, depending on your imagination:
- beads, colored glass and stones;
- corals and shells;
- ropes, ribbons, even small mirrors and other items.

The first tools you will need are the following:
- container in which the plaster mixture will be mixed;
- several spatulas of selected sizes;
- tape or paper adhesive tape;
- damp sponges for cleaning instruments.

Depending on the chosen panel technique, the following may also be useful:
- spray glue;
- rollers;
- pointed wooden sticks;
- acrylic paint;
- stencils and templates.

Preparing for work
Decorative plaster is good because it does not require special preparatory work. It is enough to clean the wall surface of old materials.

A primer is applied to a clean, dried wall (as shown in the video). It is necessary for the fastening of the material. In addition, the primer will prevent moisture from being absorbed from the layer of decorative plaster by the regular layer.
While the wall is drying, you can start preparing sketches of the selected design or stencils, and arrange all available materials in a convenient order in order to save time during the main work.

Making a panel with your own hands
There are three main steps to decorating a wall with panels:
- On a freshly applied plaster base, using wooden sticks, the desired design is drawn (freely or using a stencil). If the molding technique is used, the convex elements of the design are applied with a trowel or spatula. Thanks to the plasticity of the material, small details of the composition can be easily modeled with a palette knife and even with your hands.
- The bumps or depressions are created in several stages until the desired size is achieved. After the decorative plaster has dried completely, you can carefully trim the uneven surfaces. The curing time of the material varies from 9 to 36 hours.
- The dried drawing can be painted or varnished. Paints are applied with brushes, rollers or sponges.

As you can see, there is nothing difficult about making a panel with your own hands. Experts, conducting a master class, give some more advice to those who decide to try this type of wall decoration:
- It is advisable to apply the design in small areas, since the plaster dries out after 20 minutes.
- You can purchase special textured rollers to create a particular visual effect.
- Trowels and spatulas should be cleaned as often as possible (with a damp and dry cloth). Before each stage of applying the material, the tools must be smooth.
- If the drawing area covers only part of the wall, it is better to use masking tape or tape, which can be easily removed immediately after finishing the work. In this case, the edges of the panel will be smooth and neat, as in the photo.
- It is convenient to attach stencils with masking tape to avoid the patterns moving during their application.

There are various techniques for working with decorative plaster. Their list is constantly enriched with new secrets of mastery. As it gains popularity, various visual effects tools are released.
In September of this year, a young couple I knew invited me to do decorative plaster in their one-room apartment. In the room, using a small partition (made of pink-sand and blue glass blocks), a sleeping area was separated. It was this part of the room that caught my eye. On a wall of 5+ sq.m. a decorative panel suggested itself. But the guys were ready to live in the kitchen in spartan conditions for a maximum of a week. In addition, the price changed. Having agreed on a price and received an additional 3 days, I got to work.
After applying background plaster to all the walls of the room, a couple of days later I started working on the panel. And since my immediate plans were to open master classes on decorative plaster, I decided to photograph the whole process, like this - STEP BY STEP, it will be useful as visual material.
The theme was clearly chosen - flowers. The hostess's wishes: "some spring things: daffodils, lilies of the valley..." Her husband supported her. Well... Narcissists are narcissists.
Don’t judge the quality of the photo strictly, I took the photos myself - in the process of work, and even without good (for shooting) light.
Beginning - pencil sketch on paper

The iris is "forming"

I left the middle for later, when the petals dry out.

This is how scary a “newborn” flower looks

We continue to sculpt the shape. And here are some secrets: apply another layer on the dried layer, forming a sheet, and to smooth the surface, cover it with film and...

and gently stroke it with your fingers, trying to maintain its shape (after all, it has not frozen yet)

and so on every leaf...

then we remove the film in the same leisurely manner, stretching it parallel to the wall - in this case, the solution will not be pulled behind the film.

Another way to smooth the surface, and at the same time “texture” it, is with a brush with coarse bristles. But it also needs to be worked “gently”, smoothly moving along the curves of the form.

a spatula is one of the main decorative tools

using a palette knife to smooth out the edges and work out small details

another day of working with the form; I was especially bothered by the middle of the daffodils :)

the result of three days' work

draw leaves - a brush is also suitable for this purpose

here it is - a leaf :)

Well, that's almost all. All that remains is to dry and sand - to clean the feathers, in a word.

Sanding is important. This is what the shape looks like before sanding

and here is after. But that's not all. We need to add an invoice.

Here we have it invoiced.

another one - "unkempt"

that's another matter, isn't it?))

Well, my little ones, it’s time to paint!))

First, use a brush to paint all the deep places

using a small roller to help paint flatter parts

use a large roller to go over large surfaces

our panel became such an “albino” after painting)))

After the base layer has completely dried, we will develop the design in a darker color.

This is done like this: apply paint (second color) to a small area with a roller

After allowing the paint to set on the surface for a couple of minutes, we wipe it off with a damp, wrung-out cloth from the bulges, leaving it in the pits

This is what the panel looks like after the “washing” stage

The next stage is color painting. We try not to go beyond the contours of the form.

turned blue, poor fellow)))

We also wipe off the excess with a cloth.
October 29, 2016Specialization: master in the construction of plasterboard structures, finishing work and laying floor coverings. Installation of door and window units, finishing of facades, installation of electrical, plumbing and heating - I can give detailed advice on all types of work.
Today I will tell you how to make a picture on a wall from putty, and I will look at not one, but three ways to create unique compositions. We will look at the simplest options that almost anyone can implement; you don’t need to be a professional finisher or artist, just desire and a certain amount of time, since the process is not quick. But in the end you will get an original design that no one else has.

Work options

Let's look at the simplest methods of creating paintings on walls; if you get your hands on these technologies, you will be able to master more complex options; you should not immediately take on complex application techniques, since only a born artist can handle them right away; other people need practice.

Method No. 1 - working with a spatula

This option is suitable for creating three-dimensional images of various types. For beginners, I recommend choosing simple compositions - a tree branch, a flower or something like that.

First, let's look at what materials we will need when working.

| Material | Description |
| putty | This is the main working composition, which must meet the following requirements: long hardening time, plasticity and good adhesion, simplicity and ease of grinding. My favorite “Vetonit” meets all these parameters; the composition is very elastic, sands well and dries for a long time, allowing you to correct flaws. The average price of a bag weighing 25 kg is 420 rubles, but may vary in different regions |
| Primer | The base is treated with primer before finishing, and the result of the work is also secured with it in order to give the design strength and reliability. Deep penetration compositions are used on an acrylic basis; they are sold in the form of a ready-made solution and in the form of a concentrate, which must be diluted before use. |
| Paints | To make volumetric elements look more impressive and expressive, it is necessary to highlight them using coloring. Most often, several shades are used, it all depends on the pattern. You yourself must decide how to decorate the picture; the choice of paint depends on this; the easiest way is to use water-based compositions |

When working, I use the following set of tools:
- Spatulas, most often there are several of them, one wide (about 30 cm) and narrow ones - from 2 to 10 cm. Using these devices, the composition will be applied and a pattern will be formed. I advise you to purchase a set of automotive spatulas; they have a small width and a convenient configuration; I personally find it more convenient to work with them, especially when forming small elements of the composition;

- To create a certain relief and form the final contours of the painting, it is very convenient to use a special artist’s tool called a palette knife.

- This is a very small tool that resembles a trowel, but you can also buy a whole set that will contain palette knives of different configurations. I even apply the composition with this device, as it is convenient;

- To draw the contours of a painting on the wall, you can use a simple pencil - they make a sketch, which is then used to carry out the work. But if, like me, your artistic talent is not at a high level, then it is most convenient to use carbon paper to transfer images to the surface. This way you can accurately and quickly apply markings without worrying about the proportions of the image;
- To level and give the composition an ideal look, we will use sandpaper with P180 grit. We may also need a brush that will smooth out the contours. The brush should be up to one and a half inches wide so that you can work with small elements;

Painting is done with brushes, and the finer the details, the thinner the brushes are needed. It is better to buy tools not at a hardware store, but at an art supplies store.
- First of all, you need to prepare the surface; the base must be dry and level. We have discussed how to level walls with putty more than once in other reviews, so we will not dwell on this type of work here;
- The base must be primed, the composition is prepared as prescribed in the instructions on the package and applied with a brush or roller. This allows you to strengthen the surface and improve the adhesion of the putty, which will be applied subsequently;

- If you have a plastered surface, then the place where the painting will be made needs to be puttied with an even thin layer. If the walls are already plastered, then you can skip this step;
- Now we need to draw the outlines of our composition on the wall; the work is done either with a pencil or with the help of carbon paper, through which the picture is transferred from tracing paper to the surface. It is important to make clear guidelines according to which you will work; if you make a mistake at this stage, then the final result will differ from what was planned;

- Then the putty is prepared; for this, take a container into which a certain amount of water is poured and the dry mixture is poured. All proportions are indicated on the package, so you can handle this job without difficulty. The amount of composition should be such that you can spend it in one go; it largely depends on the size of the painting and its features;

- Now let's look at the application: a small amount of the composition is taken on a spatula or palette knife and applied in the right places. If you are making a stem, then you should get a tubercle, and if you are making more complex pictures, then you need to fill the contours with the mixture. Don’t worry that a lot of compound is applied, a little later we will eliminate all minor flaws, at this stage the main thing is to apply the compound where needed in sufficient quantities;

- 15-20 minutes after application, when the composition has dried a little, you can begin to further form the pattern, for this you use the same palette knife, and if you don’t have one, you can use improvised options (I once used an ice cream stick).

- The excess composition is removed, the contours are corrected and the painting is given its final look; if somewhere too much is accidentally removed, apply more composition to the damaged area;

- After the putty has dried, you need to go over the surface with sandpaper, just take a small piece of it and remove all the flaws and sharp corners, making the composition more attractive. The work is simple, the main thing is not to remove the excess, since the composition we use is very easily rubbed off;
- The finished composition is once again treated with a primer to strengthen it, after which you can begin painting. Here you can already give free rein to your imagination and highlight each element with the help of a play of shades and. The work is painstaking, but if you try, you will get a real work of art on your wall, don’t be afraid to ruin something, because you can always touch up the bad areas;

- The last thing you need to do is apply a protective coating to the painting; I usually use acrylic varnish. This allows you to protect the surface from contamination and abrasion and makes it possible to wipe the composition with a damp cloth. In addition, a layer of varnish protects the paint from fading and preserves the brightness of the colors for a long time.

Method number 2 - using a syringe
I like this technique for its simplicity and fairly fast workflow. The paintings are simpler, but they look very stylish and attractive. To begin with, I will list the necessary materials:
- Putty, you don’t need a lot of composition to work, so buy a small package of dry mixture or buy a ready-made mixture, which you just need to mix before use. Use either “Vetonit” if we are talking about a dry composition, or “Shitrok” if you decide to use ready-to-use putty;

- The primer that will strengthen the base and the finished painting, do not forget about this composition;
- The colors, their quantity and shades depend on the composition you choose; you can use two or more colors; here it is important to choose the design in such a way that it fits harmoniously into the surrounding interior.

As for the tools, in addition to brushes for painting and priming, we need a large syringe with which to apply the mass; it is better to choose larger options of 50-60 ml, so that it is more convenient for you to work and you do not have to refill the tool every minute. Alternatively, you can use an old pastry bag or make it yourself, in which case the contours will be much more massive.

Now let's figure out how to create a picture in this way:
- First of all, the surface is prepared, everything is the same as in the case above - the base must be smooth and durable, if necessary, it is puttied to obtain an ideal plane. After this, the base must be primed; work can continue after it has dried;
- Then the outline of the future drawing is applied to the wall; the work is done either in pencil or by transferring the image using carbon paper. It all depends on the complexity of the drawing, I advise you to draw by hand, perfectly straight lines look much worse, since everything should indicate that the work was done by hand;

The putty is being prepared, if the composition is ready, then it needs to be mixed. The consistency of the mass should not be thick; it is even better if it is slightly liquid, this will greatly simplify the work process.
- Next, you need to fill the syringe with putty mass; to do this, remove the piston and fill the cavity with the compound. The work can be done using any available items, I use an ice cream stick or something similar, the main thing is that you are comfortable. After filling, the piston is put in place;

When using a pastry bag or a regular bag, the filling process is even easier. You need to put the mass in a bag, and then squeeze it out along certain contours.

- First of all, the composition must be applied along the main lines; it is important to set the contours from which you will then build. Simply move the syringe along the surface, constantly pressing the plunger so that an even strip is squeezed out along the entire length. Everything is simple here, you can practice before the main work to get better at it and not experiment on the wall;

- Once the main lines have been drawn, you can move on to smaller elements and details. Just apply the composition in the order you require and in the right places. It’s not scary if you put excess somewhere, all this can be removed, the composition does not dry quickly, so you definitely have enough time, the work is done with a spatula or the same palette knife, it is important to remove what is not needed until the mixture has set, then it it will be much more difficult to do;

- After the composition has dried, which takes about a day, you can, if necessary, correct the painting with sandpaper; with its help, sharp protrusions are smoothed out and other minor flaws are removed. A primer is applied to the completely finished composition; try to treat each area with it, as this allows you to strengthen the surface and make your work more durable;
- You can paint the finished version the way you like; some people apply as many layers so that a different shade can be seen from under the finish. Decide for yourself how best to decorate the picture, especially since there is no need to be afraid of mistakes; in extreme cases, you can always repaint the surface;

- After the paint has dried, you need to treat the surface with a special acrylic-based protective varnish; it will create a transparent protective film on the surface that will repel moisture, retain color and prevent abrasion. The varnish is applied with a brush, paying special attention to ensure that the composition gets into all the recesses in the relief areas.
Method number 3 - creating paintings using a stencil
Another simple way with which you can create real bas-reliefs on the wall. If you are afraid that you won't be able to do the job with a spatula, then this method is what you need. Once upon a time I started with stencils and I can say that even a person with no experience is able to create an interesting composition the first time.
We need the following materials:
- Putty, but this time we will use a quickly hardening gypsum-based compound. Personally, I most often use Knauf Fugen (400 rubles per 25 kg bag), but there is no fundamental difference, the main thing is that the mixture sets in 30-40 minutes. The amount of composition depends on the size of the painting, so see for yourself which packaging to purchase;

- We need a primer for the same purposes as in the technologies described above: to prepare the base and to strengthen the finished result;
- Paint is used for decoration; most often the surface is covered with several colors to highlight individual areas and make the composition more expressive. I prefer to work with acrylic-based compositions, and you can buy them in color, or it’s easier to do: buy white paint and pigments of the required shade and create the options you need right on the spot;
- Another important material is cardboard, from which we will make a stencil. The thicker the material, the more prominent the pattern will be, so decide for yourself which option to purchase; I often use 5 mm thick basalt cardboard, it is excellent for such purposes. If you don’t find thick material on sale, you can glue two thin ones using PVA glue, you will get the option you need without extra effort;

As for the tool, we need the following:
- A construction knife for cutting out our picture or pattern in cardboard, it is best to choose options with a blade width of 25 mm, they are stiffer and can be used much more accurately than with thin blades. Don’t forget to purchase a package of spare blades, as during operation they tend to become dull and break;
- Masking tape is necessary to fix the stencil on the wall; if it is heavy, you can additionally secure it with a pair of self-tapping screws; the holes from them are then simply covered with putty;

- Brushes are needed for applying primer and painting the picture, the set depends on how fine the details will be, you can use any suitable options;
- A spatula will be used to distribute the putty; the most commonly used option is 8-10 cm wide; it is convenient to use when filling the stencil. To make edits in the composition, it is most convenient to use a palette knife or something similar that is already familiar to us;
- Sandpaper is needed to sand the painting and give it its final look; with its help, minor flaws are removed and the surface is made smooth. Personally, I use paper-based sandpaper with a grit of P180; it costs little and is sold by the meter; you can buy as much as you need (usually half a meter or a meter).

Remember that in this case particularly high demands are placed on surface preparation. The plane must be flat, because if there are differences on it, you will not be able to properly fix the stencil and apply putty; it will spread over the unevenness.
When everything you need is at hand, you can get to work. The process is performed in the following sequence:
- I spoke a little higher about how important it is to properly level the base, but don’t forget that it needs to be further strengthened with a primer. It is applied the day before the start of work so that the base has time to dry completely;
- The process of making a stencil is as follows: first, you should transfer the design to cardboard or draw it there; you should not choose too ornate images with many small details, they are difficult to cut out, and it is not easy to make such a picture with putty. We need to cut out our composition along the lines; for this, the cardboard is laid on a flat, hard surface, the work is done with a construction knife;

- The finished stencil (or stencils, if there are several of them) are carefully attached to the wall, check their position with a level and only then secure with masking tape or other fasteners. It is important that the element fits tightly to the surface and holds securely;
- Next, the putty is prepared; how to do this and in what proportions to mix the components is indicated on the packaging. The composition is applied to the stencil using a spatula and carefully leveled, remove all excess and ensure that all recesses are filled as best as possible. Since the composition hardens quite quickly, you need to work quickly, we can correct all minor flaws later, don’t worry about them;

- After the composition begins to harden, but before it hardens completely (after about 10-15 minutes), you need to carefully remove the stencil from the surface, try to do this in such a way as to cause minimal damage to our composition, it is best to take one of the sides and gradually peel it off the wall;

- Then we need to take a little composition on a spatula and, using a palette knife or other device, repair all the flaws in our painting. It is important to fill in any areas where there is not enough mixture or where it came away when the stencil was removed. Work carefully and don’t worry about sagging and other small nuances, we will remove them later, now the main thing is to ensure that the composition is everywhere where it is needed;

- After you have corrected all the flaws, you need to take a brush, moisten it in water and process the pattern, with this action we will smooth out all the sharp corners, make the surface smooth and remove excess composition before it completely hardens, this is not difficult to do. We are simply modeling our composition to make it look as neat as possible;

- Now we need to wait for the surface to dry completely, since we used a gypsum-based composition, it will harden in a couple of hours, the main thing is that the room is warm and dry. The composition must be processed with sandpaper; for this, a small piece is torn off, and all elements are sanded by hand; the work is quite simple, but takes a lot of time. Try to remove all major flaws;

- After the sanding is completed, you need to treat the composition with a primer; if you prepared the base and primed it, then you can apply the composition only to those elements that you applied to the surface. This will strengthen them and improve the adhesion of the paint that we will apply later;

- When the primer has dried, you can begin painting; most often, the base color is applied first, which will serve as a general background. The paint is best applied in two layers to ensure maximum color depth and durability of the finish. The work should be done with a wide brush, since the roller may not paint volumetric elements;

- When the paint has dried, you can begin to decorate our painting; for this, compositions of a different shade or special decorating markers are used. With their help, you can highlight three-dimensional elements and give the image any desired effect. The more complex the picture, the more you will have to work with paint, so for the first time it is easier to choose a floral pattern or ornament in order to acquire the necessary practice;

- After painting is completed, a protective composition can be applied to the surface; it is necessary to protect the paint from fading and abrasion. In addition, this treatment will preserve the brightness of the color for a long time and will ensure ease of cleaning, because you can wash the painting with a damp cloth without fear of damaging the paint layer.

Conclusion
A painting made from putty allows you to transform your room and make it original and stylish, this is not ordinary wallpaper or decorative plaster, your composition will be in one copy, you will not see the same renovation from anyone else.
The video in this article will tell and clearly show additional information on this topic, but if you have questions about one of the technologies described above, then ask them in the comments under the review, we will understand all the intricacies and help you achieve the best result.
October 29, 2016If you want to express gratitude, add a clarification or objection, or ask the author something - add a comment or say thank you!


