New Year's decoupage is becoming increasingly popular. Many different ideas are found in many master classes that require certain investments.
Under New Year Not everyone wants to spend money, but many people want to make beautiful New Year’s decoupage with their own hands.
How to make decoupage while saving money?
There is an answer to this question, and it is presented in my master classes.
I believe that using a minimum of materials, you can create extraordinary beauty, no worse than using expensive materials.
Some may not like my innovation, but it is necessary to understand that in times of crisis and economic downturn, people should not stop making art.
New Year's decoupage plates
Of course, for this we need wax. Where can I get wax?! Of course, from small cheap candles that can be purchased for a very low cost in quantities of 100 pieces per package.
Believe me, this is very profitable, because buying one large candle costs much more.
And there will probably be candles at home that would be a shame to throw away and would be a shame to put on the table. These are exactly what we need.
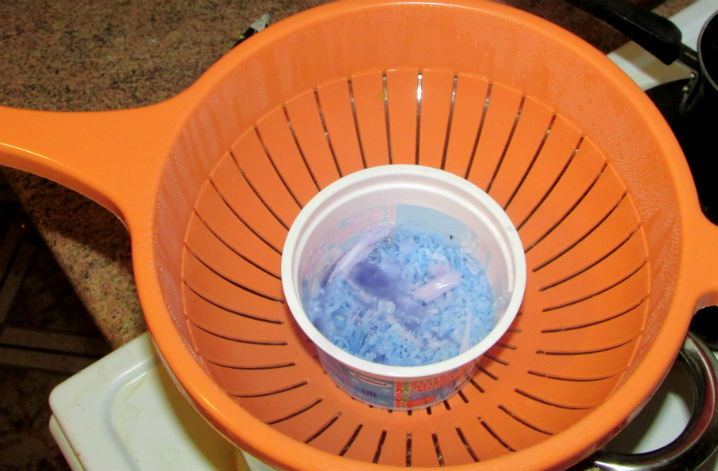
Three old candles are grated and melted in a water bath.
Take a magazine sheet and make a cone out of it. Cover the entire cone with tape, especially the top, so that the wax does not leak out.
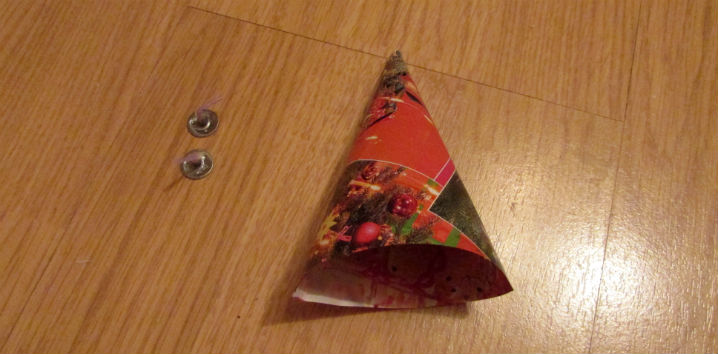
Pour the wax into the cone, first placing the fetil inside or tying it to a stick. If you don’t have fetil, you can soak several layers of thread in kerosene.
Place in the refrigerator and leave to harden. It will take about 2 hours to harden, but I left the candle overnight. I ended up with this Christmas tree-candle.
![]()

If the candle is not completely straight, you can correct it with a knife (remove excess wax elements).
This candle is ideal as a gift, table decoration or interior decoration.
New Year's decoupage champagne bottle
Lightweight and interesting idea, which will give you many pleasant emotions and will be an excellent gift for the New Year.
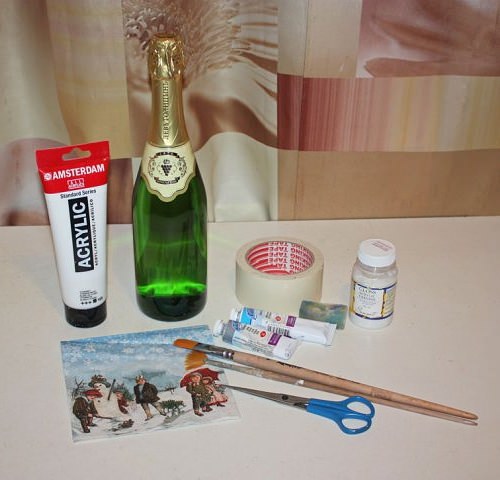
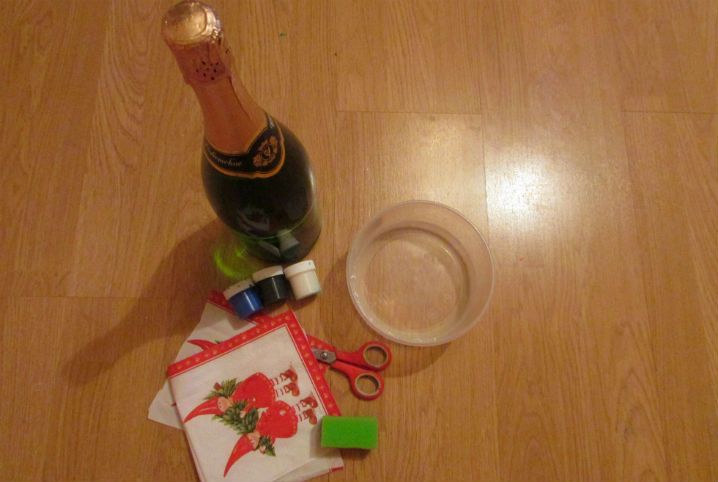
To decoupage a bottle we need:
- sponge for washing dishes;
- PVA glue;
- scissors;
- napkins;
- gouache;
- brushes
For my master class, I took a 1.5 liter bottle of Soviet champagne. I want to make it to celebrate the New Year with my family.
You can take any other bottle with or without contents.
Preparing a bottle for New Year's decoupage
First you need to remove the labels. This is not easy to do, because putting the champagne in hot water extremely dangerous (the bottle may burst in your hands).
To easily wipe off the label I used steel wool. It doesn't scratch the bottle and removes well.
New Year's decoupage - thematic decor of your favorite decorations and items for the long-awaited holiday. We have prepared ideas for you, based on which you can decorate your interior and New Year's table with original items.
For decoration, you can choose an endless variety of materials: braiding the balls with beads or making a kanzashi ball.
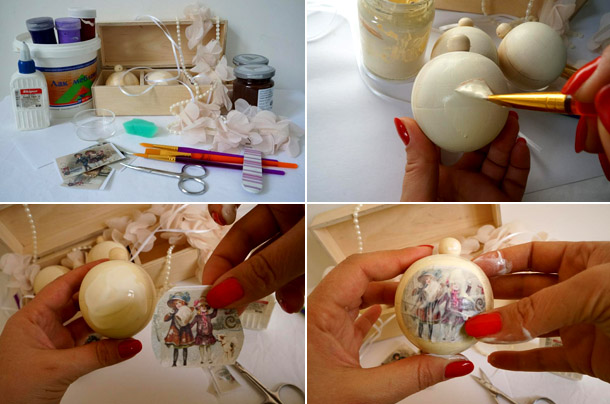
Decoupage Christmas balls in vintage style
This master class offers you a simple decor option with which you can easily repeat decoupage with your own hands New Year's balls.
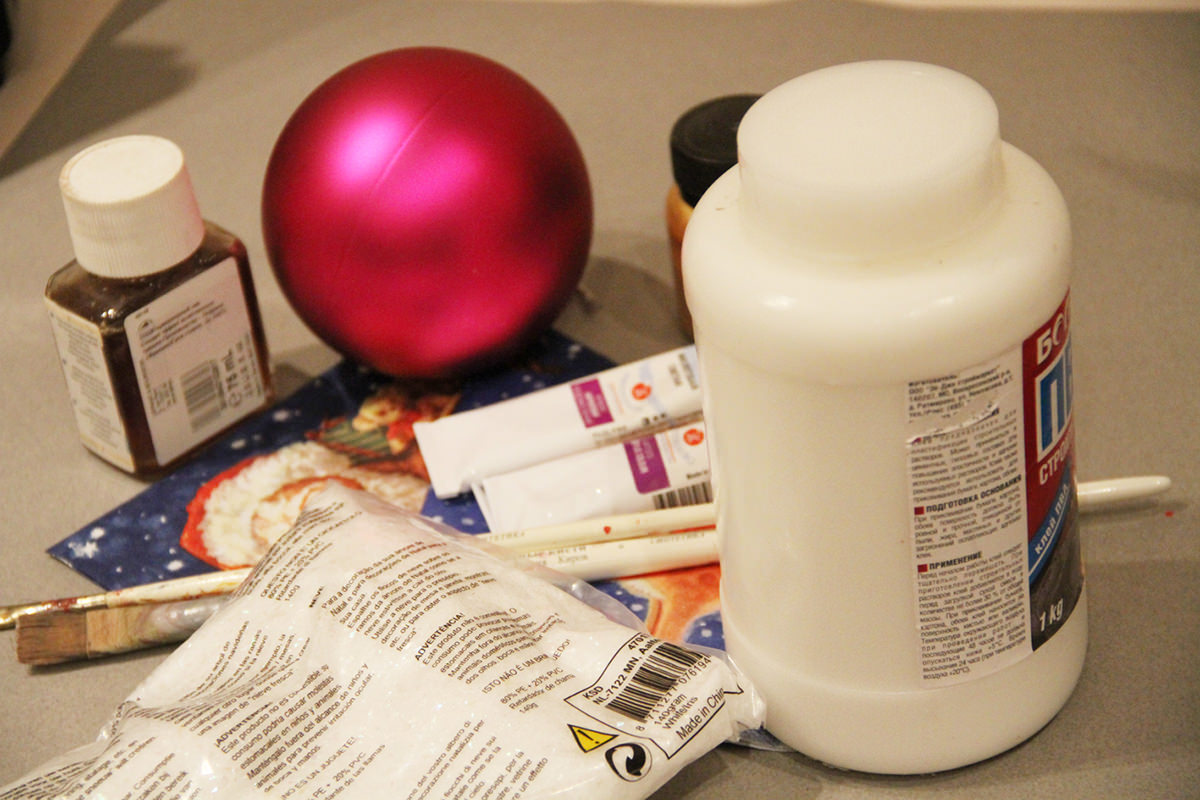 To work you need to prepare the following items:
- Plastic balls (plain or transparent);
- PVA glue, diluted with water in a ratio of one to one;
- Napkins with matching motifs;
- Scissors;
- Acrylic based paints;
- Craquelure varnish;
- sponge;
- Semolina (you can use special artificial snow).
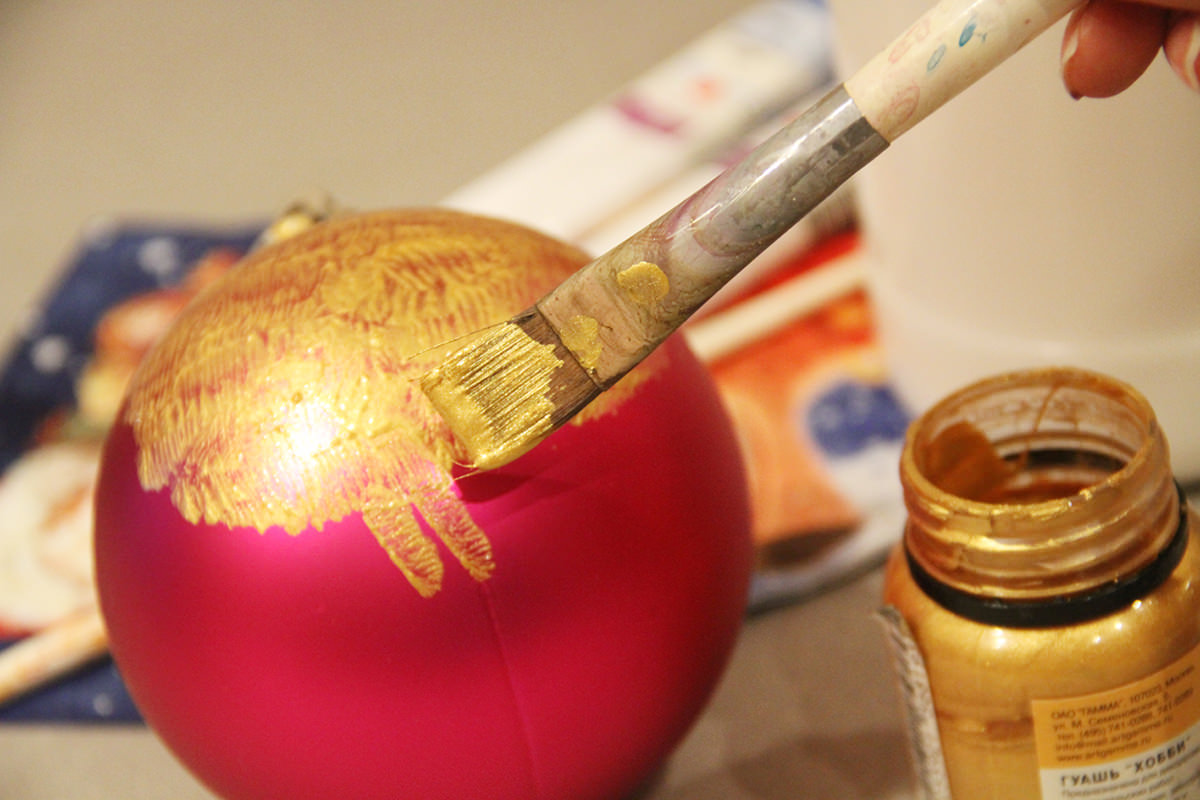
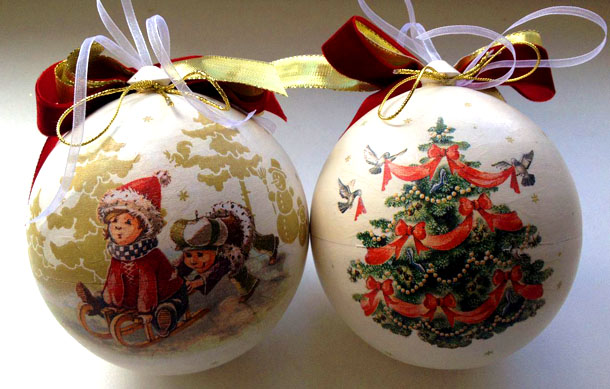
New Year's decoupage of the ball begins by covering the blank with gold-colored paint. Apply it with a tapping motion. After the paint layer has dried, a layer of varnish intended for craquelure is applied over the surface of the ball. With its help, cracks will form. This way you will get a ball with an aged effect. Leave the workpiece to dry.
![]()
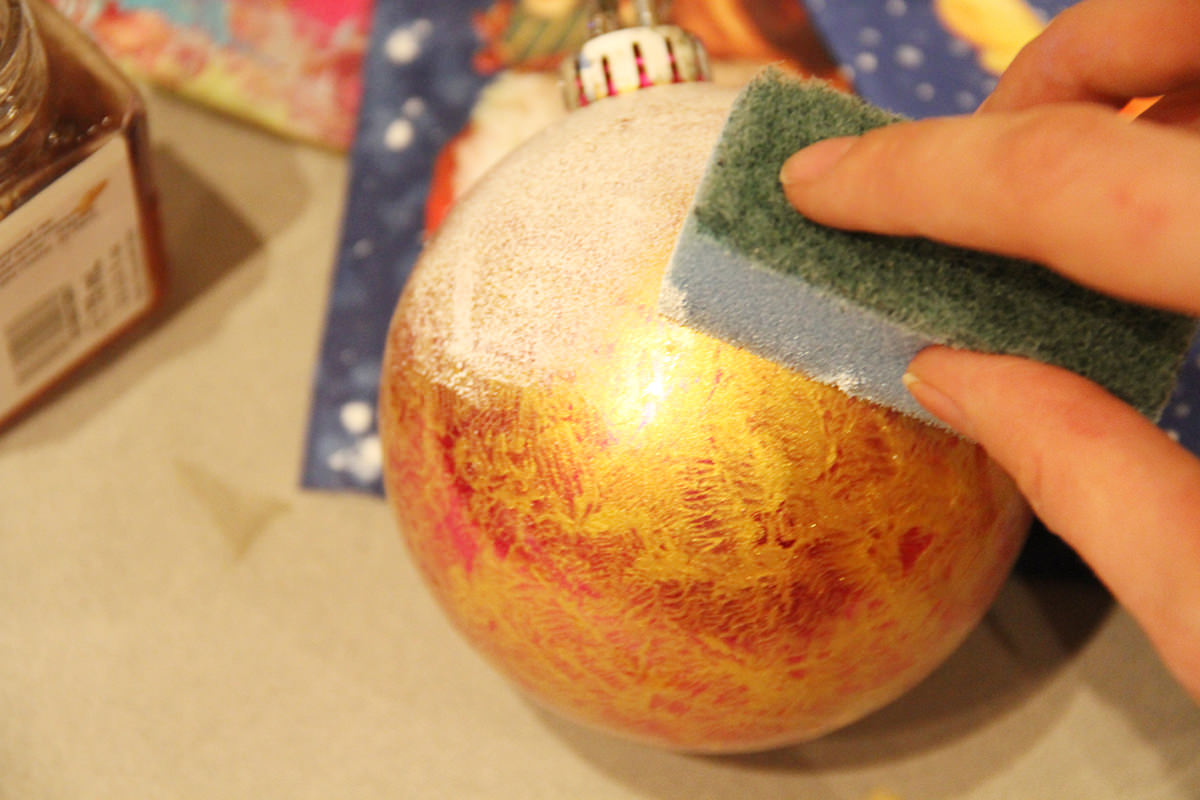
After the ball has dried, you need to apply paint of the main shade to the surface of the ball. A sponge is best suited for these purposes. Next, dry the item again. To speed up drying, you can use a hair dryer. Subsequently, you will see cracks begin to form on the ball.
 Next, the decoupage itself begins Christmas balls. From the selected thematic napkin, you will need to cut out the motif with your own hands and separate the layer with the colored image. Now using a brush and diluted PVA glue, fix the pictures on the ball. When decoupage, glue is applied from the middle to the borders of the picture. The borders of the pasted image are shaded using a sponge and paint of the main shade. In addition, pictures can be completed with acrylic-based paints.
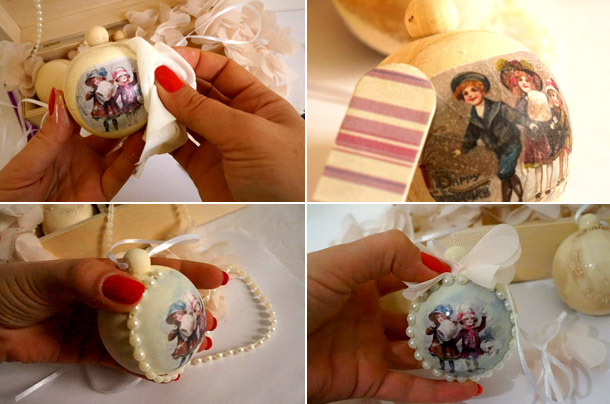
 The master class and decoupage of New Year's balls is coming to an end and last stage, certain areas of the ball are dipped in semolina or special artificial snow.
This wonderful New Year's decoupage will help you decorate boring Christmas tree balls with your own hands. Look how attractive they look in the photo.

Cold decoupage technique for candles
The second master class will show you how to do cold decoupage of candles using a napkin. To do this, prepare:
- A candle;
- Napkin;
- Scissors;
- A glass rod or other device with a smooth surface.
 This method is best suited for candles with thin walls. This makes it easier for napkins to stick to surfaces.
The master class begins with measuring the required length of the napkin. To completely cover the candle using the decoupage technique, you must try to make an even seam. You need to cut out the motif with small gaps relative to the length and width (about a centimeter).
 Next, attach the image of the napkin to the candle, align the image relative to the top edge and begin to smooth it using a glass rod, moving from the middle to the borders.

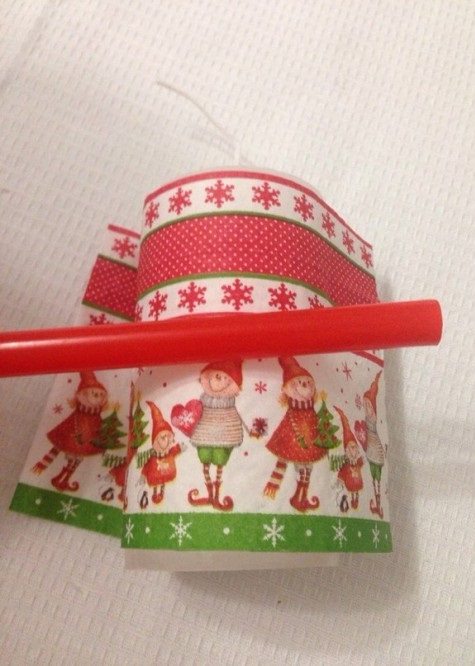
When you smooth the paper, gently press the stick, allowing the napkin to stick to the plane of the candle. Once you've finished ironing, pay attention to the seam. First, you need to press one side of the picture, and then work on the other. If its length extends beyond the first side, cut it off. Do not overlap, as this will make the decoupage candle look unpresentable.
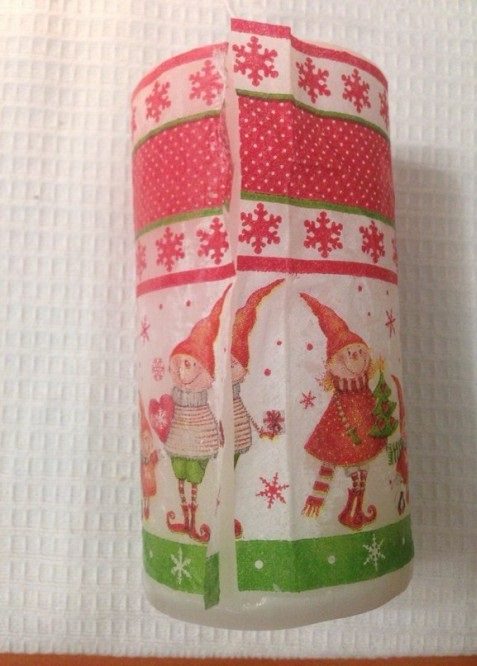 It remains to work out the upper and lower boundaries of the candle. At the top, use scissors to carefully trim off the unnecessary parts at the bottom. Leave a couple of millimeters, this will help make the decoupage of candles more accurate.
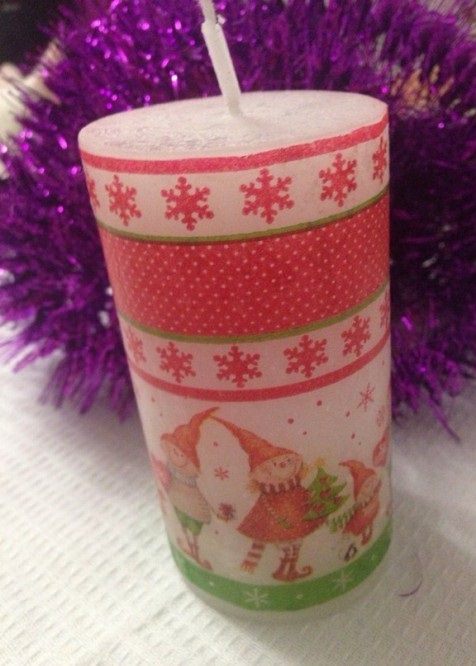 At the final stage, you can stick on shiny elements that will give the candle an even more festive look.
Decorating a bottle of champagne for the New Year
Continuing the theme of New Year's decoupage, let's look at decorating a bottle of champagne with your own hands, because not a single New Year's feast is complete without this traditional drink.
Necessary materials and equipment for decoupage of a champagne bottle:
- The bottle itself (before decoupage, it must be soaked in water. This will make it easy to remove paper labels glued to it);
- Fan tassel;
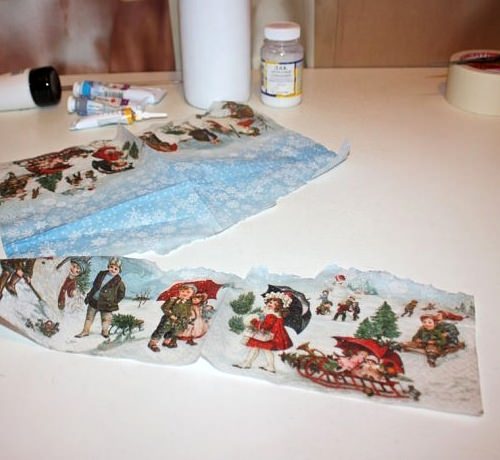
- Themed napkins with New Year's motifs;
- Scissors;
- Acrylic-based paints and contours;
- Special varnish for decoupage work;
- Construction tape.
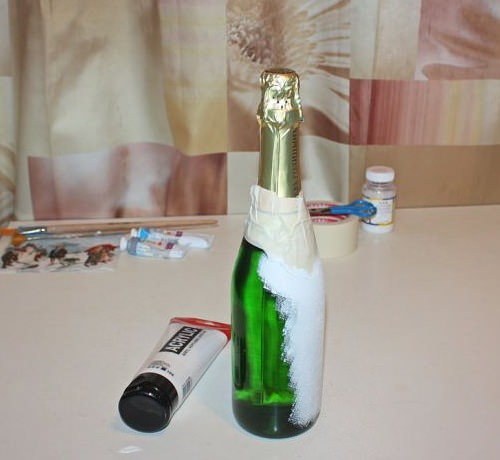
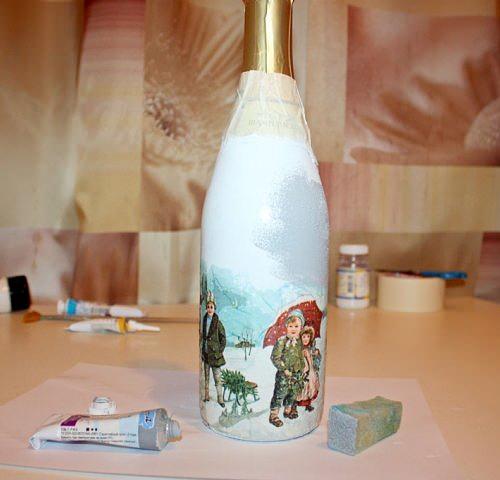
The top of the bottle is sealed with construction tape. This will help keep the gold portion of the label clean.
Next, take a foam sponge and use it to cover the champagne bottle with paint with your own hands. white acrylic based. To obtain a uniform surface, apply several layers of paint with intermediate drying of each of them. After allowing this primer to dry, an acrylic-based varnish is applied to the bottle.
 At the next stage, the master class begins the decoupage technique. To do this, take three-layer napkins and separate the very first layer from them, on which color pictures are applied. After this, you need to tear out the images with your own hands, with which further work will be carried out.
 Having prepared all the details, proceed to fixing them on the bottle of champagne. Using gentle movements, go over the surface of the napkin with a brush dipped in water, moving from the center to the borders of the picture. Try to carefully smooth out any wrinkles that may form. By connecting the napkin to the plane of the bottle, the product is covered with a layer of PVA glue.
 After drying, the master class moves on to tinting the top of the champagne bottle using acrylic paints. By selecting matching colors, they are applied with a sponge along the plane of the object, slightly stepping onto the decoupage pattern. This will help you hide the transition areas. Leave the bottle to dry. After this, re-coat it with several layers of varnish.
 Use an outline as an additional decoration golden color and create interesting patterns or themed greetings on champagne with your own hands, as in the photo. Varnish is applied over the decor.


Original DIY New Year's toy
And one more final master class will show you an example of how to make decoupage Christmas decorations from old light bulbs.
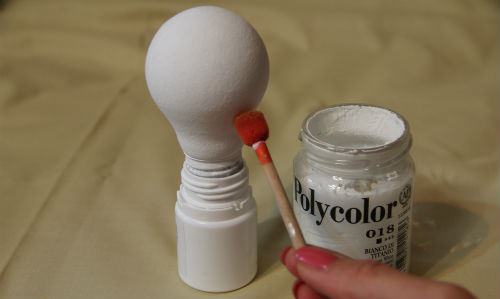
Before making decoupage, the light bulb is wiped with alcohol. Next, its surface is covered with an acrylic primer, which is applied in a small layer with a foam sponge. To make it more convenient for you to apply the primer, hold the object by the base or do it on a supply made from scrap materials, as in the photo.
After letting the primer dry, apply white acrylic paint over the bulb. Let the acrylic dry for half an hour.
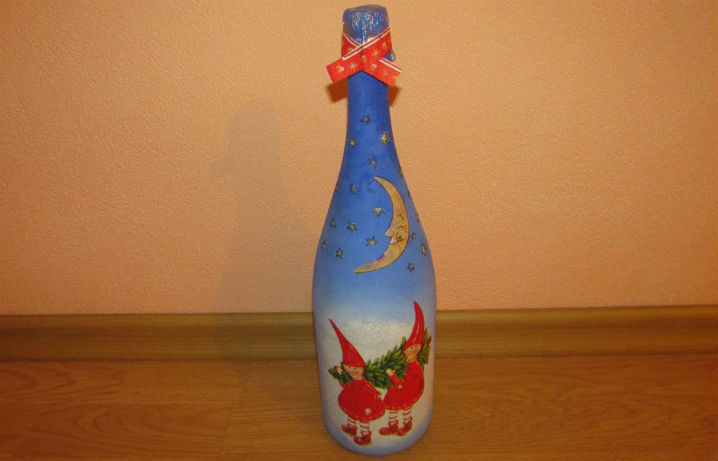
 Take the prepared napkin and tear out a thematic inscription from it. If the napkin has three layers, separate it upper layer with pictures. The resulting element must be fixed along the protruding contour of the product. Decoupage glue is applied over the fragment from the center to the borders. Next, let the item dry. After this, you can start painting the background. Choose paint to match the selected pattern. IN in this case These are delicate blue shades. To get it, mix light acrylic with a couple of drops of paint. blue tone. Now, using a sponge, apply the resulting color over the entire light bulb, lightly stepping onto the glued picture.
Lots of toys exciting activity, which even someone who has not previously been interested in anything like this can cope with. Create some Christmas tree crafts yourself. They will delight you every time you prepare for the New Year holidays.
List of necessary tools and materials
- The most important thing is napkins with suitable patterns or simple pictures.
- Next you will need decoupage glue. It can be replaced simple glue PVA, which needs to be slightly diluted with water.
- Tassels. It is better to take synthetic ones, since they practically do not shed lint.
- Varnish. You can take a special one for decoupage, a craquelure one to create cracks, or one that is available.
- A piece of sponge. You can cut a little bit from a kitchen washcloth.
- Acrylic paints. The quantity and color depends on your wishes.
- Ribbons so that the toy can be hung on the Christmas tree.
The rest of the list depends on the design of the crafts. So, for example, to make New Year's toys with a voluminous texture, you will need to take a structural gel. It is applied with strokes, hardens and takes shape. Then it is painted in the required color.
Various sparkles, beads, rhinestones and other small decor may also come in handy. To glue these materials, it is better to use a glue gun.
What can you make crafts from?

Decoupage New Year's toys can't be done unless you have the foundation. The following materials can be used:
- old ;
- special round shapes made of polystyrene foam (available in any diameter);
- wooden bases of any shape (for example, a ball, a Christmas tree, a star, and so on);
- transparent glass or plastic balls;
- old light bulbs;
- thick cardboard from which various figures are cut out, and much more.
Decoupage of New Year's toys - master class for all design options
Instructions on how to make crafts using decoupage technique:

- Take your base and, if necessary, clean it of any dirt (such as peeling paint, paper labels, etc.).
- Cover the base with a layer of acrylic paint. If you want to completely decorate the craft with a napkin, then use it as a substrate. white paint. If you are gluing small elements, then draw the background in the required color.
- Cut out the part of the design that you will glue. It is best to wet the brush in water and run it over the napkin. Easily tear off excess paper.
- Coat the area on the base with glue and lean the picture against it.
- Apply a thin layer of glue over the picture.
- Let the craft dry completely.
- Next, pour some of the paint you used for the background onto the paper or palette, dip a sponge into it lightly, and run it around the edges of the glued design. Movements should be light.
- Cover the craft with a layer of varnish.
- Attach a ribbon so you can hang it on the tree
Decoupage is complete. At your discretion, you can sprinkle glitter on top and paint individual elements drawing or make a shadow, glue rhinestones or beads and so on.
Possible decoration options for Christmas tree toys

- Take a ready-made base (for example, a star or a ball), cover it with a layer of paint, and then glue the entire napkin. Turn the base over and go over the edges with a brush dipped in water. Tear off any excess paper. Do the same with reverse side. Paint the edges.
- You can make New Year's toys. The master class consists of the fact that, after the glued pattern has dried, a structural gel is applied to the base. With its help you can depict snow or some elements. It is better to mix the gel with paint in a separate container or cover it with acrylic at the end.
- Take a ball and cover it with a layer of paint. Then tear the patterned paper into several pieces. Glue each piece separately. You will get a very beautiful New Year's toy.
- Prepare the base. Cut out the design in a circle and stick it on. Cover the craft with varnish. With help glue gun place beads with a flat bottom (special droplets) along the contour of the picture. The image will appear to be framed.
When decorating a house for the New Year, we always want to add variety to the standard set and tinsel. Let's try to do holiday decorations using decoupage technique. This easy way Even a novice designer can master decor! The only difficulty is the selection necessary materials for decoupage, such as napkins with New Year's patterns, primer, brushes, acrylic paints and varnishes. But, once you acquire everything you need, you will be able to make your family happy for every holiday!
Decoupage is a technique that every handmade craftswoman must master.
Lovely and funny toys using the decoupage technique will instantly transform your christmas tree. To create them you need to prepare:
- toys for the Christmas tree (balls, hearts, etc.)
- primer
- acrylic paints
- patterned rice paper
- PVA glue
- film
- acrylic lacquer
- elegant ribbons
 With a set of napkins, every toy in your home will become unique.
 Remove from toys metal fastenings. Wipe the workpieces with alcohol to degrease them, then treat them with a primer and dry until completely dry. Cover the pieces with white acrylic paint. After this, tear the rice paper into small pieces and soak them in the glue solution. Make it in advance in a small container, diluting the glue with water to the consistency of kefir. Lightly squeeze out the paper and place it in folds on the surface of one half of the toy. Apply another layer of glue on top.
 Step-by-step instruction for creating New Year's decoupage
 Leave the finished base to dry overnight. Place the picture on the empty half of the craft. Print the desired image on sheets of special paper with transparent film. This design is printed on film and transferred to any surface, like a sticker. Carefully tear off the desired picture and soak it in water for 1 minute. Remove the film and place it on the surface of the toy. Dry again.
 Cleaning with an abrasive file and decorating a Christmas tree decoration
 Paint the toy with white paint, and then paint the product with colored acrylic paints to match your picture. Light shades Apply with a brush, moving from the design to the edges. Cover the back with dark paint. For the sidewall it is better to choose a medium tone. Then cover the craft with several layers of varnish and secure the elegant satin ribbons for suspensions.
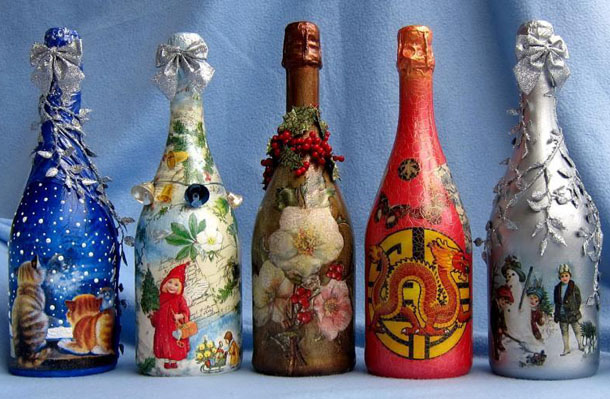 The more details you use in your decoupage, the more beautiful the bottle will be!
 An unusually designed bottle of sparkling wine is not only a nice addition to the interior. It can be presented as a holiday gift. To make a craft, prepare the following materials:
- bottle of champagne
- primer for glass
- primer sponge
- latex gloves
- paper napkin
- acrylic paints
- gel paste
- wood putty
- stencils
- baguette paste
- glue "Moment"
- decorations, rhinestones
- elegant ribbons
At the first stage, prime the vessel. Apply the primer with a sponge, moving vertically from top to bottom. You only need to do this once; no sanding is required. After all the manipulations, glue a picture cut out of a napkin to the bottle and cover it with a layer of varnish. When painting a bottle, make a transition from a dark color at the bottom to a light color at the top.
Once the vessel is painted, coat it with matte varnish. Decorate the champagne with gel paste using a stencil: then the colors will shimmer and shine. Glue small rhinestones and sparkles to the product. Using contour paste, draw dotted patterns of your choice. Wrap the neck of the bottle with tape and, using double-sided tape, secure it.
Decoupage of wooden products
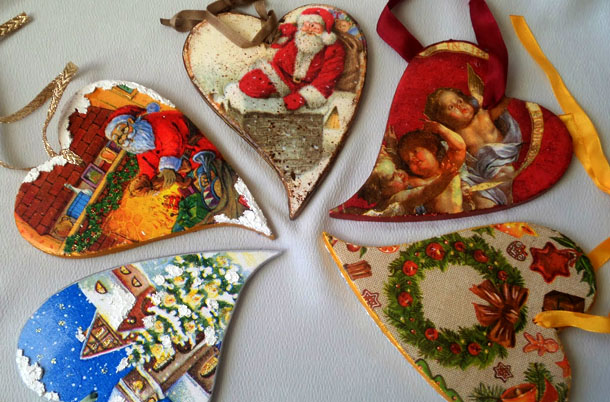 From plywood figures you can make whole set Christmas tree decorations
 Using decoupage, you can create a thematic picture or craft for decorating a Christmas tree from plywood blanks. Source materials:
- plywood figures
- rice paper or decoupage cards
- acrylic paints
- PVA glue
- acrylic primer
- craquelure pair
- bitumen patina
- solvent
- structural and crystal paste
- brushes
- scissors
- sandpaper
- sponge
Cover the wooden pieces with primer. After drying, walk over the surface of the product sandpaper. Pick up required colors paint and apply it on both sides in two tiers. Attach the design to the base and coat it with PVA glue diluted in water. After drying, coat the structure with varnish. If necessary, you can correct the pictures using paints. To shade the picture, dilute the bitumen patina with white spirit in a ratio of 1:2 and brush along the edges of the picture.
Paint the ends with bronze paint. After drying, coat the craft with varnish again. The next stage of work is applying craquelure. Having done this, coat the plywood again with two layers of varnish. After drying, “complete” the missing elements. WITH inside crafts, attach ribbons to use your craft for home decoration.
Decoupage candles
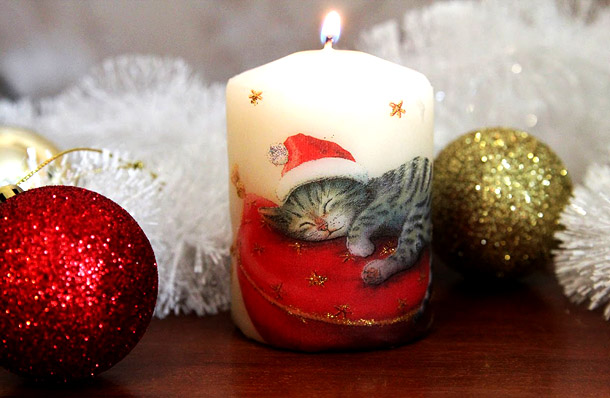 Don't buy expensive ones New Year's candles with drawings - make them yourself!
 This technique can be used to transform a run-of-the-mill paraffin candle into a holiday masterpiece. Prepare the following materials:
- white paraffin candle
- napkins with New Year's themed pictures
- teaspoon
- golden or silver colored water contours
- CD
- Super glue
This version of decoupage is done without glue. Cut out the pieces you like from a paper napkin. Heat the tablets over the flame inner surface teaspoon. Attach the design to the candle to be decorated and quickly press the napkin onto it with the convex side of a spoon. The paraffin will begin to melt and saturate the paper that will stick to it.
You need to move the hot spoon over the candle slowly, without jerking, so as not to leave a void. When the picture is applied to the candle, outline the picture with a water outline. Add decorations not only to the napkin, but also to the candle. To make the product stable, make a stand for it from a CD. It is enough to apply a little glue to the disk and attach a candle to it.
Decoupage of New Year's plate
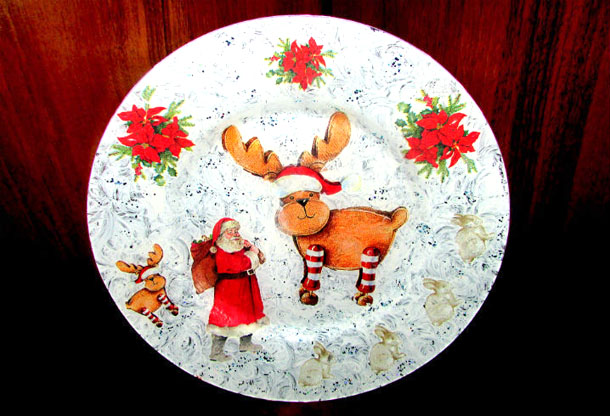 Even old plate can be turned into decorative using decoupage
 A Christmas-themed drawing will give a second life to even a well-worn plastic dish. Materials for making a holiday plate.


