Ceramic tiles are the most a good decision for covering the floor in the so-called wet area, in other words, in the kitchen, bathroom or toilet, because there the probability of water getting on the decorative coating is quite high. To correctly lay tiles on the floor in an apartment or private house with your own hands, you need to familiarize yourself with construction technology installation, and also learn professional secrets experienced craftsmen.
The first thing the owners of the premises being renovated are faced with is the purchase of decorative finishing materials (cladding, grout) and related products. As for the design of tiles, here everyone relies on their own taste, but its purpose must be clarified, otherwise you risk purchasing material that can only be laid on walls, despite the fact that you need floor tiles. The main differences between these two varieties ceramic tiles- This:
- thickness;
- coating texture;
- strength.
Please note that products that are laid on the floor are equipped with a rough surface in order to avoid injuries when wet feet come into contact with the floor covering due to slipping. We also advise you to purchase the required amount of cladding at a time from one product lot, otherwise you may encounter a difference in shade, and this will negatively affect the decorative effect.
The same principle applies to selecting grout for joints. Currently, designers offer a lot of processing options ceramic coating, where the grout does not have to match the tone of the cladding - it can be contrasting.
Do not forget about a small supply of tiles, because during the work a defect may be discovered or during cutting several samples may crack, which often happens even with experienced craftsmen, not to mention those who carry out repairs with their own hands.
Preparing the floor for finishing
The quality of the work performed directly depends on the condition of the base, which means that the floor must be smooth and free of dirt. various kinds pollution. Since the base in the kitchen or toilet can be made of various building materials, we suggest considering each option separately.
Cement strainer
 Laying tiles on a cement screed
 In most cases, ceramic cladding in a new building is laid on concrete screed, and here the main thing is to wait until the moment when you can lay the tiles, which will take at least 30 days. This period is quite sufficient for complete setting and hardening. cement-sand mixture.
Do not forget that mortar hardeners create a strong film on the floor, which reduces the degree of adhesion of the base to the cladding. It is also necessary to know that new house gives technological shrinkage, and the supporting bases may become cracked.
To avoid troubles when covering surfaces with your own hands, it is advisable to organize a plastic layer between the floor and the decorative material, then both the tiles and the grout for the joints will serve you for decades. Are you planning to put decorative cladding in a toilet or shower in an old house, and the base there has cracked from time to time? All existing defects will have to be eliminated using special repair compounds. Any specialist will tell you with confidence that it is best to lay ceramic products on a concrete base; the main thing is not to forget to prime the subfloor.
Wooden floors
 Laying plywood on a wooden floor
 It is very rare to find a perfectly smooth wood flooring, so in most cases you will have to put sheets of plywood or OSB boards. Ideally, the thickness of the substrate made of compressed shavings or plywood should be at least 12 mm, as it should safely withstand pressure solid tiles and at the same time not be deformed.
In bathrooms and toilets, it is better to give preference to elastic linings, because wood is subject to intense swelling in a humid environment, which can cause the lining on the floor to crack.
Old tiles
 Dismantling old tiles
 When starting to install flooring, you often have to face the problem when it is not possible to remove old tile without significant damage to the base, then you will have to dismantle it and refill the screed, filling all the voids and irregularities with fresh mortar. Unfortunately, such a process will take a lot of time, and this is not suitable for everyone.
You can also solve this problem in another way, namely, sand the surface (the grout for the joints must be carefully removed) until a rough texture is formed.
Necessary tool
When planning to lay decorative tile material in the toilet or kitchen with your own hands, you need to prepare in advance necessary equipment, with the help of which the main process is carried out and the joints are grouted.
 Tile laying tools
 For this you will need:
- glasses to protect the eyes from possible fragments;
- professional tile cutter;
- level;
- notched spatula;
- rubber spatula for seams;
- wide sponge;
- tape measure and slate pencil;
- plastic crosses of the required size;
- hammer;
- clean rags.
At the time of collecting the tool, you need to decide on the pattern according to which the material will be laid on the floor. You can lay decorative material with your own hands, sew exactly a seam into a seam, diagonally, in a run. If you want to limit yourself to single-color tiles, combine contrasting shades in a checkerboard pattern or add decor - it’s up to you, the main thing is that the result is harmonious and delights with its beauty.
 Laying tiles
 Typically, laying tiles on the floor in a bathroom, toilet or kitchen starts from the wall, which always remains in sight, and it is better to leave trimming in those areas where furniture and plumbing fixtures are planned to be installed. Do not forget to control the center lines of the window opening, because when entering the room there is a mismatch tile joints and those very lines immediately catches the eye and does not look aesthetically pleasing.
To avoid such mistakes, first lay out part of the ceramic cladding without gluing and make sure that the desired pattern is achieved. This procedure will not take much time, but as practice shows, it will be very useful.
Glue selection
There are two types of adhesive base for ceramic tiles on the shelves of hardware stores:
- Ready glue.
- Dry mixture for making a solution with your own hands.
 Calculation of glue consumption
 The finished mass is poured into plastic buckets, and you can immediately start using it without additional preparation. The only drawback of this material is its high cost. Dry mixtures can be considered more popular glue, which, in turn, are divided into several categories:
- Universal– designed for most cases.
- Reinforced– used for laying large, heavy tiles and porcelain tiles.
- Basic– applied to perfectly flat surfaces without errors.
- For complex surfaces – you can put a material with a smooth texture (glass, metal) on them.
A solution is prepared from dry mixtures according to the instructions indicated on the package. To do this, pour the dry mass into a container with water in the proportions recommended by the manufacturer. Grout for joints is prepared in the same way. We do not recommend mixing immediately a large number of glue, as it hardens quickly and you simply won’t have time to work it out.
The main stage of installing tiles on the floor
In order to install the facing material without any problems, it is necessary to ensure the correct temperature conditions in the toilet or bathroom where the work will be carried out. The optimal level is considered to be +20 C. If this parameter is lower, the drying time of the glue will increase, and at high rates, the moisture from the solution will evaporate very quickly, which will negatively affect its strength.
Starting to lay floor tiles in the toilet with your own hands you need to take a spatula with the even side, put glue on it and under acute angle apply the mixture to the floor, while applying some force. This method will help the glue penetrate into all the cracks, and it will be evenly distributed over the flat surface.
Next, you need to walk over the glue with the notched side of the spatula, maintaining the same angle of pressure, otherwise the grooves will have different heights, which means the tiles will lie unevenly. The optimal adhesive layer should be at least 3 mm.
 Tile installation
 Ceramic cladding laid on the floor, starting from the intended wall. If this is your first time carrying out such work in a bathroom or toilet yourself, start with solid tiles and fill the resulting gaps with cut material. Each tile is pressed firmly against a surface coated with glue so that the grooves are completely filled with the solution, and the excess from the seams is wiped off with a rag.
To ensure that the dimensions of the seams between the decorative segments are the same and the grout lies evenly in them, you need to install plastic crosses at the joints of the tiles. Make sure that the joint line does not move during the work - it should be straight.
Trimming ceramic facing material This is done using a special tile cutter, but in the case of thin samples, you can get by with a glass cutter or a scraper with a Pobedit tip. The edges of the tiles are carefully chipped off with sharp pliers.
After 24 hours, grout can be applied to fill the gaps between decorative coating. Construction stores sell multi-colored fugue, and you can easily match it to your tile. The procedure for applying a fugue is quite simple and is carried out with a rubber spatula.
 Grouting joints
 After the material has dried, wipe the floor surface with a damp cloth. To make the grout last longer and not lose its color, it can be coated with a special solution. By following our tips, you can lay tiles on the floor in the toilet or shower yourself.
The work ahead will be long, it will be divided into several stages, which are completely interconnected.
Tool
First of all, the necessary tool is determined. You will need:

- Hammer and rubber mallet.
- Chisel.
- A set of simple spatulas, as well as a serrated one.
- Trowel.
- Level and roulette.
- Tile cutter
- Tile adhesive, grout and sealant.
- A set of crosses for creating even seams.
- Container for water and solution.
Of course, depending on specific situation Other devices may be needed.
Calculation of material quantity
It is better to do this at the initial stage. Many people think that calculating floor tiles is quite difficult, but in reality everything is different. This is done according to the following principle:
 The first step in installing tiles is calculating the number of tiles, so it is important to carry out this task correctly
 - Define object parameters. Its width and length. The total area is calculated.
- The resulting indicator is divided by the area of the selected tile (several options can be calculated at once).
- Ten percent is added to the resulting amount. This will be the necessary supply.
For example, the floor has a size of 3*3 meters. So the area will be nine square meters. Regular tile has a size of 30*30 cm. The resulting tile area is converted to meters: 0.09 sq. m. Total: 9:0.09+10%=110 pieces. When calculating trimming, the size of the seams is also taken into account.
On a note! Any large hardware store, which sells tiles, offers free services by calculating the required number of products.
Working with the surface
Laying floor tiles is only possible on a well-prepared surface. First, everything unnecessary is removed from the room. The old is removed flooring. Communication is checked. This is precisely what is worth focusing on. The fact is that all water supply and drainage connections are done in advance. You should not work on the floor until all problems in this area have been resolved. If possible, it is advisable to immediately hide the pipes.

When all technical procedures are completed, the surface leveling process begins. It is much easier to carry out work when it comes to new houses and apartments that only have screed and plaster. In old premises - you will have to try. The fact is that objects built many years ago may have different foundations. Sometimes you will have to create a new surface.
On a note! When it comes to bathrooms that are located in old apartment buildings, then pay attention to the baseboards. They are made from durable cement mixture. They will have to be removed completely, along with the coating.
Preparing the floor before laying tiles
- After cleaning, there is a lot of dust and dirt left that needs to be removed. Floor tiles do not tolerate anything unnecessary.
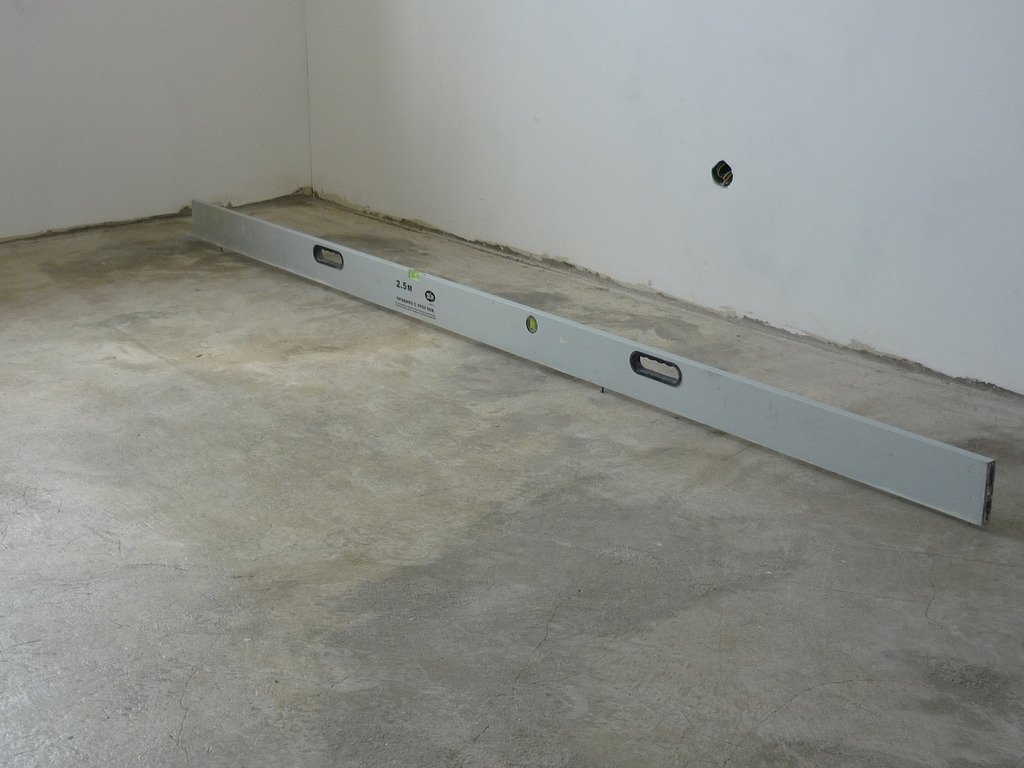
- The surface is measured. This is done in order to determine the existing curvature. Small differences are allowed - no more than 5 mm per 2 meters. Any defects that exceed the specified parameters require a more serious approach.
- A leveling mixture will help correct the situation. It is better to choose cement-sand compositions. This mixture is poured installed beacons. The result is an even and smooth base. But this procedure is performed after all deep cracks and potholes have been sealed.
- Wooden floors need the same treatment. The only thing is that the procedure will be slightly different. First, the reliability of the joists and boards is checked. Next, the wood is impregnated oil paints. The cracks are sealed in advance with elastic putty. A layer of waterproofing will be laid on the dried surface. A reinforcing mesh is pulled on top. The prepared mixture is poured.
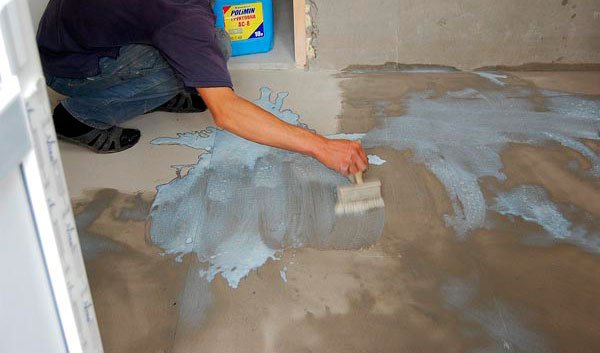
- Don’t forget about priming with penetrating compounds.
 Priming the floor before laying the tiles ensures a stronger connection of the tiles to the floor surface
 On a note! Premises with high humidity require a more careful attitude. A prerequisite will be -. Different materials can be used for this. Some can be laid (film, roll), others can be applied using a roller and brush (liquid).
Indeed, laying floor tiles with your own hands requires a balanced approach to the surface. Small imperfections cannot be expected to be corrected by the final coating.
Marking
There are two main methods of tiling a floor. Each has its own characteristics.
- The simplest option is to start installation from the far corner. The movement is towards the doorway. This method is suitable for small objects, as well as for rooms with complex geometry. Ideal for those who do not have sufficient experience.
- More can be used difficult option. In this case, veneering begins from the middle. The surface is pre-marked - you need to get four identical squares or rectangles. The lines will run through the center, creating four corners. You should choose one, it will serve as a starting point for work. Material laid according to this principle will require trimming along the entire perimeter. Therefore, such manipulations are carried out with sufficient experience.

It is recommended to start work with a preliminary arrangement of elements. That is, laying tiles on the floor is done “dry”. This will help you calculate everything correctly right away. Especially if there is a pattern that requires adjustment. It is also important to take into account the presence of seams. This method allows you to once again evaluate the size of the trim and, if necessary, make adjustments.
Advice! When making initial calculations, pay attention to the areas that will be located along the walls. To get a beautiful floor surface, you should follow the principle that the tiles should not be cut into narrow strips. The size should be more than 35-40% of the total width.
Laying
Laying ceramic tiles on the floor begins with preparing the adhesive. Even if you purchased a ready-made composition, it needs to be stirred thoroughly. When using a dry mixture, you need to follow the recommendations provided by the manufacturer.

Don't cook right away large stock glue. It should be taken into account that the process may take a significant amount of time. Then the composition will begin to lose its properties. It will simply freeze.
The work is carried out according to the following principle:


On a note! The space near the walls begins to be sealed with last stage. This approach will help reduce time, since in this case it will be possible to trim all the material at once.
- It should be taken into account that the technology of laying tiles on the floor does not allow the presence of voids. If such a defect is allowed to form, there is a high probability of damage to the coating.
- Immediately wipe off excess glue from the surface. Otherwise, the glue will have to be removed with a special scraper.
- The question often arises: how long does it take for the laid material to dry? It depends on the mixture used, but it is not recommended to walk on the floor for two days.
- At the last stage, rubbing of the seams is used. This procedure allows you to get beautiful gaps. When the need arises, additional sealant is used.
If you analyze all the requirements and rules, it will become clear that installation tiles on the floor - a difficult task, but doable.
Ceramic tiles are the most common finishing material for rooms with high humidity. Working with tiles requires time and accuracy, but following simple rules, Can with my own hands create a comfortable and cozy bathroom.
Where to begin
So, we settled on tiles.
The first stage is calculating the amount of material. To do this, you need to measure the length, width and height of the room. We determine the area of the walls by multiplying the perimeter by the height. The floor area is obtained by multiplying the length by the width. For borders and others decorative elements you will still need a perimeter.
Stage 1: calculation required quantity tiles
We determine the quantity of tiles with a small margin, since even a professional is not immune from accidental errors in calculations and during work.
Floor and wall tiles differ in strength, anti-slip properties, and often in size.
You can start working. It is better to start laying tiles from the walls.
Prepare the surface for laying tiles
In order to end up with smooth and beautiful walls, they must be carefully prepared.

You can start laying tiles.
Important points before installation
Now that the flat surfaces are ready, we apply markings. First of all, we determine from which we will start. We make a mark in the corner and, using a building level, transfer this mark to the other corners of the bathroom. Using a cord with pigment, we beat off the reference lines through the formed points.
At all stages of work, the first intended point will be an indicator of how smoothly we lay the horizontal rows.

The bathroom is tiled
The most popular methods for arranging tiles are diagonal and rectangular, which is also called traditional.
Starting from the top point of the wall where the tiles will be located, measure the distance to the bottom in whole tiles. This way we determine where the row of cut tiles will be, if necessary. Having reached the corner of the wall, we cut the tiles using a tile cutter.
To maintain equal gaps between adjacent tiles, we use plastic crosses.
The glue is prepared according to the instructions on the package.
- Take a bucket and pour it into it required amount water.
- Pour the mixture into the water little by little, constantly stirring with a construction mixer or a drill with a special attachment.
- The glue should be of a uniform consistency and easily spread over the surface of the wall.
- When working, we experimentally determine the amount of glue applied to the surface so that it does not have time to dry out.
Laying tiles

Laying the last tiles
Now it's time to create beauty.
Apply the prepared glue to the wall. Apply the tile and press lightly. You don't need to press too hard so as not to squeeze out the glue.
During the installation process, we check that the rows are horizontal and vertical. To do this, we use a building level and a plumb line.
We process the wall with the door last. We start from the corner of the wall, lay the tiles above the doorway, and then tile the entire remaining space.
A common problem when laying tiles in the bathroom is leftover corners. They are hidden by plastic. There are many colors and shades on sale now, so it is possible to choose it to suit any interior.
We begin laying the floor from the far corner from the entrance. In this case, you should plan the layout so that the cut tiles are in the most inconspicuous places. Larger plastic crosses are used for this than for walls. Before laying, the tiles are thoroughly cleaned of packaging material and dirt.
All work should be performed in good lighting.
If the floor is heated, then it must be turned off.
To cut if necessary round holes in tiles, use special nippers. To do this, you will need to very carefully bite out small pieces until you get the required size.
The final stage when laying tiles
After finishing laying the tiles, you must wait for the glue to dry completely. Usually this happens no earlier than two days after completion of the work. Then comes the turn of another important stage - processing the seams.
Key points to pay special attention to:
- The surface for cladding must be perfectly flat and free of any dirt or dust.
- The layout of the tiles must be thought out before starting installation.
- The tiles must be cut carefully. In this case, trimmings should be used in the least visible places.
- The corners are hidden with plastic corners.
- Laying must begin from the bottom of the walls, but not from the first, but from the second row. The very first row should be laid out after the flooring is done in order to hide all the imperfections.
- At each stage of work it is necessary to control the horizontality and verticality of the rows.
- As an adhesive material, we select only mixtures that are specifically designed for laying tiles.
- Apply the glue to the wall gradually so that it does not have time to dry.
- We select the spatula depending on the size of the tile.
- To obtain identical seams we use special plastic crosses.
These are the basic rules for laying tiles, following which you can independently create a beautiful appearance room.
is a process that requires precision, accuracy and diligence, but we can say for sure that if you follow the instructions, observing technological process, you can perform such repairs yourself, which will significantly reduce your costs.
The article is divided into the following stages:

Everything you need to do before installation
On initial stage You will need to do and prepare the following:
Cooking necessary tool, and you will need the following:
- Building level;
- Hammer or drill;
- Roulette;
- Attachment for a preforator or drill for mixing the mixture;
- Notched and rubber spatula;
- Paint brush and roller;
- Pencil;
- Plastic crosses for tile joints;
- Tile cutter;
- Container for primer and glue.
We make a preliminary calculation of the number of tiles needed for repairs
Making it is not very difficult, since it is enough to know all the linear dimensions of the room, that is, the length and width, which can be found out using a tape measure. Next, the results obtained must be divided into the corresponding linear dimensions of one tile, adding to them the width of the joint between the tiles (usually 2-5 mm).
Please note that if you took the length and width in meters, then the dimensions of the tile + seam must also be converted to meters.
This way you will know the quantity required tiles, and almost to the point. IN in this case It is also necessary to take a reserve of 10% of the quantity, if the tiles are 15%, this reserve is taken for waste, and also taking into account the fact that the tiles may be damaged during the process.

Preparing the floor surface for work
Naturally, you first need to remove literally everything from the room, from furniture to plumbing fixtures. Now it’s time, for this it is best to use a hammer drill with a special chisel attachment, or it is also called a spatula; if you don’t have a hammer drill, then a chisel and a hammer will do. Do not forget about safety precautions when dismantling tiles - use gloves and goggles to avoid injury.
Leveling the floor surface
This important stage, since the better you level the floor surface, the better and easier the installation of the tiled surface will be, so you need to know all the nuances of this item in order to cope with the task perfectly.
The floor leveling process can also be divided into several stages:
- Thorough cleaning of the floor surface;
- Installation of waterproofing, if it has not been done previously;
- Leveling the surface with a mixture;
- Applying primer to the floor.

Everything is clear with the first point - it is necessary to completely remove all debris, as well as dust, for which you can use a vacuum cleaner, because dust significantly reduces adhesion.
Leveling is also an important point, since the tiles should only be laid on a solid base, which is the key to long operation of this coverage, and the surface must be even - this will avoid unevenness and distortions, which is why the screed is made, which can be either cement-sand or from special ready-made mixtures that are sold on construction markets.
Inspect the surface for unevenness; if there are cement skirting boards left, they must be removed. Using a building level, check for differences in height, because extra gaps will only interfere with work. It is acceptable that the differences were of the order of 5 - 10 mm, however, if possible, it is better to do cement-sand screed or use self-leveling mixtures - this way you will get rid of all defects and, as we have already said, significantly simplify the next stage of repair.

If the base of your room is concrete, then you can use both cement-sand and other ready-made mixtures. However, if the floor is wooden, then in this case the process will be slightly different - it is necessary to properly treat wood covering, soaking it with paint on oil based. After this, a layer of reliable waterproofing is made and this is a must! Now you need to make reinforcement from a mesh, which is installed just above the floor surface (4-5 mm is enough) and after that the floor is filled with a cement-sand mixture, creating a strong, reinforced base.
To achieve almost perfect horizontality, they will allow you to use exactly the required thickness of the solution, which will result in excellent horizontal level, without drops and potholes. Periodically check the correctness of the process using a building level.

Choosing markings for tiles
Typically, tiles are laid in one of two ways:
- From distant free angle in the direction of the wall with the doorway - this option is the fastest and is mainly used for small rooms or complex shape, mainly used by tilers without much work experience;
- Laying from the middle to the walls - usually used indoors large area. Markings are made with which to find the central point - for this, the midpoints of two opposite walls are marked using a tape measure and a line is drawn along these marks, the process is repeated with other opposite lines, the result is a cross with a point exactly in the center. Noteworthy is the fact that in this case, identical cut pieces of tiles will be located along the walls of the room. Now is the time to double-check the calculations and start laying, starting from any of the four corners of the markings you made in advance in the center.

Before starting installation, it is recommended to lay out the tiles on the floor surface in order to finally check everything and see how the coating will approximately look, do not forget about the seam between the tiles. It is advisable to avoid very small cuttings of tiles - pieces of tiles less than 20% of the width will look unsightly and the most important thing is that in the most visible area of the room the tiles are not only intact, but also run exactly parallel to the wall, while it is better to hide the cut pieces under furniture or sanitary fixtures, and also place it in the least visible places.
Details about the installation process
It all starts with preparing the mixture; at the moment, construction markets can offer big choice tile adhesive and this option is much better use cement-sand mixture. Water is poured into the container, after which the dry, ready-made mixture is poured into it and mixed using a drill and a special nozzle until it has a homogeneous consistency. When preparing glue, be sure to follow the proportions indicated by the manufacturer on the packaging; you should also not dilute a lot of the mixture at once, because the process is not quick and part of the solution may eventually harden.
The floor surface must be completely clean before laying, and also, in order to increase adhesion, it must be treated with a primer; it is convenient to use a paint brush or roller for application. After applying the primer, you must wait until it dries. Immediately before laying the tiles, it is advisable to moisten the surface a little.
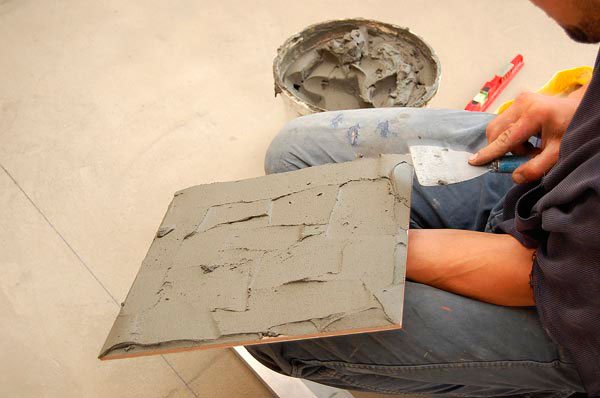
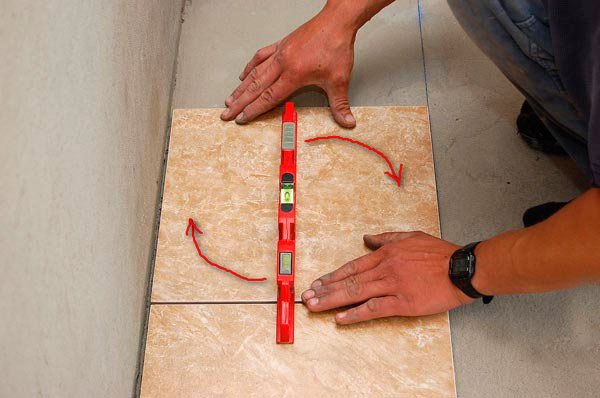
Tile adhesive is applied to the selected and ready-made area of the floor, after which a notched trowel, removing the excess, then put the glue on the side of the tile with a slap, with which it will be pressed to the base, the glue is also leveled with a spatula. Then the tile is turned over and pressed to the intended place, and force must be applied evenly over the entire area. We do the verification building level and if the tile lies a little unevenly, then using rocking movements with pressure you press in the area that is above the desired level. If the tile is below the level, then you need to carefully remove it and add mortar in the right place.

After this, check the laid tiles again using a level and if everything is fine, then you can proceed to the next one. For ease of control, you can use a nylon thread stretched by a level - this will make it easier to navigate, however, the final check still needs to be done using a level.
Do not forget about the gaps between the tiles on the floor - to ensure that the seams are even, special plastic crosses are used - it is with their help that the interval between the tiles will be the same over the entire area. Seams are necessary so that during the process of moistening due to an increase in volume, the ceramics do not crack or swell, squeezing each other out. The tiles are cut using a tile cutter.
Finishing the job
After the work is completed and the glue has set a little, you need to carefully wipe off the remaining glue from the surface of the ceramic. You cannot walk on the laid surface for at least a day, as otherwise you can ruin your work.
The necessary time has passed and now is the time to clean the seams from debris and seal them using a special grout that has increased moisture resistance. The most convenient way is to use a rubber spatula - typing a small amount of mixture, it is pressed into the seam with movements directed across the seam, jointing can be done using a piece of cable - press it between the tiles and draw it along the entire length - remove the squeezed out excess with a spatula. After the grout has set, you wipe the tiles, and final cleaning is done only after the grout has completely dried.

Detailed video instructions
The video instruction will allow you to see the described installation process and all the nuances clearly:
That's all - you can only be glad that you have significantly reduced the cost of updating the room.
In the minds of people far from the tile craft, there are two opposing opinions. Some consider tiling to be too complicated, while others are convinced that you can figure out how to lay tiles on the floor in a couple of days. Golden mean It hasn’t let anyone down yet, it works in this case too. Laying ceramics is not nuclear physics, but it shouldn’t be considered a piece of cake either. However, with the theoretical basis obtained from the article and with the help of practice, you will soon be able to improve the interior on your own.
Quick navigation through the article
Preparing the base
Laying floor tiles with adhesive is impossible without a prepared base. In order for cladding to be a pleasant and not a painful process, and in order to save material, the surface must be perfectly flat. To do this, the floor in the room is filled with screed or a self-leveling floor is made using self-leveling mixtures.
- Screed requires more qualifications, but is cheaper and suitable for leveling surfaces with huge differences.
- A self-leveling floor will be more expensive, but it will not require much skill. Considering that extremes with the horizontal are rarely found in a standard home, it is recommended to use it.
Self-leveling mixture
The mixture is a solution that easily spreads over the surface, forming a horizon. There are mixtures based on cement and gypsum base. The latter are only suitable for dry rooms with a difference of no more than a centimeter, and this goes against the “tile” goals. Cement ones are ready to level a rather uneven floor (up to 5 cm).
Before using the solution, you need to thoroughly clean the base of debris, remove obvious “high spots”, and caulk large cracks if necessary. Immediately before pouring, the surface should be treated with a primer.
The mixtures are usually sold in 25 kg bags. This amount requires approximately 7 liters of water (the exact dosage is indicated on the packaging). Because the ready mixture needs to be used up within 30 minutes, calculate your strength.

Self-leveling floor requires compliance temperature regime– less than +5 degrees already has a negative effect on the final result.


Although you can walk on the finished base after 6–12 hours (depending on the layer), laying ceramic tiles on the floor is possible after three days.

It is correct to level the floor in a bathroom or shower with a slight slope. In the first case, the water that gets in should flow from the bathtub to the door, in the second - to drain hole(ladder). In this case, the floor level in the bathroom should be lower than in the corridor, or in doorway there must be a threshold. This is done to protect the entire apartment from flooding.
Layout types

The tiles can be laid “seam to seam”, “staggered” and diagonally. The first method is familiar and popular; the boundaries of the plates must match. The second is the simplest, reminds brickwork; even if small deviations appear, they will not be very noticeable. Laying tiles on the floor diagonally is the most the hard way. It is difficult to do it correctly the first time. Is there some more exotic ways, and there are many, but it is better to use them as you master those described above.
Marking
Depending on the type of layout, the floor is also marked. If you decide to lay tiles using the first two methods, you will only need to calculate the number of tiles taking into account the seams. Laying floor tiles (and wall tiles correctly) always starts from the most visible area, and trimming takes less time. relevant places. Therefore, the calculation of the entire tile must begin from the most “important” wall.


Most the right way get beautiful cuts on both sides - align the center of the first tile with the center of the floor. And then continue laying to the edges. On the bathroom floor, the center is calculated from the bathtub screen to the opposite wall. In some cases, it makes sense to deliberately move the center of the installation or change the size of the room by a couple of centimeters (due to the box) in order to avoid trimming altogether.
Floor seams and wall tiles do not necessarily have to match.
The best video on how to lay tiles on the floor correctly:
Marking for “diagonal”

Marking axes when laying tiles diagonally:
a - marking a diagonal in a rectangular room, b - laying tiles of the same color along the frieze with the correct markings, c - laying multi-colored tiles along the frieze with incorrect markings, d - laying tiles at an angle in the center to form a single-color row along the perimeter of the frieze.
Laying tiles this way is not easy for a beginner. This layout makes sense because it is more decorative and visual increase space. The disadvantages include not only the complexity of the cladding, but also increased consumption slabs due to more waste.
There are several ways diagonal laying. All of them require a rectangular geometry of the site, which will be given over to this type of layout. If right angles in the room are not maintained, the outer tiles running along the perimeter along the walls will be cut unevenly. To avoid this, you can surround the central rectangular area with tiles arranged in the usual way (or a frieze). This will smooth out visual flaws. But this is a matter of taste.
The rectangle is cut out using cords and a tape measure. Opposite sides, like diagonals, must be equal. Having walked along the outer contour of the rectangle with tiles “seam to seam”, you can begin laying ceramics from the most visible place. The internal contour consists of alternating halves and whole slabs. Unlike the usual way, the cords should be pulled along two diagonals, forming a right angle.
Laying tiles
If the floor has not previously been waterproofed, you will need to install a liquid barrier. Let's say more: additional waterproofing It won't hurt, don't rely on house builders. When it comes to tiling the bathroom floor, waterproofing is mandatory. Making it is not problematic; a dry mixture diluted with water is usually used. Mix according to the instructions and use a paintbrush to go over the floor surface, covering the walls by 10–15 cm.
When the waterproofing has completely hardened, you can begin laying the tiles.

The solution must be applied either to the tiles or to the base. If the room is large, the second option is more reasonable - the process goes faster. If the floor is small or it comes down to cutting tiles, it is better to coat the ceramics.

For floor tiles, trowels with 8-12 mm teeth are suitable, depending on the unevenness of the base and the size of the tiles.

Laying tiles on the floor begins from the most visible place - the entrance.


Some tips:
- Do not wet the base or tiles.
- Do not use glue that has been standing for more than 40 minutes.
- If you “glue” both the base and the tile, adhesion will increase. In this case, it is enough for one of the elements to apply the mixture “scraping” - apply it and immediately remove it with a spatula. The remaining thin layer will enhance adhesion.
- To prevent the glue from sticking to the comb, keep it constantly in water.
Tile cutting

It is not enough to know how to glue tiles; you need to master the skill of trimming. The most popular profile tool is a tile cutter. There are many variations, usually a double-rail with bearings is used. But since floor tiles are much stronger than wall tiles, a tile cutter must be expensive. Cheap household models they make a lot of defects. It’s easier to cut everything off with a grinder.
In addition to mechanical ones, there are also electric tile cutters. They are more versatile and allow you to work with thicker ceramics.
The figured cut is performed using a grinder. Sometimes the help of wire cutters is required.


Grouting joints
Laying tiles on the floor with your own hands is finished, all that remains is to seal the seams. This is done using a special grout and a rubber spatula. If several colors are used, you need to use masking tape on the tonal boundaries.
Be sure to clean the seams before jointing.
Using a putty-applied spatula, apply the mixture to the seams in diagonal movements, immediately removing any remaining residue. As the fugue hardens, use a sponge to bring the gaps between the slabs to the desired condition.
Well, you have taken the first step in understanding how to lay tiles on the floor correctly and quickly. Do you know how to lay tiles? different ways, now it's time to start practicing.


