Two-level stretch ceiling- it's not only beautiful elements interior, but also quite complex designs, due to which the design of the apartment can be significantly transformed and visually expand the space. In addition, it is with the help of this decor that you can hide unevenness. ceiling covering or electrical communications.
In order to carry out competent installation, you will need to first prepare necessary equipment, the presence of which will allow you to carry out the process quite quickly.

Namely, you will need to be present:
- Rounded spatula;
- Hammer;
- Hammer;
- Construction hair dryer;
- Laser level;
- Roulettes;
- Pencil;
- Hacksaws for metal.
It is important to note that ceiling coverings made on the basis of polyvinyl chloride, especially gapless ones, retain heat in the room much better and also look quite impressive when installed spotlights. Glossy ceiling serves as a kind of reflector of rays, which creates not only a magical, but also a pleasant atmosphere.
Before you order fabric production and installation, you should decide on its finishing, for example, look at the options for products with photo printing. The starry sky will look very original, especially with backlighting.
Making a two-level stretch ceiling with lighting: examples
The installation of lamps on double suspended ceilings can be very different.
There are three main types that you should pay attention to:
- Spot;
- Luminescent;
- Suspension.

You can find an incredible amount of spot ceiling structures on sale, as their range is simply off the charts in quantity. They help create a magical atmosphere in the room. Due to them, light is distributed over all surfaces present in the interior. This lighting is perfect for a living room or bedroom. If you plan to install a stretch ceiling in the kitchen, then it is better to select spotlights that have transparent glass installed.
Fluorescent lamps are built-in structures. They look very elegant, especially in small rooms, such as a hallway or bathroom.
The most common are suspended lighting, since they can be different in design, are sold in a large assortment, and you can make to order exclusive models specifically for your interior, which will be in a single copy in the world.
Frame of a two-level stretch ceiling
Two-tier stretch ceilings, for the manufacture of which a certain technology is used, must be installed on a frame located around the entire perimeter of the room. In order to build it, you will need to draw a line or, in other words, markings, which will be a guide and the vertical edge of the ceiling. The tension level of the ceiling can be measured with a special laser device or with your own hands using a tape measure and pencil. Next, the timber is mounted at the intended levels in increments of 20 cm, and a metal profile is mounted on it - the basis of the future coating. On the side where the upper level of the canvas will be located, plywood is installed.
If you plan to install a two-level, square and curved ceiling, then the frame can be very different. For it you need to use a profile with notches to make a smooth bend, and you also need to use bent plywood.

The plywood will be installed on steel corners and you will also need to purchase additional bent plasterboard installed on the guide profile. The step between them depends on how curved the line is, but it should not be less than 20 cm.
There are suspended ceilings made using plasterboard boxes, for which CD and UD profiles are used. It is worth noting that in this case the frame will be located not only around the perimeter of the room, but also along its area, which will visually resemble a box. The guide profile is installed on the walls of the room and on the base of the ceiling. Assembled structure will be covered with plasterboard sheets.
For a backlit ceiling covering, you will need a completely different frame system, namely you need:
- Ceiling rail;
- Aluminum corner;
- Guide profile.
Their quantity is calculated directly according to the project. The tires are installed on the ceiling according to pre-made markings, a corner is installed on it, and a light strip will be mounted into the structure resembling a shelf.
How to fix a 2-level stretch ceiling
Studios that make matte black and white or glossy two-level ceiling coverings look very elegant. This is modern, unusual and extremely profitable, since this is exactly how you can implement visual extension space. In order to make a calculation using a calculator, you must first take a measurement.

The method of fastening it depends on what types of structure will be used and on the size:
- A conventional ceiling covering, for which conventional rectangular sheets are used, is installed along a vertical edge.
- 2-level ceiling structure, which is made of tension fabric and there is a wave in it - here a height difference will be required for installation.
- Combined two-level ceiling.
- Designs with two tiers and lighting.
Instructions for installing such canvases suggest various options fastenings
There are two of them:
- Harpoon. He has positive reviews, and is also considered one of the most popular, since it is simple and you can make a sketch and installation yourself. A clear measurement of the room is extremely important here so as not to make a mistake with the materials.
- Klinova. The technology of this method is more complex and does not require little experience to complete the installation. However, this type has its own advantage and it lies in the fact that it is not necessary to install a harpoon around the perimeter of the entire canvas. Strict adherence to dimensions is not required here, and the coating can be retightened, defects can be eliminated, and even removed during operation.
Profile for two-level suspended ceilings: forms
Before choosing pictures and photo printing in order to decorate the ceiling covering, you need a precisely drawn up diagram of a two-level ceiling and drawings, which can be ordered in Odintsovo. It is along them that the profiles will be installed.
The profile is intended to:
- Fix the canvas;
- Close the gaps between the wall and the covering;
- Strengthen the structure.

There are several types of profiles, and they differ in how the material is fixed. The service life of the ceiling, as well as its reliability, depend on which type of profiles will be preferred. Complex structures of two levels are often installed using two types of profiles.
The profile is:
- Open, made of PVC and aluminum;
- Concealed wall made of PVC and aluminum and it is considered universal;
- For double fabric with a separator;
- For double fabric without dividers;
- Double;
- Structural type;
- Angular;
- Made from polyvinyl chloride for fabric.
The installation pitch can vary between 70-150 mm, which can be affected by the curvature of the structure. Universal profiles are made mainly of aluminum and are mounted both on the surface of walls and ceilings.
That is, they can be used to fix the canvas using both the upper and lower methods. Installation is carried out around the perimeter of the room on a leveled frame installed according to the markings. Often, installation requires the use of a straight spatula to eliminate gaps between two parts of the canvas, and is also needed in addition decorative tape.
How to make a two-level stretch ceiling
For installation of high-quality stretch ceiling, regardless of LED backlight or without it, you need not only to purchase materials.

Required:
- Read the instructions carefully if you plan to independent conduct works;
- Hire craftsmen if you have no work experience;
- Select excellent guides of the highest category;
- Stock up on the necessary tools;
- Prepare the surface of the ceiling and room;
- Follow technology.
Previously, suspended ceilings were installed using special heat guns, and careful preparation was required to comply temperature regime, a certain level of humidity. In addition, this method was not particularly safe, and it was impossible to carry out the steps to create a two-level ceiling on your own.
Installation of two-level suspended ceilings (video instructions)
Modern technologies have allowed people to independently carry out work on installing a stretch ceiling, if they have the skills and desire to do so. The main purpose of creating a two-level ceiling is to create two tiers. The tensioning of the canvases is carried out gradually at each individual level, and the end part of the wave is often sealed with plasterboard, and of the flexible type. In order to hide defects such as gaps between coatings, it is worth using such finishing material like a decorative ribbon. Thus, the composition will be completely completed and will acquire original look, which is what is required.
Among the many design solutions in terms of ceiling design, more and more owners of houses and apartments are inclined to install two-level plasterboard ceilings.
Two-level figured ceilings will help make the interior of the room refined and individual, revealing ample opportunities on creating light compositions. In addition, this choice allows you to get decorative ceiling relatively quickly and inexpensively.
Two-level ceiling: assessing the merits
Installing two-level plasterboard ceilings, especially with your own hands, is a costly process in all respects: financial, time and effort. But all this is compensated by the opportunities and advantages of installing a multi-level ceiling:
- obtaining perfectly smooth surfaces, the ability to completely hide defects in the rough (original) ceiling
- disguise (covertly lay) all communications and network engineering– electrical wiring, freon ducts for air conditioners, TV, telephone and Internet cables, air ducts, heating pipes, etc.
- using the installed backlight zone the space, designating the area of the dining room, living room, kitchen, bedroom, etc.
- visually redraw the geometry of the room, its shape, visually transform the space
- the ability to create unique, multi-level lighting systems that combine different types (halogen, LED, fluorescent) light sources
- opportunity again (and repeatedly) paint the ceiling to change the mood and atmosphere in the room
Methods for installing two-level plasterboard ceilings
By your design two level ceilings made of plasterboard are extremely varied, but in general two main types of installation can be distinguished, the main difference of which lies in the choice of the top level.
First way. Used as the top level existing ceiling , and plasterboard boxes are mounted only in certain areas (islands) or along the perimeter of the room. This method allows you to significantly save materials (and therefore money) and significantly speed up the process. However, this method is applicable only with a flat ceiling, when the main plane is quite smooth and does not require significant repairs; it will only be possible to putty it. In this case, the second tier is installed to visually divide the room into functional areas
or hiding (secretly laying) communications. In Fig. 1 the first level is standard ceiling
(painted or plastered), second level (box) - drywall. The joint is solid, the lamps are built-in, mounted on the second level. An option is a second tier with a canopy (Fig. 2), in which light cords or lamps are laid. The first level is a prepared base ceiling, the second is plasterboard with built-in lamps. Installed on the second level outlet, giving diffused soft light. This design allows, by turning off the spotlights (main) to get unobtrusive, dim lighting, creating a romantic and cozy atmosphere in the room.
Second way.
With this method, both levels are made of plasterboard. Most often this is caused by the unsatisfactory condition of the rough ceiling plane, when all its visually visible defects are easier to hide than to repair.
Usually, the entire base area of the ceiling is first mounted, and then the elements of the second are hemmed onto the frame of the first (basic) level (Fig. 3).
Another option (Fig. 4) is to attach a guide profile to the side of the installed box, on which the main plane of the ceiling will be mounted.
Sequence of work
- In order to correctly and reliably install two-level plasterboard ceilings on your own, you should adhere to the following procedure: develop a two-level ceiling project and implement it precise markings
- on the mounting grid
- determine the type of installation of a two-level ceiling and the sequence of work
- prepare the ceiling
- accurately transfer the mounting grid to the base ceiling
- assemble the frame
- lay communications
- cut shaped trim parts to size, form curved elements
- cover the frame with plasterboard conduct finishing
- ceiling
install lamps
Preparatory stage Before you install two-level plasterboard ceilings with your own hands, you need to complete all the “wet” work - rough finishing of the walls, screeding the floor, etc. Drywall is very sensitive to high humidity
, therefore, the air humidity should not exceed 75%, the room temperature should not be lower than 16C. When installing a two-level ceiling using the main ceiling as a base, remove the previous plaster, seal the cracks, treat with a primer and plaster the ceiling, leveling it. Dry the room and only then begin work on installing a two-tier (multi-level) ceiling.
Frame installation The frame is mounted from galvanized cold-formed metal profile no thinner than 0.5-0.8 mm. It is the accuracy and correctness of installation of the frame that determines the strength and evenness of the entire structure, so it is very important to correctly and accurately mark at the very beginning. All stages of frame assembly must be checked. To secure the profile, special metal screws are used. The finished frame is carefully leveled in several directions before proceeding with plasterboard cladding.
Advice! When installing the frame, it is important to immediately provide for the mounting location chandeliers, laying at least two embedded profiles - this will make it possible to securely fasten the lighting device.
Stretch ceilings are a modern and popular type of decoration. Using this technology, you can give the room any desired look and shape. The most common are two-tier designs - they look stylish and elegant, and at the same time they have an affordable price. If you have the materials and tools, you can install a two-tier stretch ceiling yourself.
Features of two-tier ceilings
Two-level stretch ceilings fully possess all the advantages of simple tension structures; in particular these are:
- beauty and richness of colors;
- the ability to hide communications, wiring and make built-in lighting;
- no need to prepare and level the rough ceiling before installation;
- durability, long-term preservation of color and texture.
These qualities are inherent in all ceilings, regardless of material and texture.
The most popular ceilings made from PVC film among consumers also have the following qualities:
- waterproof and dustproof;
- antistatic surface;
- ability to retain water during leaks.
With all these advantages, two-tier ceilings take away only 10-15 cm of height from the room, which is why the two-level design is most popular among designers, finishers and apartment owners.

A two-tier ceiling is mounted in two ways: on a plasterboard base or on aluminum frame . In the first case, the lower tier of the ceiling is made in the form of a box made of gypsum board or gypsum plasterboard sheets, puttyed and painted. Profiles for suspended ceilings are installed on the structure and the upper tier is attached. This installation method is justified if installation is necessary massive chandelier or decorative elements, for example, gypsum stucco.
The second method involves installing both tiers of the ceiling on special guides, with all planes (both horizontal and vertical) formed from the stretch ceiling fabric. This ceiling is lighter and creates less load on the floors, is not afraid of moisture and does not require repairs for 10-15 years.
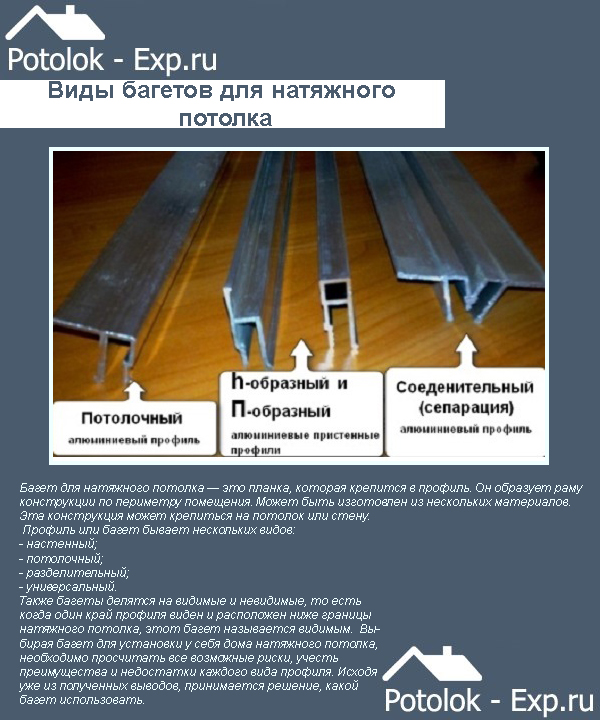
Guides for suspended ceilings
The stretch ceiling canvas is attached to aluminum or plastic guides (baguettes), which are fixed to the walls, and in rare cases, to the ceiling.
Depending on the mounting location, the profile can be:
- ceiling;
- wall;
- connecting.
Ceiling is used for the upper tier of a two-level ceiling, while the gap between the floor slabs and the canvas is minimal. The wall-mounted one is mounted at any level of the wall or plasterboard box. Connecting, which is also called separation, is used in cases where it is necessary to connect two canvases at the same level.
Methods of fastening the canvas
The most popular methods of attaching the canvas to the guides are harpoon and wedge. The harpoon system is usually used for PVC ceilings, and the harpoons are attached at the stage of cutting and manufacturing the canvas according to finished measurements. The wedge system is used when installing textile fabrics; it allows for adjustment and tightening on site.

Installing a ceiling with a wedge system requires highly qualified installers, so when installing a two-tier ceiling with your own hands, a harpoon system is often used. In this case, the harpoon is inserted into the groove of a pre-installed baguette, where it (the harpoon) snaps into place and is rigidly fixed. The gap in the guide is covered with a plastic cover, which has a fairly elastic structure and allows you to hide minor irregularities in the wall.

Important! To fasten the canvas harpoon system high measurement accuracy is required. You need to measure the room with an accurate instrument, taking into account not only the length of the walls, but also the diagonals.
How to choose the shape, color and texture of the ceiling
Multi-tiered ceilings are different huge variety shapes and colors. They can be plain or combine fabrics of different textures and colors; this technique is often used in zoning. Designers use different shapes tiers depending on the overall style and size of the room.
Geometric figures
Strict straight lines are usually used in decoration classic style. One of the tiers of the ceiling is made in the form of a symmetrical geometric figure. It can be located in the center of the room, against one of the walls or in a corner.
- A rectangle, oval or ellipse, located across a narrow long room, and made of linen contrasting color, visually expand it.
- A circle, square or polygon in the center of the ceiling lifts it, giving it depth and spaciousness. They are usually made from a darker fabric of a similar or contrasting color, decorated with a chandelier or lighting, and sometimes with special effects and prints.
- The lower tier of the ceiling, located near the wall or in one of the corners, is used for zoning, highlighting a bed in the bedroom, a table in the office or kitchen.

Note! When choosing a symmetrical figure for the lower tier, it is better to also place the built-in lamps symmetrically.
Complex free-form shapes
They can be based on simple geometric shapes or have an abstract curvilinear design. Such ceilings are appropriate in the design of any room, from a study to a nursery and a bedroom. When choosing a shape, you don’t have to limit your imagination, but the main rule is to maintain a balance between the size of the upper and lower tier.
Popular abstract shapes are given below.
- A blot or daisy with random outlines will look great in a nursery in combination with a large pattern on the wallpaper. They are usually made of glossy fabric in bright, saturated colors that contrast with the main tone. Additional lighting for the decorative tier is usually made from spotlights or LED strip.
- A lake or pond is a central element with curvilinear shapes, which can be either the lower or upper tier. The color is usually contrasting; in some cases, the effect is achieved by combining fabric textures in a single color scheme.
- Accordion or SIM card - a modified rectangle with cut corners and rounded lines will fit perfectly into a standard-shaped room; this design looks both in one color and in a combination of shades.

Note! Elements located in the center of the room in the form of an upper tier look very advantageous when framed by an LED strip. They can be additionally decorated with a chandelier with many LED lamps.
Asymmetrical waves
A popular form of two-tier ceiling, it can be used in rooms of any shape, size and purpose. With the help of various wavy lines, you can compensate for the shortcomings of the room, expand and zone it. Despite the complexity of the frame, wavy structures are used very widely, both in single-color and two-color ceilings.

- Using one wave, you can divide the room into two functional parts. In this form of ceiling, a combination is appropriate bright colors or a single-color design, with one tier highlighted by spotlights.
- The wave can go around the room along three walls or highlight one corner (this is how they create cozy areas recreation).
- A very popular ceiling is made of three parts, forming an insert. irregular shape, passing through the entire room from wall to wall. In this case, the central part is usually made of dark glossy canvas, and the room looks taller and more spacious.
Note! Making two-tier waves on the ceiling with your own hands is quite difficult; it is better to seek the help of professionals.
In two-tier structures, you can use a combination of different fabric textures, in particular:
- the main tier is matte, the elements located in the center are made of mirror fabric;
- a combination of two matte, satin or glossy canvases of the same texture, but in a contrasting color;
- a completely monochromatic ceiling of the same texture, in this case the zoning effect is achieved using basic lighting or backlighting.
When choosing a material, it is better to listen to the advice of designers or look at examples of work that best suit the style of your apartment.

Installation of two-tier ceilings: instructions
If you decide to install suspended ceilings with your own hands, first of all, soberly assess your strength: this work requires precision and accuracy. Installation simple ceiling It’s easier to order from a company; payment for the work in the total price tag will take only a small part, the rest you will pay for materials.
Significant savings from self-installation happens in two cases:
- the two-tier structure has a complex shape with many joints and bends - payment for these elements depends on their footage;
- design project involves installation large quantity lamps and other built-in elements - for each of them, installers charge an additional fee, which in total will result in a significant amount.
The sequence of work for installing a stretch ceiling includes the following steps:
- room measurements;
- production of a design project;
- ordering canvas from the company;
- preparation of the rough ceiling;
- installation of guide moldings;
- laying electrical wiring and installing fixtures;
- installation of the canvas.
Most of the work can be done independently if you have the skills and the necessary tool. Step-by-step instructions are described below.
Room measurements and sketch making
It is known that walls and corners in modern houses far from perfect. Therefore, to produce a canvas that completely follows the contours of the room, it is necessary to measure not only the length of the walls, but also all possible diagonals.
Indoors simple rectangular shape it's quite simple, you just need to follow the plan shown in the first picture. Draw a schematic plan of the room, mark the corners with letter symbols and mark on the sketch the results of measurements of all four walls and both diagonals. It is more convenient to take measurements with a laser tape measure.

For indoors complex shape there will be many more measurements. So, for a room with niches and projections, it is necessary to draw lines on the plan connecting all possible angles, and then measure these distances.
If the walls have curvilinear shape, it is necessary to draw rays emanating from one corner on the plan and measure the length of the segments.

After all the measurements, the room plan is drawn to scale on paper or on a PC in any graphics editor. Symmetrical elements are drawn using the basic tools of a graphic editor, after which control points are marked on the drawing and the distances between them are measured.

Geometric shapes on the ceiling - measurement methods
Asymmetrical waves and other designs can be drawn by hand or using a template. On ready plan it is necessary to mark the ceiling levels and note other elements: lamps, pipe passages through the canvas, fire alarm sensors.

The finished sketch can be taken to the company to order a canvas with harpoons attached to it. The color and texture of the ceiling are also chosen there, and other components can be ordered: baguettes, flashings, lamp fittings.
Note! At independent measurements the manufacturer is unlikely to take responsibility for ensuring that they match the size of your room. If you are not confident in your measuring and drawing preparation skills, it is better to entrust this to specialists.
Preparing the rough ceiling and walls
Stretch ceilings do not require careful preparation of the rough ceiling or floors. It is enough to remove old crumbling paint or plaster from them and seal the cracks and joints. If the ceiling is installed with hemming and suspended structures, they are dismantled and the holes from the fastening of the guides and hangers are sealed with putty.

When installing thermal insulation or noise protection, a structure holding it must be installed before laying electrical cables and installing lamps.
The finishing of the walls can be done both before and after the installation of suspended ceilings, but work on leveling the walls must be completed before the measurements begin, so as not to introduce an error into the final result. It is better to finish painting the walls with interior compositions before stretching the canvas, so as not to stain the ceiling. But wallpapering is carried out after installation ceiling structure so as not to inadvertently tear the wallpaper when installing baguettes.
Satin stretch ceiling - pros and cons
To find out about all this, read. You may also be interested in material about which ceiling is better -.
Installation of stretch ceiling
After preparing the room, ordering the guides and manufacturing the canvas, you can begin installing the two-tier ceiling.
It is necessary to prepare the following tools:
- drill or hammer drill depending on the type of walls;
- screwdriver;
- metal scissors;
- gas heat gun and a balloon;
- mounting knife;
- tool for installing electrical wiring.
You should also stock up on an electrical cable, fittings and brackets for lamps, corrugated metal tube and terminals for connection.

Step 1. Level joints are marked on the ceiling. To lower the upper tier of the ceiling to the required height, a block or metal carcass. In this case, it is necessary to use a level to avoid distortions. A baguette is attached to the block at the height of the upper tier of the ceiling.
Step 2. Mark the level of both tiers of the ceiling on the walls. If the wall decoration is not completed, you can do it with a marker. Attach baguettes to the walls around the perimeter of the room. Laying electrical cable in a corrugated sleeve and bring it to the installation site of the lamps. Install the fittings on adjustable brackets to the ceiling.
The method of attaching the fittings to the ceiling is shown in the figure. Upper part The racks are attached directly to the ceiling or to a block. The lower part of the rack, equipped with a tread ring, must be located strictly on the plane of the stretch ceiling.

ceiling. Part 1
Highly heating lamps should not be used for suspended ceilings. Recommended power various types lamps are shown in the table. For luminaires with a voltage different from the mains voltage, it is necessary to install a step-down transformer with a rectifier unit.
Step 3. Another block is attached, forming a vertical plane and the corner of the lower tier of the ceiling. Its edge, on which the film will be stretched, is lined plastic corner so as not to tear the fabric. Small irregularities are filled epoxy glue, after drying, sand with fine sandpaper until smooth.
Step 4. Install the chandelier mount on adjustable brackets. The structure must be strong enough to withstand the load. Connect the electrical cable to the mount.

Video - Installing a chandelier on a suspended ceiling
Step 5. Heat the room using a gas heat gun to a temperature of 55-75 degrees. In this case, the stretch ceiling fabric will soften and become pliable. Fastening the canvas starts from the top level. First, the corners of the ceiling are put in place, then, using a special plastic spatula, the harpoons are carefully tucked into the baguettes, making sure that the canvas does not warp.

Do the same with the second-level canvas; if necessary, preheat the air in the room. After the room has cooled down to normal temperature the fabric stretches and becomes elastic.
Important! When heating a room with a gas heat gun, the cylinder is placed in an adjacent room, on the street or on the balcony.
Step 6 When installing built-in lamps, it is necessary to cut holes for them. To do this, you need to feel the tread ring on the pre-installed reinforcement and glue the thermal insulating ring from below exactly along its contour. The fabric in the center is carefully cut crosswise and the excess is removed, after which the lamp fittings are inserted.

Installation of a two-tier tension
ceiling. Part 2
Step 7 To hide the cracks in the baguettes, plastic covers are installed. This must be done carefully so as not to damage the canvas when putting the groove of the flashing on the back tooth of the baguette. If the walls are not yet covered with wallpaper, this operation is postponed until the wall repairs are completed.
Video - Installation of two-tier stretch ceilings
Two-tier stretch ceilings are not only stylish, but also convenient: you do not have to regularly update the finish, because a properly installed canvas does not lose its shine and elasticity for 10-15 years. Original design and worthy appearance will create a cozy atmosphere and comfort in the house.
Designers pursue two goals: to give the interior individuality and to hide possible defects in the ceiling. The design of such ceilings uses various materials. Their choice depends on the style requirements and wishes of the owner. Features of choice, design varieties and installation details.
Two-level stretch ceilings for the hall: advantages and disadvantages
What can be achieved by using two-level ceilings in the hall, what will they give to the room and what is their appeal? Any designer can easily answer these questions.
- The two-tier ceiling design adds expressiveness to the interior.
- Using the shape and color of the ceiling details, you can emphasize an important piece of furniture.
- Two levels help in zoning of space.
- A stretch ceiling is an excellent camouflage for communications and defects in the rough surface of the ceiling.
- It is possible to place light sources on different levels, which leads to original lighting effects.
- An endless series of shapes and colors.
As you can see, the two-level ceiling design has plenty of advantages. But picky consumers do not forget about the shortcomings of the product. What can be attributed to the disadvantages of two-level stretch ceilings?
Followers single-level ceilings think that multi-level structures“steal” the amount of free space. They create a visual sensation of the pressure of the arch above the head. In addition, two-level ceilings are more difficult to maintain. And yet decorative value similar designs higher than traditional whitewashed and painted ceilings.
Varieties
The list of components that influence the variety of two-level structures includes: material, shape and color.
Form
By combining a plasterboard ceiling and a suspended ceiling, you can get voluminous shapes around the edges and a soft, airy core. This option is suitable for large rooms that are not afraid of a visual reduction in space.
Most designers, working with stretch ceilings, gravitate towards smooth curves of the level boundaries. Curls, islands, drops, flowers, waves - the levels take on any of these shapes, creating an amazing pattern. For minimalist furnishings and strict classics choose rectangles, rhombuses and squares.
Important! The design of a two-tier stretch ceiling must be in harmony with the lines and shapes inherent in a certain style.
Color
Separation by color begins with the surface structure. For the living room they use both glossy and matte ceilings, combined in one project. IN color scheme they can be in white colors, and are built on the contrast of dark and light. The gloss is elegant, and the matte surface looks warmer.
Very often, designers abandon monochromatic designs and use a combination of various colors: white and green, white and gray, white and brown, two shades of the same color. Combinations of colors that are transitional in the spectrum are also popular.
Materials and texture
In the production of two-level stretch ceilings, polyvinyl chloride film and seamless fabric are used. They have their pros and cons.
- Seams form on the film, but they are so thin that they are difficult to notice unless you look closely.
- It is easier to make two-level compositions from film. It is easy to cut and weld into any silhouette.
- Polyvinyl chloride has a wide variety color shades. In addition, a drawing can be reproduced on film. natural stone, and imitation suede, and mother-of-pearl, and metal.
- Seamless fabric is produced in rolls up to 5.5 m.
- Unlike film, which easily conveys gloss, fabric can only be matte.
- The fabric ceiling can be painted according to your own sketch.
- And what is very important is that the fabric breathes. To allow the film coating to breathe, choose a material with perforations.
- Both materials are moisture resistant and can withstand a load of one hundred kilograms.
It is clear that the price of suspended two-level ceilings depends on the material used. Film is cheaper than fabric. However, the two-level stretch ceiling itself is an expensive pleasure. The price includes both the texture of the canvas and installation work. White glossy film costs approximately 250-300 rubles. for 1 square meter, and matte metallic will cost you 700 rubles. per square meter. The price for seamless fabric starts from 1 thousand rubles.
Beautiful, stylish, original... many more adjectives can be chosen while admiring the beautiful two-level plasterboard ceiling. This is precisely the unusual design of these ceilings. The fact is that each ceiling looks different.
And the more imagination you show when developing sketches of the ceiling, the brighter it will characterize you and decorate the hall, bedroom, living room or kitchen.
At first glance, it seems that only a tandem of a designer plus professional builders can create such beauty. But no, to install gypsum board ceilings you don’t need to graduate from art school or have higher education majoring in construction. No need for a kit special tools. You just need to have an idea of what kind of ceiling you want to make and get. And also get a little creative. The rest is a matter of technique.
Despite the fact that visually all ceilings are different, the final decoration and good design. Some are more concerned about the design, while others are more concerned about the design, although these processes can be connected, complementing each other.
The technology for installing a two-level plasterboard ceiling is identical for each type (single-level, multi-level). And to make it easier for a beginner, this article will provide step by step instructions- how to install 2-level plasterboard ceilings. But first, a little theory...
How to make a two-level plasterboard ceiling - plan
First of all, there are several important points to consider:
- height of the room. A two-level ceiling design will reduce the height of the room. For residents modern apartments V panel house even 5-10 cm is already a significant loss;
Advice.
If yours is perfect flat ceiling, then you can mount the second level of the frame directly on it. This way you will save space.
- distribution of accents. Using lamps built into the frame plasterboard ceiling you can zone the space or shift the emphasis to any part of the room.
You can purchase lamps of any power. Plasterboard systems do not impose any restrictions on your choice. Such as, for example, suspended or plastic ceilings, where there is a danger of using powerful lighting devices (can lead to deformation and even fire).
- room humidity. It is not recommended to install such a ceiling in the bathroom, because the sheet may become deformed. Although, there is moisture-resistant drywall (GKLV), for example, Knauf, with correct installation and organizations high-quality ventilation, may well serve.
Advice.
To protect drywall from moisture, a primer is used in several layers.
- presence of assistants. A person cannot do this work on his own.
- complexity of the design. How more complex design, the more difficult it is to calculate the amount of materials and install them, and accordingly, the longer the work will take.
(single-level, two-level and multi-level)

Tool for installing drywall and profiles
- metal scissors;
- hammer drill or drill;
- painting knife;
- square;
- roulette;
- plumb line;
- building level;
- planer for drywall;
- drywall float;
- narrow and wide spatula;
- gloves and glasses.
Materials for plasterboard ceilings
This selection is needed so that you can calculate and know exactly what to buy, what this or that element looks like, and for what purpose it is used. We hope that thanks to this detailed description you won’t buy too much and save money and nerves.

As a rule, ceiling plasterboard is used. Its thickness is 9.5 mm.
For the second tier, which does not have lamps and sidewalls, you can use arched plasterboard. Its thickness is 6 mm.


Designed for splicing two CD profiles.

The profile is attached to it to the ceiling.

Used when the length of the direct suspension is not enough for installation. That is, the second level of the ceiling is lowered too low.


For connecting CD profiles at different levels.
Advice. When installing, try to reduce the number of extensions of this type of profile.


Designed to connect CD profiles at the same level.
 Advice.
Crab can be substituted. How to do this can be seen in the photo.

Its purpose is to connect the CD profile perpendicularly and at the same level.


The choice depends on the material from which the walls and ceiling are made.

 Self-tapping screw "flea" Self-tapping screws for metal 3.5 by 9.5 mm. - “flea”.
 Serpyanka tape (self-adhesive)
For gluing seams or interlining for completely covering the ceiling.


(ceiling, spot, halogen or LED).
Advice. The wiring for the lamps is started before the plasterboard work begins.
Schemes and sketches of two-level plasterboard ceilings
Knowing what you want to see on the ceiling will ultimately make it much easier for you to calculate the material and work.
Before making ceiling drawings, familiarize yourself with what types of two-level plasterboard ceilings exist.
Plasterboard ceiling with lighting - installation methods
The first method is to install a second level without installing the first. Used if you have perfect surface ceiling. And the lamp is supposed to be placed in the frame.

The approach is the same. But the lamps are also mounted on the side of the frame.

Installation of two frames. The lamps are mounted in the second of them.

The installation approach is the same. But the lamps are also located around the perimeter of the second tier.

Similar approach. But for side lamps, instead of a frame, a polypropylene profile is provided, which is glued to the second-level frame using putty.

Using one of the presented basic types installation, you can easily create sketches of a two-level ceiling that will appeal to all family members.
How to make a two-level plasterboard ceiling - installation instructions
It should be noted that there is disagreement among professionals about the order in which the tiers should be installed. There are two ways.
- In the first case, work begins with the installation of the first level frame. And then the frame of the second tier is suspended from it. Applicable if the area of the second tier is insignificant, because virtually the entire weight of the second frame falls on the sheets of the first.
- In the second case, the frame of the second tier is assembled first, and the frame of the first is made between its elements. More complex design.
We will talk in more detail about the first option for installing a two-level ceiling. This will give you basic installation information. The second option, more complex, will be described below and illustrated in the photo.
We make a two-level plasterboard ceiling consistently and in accordance with the instructions, then the work will be done efficiently.
The technology for manufacturing 2-level plasterboard ceilings involves performing work in the following order:
- Preparing the ceiling for plasterboard (preparing the workplace).
- We mark the ceiling for the plasterboard frame.
- Installation of a frame for drywall - first level.
- Installing a frame under drywall - second level.
- Finishing a two-level plasterboard ceiling.
1. Preparing the ceiling for drywall
 Finishing the ceiling is not like screwing in a light bulb - you can't do without removing the furniture.
Clear out the room and the approaches to it, this will make installation easier. It is important to prepare the surface itself. Agree, it’s better to do something free space rather than constantly bending around, cutting off, and washing off any leftovers. All loose plaster should be removed. Some craftsmen leave it, but everything that doesn’t hold up well will sooner or later fall away.
2. Marking the ceiling under the plasterboard frame
To do this you need to take the following steps:
 - measure the height of the corners in the room;
Determine the angle with the smallest height.
It will serve as a starting point for marking. After all, we need the structure to be level relative to the horizontal;
 - make markings.
On the walls for profiles we designate straight line. We place dots on the ceiling for direct hanging. There is no need for extra markup; it will only confuse. For these purposes it is convenient to use laser level or water.
 Advice. You can make a water level of the required length yourself using a nylon hose (for example, from a medical dropper) with a diameter of 10-15 mm. and filling it with water.
It may happen that in your room not only the angles are different, but also the length of the opposite sides. In this case, try to level it horizontally first. And then draw a clear pattern on the ceiling and level the structure around the edges. This way you can visually center the ceiling.
3. Installation of the frame for drywall - installation of the first level

3.1. Installation begins with the installation of UD profiles.
They are guides and are mounted on the wall, along the perimeter of the entire structure. Fastening pitch - 600 mm. And also on the ceiling.
 The method of connecting the profile on the wall and in the corner is shown in the photo (right and left, respectively).

 If you plan to form rounded elements, you need to draw a picture on the wall and attach the UD profile to it. But first, you need to make notches on the profile.
 And fasten it along the line drawn on the ceiling.

3.2. We attach a direct suspension to the points placed on the ceiling.
 At the same time, we maintain a fastening pitch of 600 mm.
If your ceiling surface is ideal, then you can skip this step. And start right away with the installation of the second level.

3.3. A CD profile is attached to a direct suspension.

The resulting frame will look like the one shown in the diagram and photo.

 The use of crabs will give rigidity to the frame.

 Advice.
Where the sheet was cut, a chamfer must be provided. To do this, use a knife to cut off part of the material from the sheet of drywall.
 This is necessary so that the putty fits better on the seam. And the seam did not come apart over time.
4. Installation of the frame under drywall - installation of the second level
4.1. Marking the frame for drywall.
 To do this, we draw lines on the wall for the UD profile, and on the ceiling we draw the future drawing.
Having a diagram on the ceiling will not only simplify the installation process, but will also help you understand what your structure will look like after the work is completed. And, therefore, you will have the opportunity to make the necessary adjustments.

We mount ceiling frame from a metal profile (UD profile), fixing to the wall and ceiling.
We already know how to make a frame of the desired shape (round the profile).
Material prepared for the website www.site
4.3. Lower the frame to the desired length.
To do this you need:
- cut the CD profile to the length to which you want to lower the frame;
- cut out “tongues” on one side of these pieces. To do this, you need to cut off the side parts of the profile. This will make it easier to install them.
- insert the cut pieces into the UD guide profile, which is already fixed to the ceiling. You need to insert it with the flat side.
- secure the pieces with a flea. The pitch between straight sections is 500-600 mm. A larger step will make the structure insufficiently reliable, a smaller step will make it heavier. The step between curved segments is 200-300 mm. This is due to the fact that the curved sheet needs to be fastened more often.
- “put” a UD profile on the hanging pieces and secure them with a “flea”.
 As a result, you should end up with a side frame like this.
Then follows:
- cut the CD profile to a length that is equal to the distance from the side of the frame to the UD profile located on the wall;
- secure them with “fleas” on both sides.
 You now have a finished metal frame. After which, it should be covered with plasterboard and proceed to finishing work.
Advice. When assembling the frame, look at the drawings. Otherwise, it may happen that the jumper will be placed in the place of the future lamp.
 The photo and picture show how to bend drywall for an arch and how the CD profile and sheet of drywall should be prepared.
 Their device is very simple; it is important to correctly make notches on the sheet without cutting through the front layer of cardboard.
 If possible, cut right size From the whole sheet the question can be solved easily. If not, cut out the segments and install them in parts.
It should be noted that in this case the frame must be stiffer. Because each self-tapping screw is screwed into the profile.
 The result of your efforts should look something like what is shown in the photo.
5. Plasterboard ceiling finishing
 We sew the seams with sickle tape.
 Apply a little putty to the tape with a small spatula.


